
How to Manage and Customize a Restaurant Menu in Chat To Clients CRM
Once your restaurant menu is created in Chat To Clients CRM, you can update categories, edit items, adjust pricing and availability, and offer add-ons that let guests customize their orders. These settings help you keep your menu accurate as your offerings change, without starting from scratch.
If you haven't set up your menu yet, start with How to Create a Restaurant Menu in Chat To Clients CRM.
TABLE OF CONTENTS
- Manage Menu Categories
- Manage and Edit Menu Items
- Set Prices, Sizes, and Daily Stock
- Set When an Item Is Available
- Create and Manage Modifier Groups
- Frequently Asked Questions
- Related Articles
Manage Menu Categories
Categories help guests find what they're looking for by grouping related items, such as Starters, Pizzas, and Drinks. You can change their order, update their details, or remove categories as your menu evolves.
Edit, Reorder, or Remove Items from Categories
Open Restaurants > Menu > Categories to manage your existing categories. Click a category to expand its items, select Expand all to view everything, or use Search categories and items to find a specific entry.
- Reorder: Drag the handle next to a category or item to change where it appears on your menu.
- Edit a category: Click the three-dot menu next to a category and select Edit category. Update its name, description, ordering channels, or availability hours. You can also review its items or click Add items to include more. Click Save changes when you're done.
- Manage items within a category: Click the three-dot menu next to an item to Edit item, Duplicate, or Remove from the category.
Note: Removing an item from a category does not delete the item itself.
Delete a Category
If you no longer need a category, you can delete it while choosing whether to keep its menu items. This gives you the flexibility to reorganize your menu without unnecessarily removing products.
- Click the three-dot menu next to the category and select Delete category.
- Choose whether to Keep the items and move them to another category or Delete the items too.
- Click Delete category to confirm.
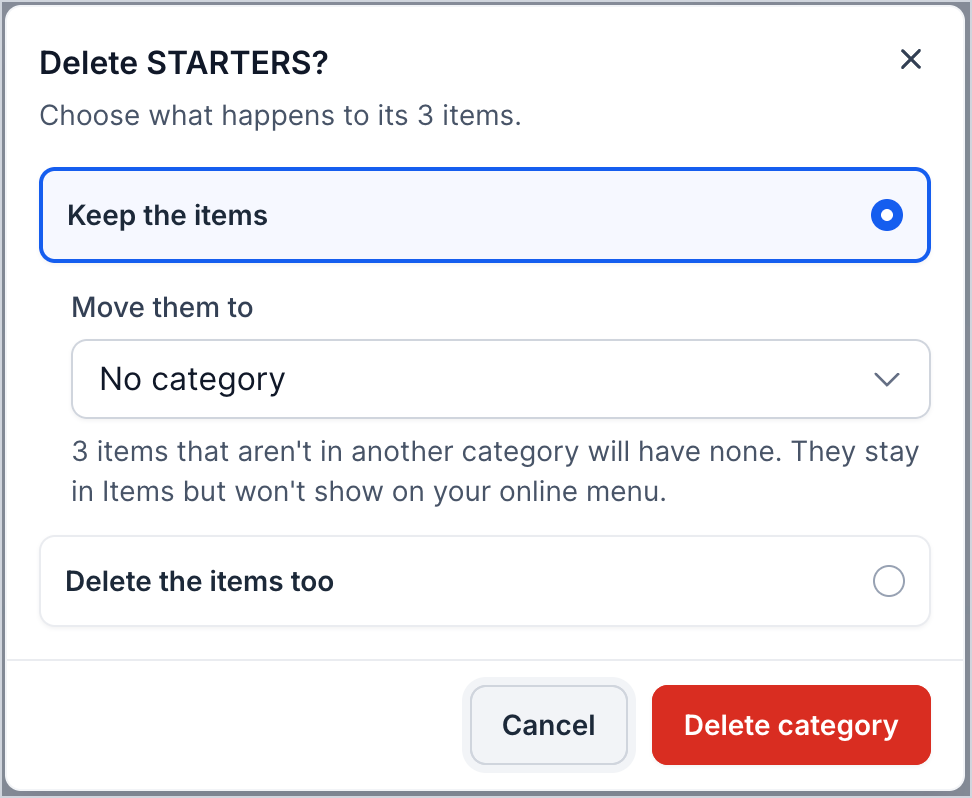
Important: Items kept without a category remain in the Items tab but won't appear on your online menu until you assign them to a category.
Manage and Edit Menu Items
The Items tab gives you control over individual products on your menu. You can quickly find items, change their availability, update their details, or duplicate products when adding similar offerings.
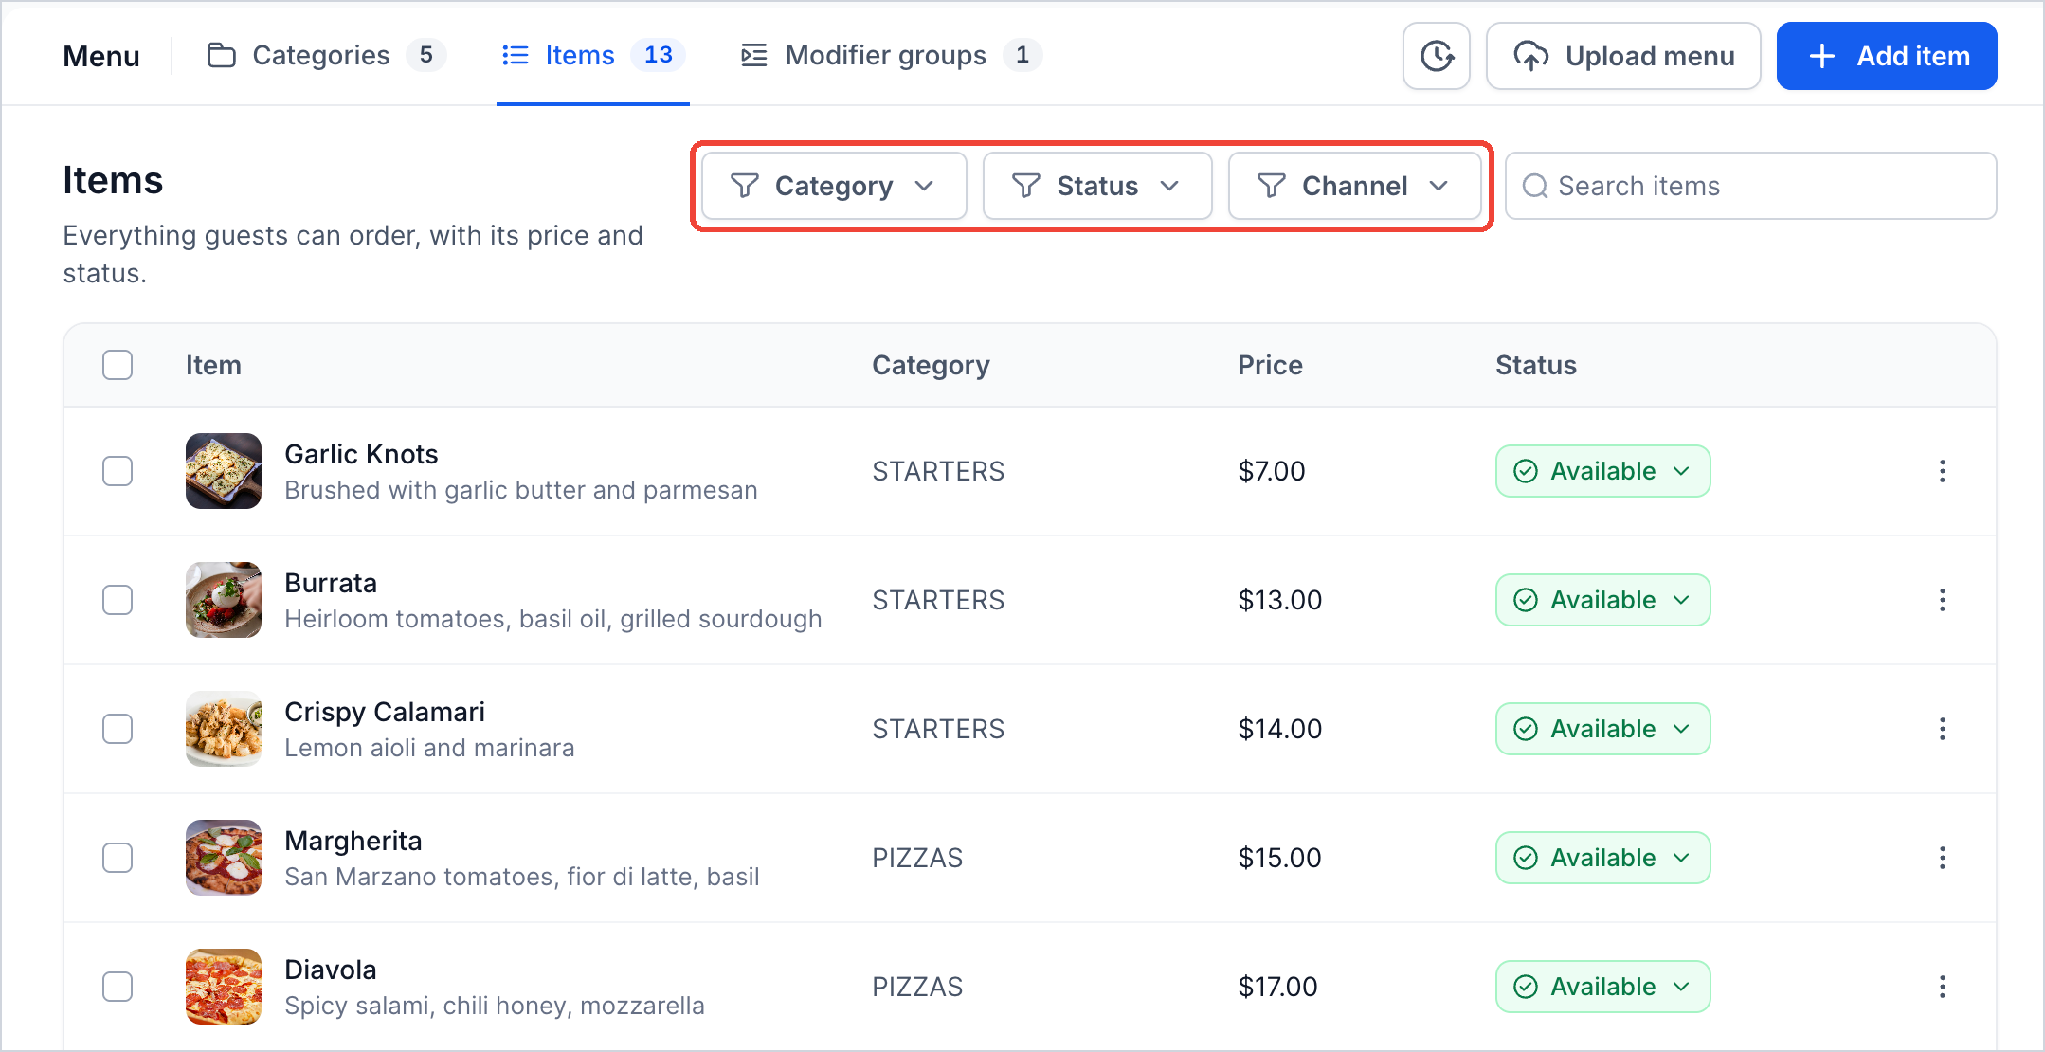
Go to Restaurants > Menu > Items to see your menu items, including their categories, prices, and status. Use the search bar or filter by:
- Category: View items within a specific category, including Uncategorized items.
- Status: Filter by Available, Sold out, or Hidden.
- Channel: View items offered through Dine-in, Pickup, or Online Delivery.
Mark an Item Sold Out or Hidden
When a product is temporarily unavailable, you don't need to delete it from your menu. Change its status to prevent new orders, hide it from guests, or make it available again when you're ready.
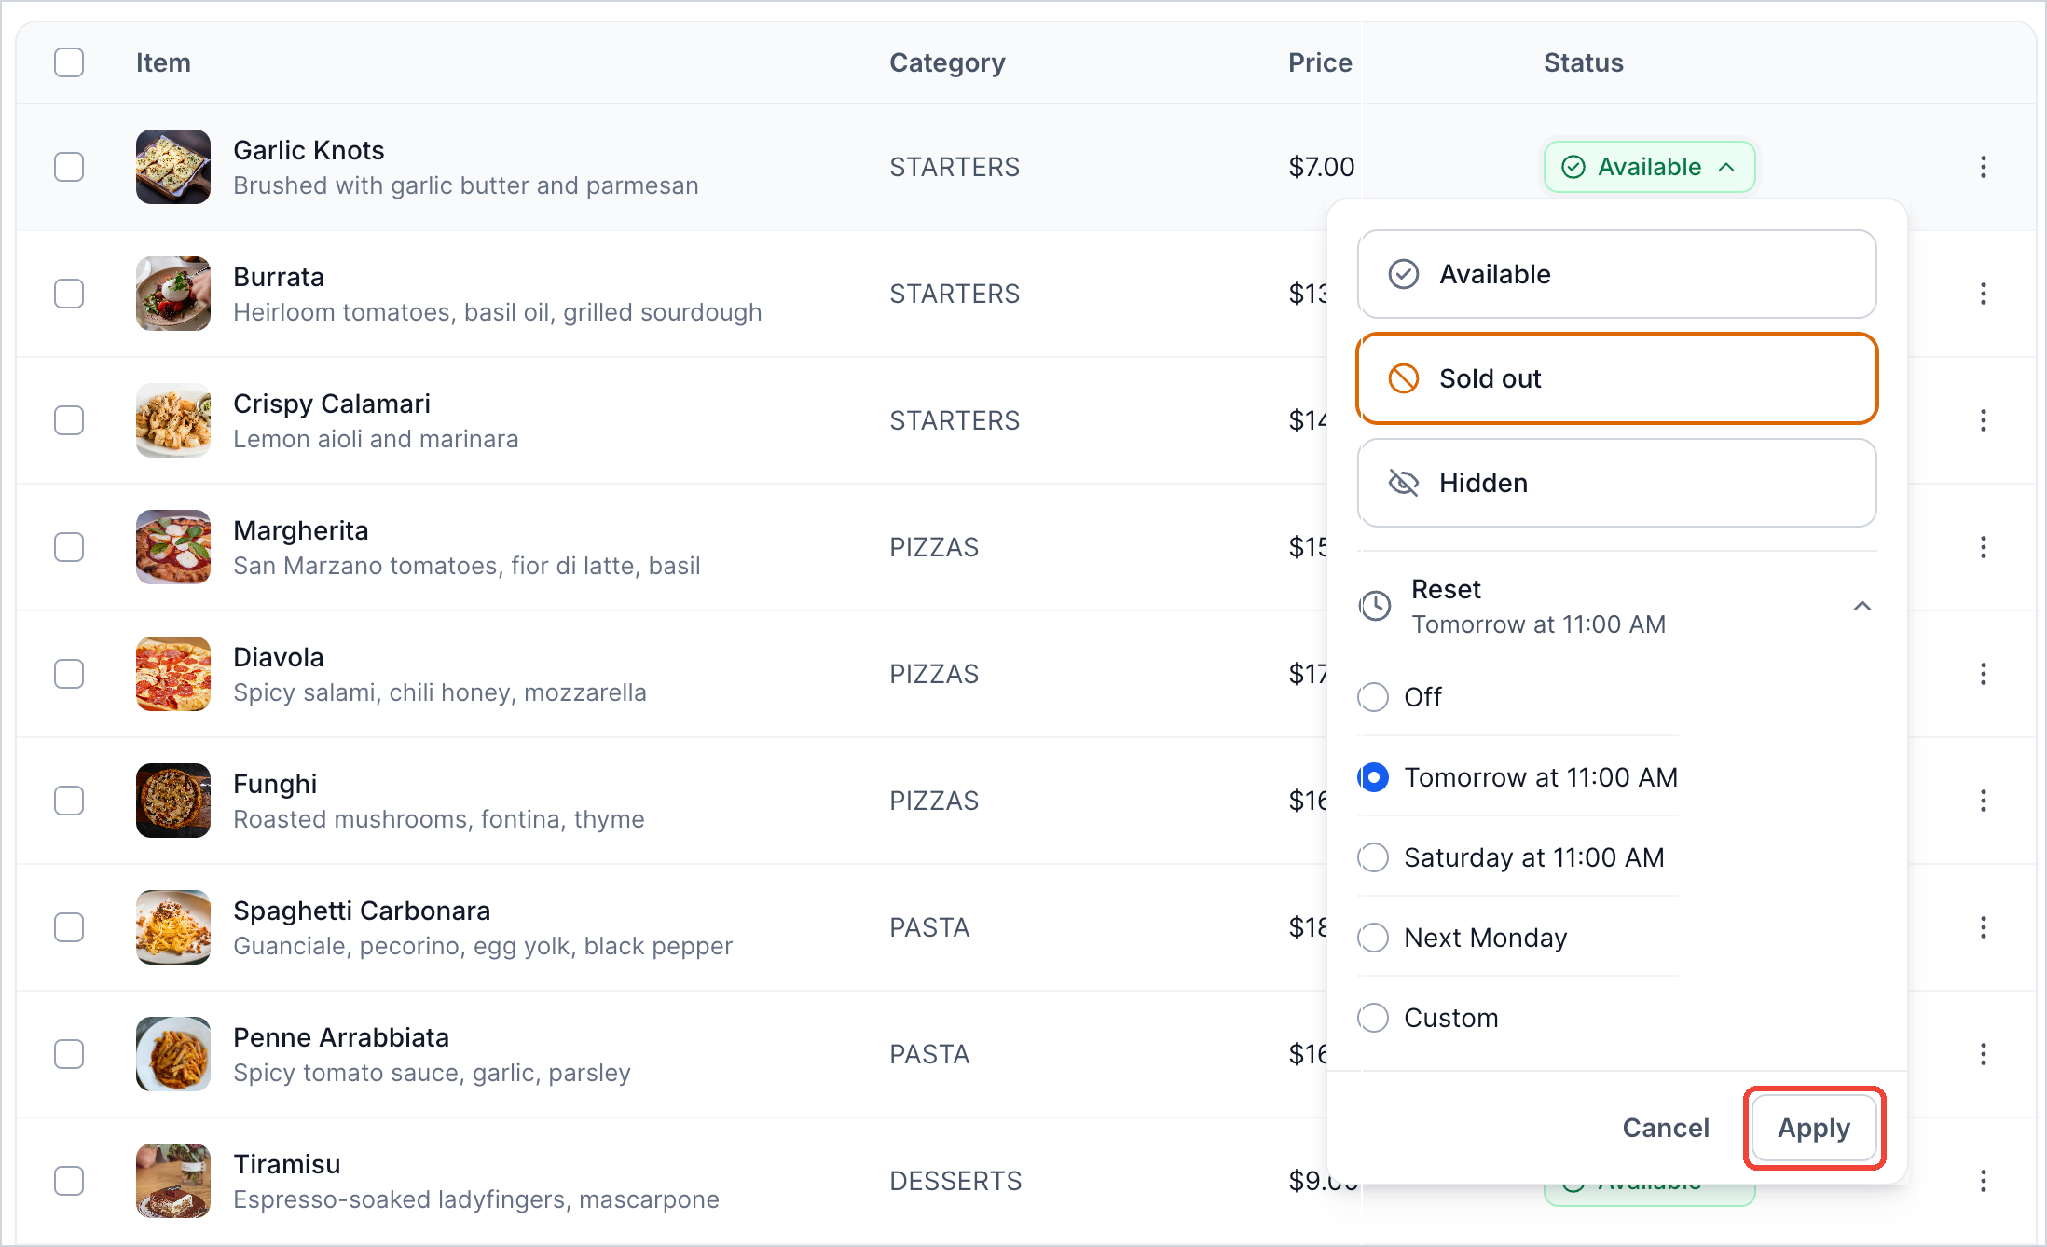
- In the Items tab, click an item's current status, such as Available.
- Choose the appropriate status:
- Available: Make the item available for ordering again.
- Sold out: Temporarily stop guests from ordering the item.
- Hidden: Remove the item from the visible menu without deleting it.
- Available: Make the item available for ordering again.
- If you select Sold out, use Reset to choose when the item becomes available again. Select a preset time, Custom for a different time, or Off to keep it sold out until you manually change it.
- Click Apply.
Tip: You can also change an item's status next to its name when editing the item.
Edit, Duplicate, or Delete an Item
As your menu changes, you can update an item's details, create a copy of a similar product, or remove one you no longer offer.
On the Items tab, click the three-dot menu next to an item and select Edit, Duplicate, or Delete.
If you try to leave the editor with unsaved changes, Chat To Clients CRM asks you to confirm. Select Keep editing to return to your changes or Discard changes to leave without saving.
Set Prices, Sizes, and Daily Stock
Menu items may have different sizes, prices, or daily quantities depending on what your restaurant offers. You can manage these settings individually to keep prices accurate and control how many orders you accept for limited-stock products.
Set One Price or Multiple Sizes
For products sold at a fixed price, enter the amount in the item's Price field. If the item comes in different sizes, such as Small, Medium, and Large, you can assign a separate price to each.
- One price: Enter the item's base price under Price.
- Multiple sizes: Select Sizes, enter each size's name and price, and click Add size for additional options.
Each size must have a name and a price.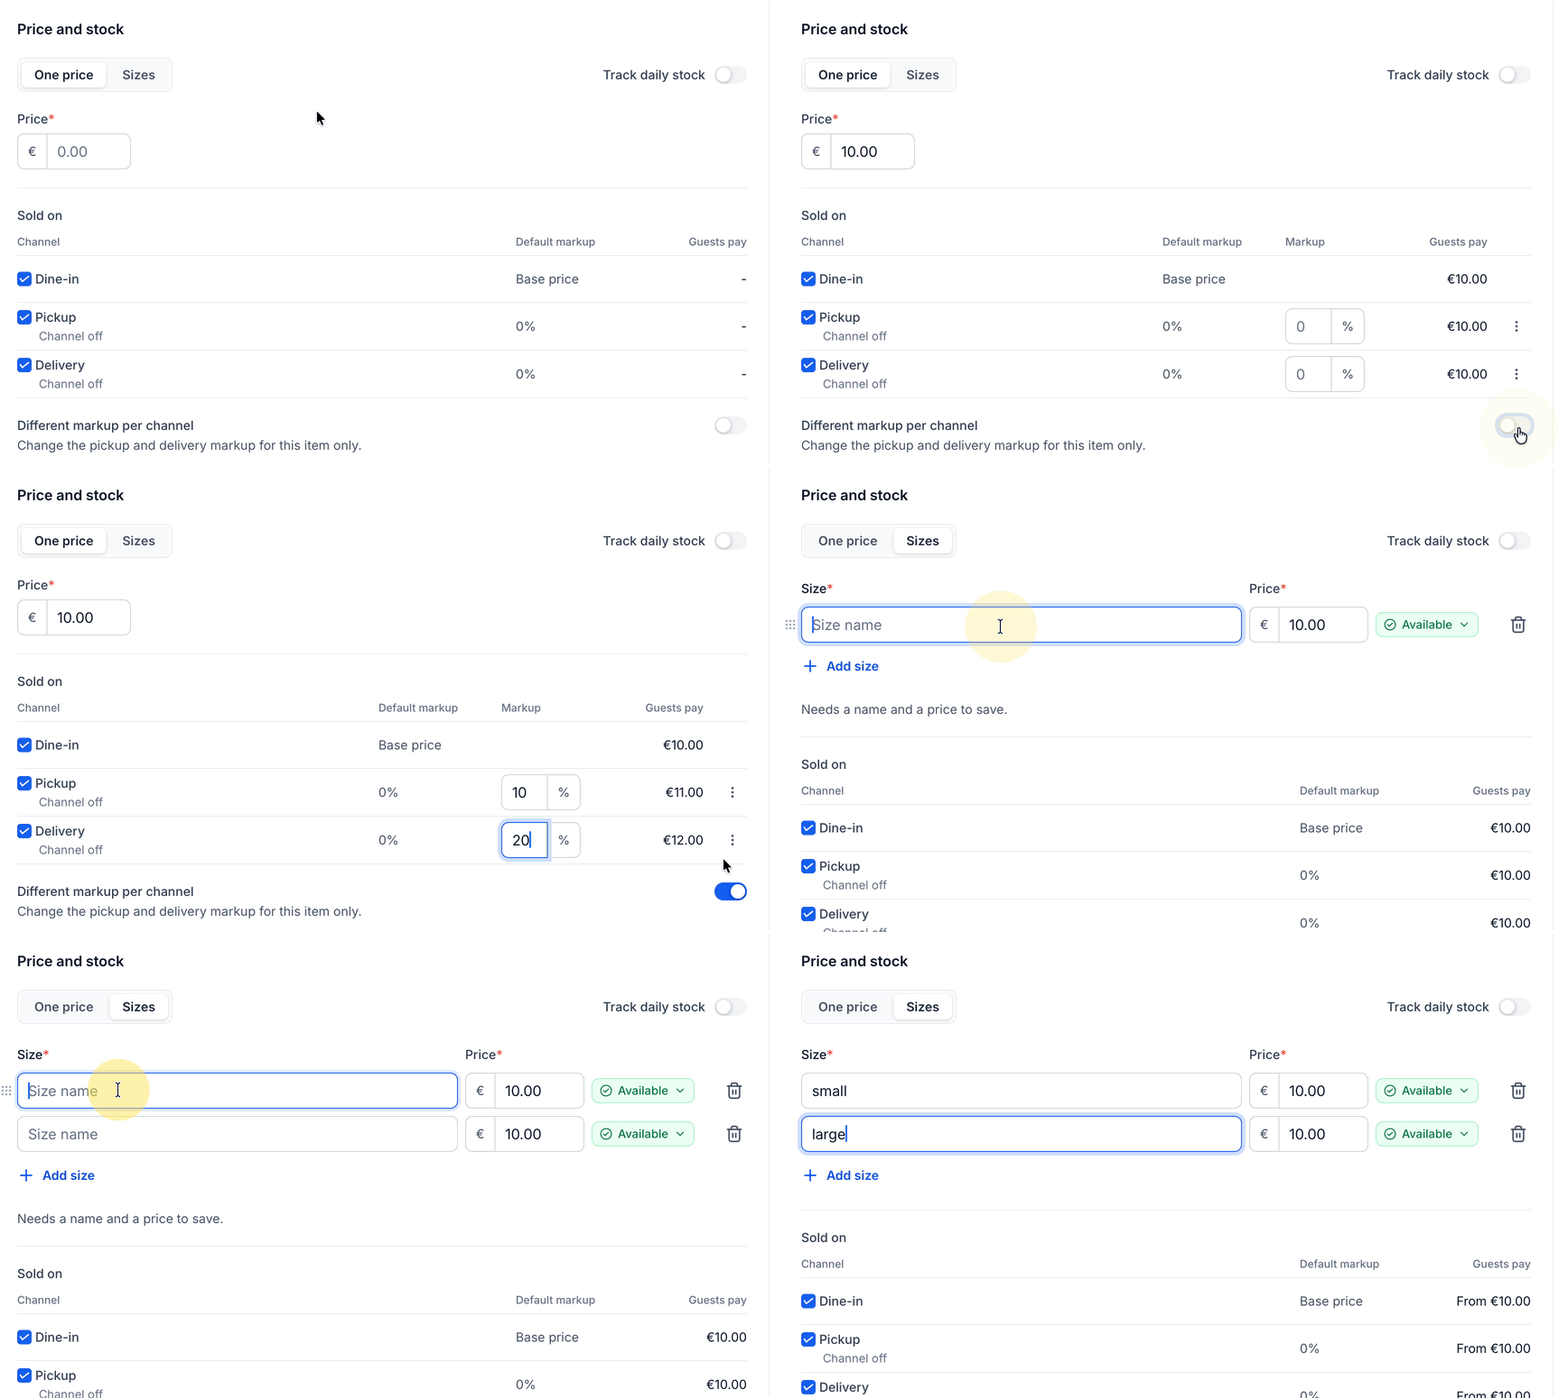
Set Prices for Pickup and Delivery
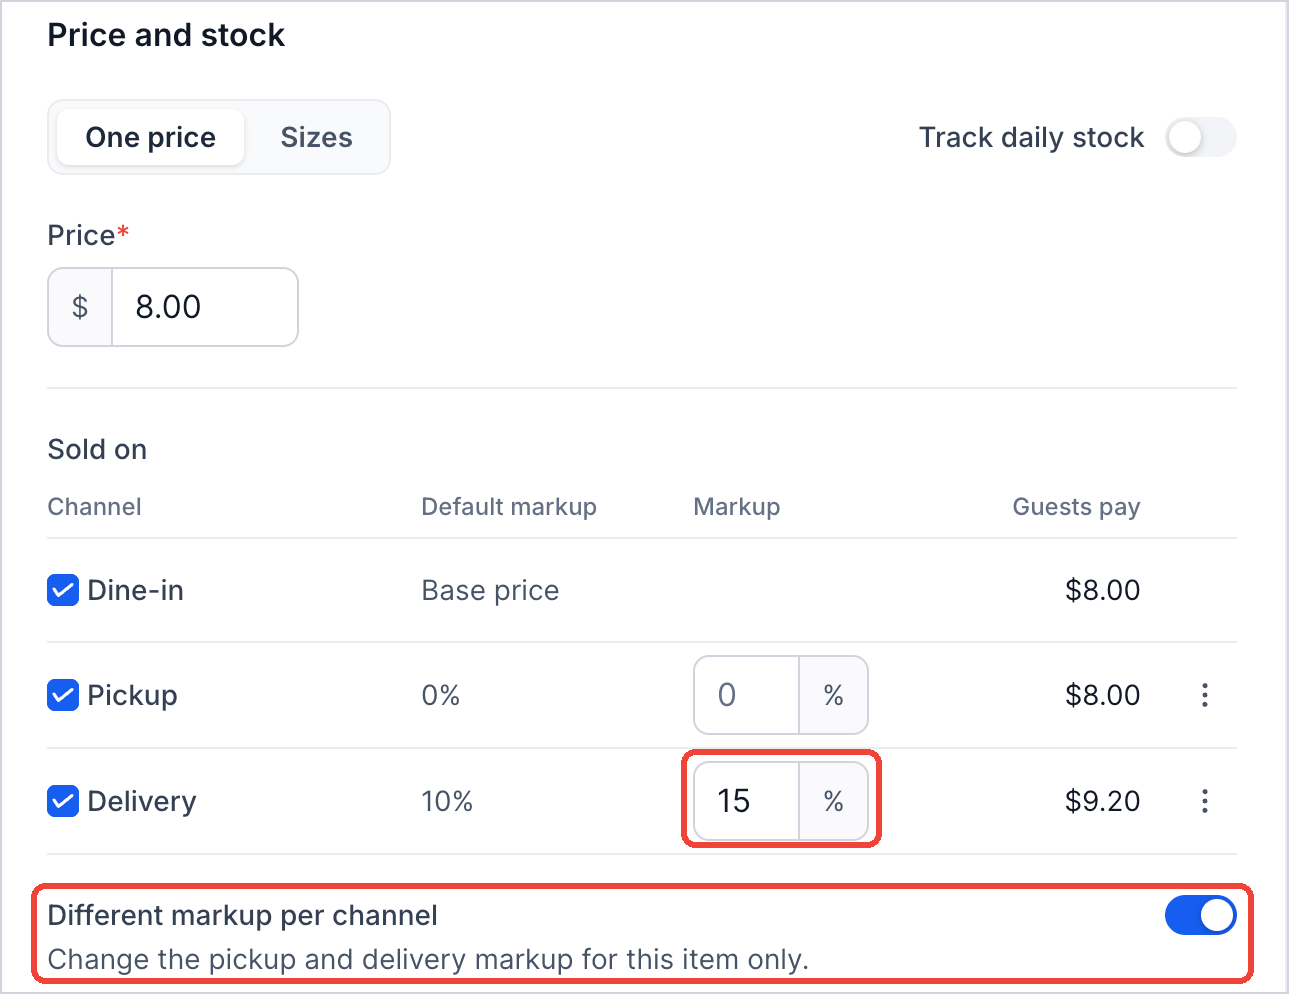
You can charge different prices for pickup and delivery orders to account for additional fulfillment costs. The Sold on table shows the price guests pay through each ordering channel.
Dine-in orders use the item's Base price. Pickup and delivery prices include the default markup configured under Restaurant Settings > Pickup and Delivery.
For example, if an item costs $15.00 and has a 10% delivery markup, guests pay $16.50 when ordering it for delivery.
To set a different markup for a specific item:
- Open the item for editing.
- Turn on Different markup per channel.
- Enter the desired Markup for Pickup or Delivery.
- Save your changes.
Manage Daily Stock
For items prepared in limited quantities, daily stock settings help you control how many can be sold each day. You can also adjust stock for specific dates when your expected supply is different.
- Open the item for editing and turn on Track daily stock.
- Enter the number of units available in Daily stock.
- To adjust stock for a special date, click Add a date under Different daily stock on some dates.
- Enter the date-specific quantity and save your changes.
Set When an Item Is Available
Not every menu item needs to be available throughout the day. Availability settings let you offer certain dishes only during specific hours, such as breakfast or lunch, while keeping the rest of your menu unchanged.
When editing an item, choose how its availability hours are managed:
- Same as its categories: The item follows the availability hours of its assigned categories. This is the default setting.
- Its own hours: Set specific days and time ranges when the item can be ordered. Click Add another time to create an additional time range on the same day.
You can also manage the taxes that apply to an item. Under Taxes, click Show taxes and select the applicable taxes.
Create and Manage Modifier Groups
Modifier groups let guests personalize their orders by selecting extras, sides, toppings, or other options. For example, you can offer a choice of salad dressing or allow customers to add extra cheese to a pizza. The same modifier group can be applied to multiple menu items, so you don't need to recreate the options each time.
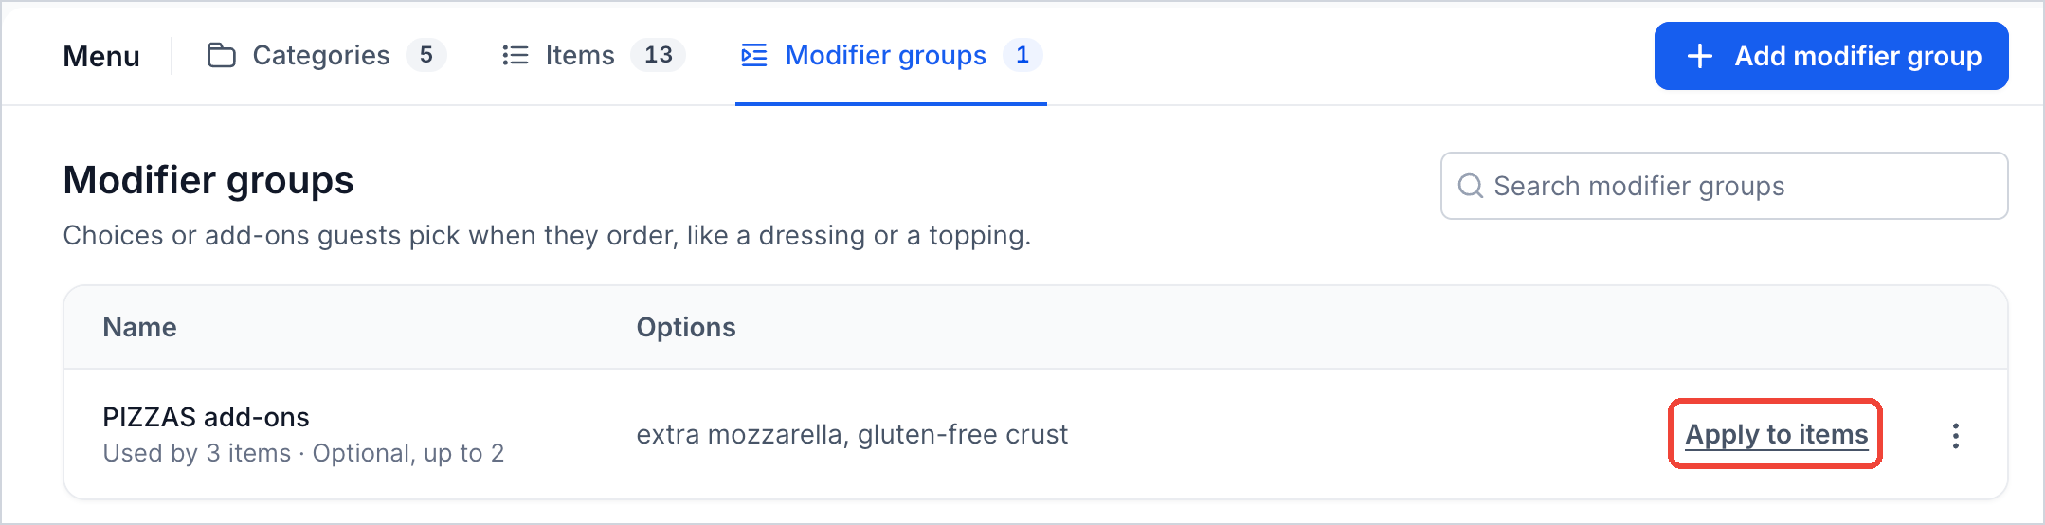
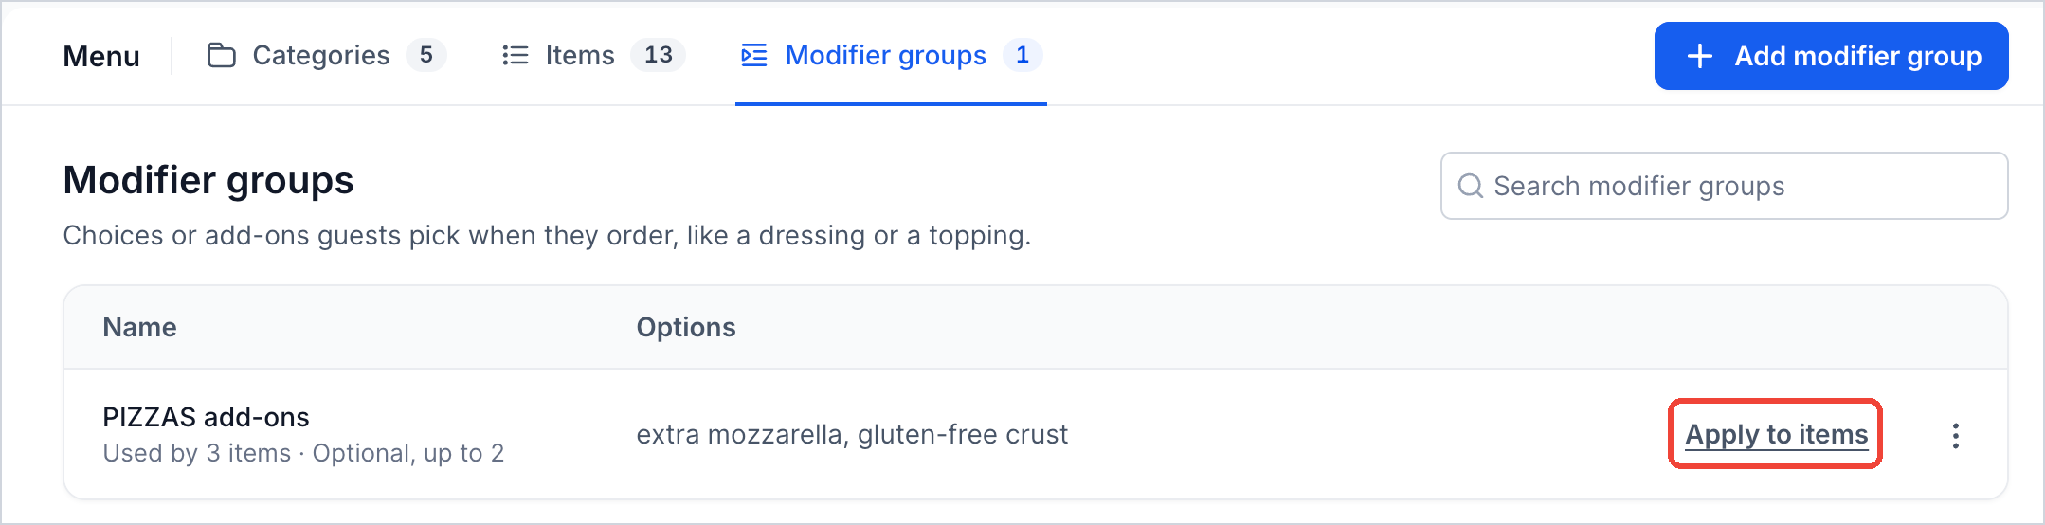
Navigate to Restaurants > Menu > Modifier groups to view your existing groups. Each group displays its options, the number of items using it, and its selection rules.
Create a Modifier Group
Creating a modifier group allows you to define which choices guests can make and whether those choices are required. You can also assign prices to individual add-ons and limit how many options a guest can select.
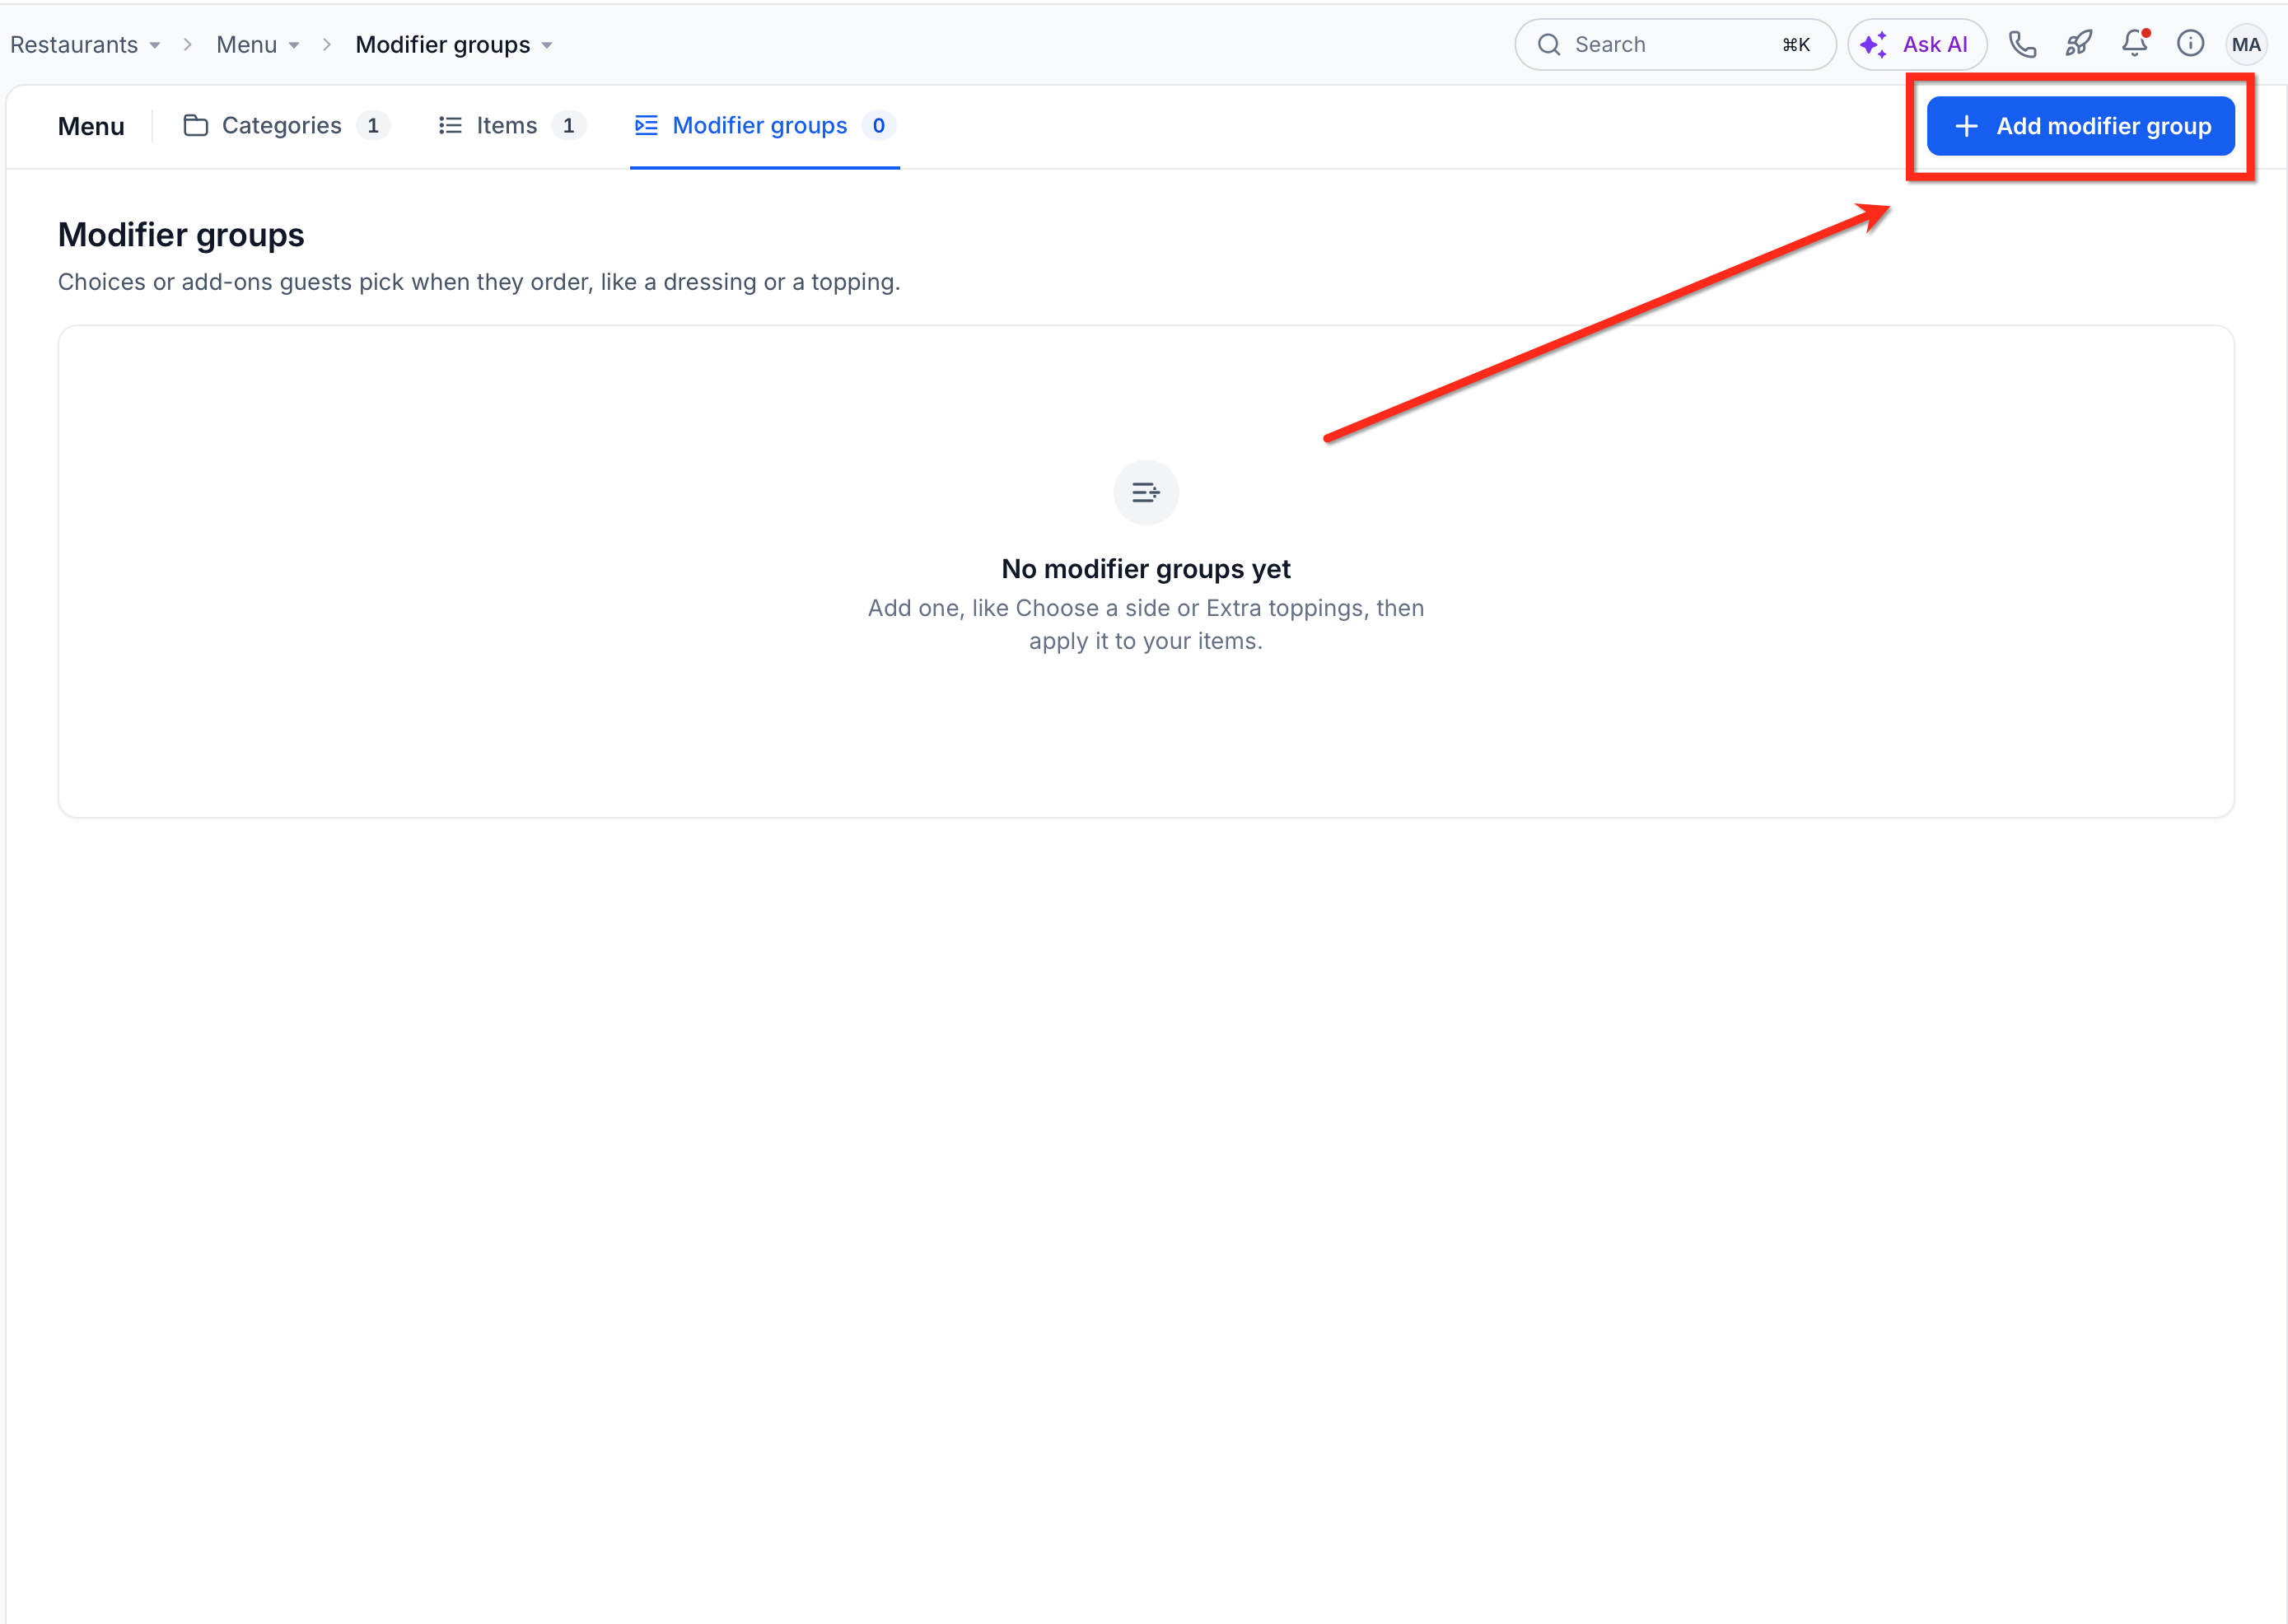
- On the Modifier groups tab, click Add modifier group.
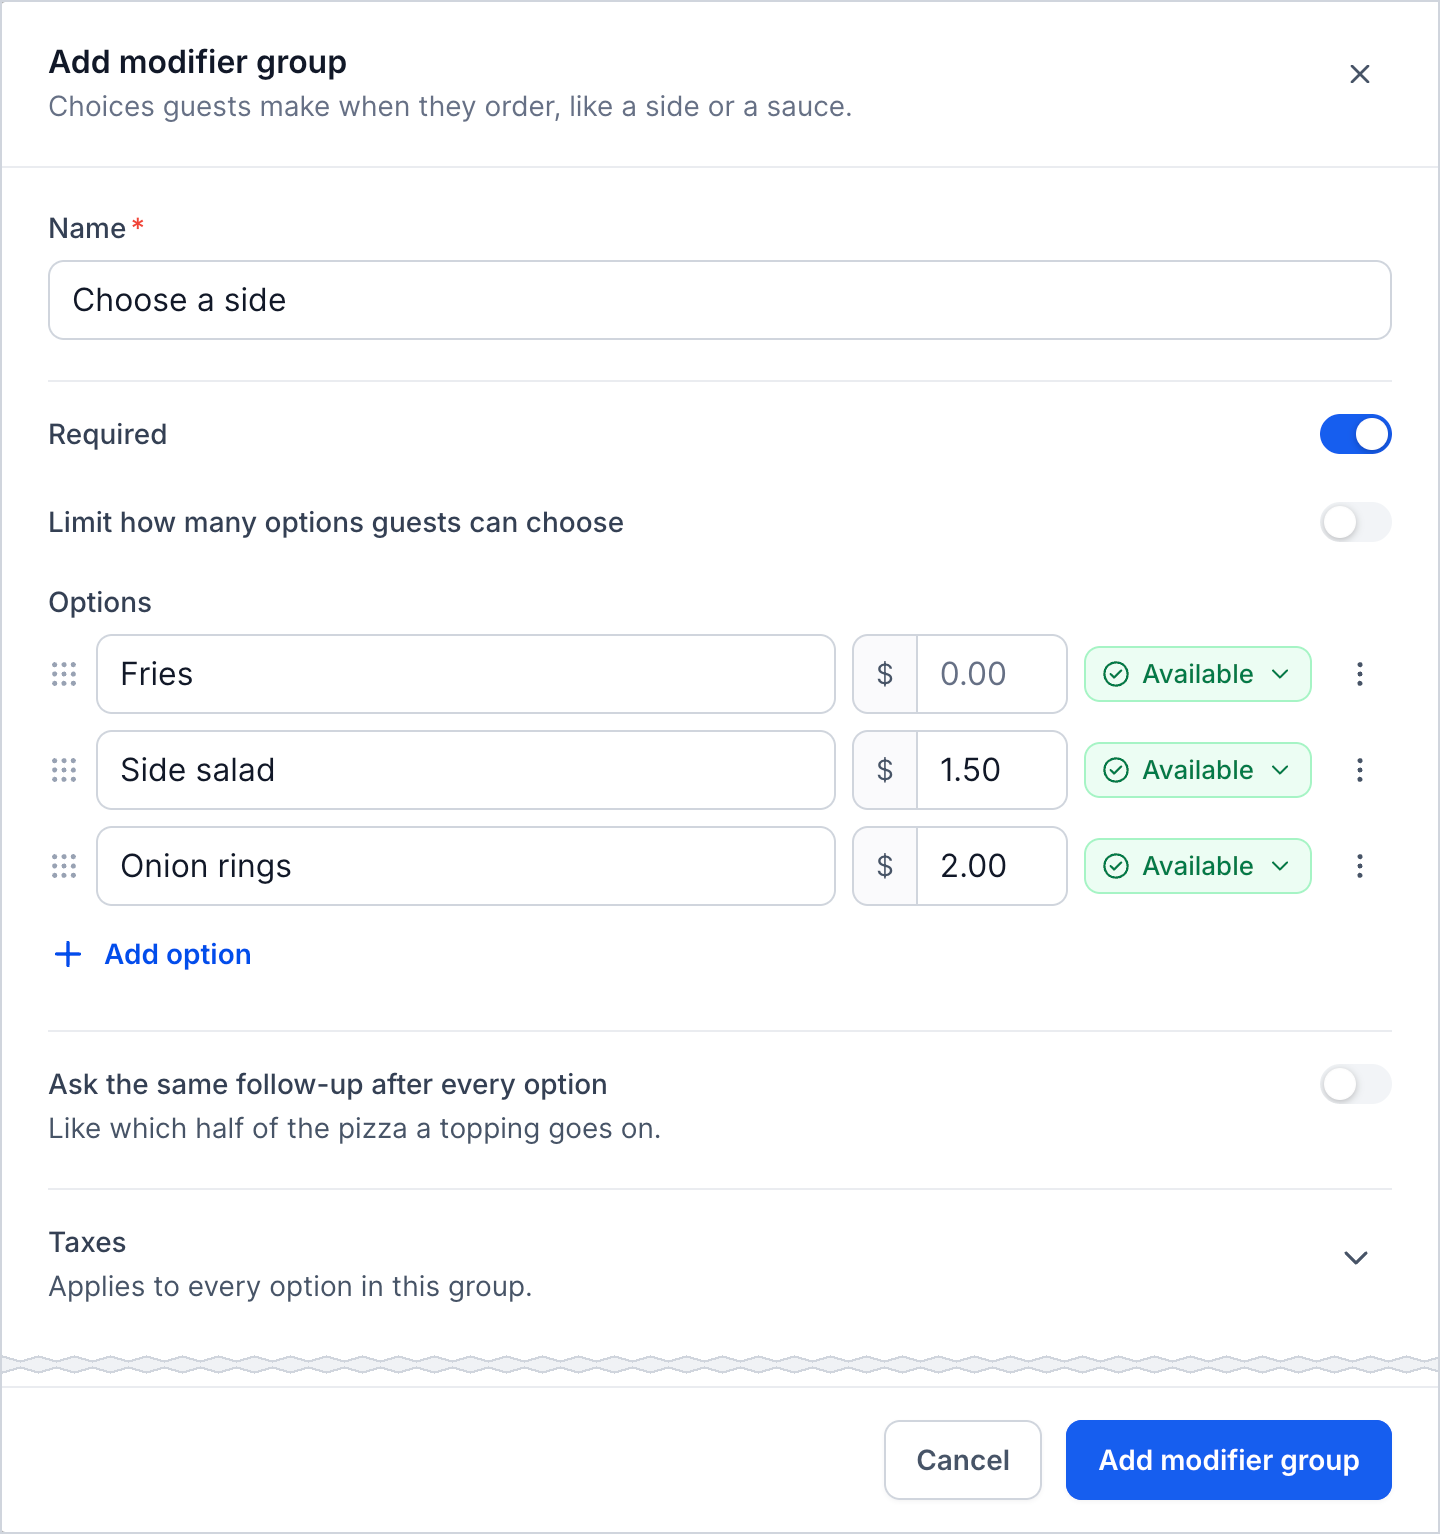
- Enter a Name that guests will recognize, such as Choose a Side.
- Turn on Required if guests must make a selection.
- To restrict the number of choices, enable Limit how many options guests can choose and set the limit.
- Under Options, enter each choice's name and price. Click Add option to include more.
- Turn off Available for any option that is temporarily out of stock.
- Optional: Enable Ask the same follow-up after every option to collect additional details, such as which half of a pizza a topping should go on.
- Under Taxes, select the taxes applicable to the group's options.
- Click Add modifier group to save.
Apply a Modifier Group to Items
Once you've created a modifier group, assign it to the items where guests should see those choices. This is useful for sharing common options, such as sauces or toppings, across multiple products.
You can apply a modifier group in either of these ways:
- From Modifier groups: Click Apply to items next to the group and select the relevant menu items.
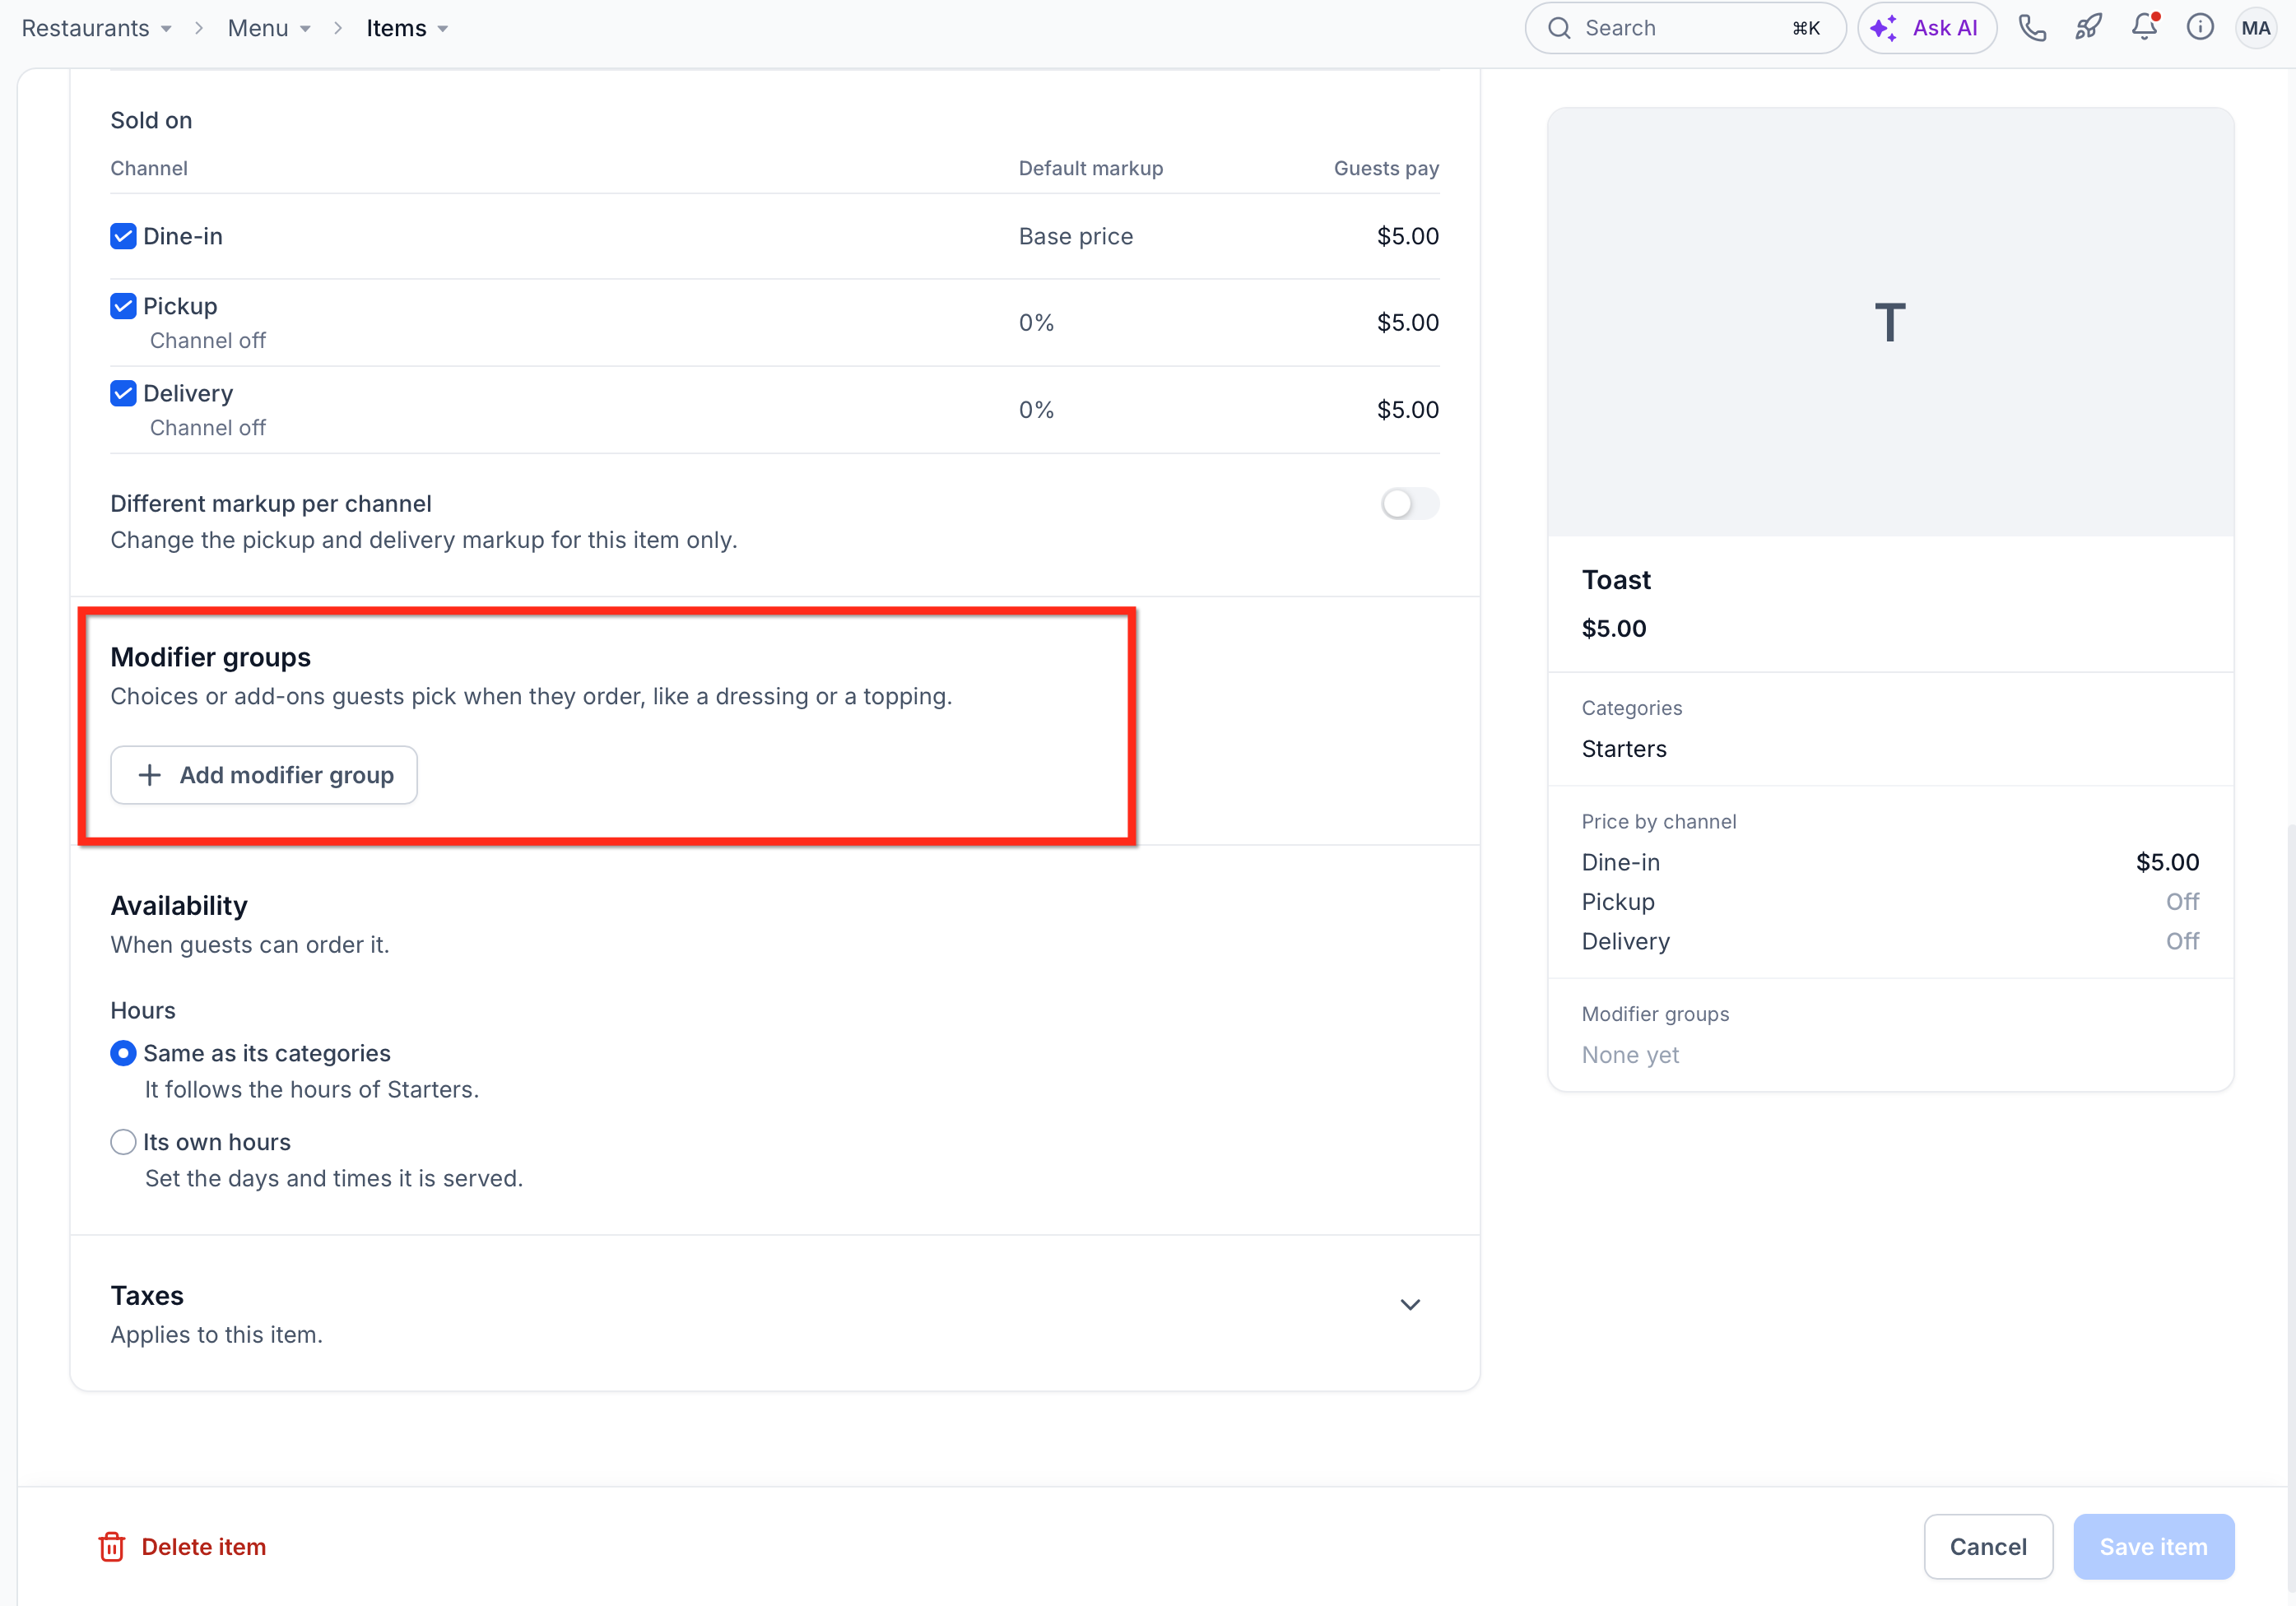
- From an item: Open the item for editing, click Add modifier group, and select an existing group. You can also choose Create a modifier group to make a new one.
Frequently Asked Questions
Q: Why isn't an item showing on my online menu even though it's marked Available?
Check whether the item is assigned to a category, whether that category supports the intended ordering channel, and whether the item's or category's availability hours allow ordering at that time.
Q: Can the same menu item appear in multiple categories?
Yes. You can assign an item to multiple categories. Changes made to the item are reflected wherever it appears, so you don't need to edit it separately for each category.
Q: What happens if I delete a category but want to keep its items?
Select Keep the items when deleting the category. You can move the items to another category. Items left without a category remain in the Items tab but won't appear on your online menu until they're assigned to a category.
Q: Why is an item's delivery price different from its dine-in price?
Pickup and delivery prices may include markups configured in Restaurant Settings. If the price differs from what you expected, check whether Different markup per channel is enabled for that item.
Q: Can I offer an item only during certain hours without changing the availability of other items?
Yes. Select Its own hours in the item's availability settings and configure the days and times it can be ordered. Other items can continue following their category schedules.
Q: Can I make a modifier option unavailable without removing it from the group?
Yes. Turn off Available for that option. This allows you to temporarily stop offering an add-on while keeping the other options in the modifier group available.
Related Articles
- Restaurant Setup Guide: Get Ready to Take Orders and Reservations
- How to Create a Restaurant Menu in Chat To Clients CRM
- Restaurant Orders: How to Manage Orders and Payments
- Restaurant Reservations: Manage Bookings, Tables, and Guests
- Restaurant Website: How to Customize and Publish Your Site
- Restaurant Settings: Change Your Restaurant’s Details and Rules