
How to Create a Restaurant Menu in Chat To Clients CRM
Menu in Restaurants is where you build and look after everything guests can order: your categories, items, prices, sizes and add-ons. This article shows how to open Menu, import a menu from a file or link, create categories, add items to categories, and create individual menu items.
TABLE OF CONTENTS
- What Is Menu?
- Key Benefits of Menu
- How to Open Menu
- Add Your Menu From a File or Link
- Add a Category
- Add Items to a Category
- Frequently Asked Questions
- Related Articles
What Is Menu?
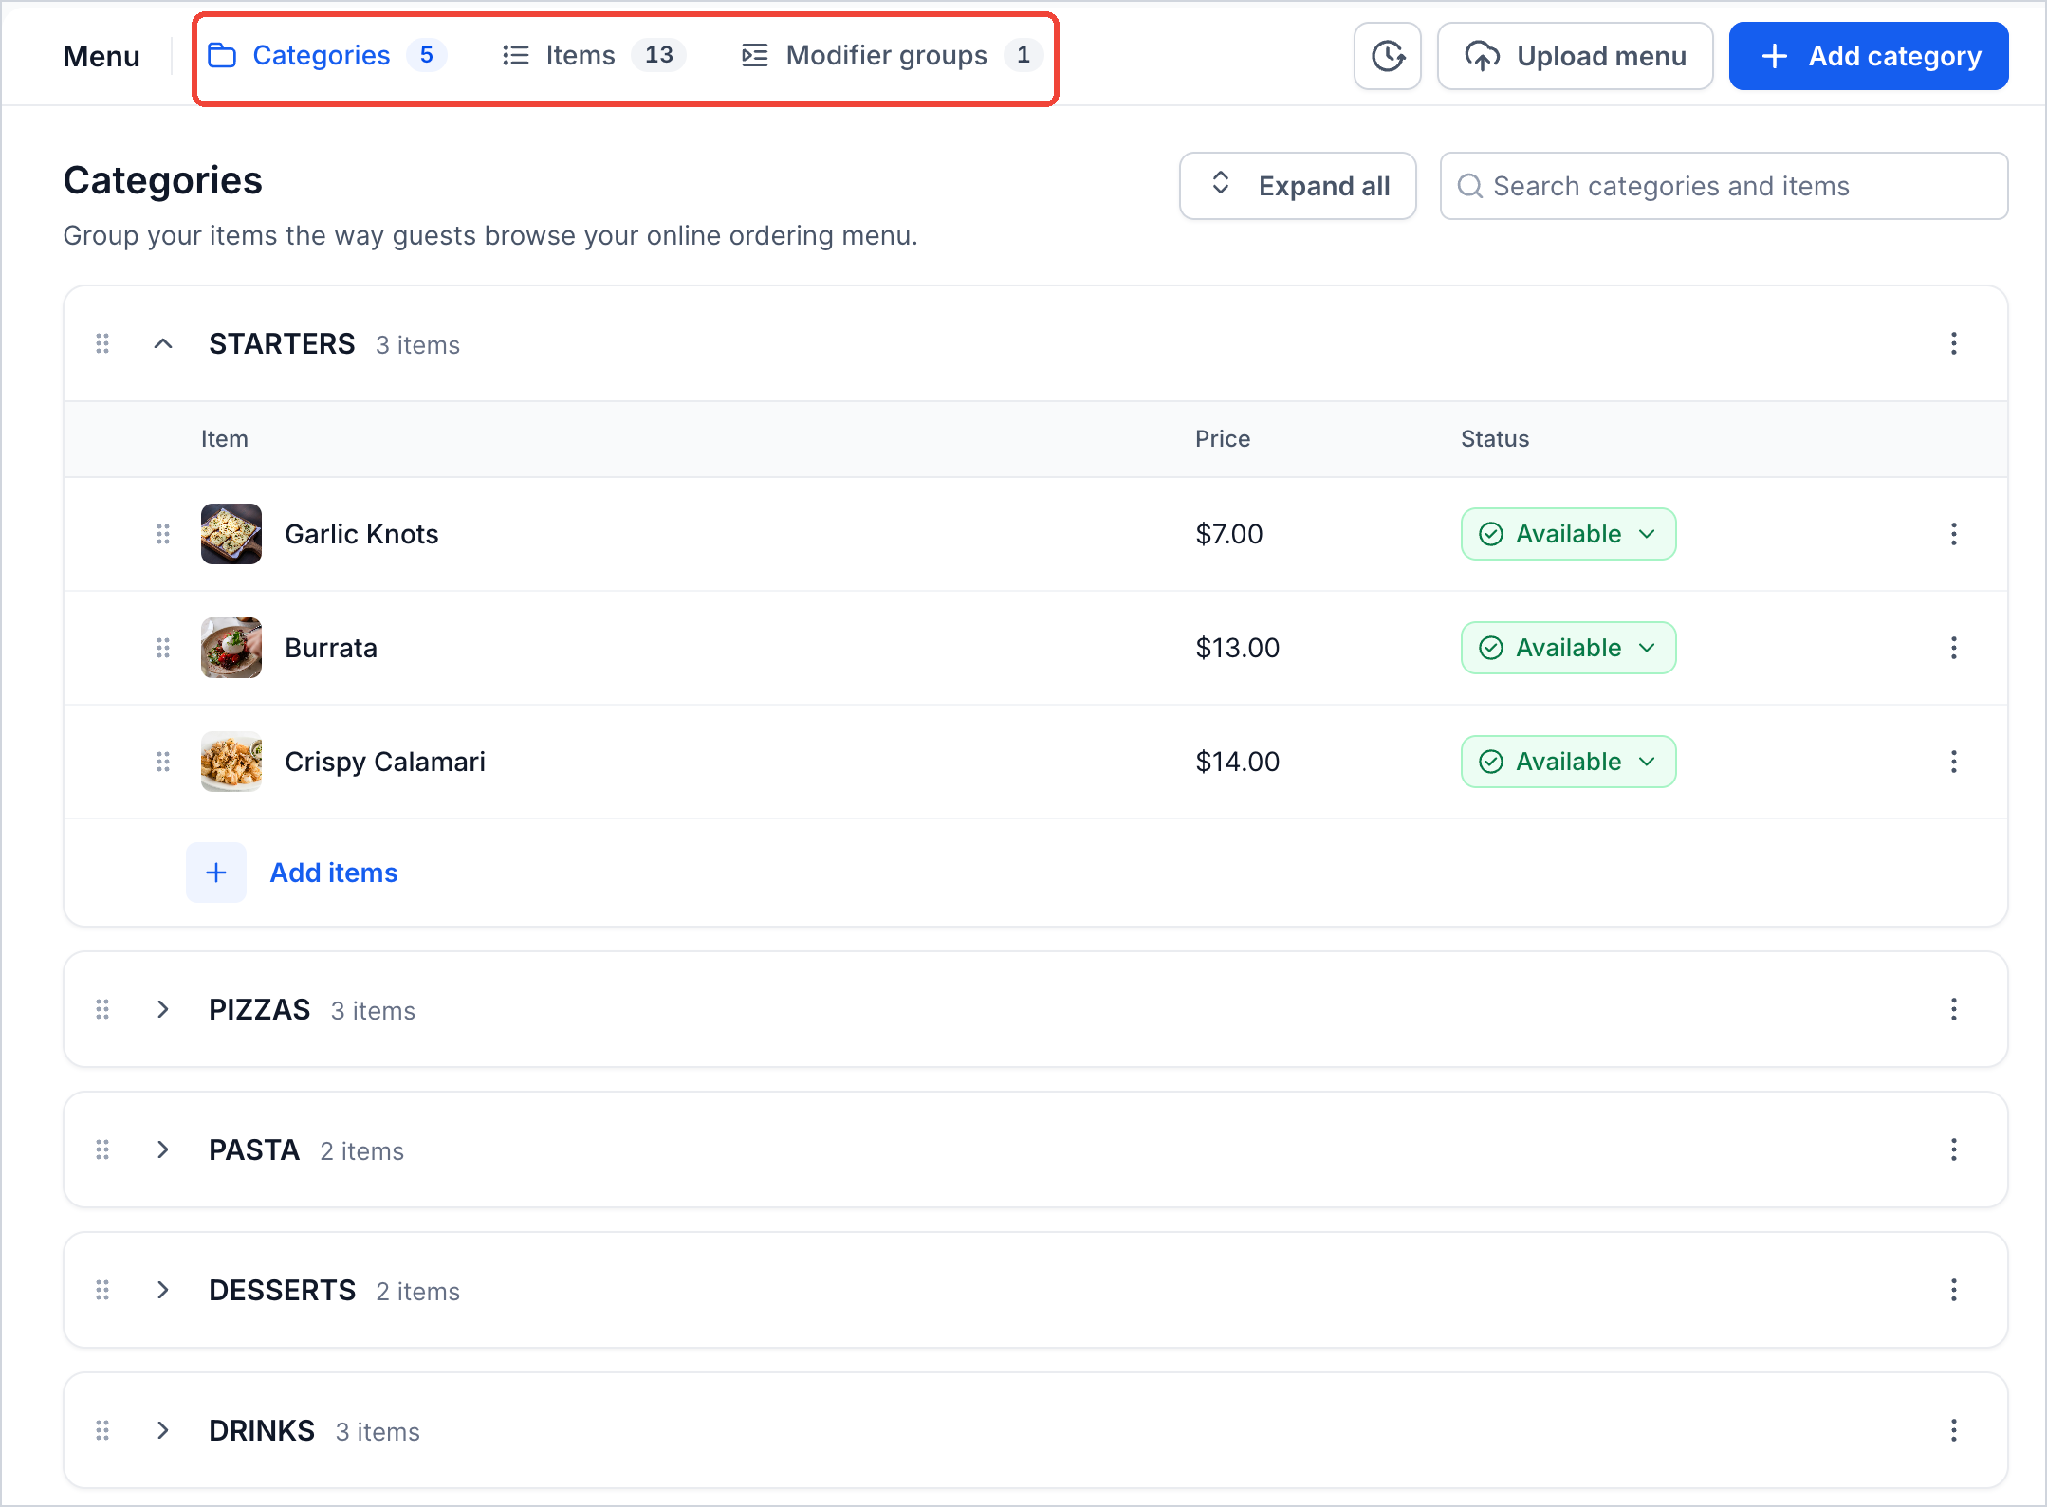
Menu holds one menu for every way guests order from you: dine-in, pickup and delivery. Your team uses it to take dine-in orders at the table, and guests see it on your restaurant website. The page has three tabs. The number next to each tab shows how many you have.
Tab | What it shows | Use it to |
|---|---|---|
Categories | Your categories and the items in each one | Group items the way guests browse, and put categories and items in order |
Items | Every item, with its category, price and status | Find, filter, add and edit items |
Modifier groups | Choices and add-ons, and how many items use each one | Offer sides, sauces, toppings and other extras |
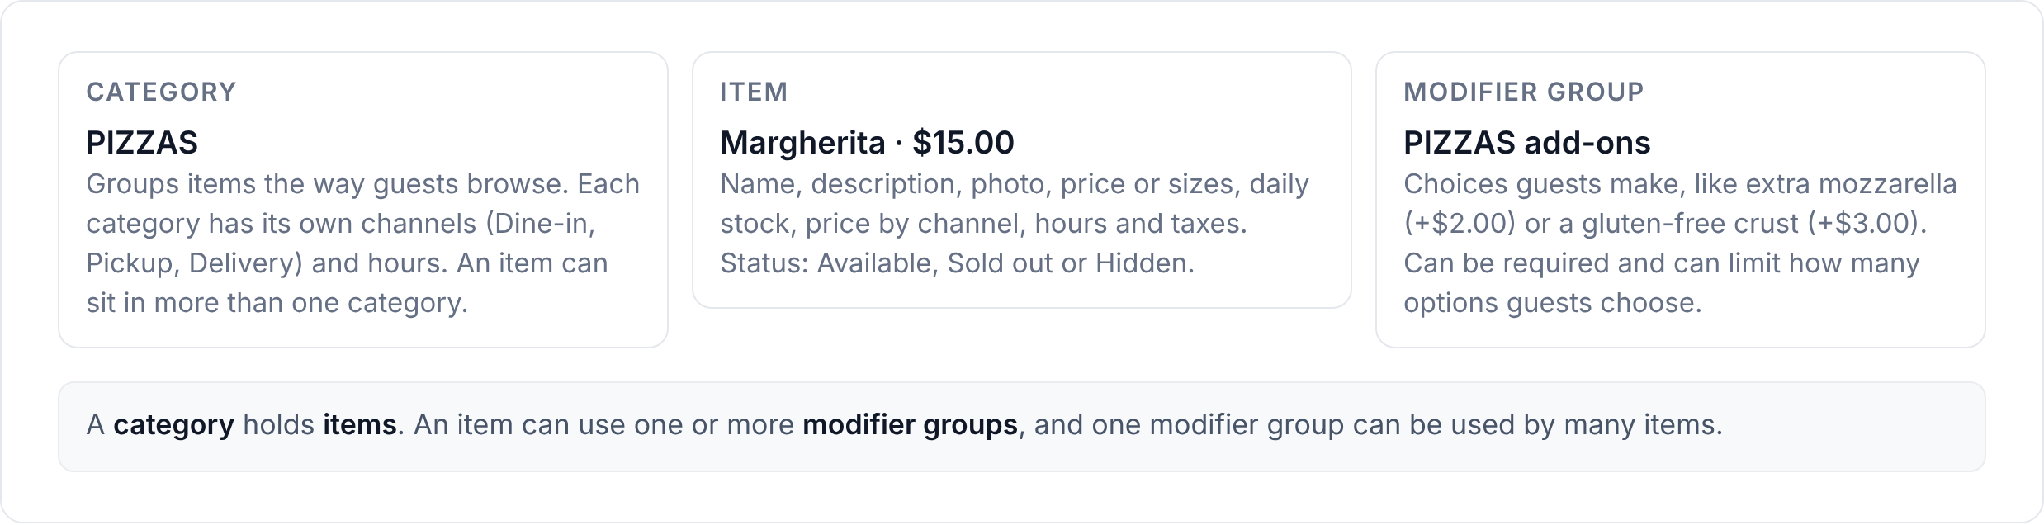
Your menu has three building blocks. A category holds items, and an item can use one or more modifier groups.
Key Benefits of Menu
Managing your restaurant menu in one place helps keep ordering information consistent and makes updates easier. Categories, item details, and menu imports give your team practical ways to organize what guests can order.
A menu in minutes: Upload a PDF, photo or spreadsheet of your menu, or link to your menu page, and check the draft before anything is added.
One menu for every channel: Each item has one price. Pickup and delivery can add a markup, and you can change it for a single item.
Choices guests understand: Offer sizes, and add modifier groups for sides, sauces and toppings, each with its own price.
Stay in control: Mark items Sold out or Hidden, limit how many you sell each day, and choose when categories and items are served.
Edit once: An item can sit in more than one category, so a change to the item shows everywhere it is listed.
How to Open Menu
The Menu page brings together the tools for viewing categories, creating items, and accessing modifier groups. Opening the correct tab helps you find the menu information you want to manage.
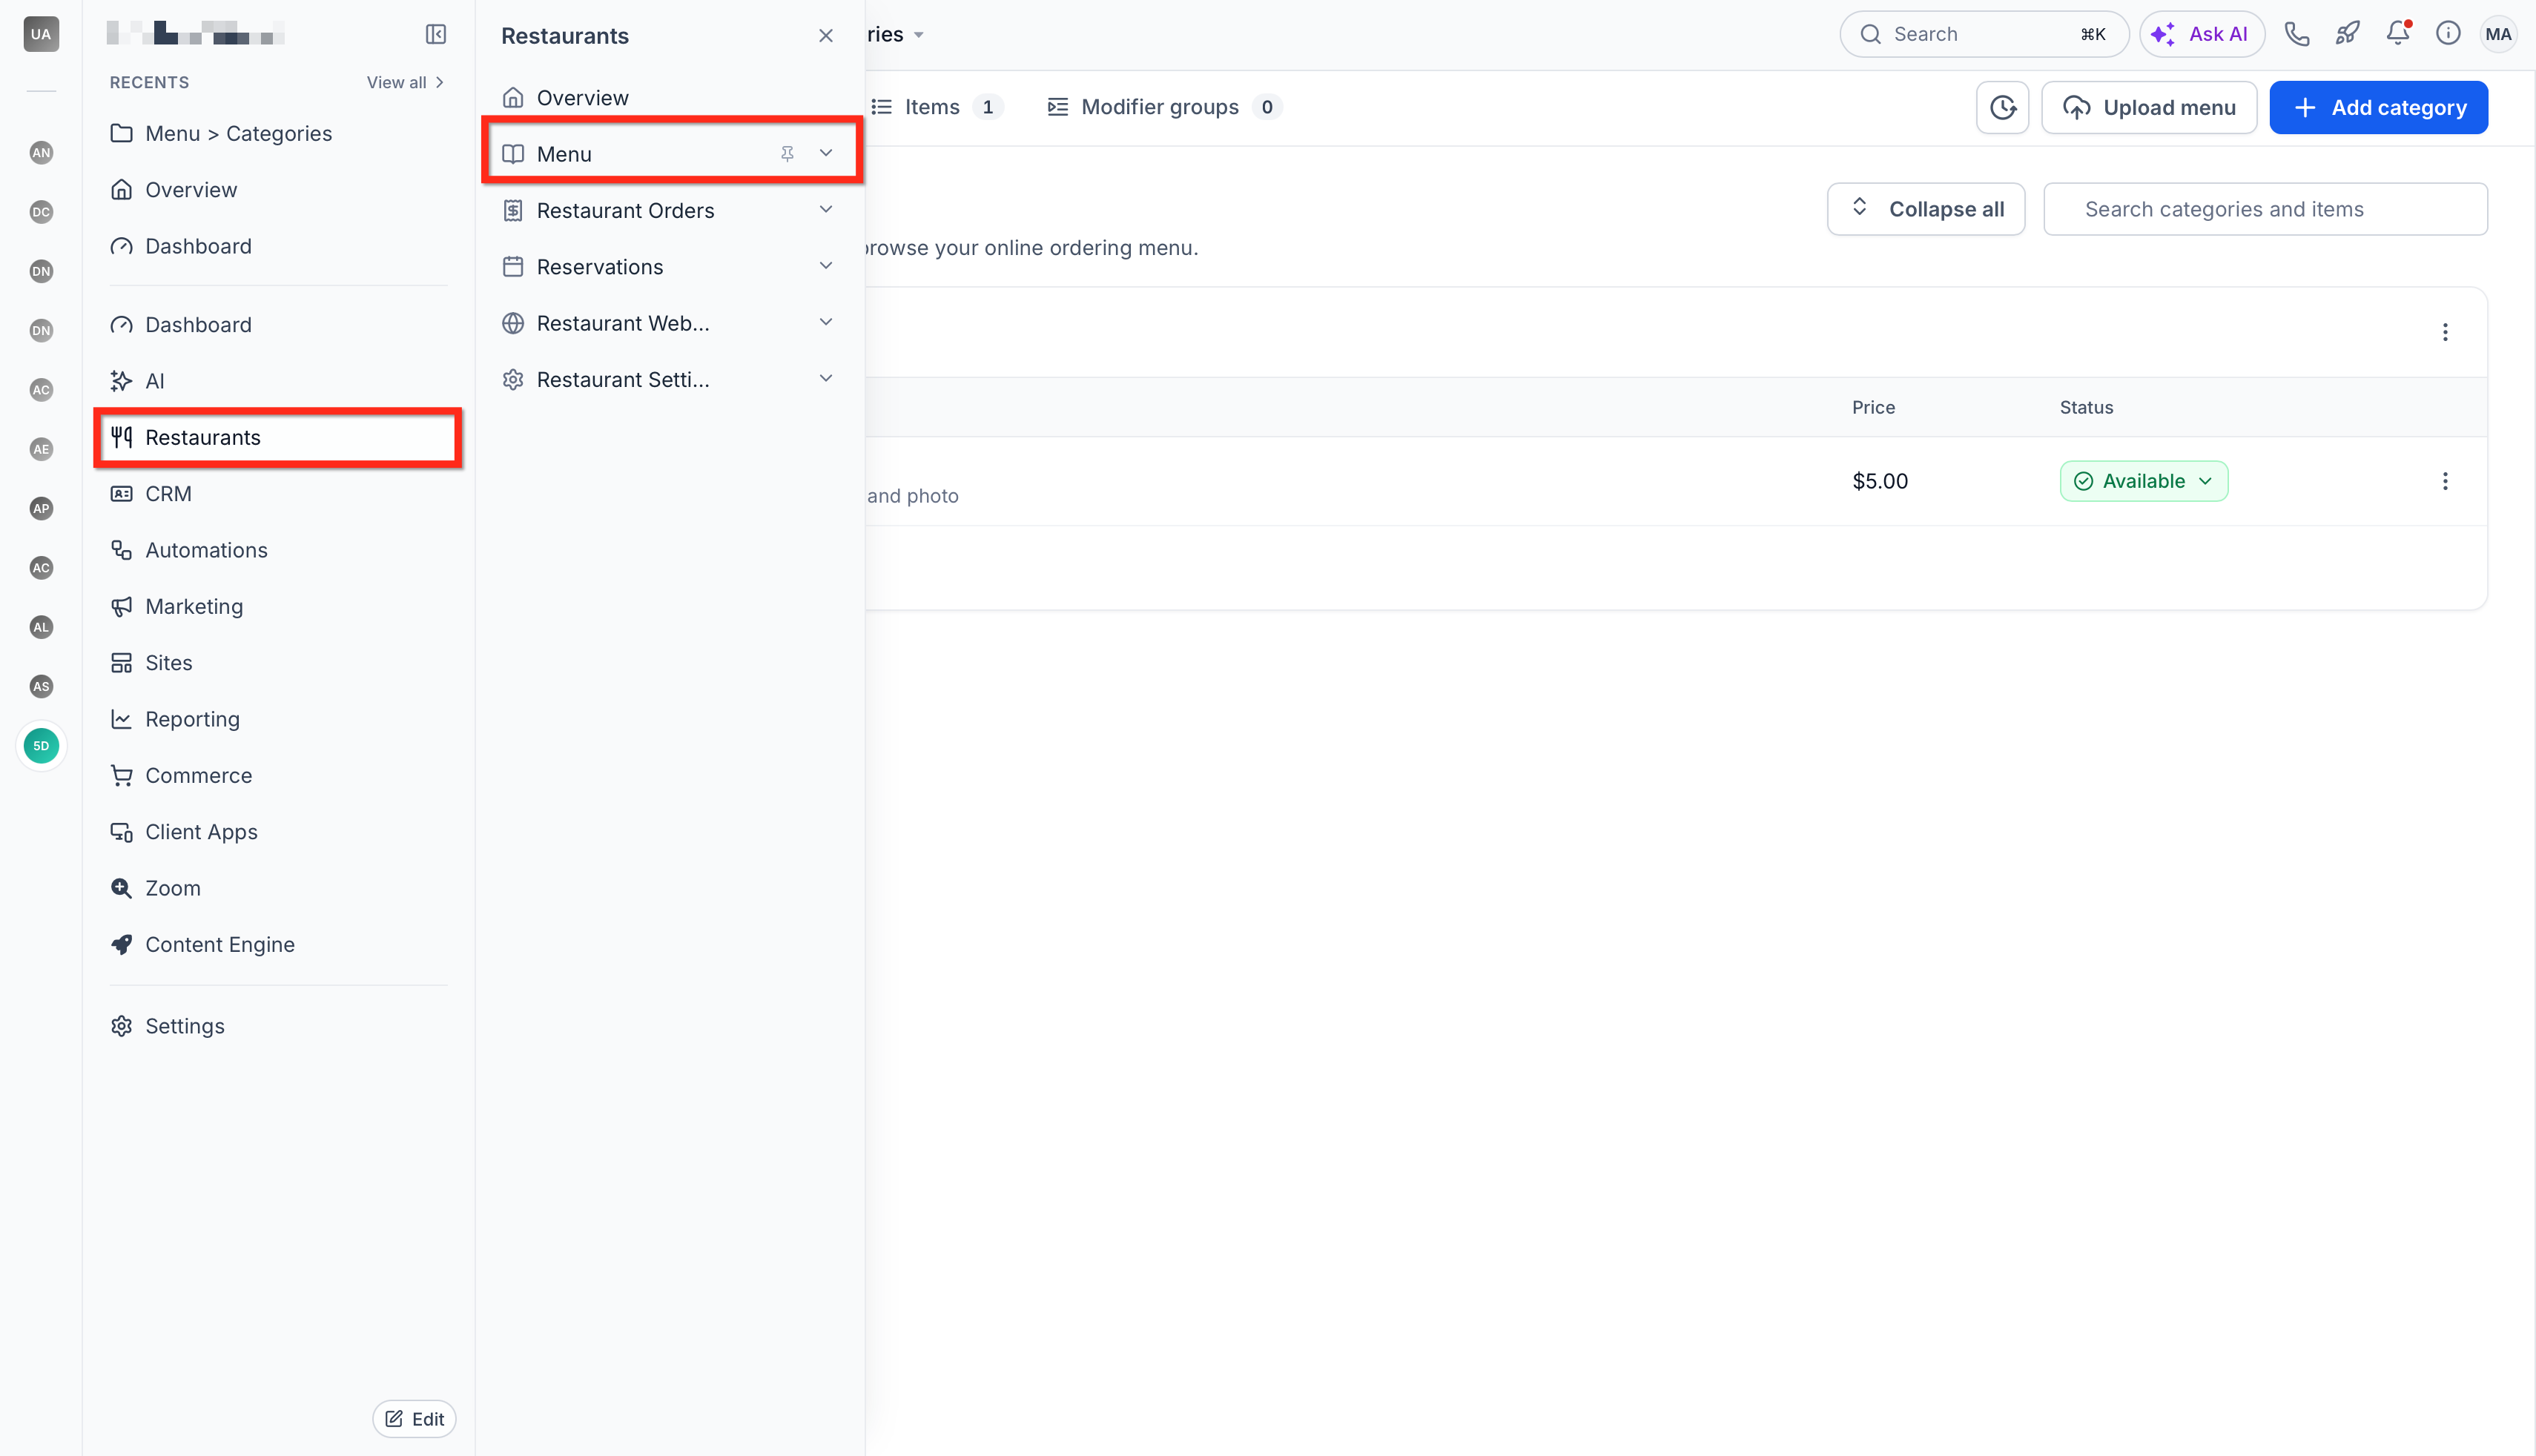
In the left navigation, click Restaurants.
In the Restaurants panel that opens, click Menu.
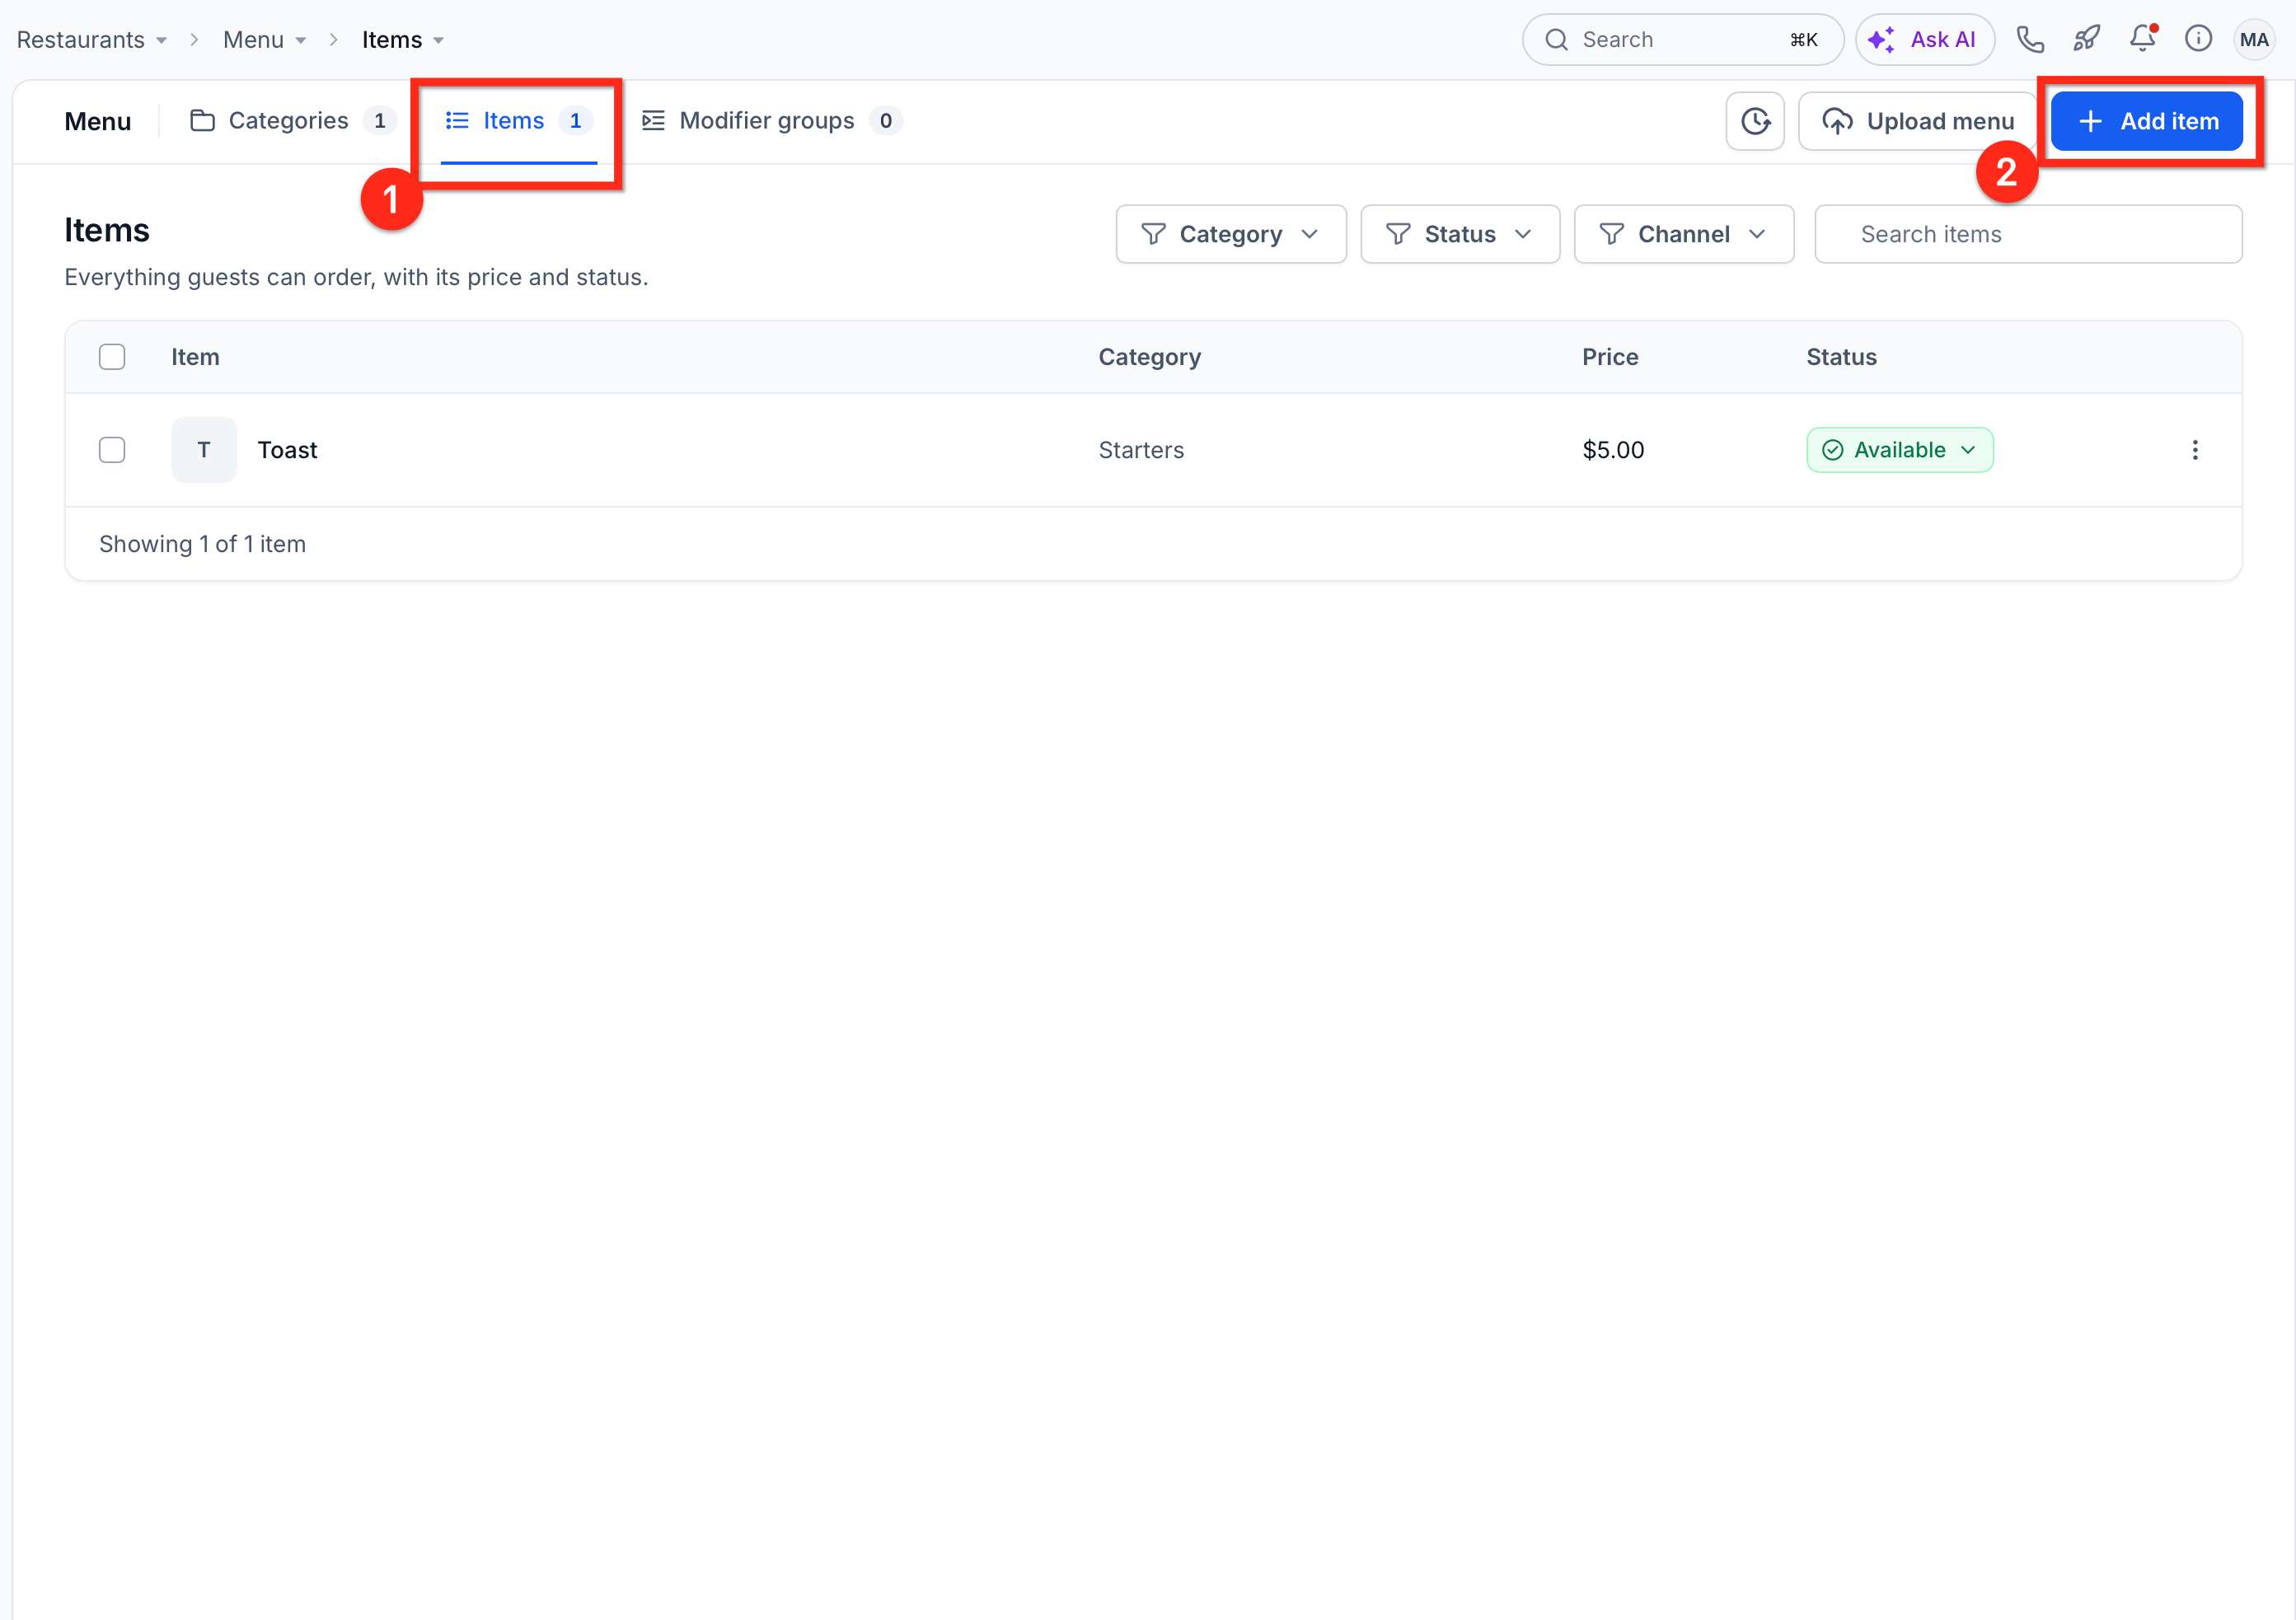
Menu opens on the Categories tab. Click Items or Modifier groups to switch tabs.
Tip: Click the arrow next to Menu in the panel to go straight to Categories, Items or Modifier groups. If you are setting up a new restaurant, you can also add your menu during Restaurant Setup.
Add Your Menu From a File or Link
If you already have a menu, Chat To Clients CRM can build it for you. It turns your file or menu page into a draft you check before anything is added.
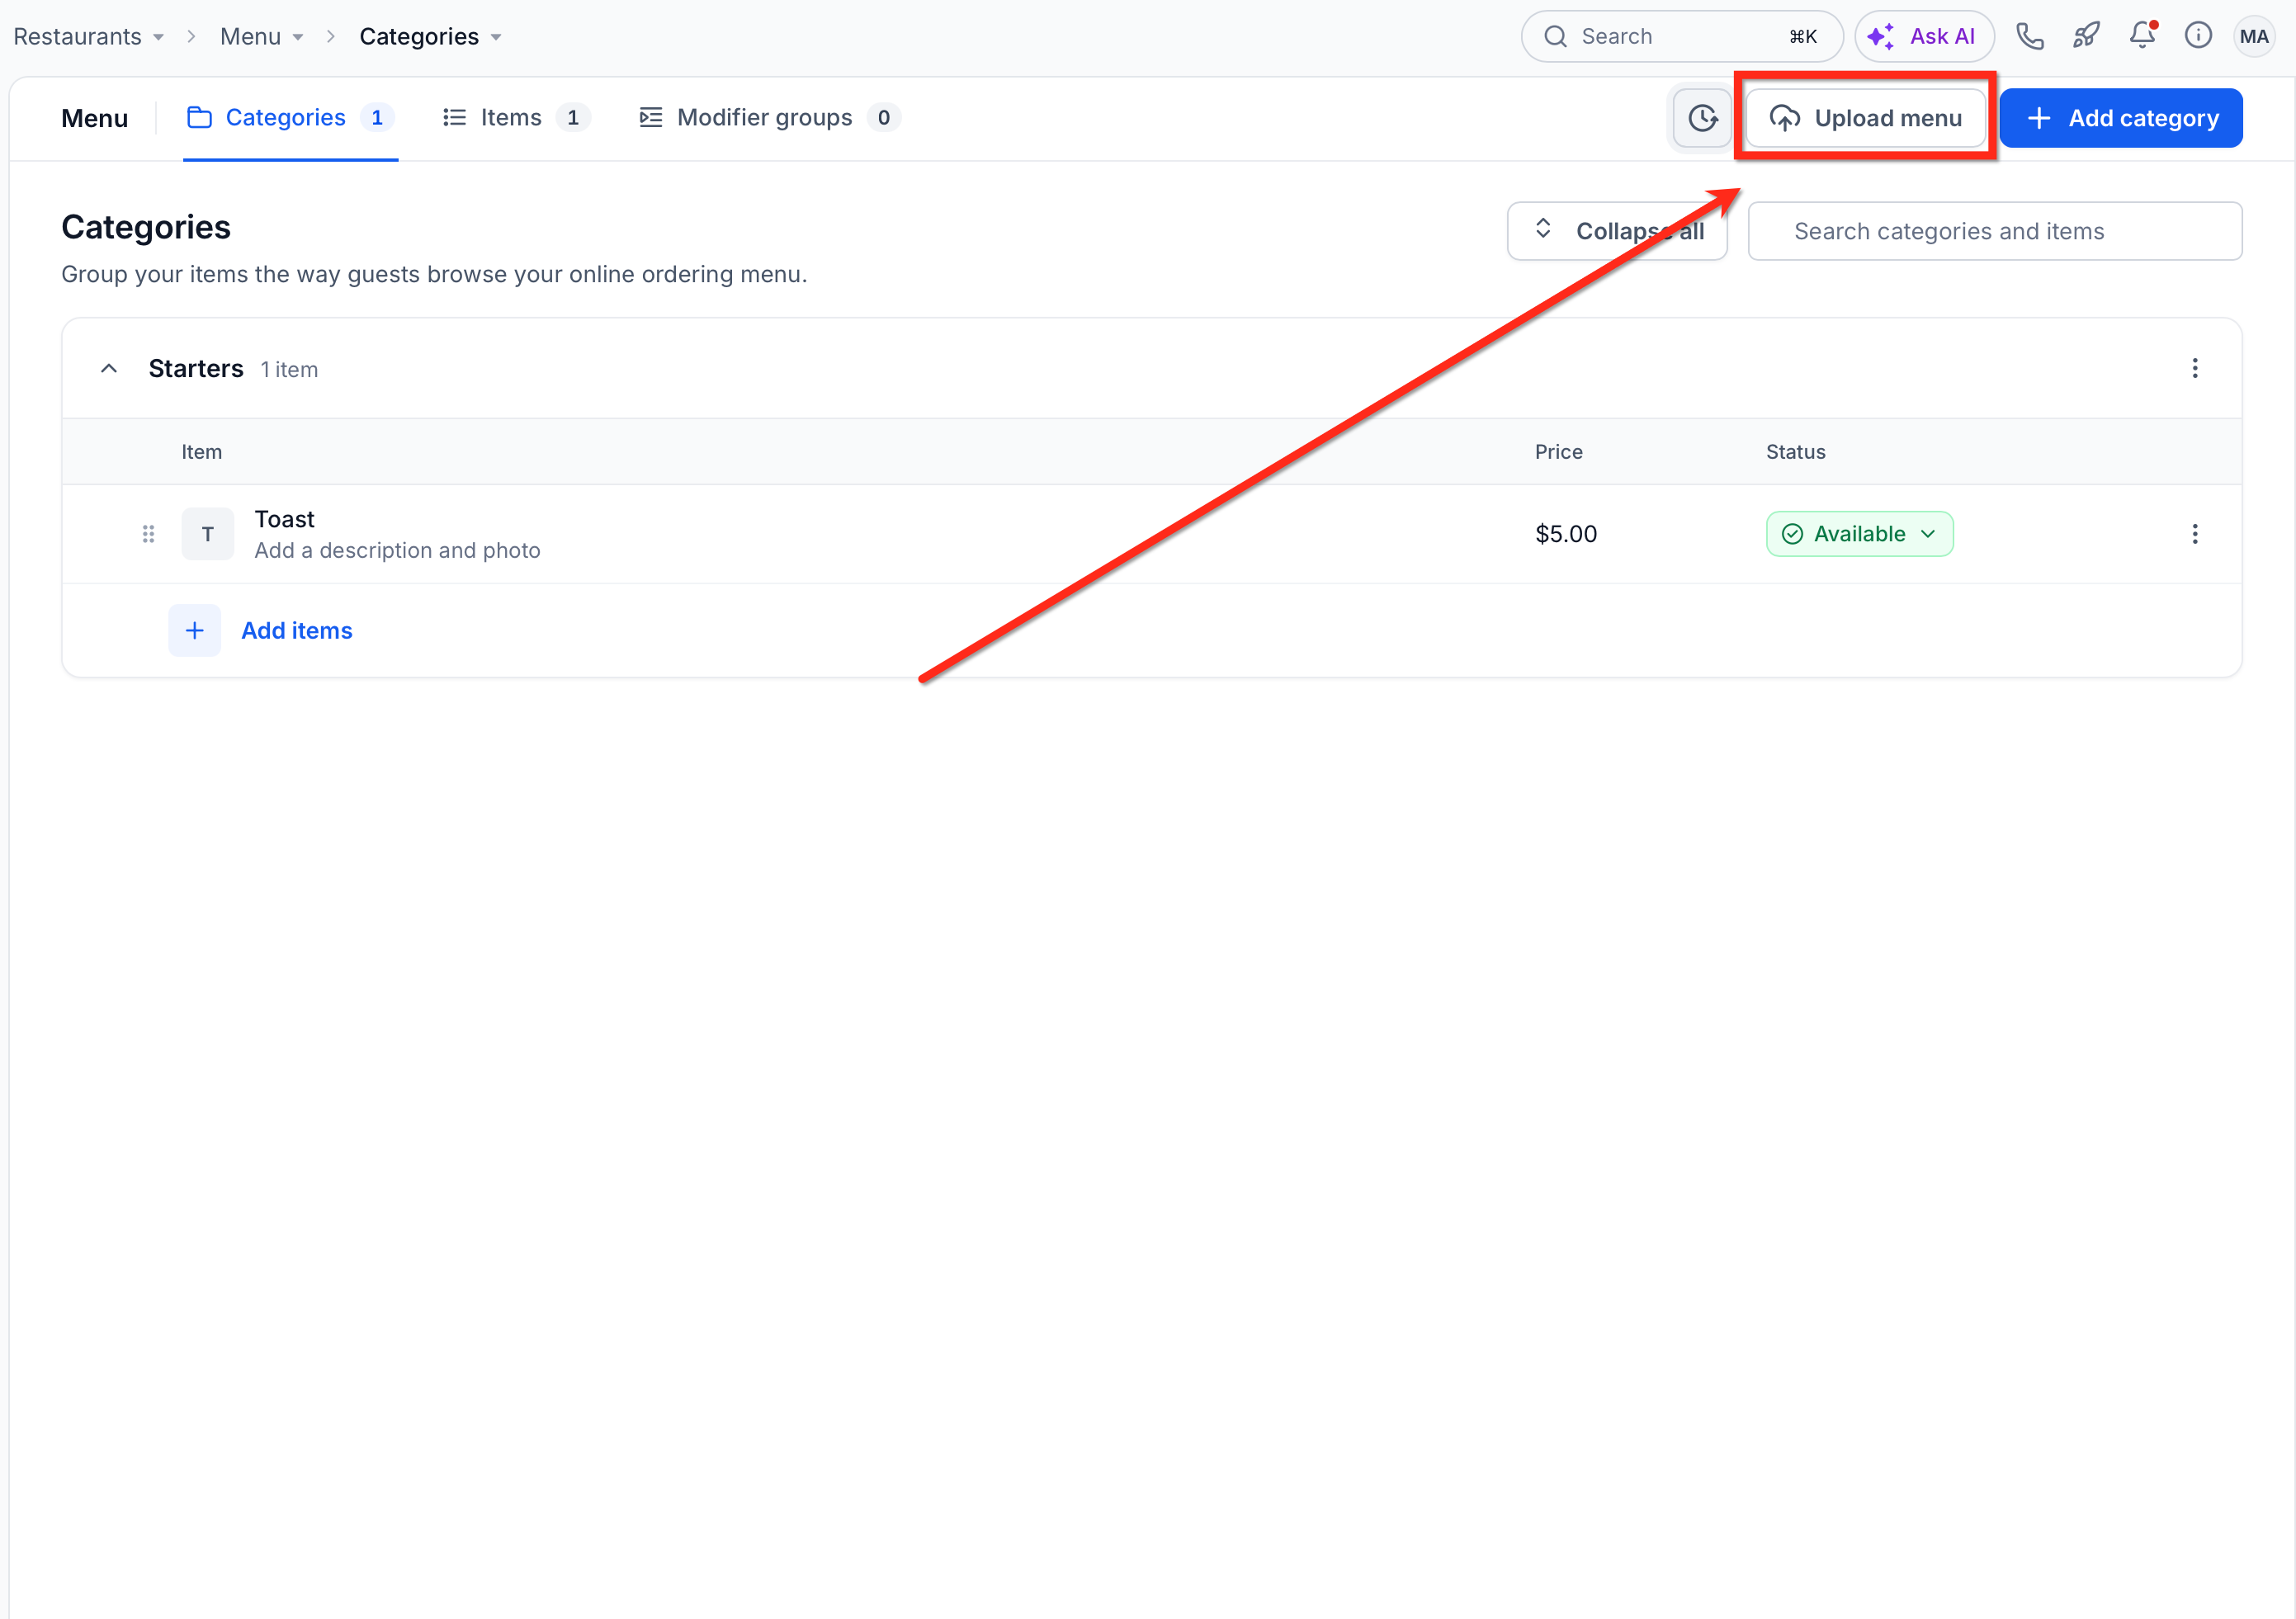
Click Upload menu at the top right.
Add your menu in one of these ways:
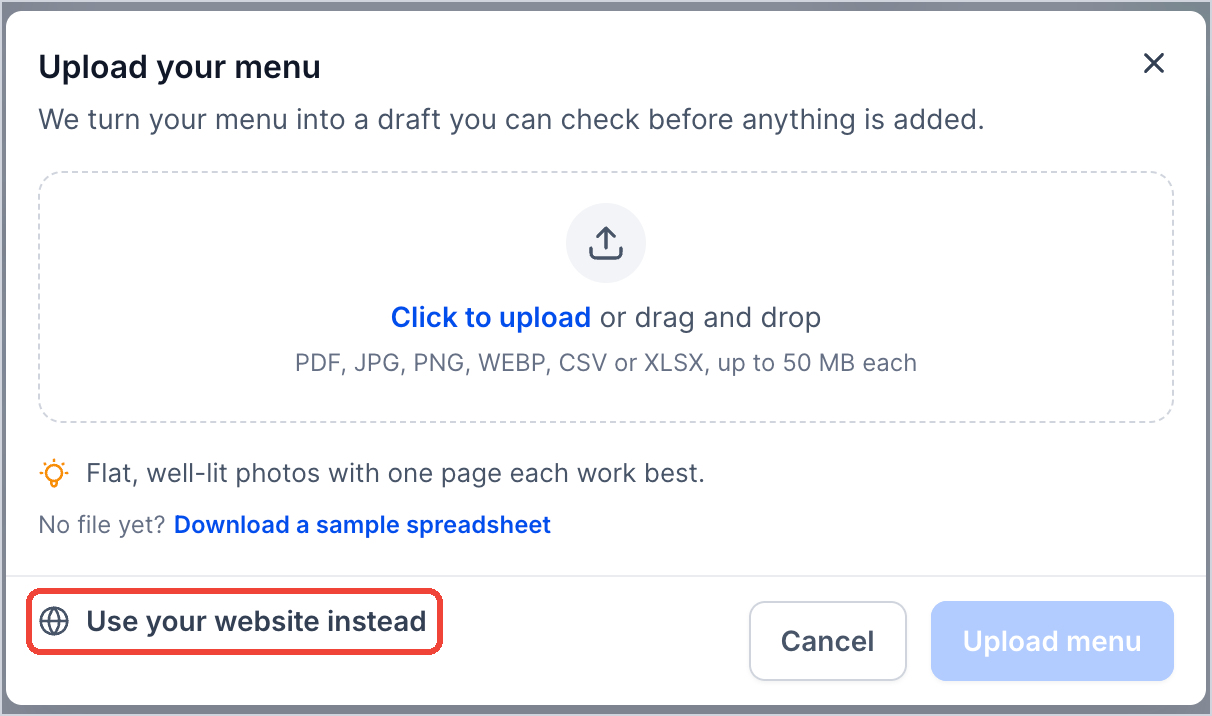
From a file: Click Click to upload, or drag your files into the box. You can upload PDF, JPG, PNG, WEBP, CSV or XLSX files, up to 50 MB each and up to 15 files at a time. Flat, well-lit photos with one page each work best. Then click Upload menu.
From a web page: Click Use your website instead, paste the page’s link in Link to your menu page, and click Use website.
No file yet? Click Download a sample spreadsheet, fill it in, then upload it.
Wait while Chat To Clients CRM builds your draft, page by page. When it is done, check every item. Needs review shows anything to double-check.
To fix an item, click the three-dot menu next to it and choose Edit item, Move to category or Remove from draft.
Click Add items to menu. The button shows how many items will be added.
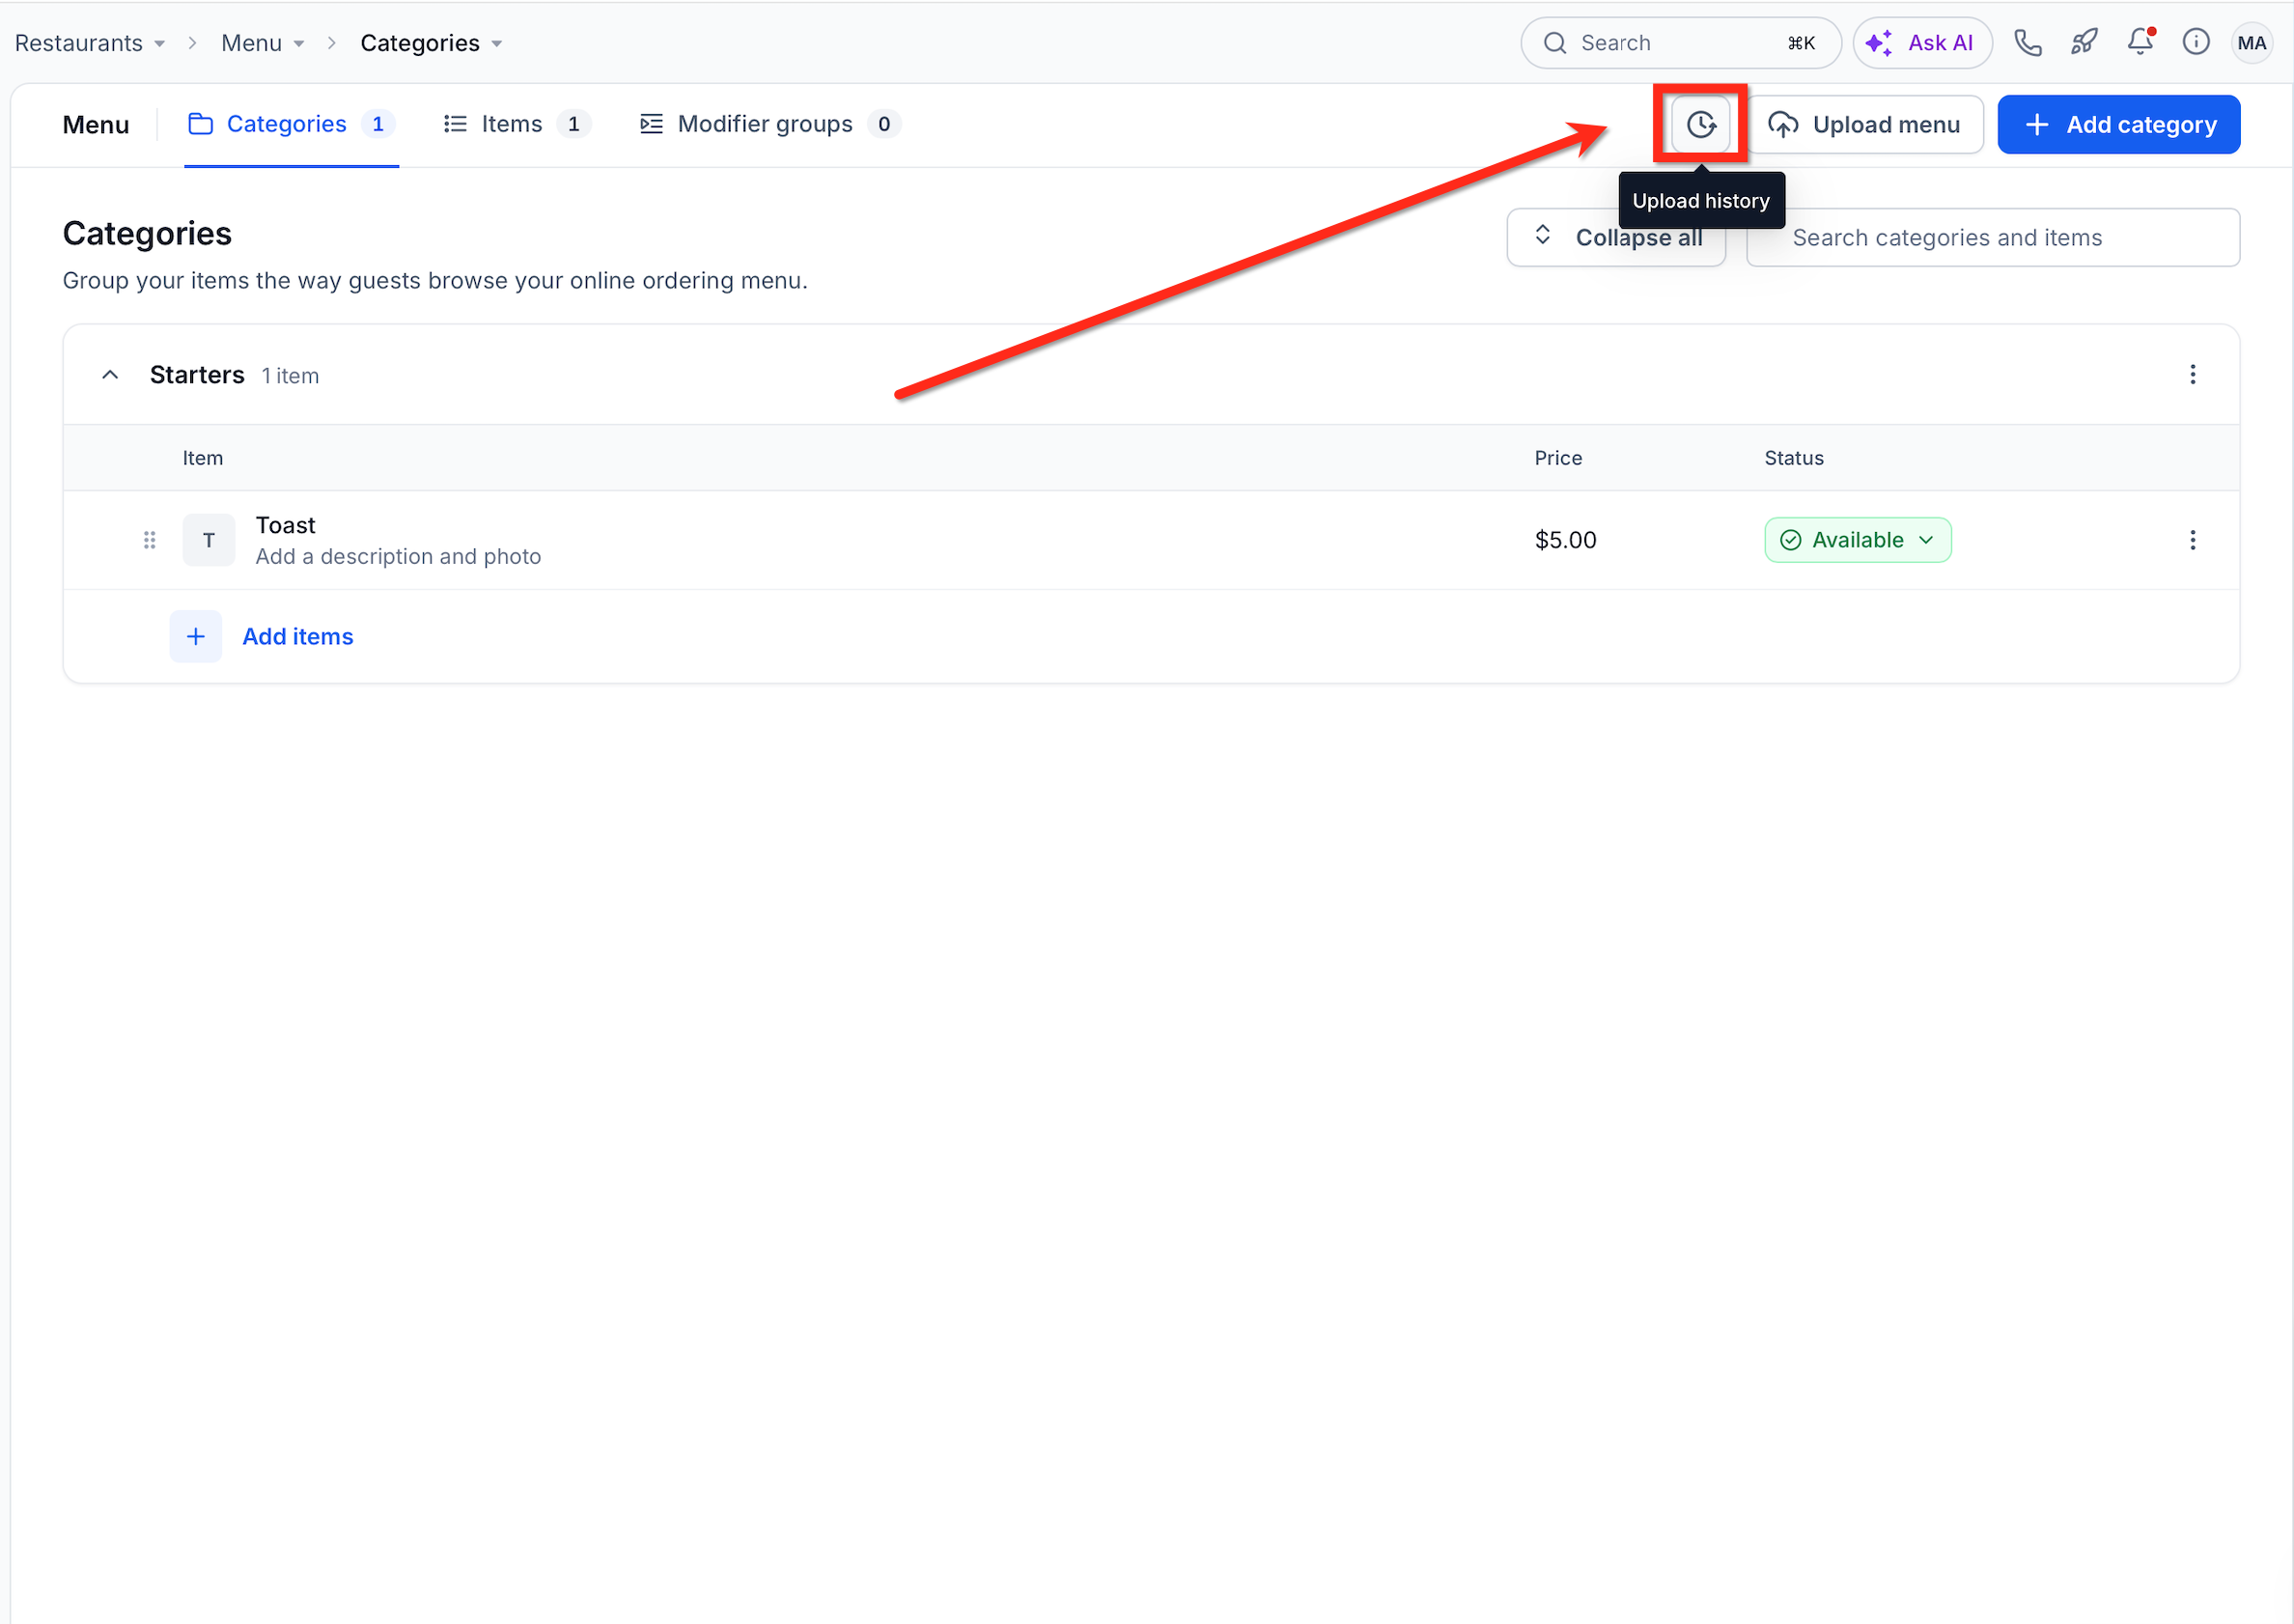
Note: Nothing is added to your menu until you add the draft. To start over, click Discard draft.To see what you uploaded before, click the Upload history icon next to the tabs. Each upload shows the file, how many pages it had, when it was uploaded, who uploaded it and how many items it added.
Add a Category
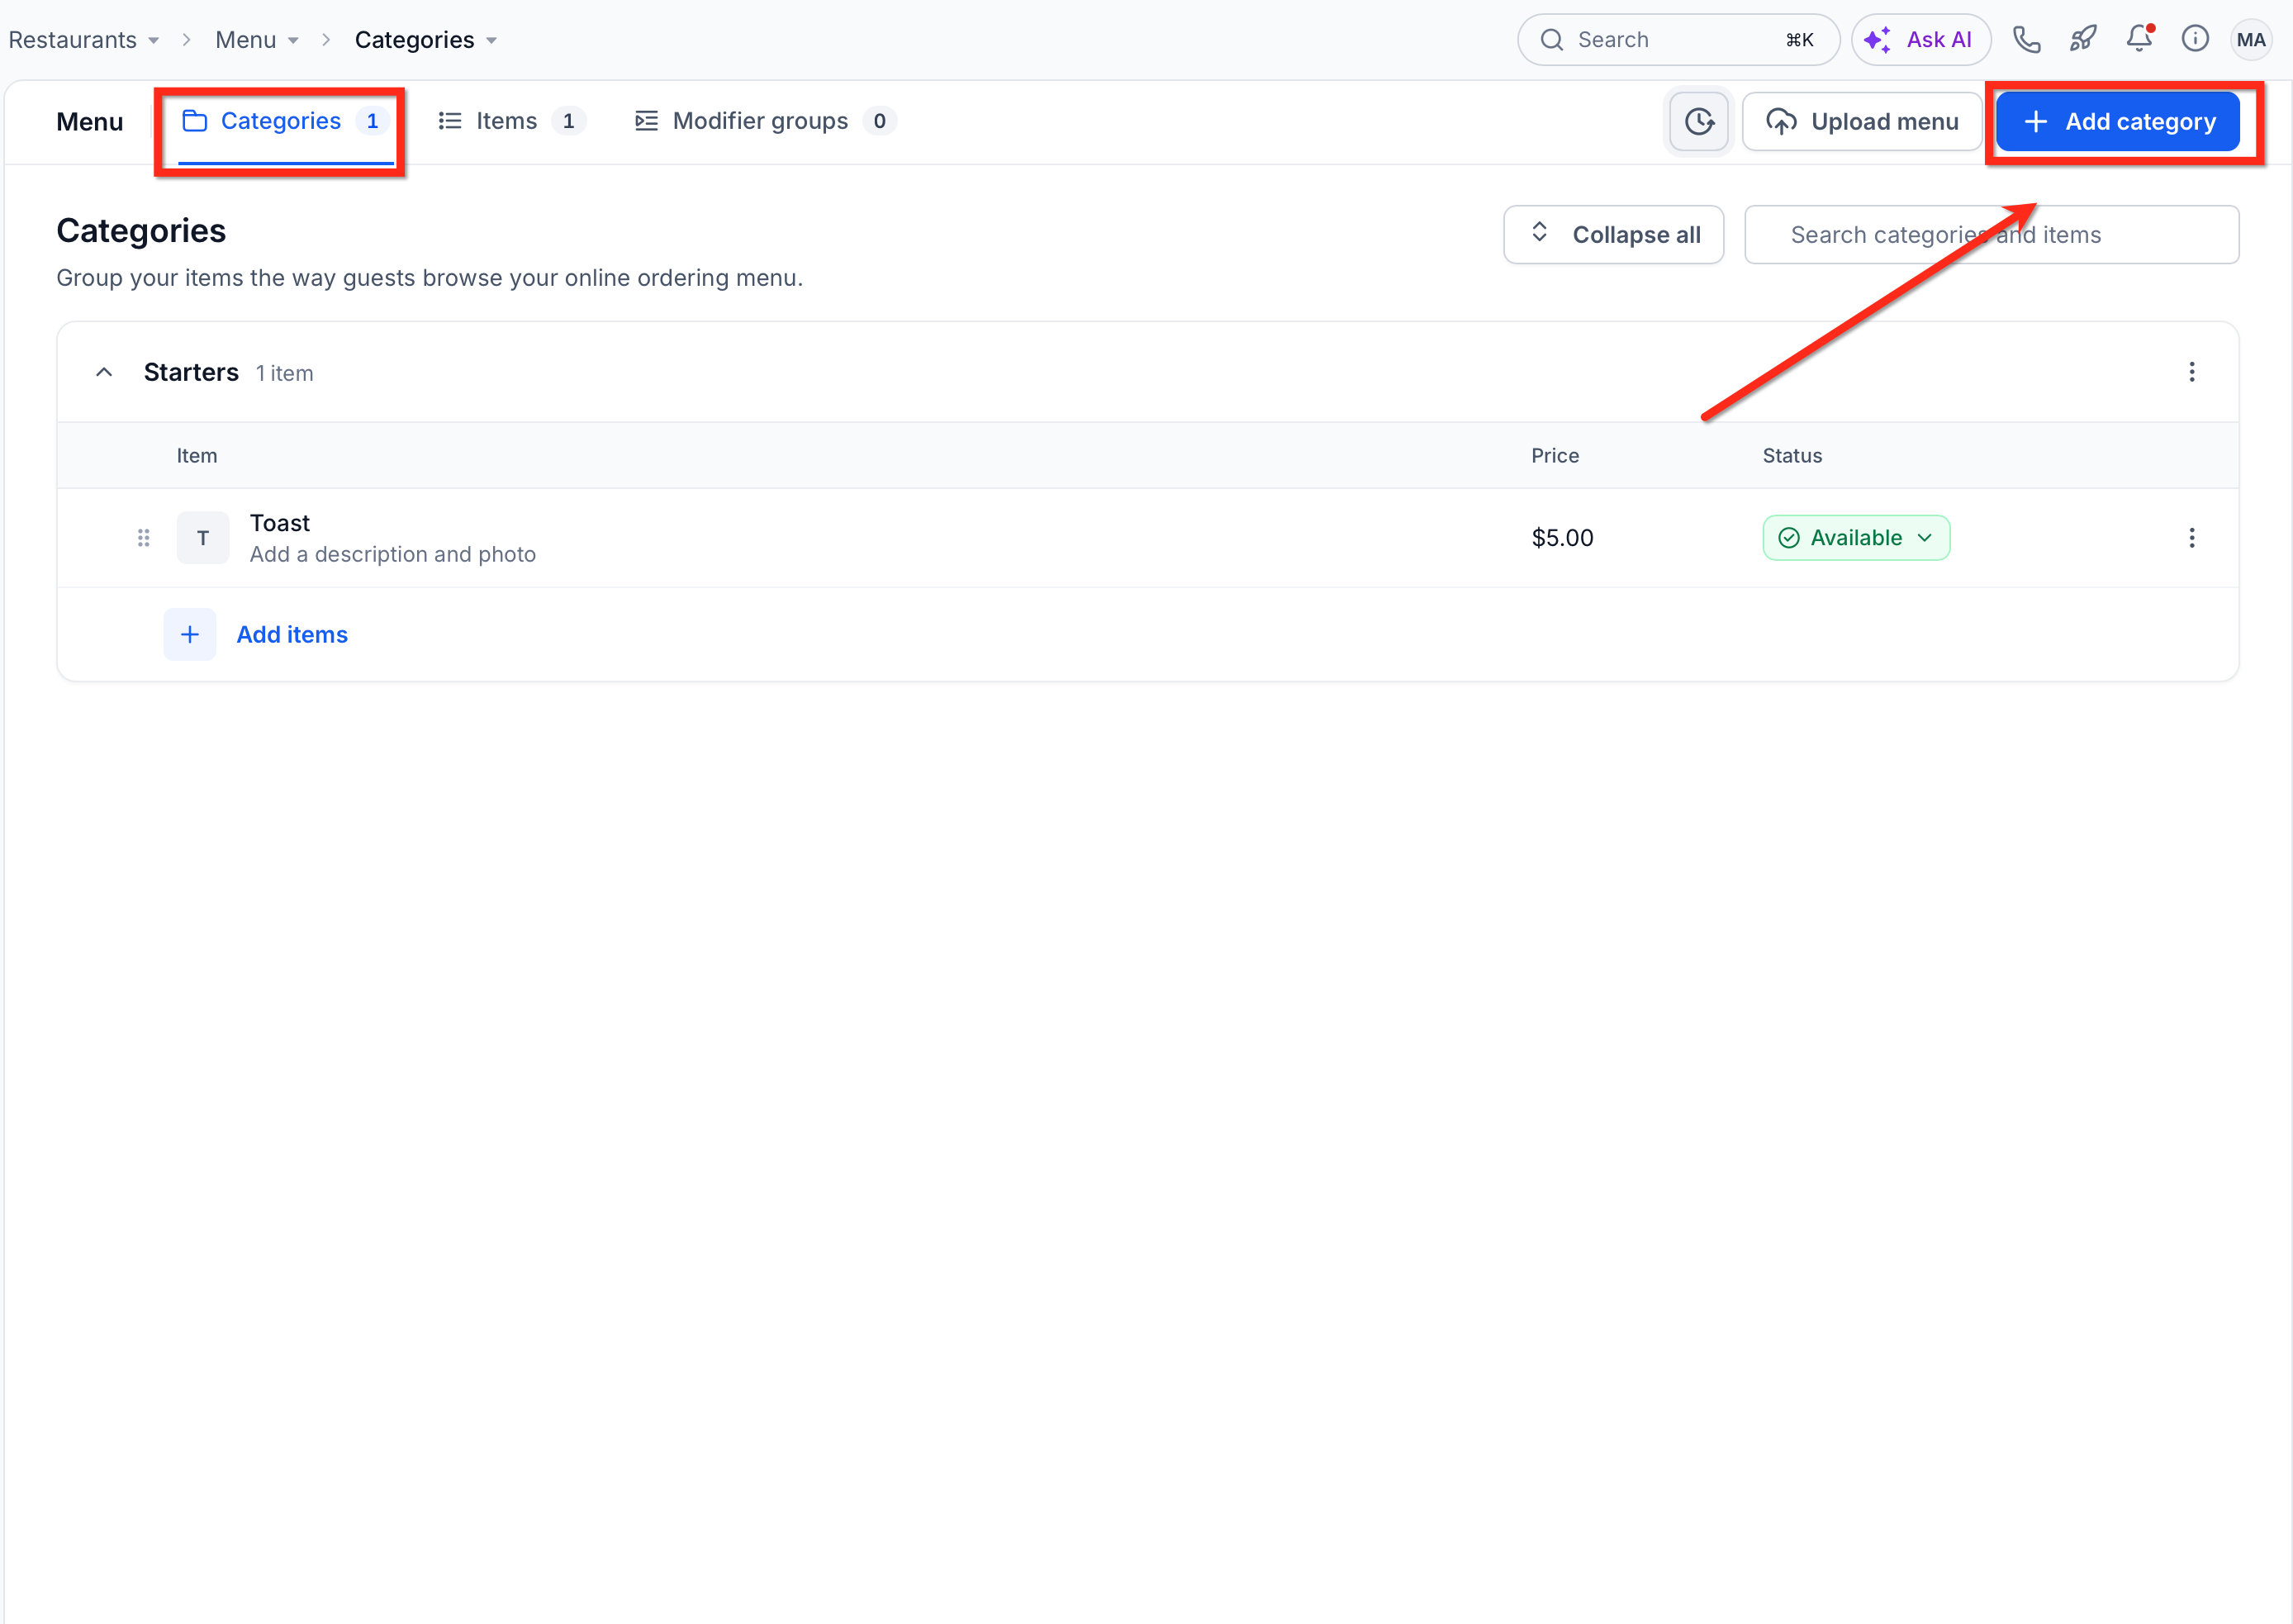
The Categories tab groups your items the way guests browse your online ordering menu, for example Starters, Pizzas and Drinks. Click a category to show or hide its items, or click Expand all. Use Search categories and items to find something fast.
On the Categories tab, click Add category.
Enter a Name, for example Starters, and an optional Description, for example Small plates to share.
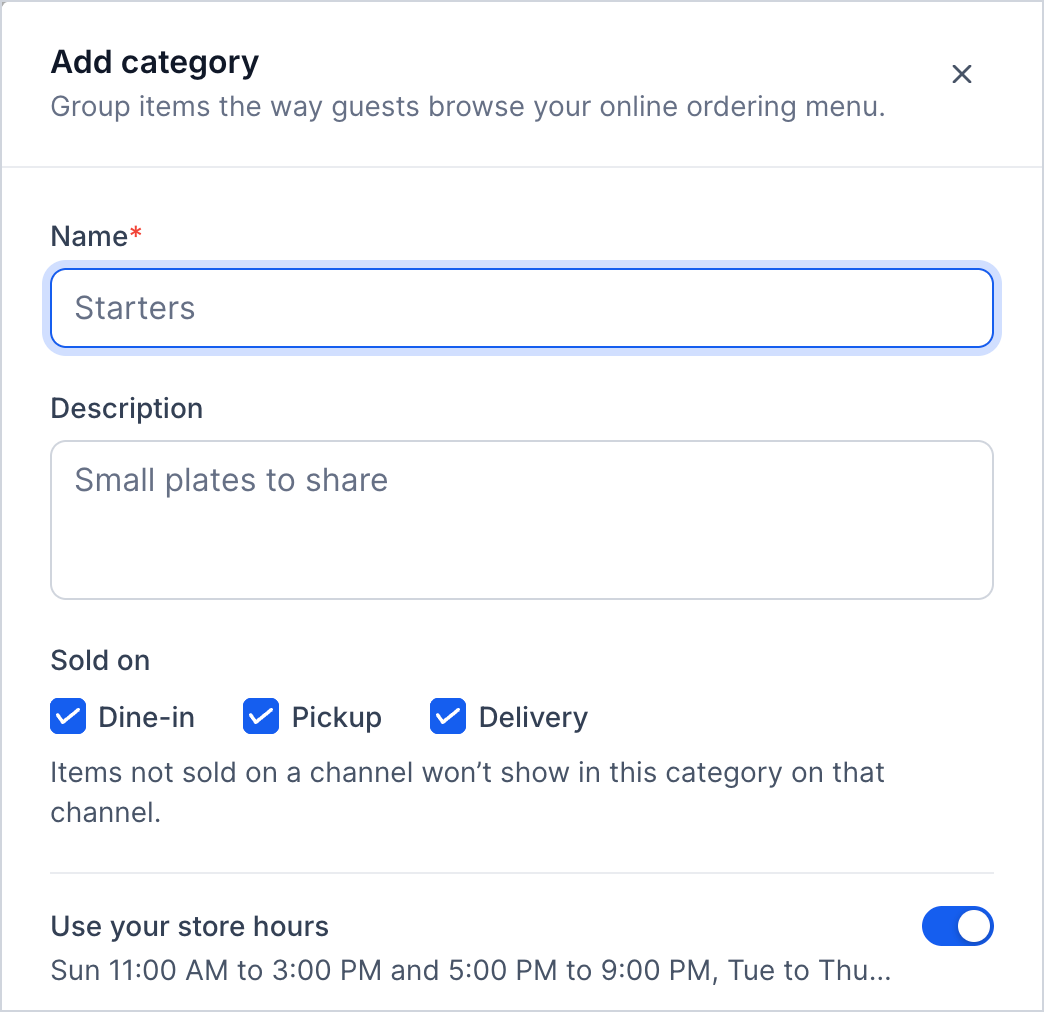
Under Sold on, choose where the category is offered: Dine-in, Pickup and Delivery. Items in the category are not shown on a channel you leave out.
Leave Use your store hours on to offer the category whenever you are open. To offer it at other times, turn it off and set the hours for each day. Days you are closed show Not served.
Click Add category.
Add Items to a Category
Adding existing items to a category helps guests browse related food and drink options together. An item can be placed in more than one category without creating a separate copy. Click Add items under a category, or click the three-dot menu next to the category and choose Add items. An item can sit in more than one category.
On the Items tab, click Add item.
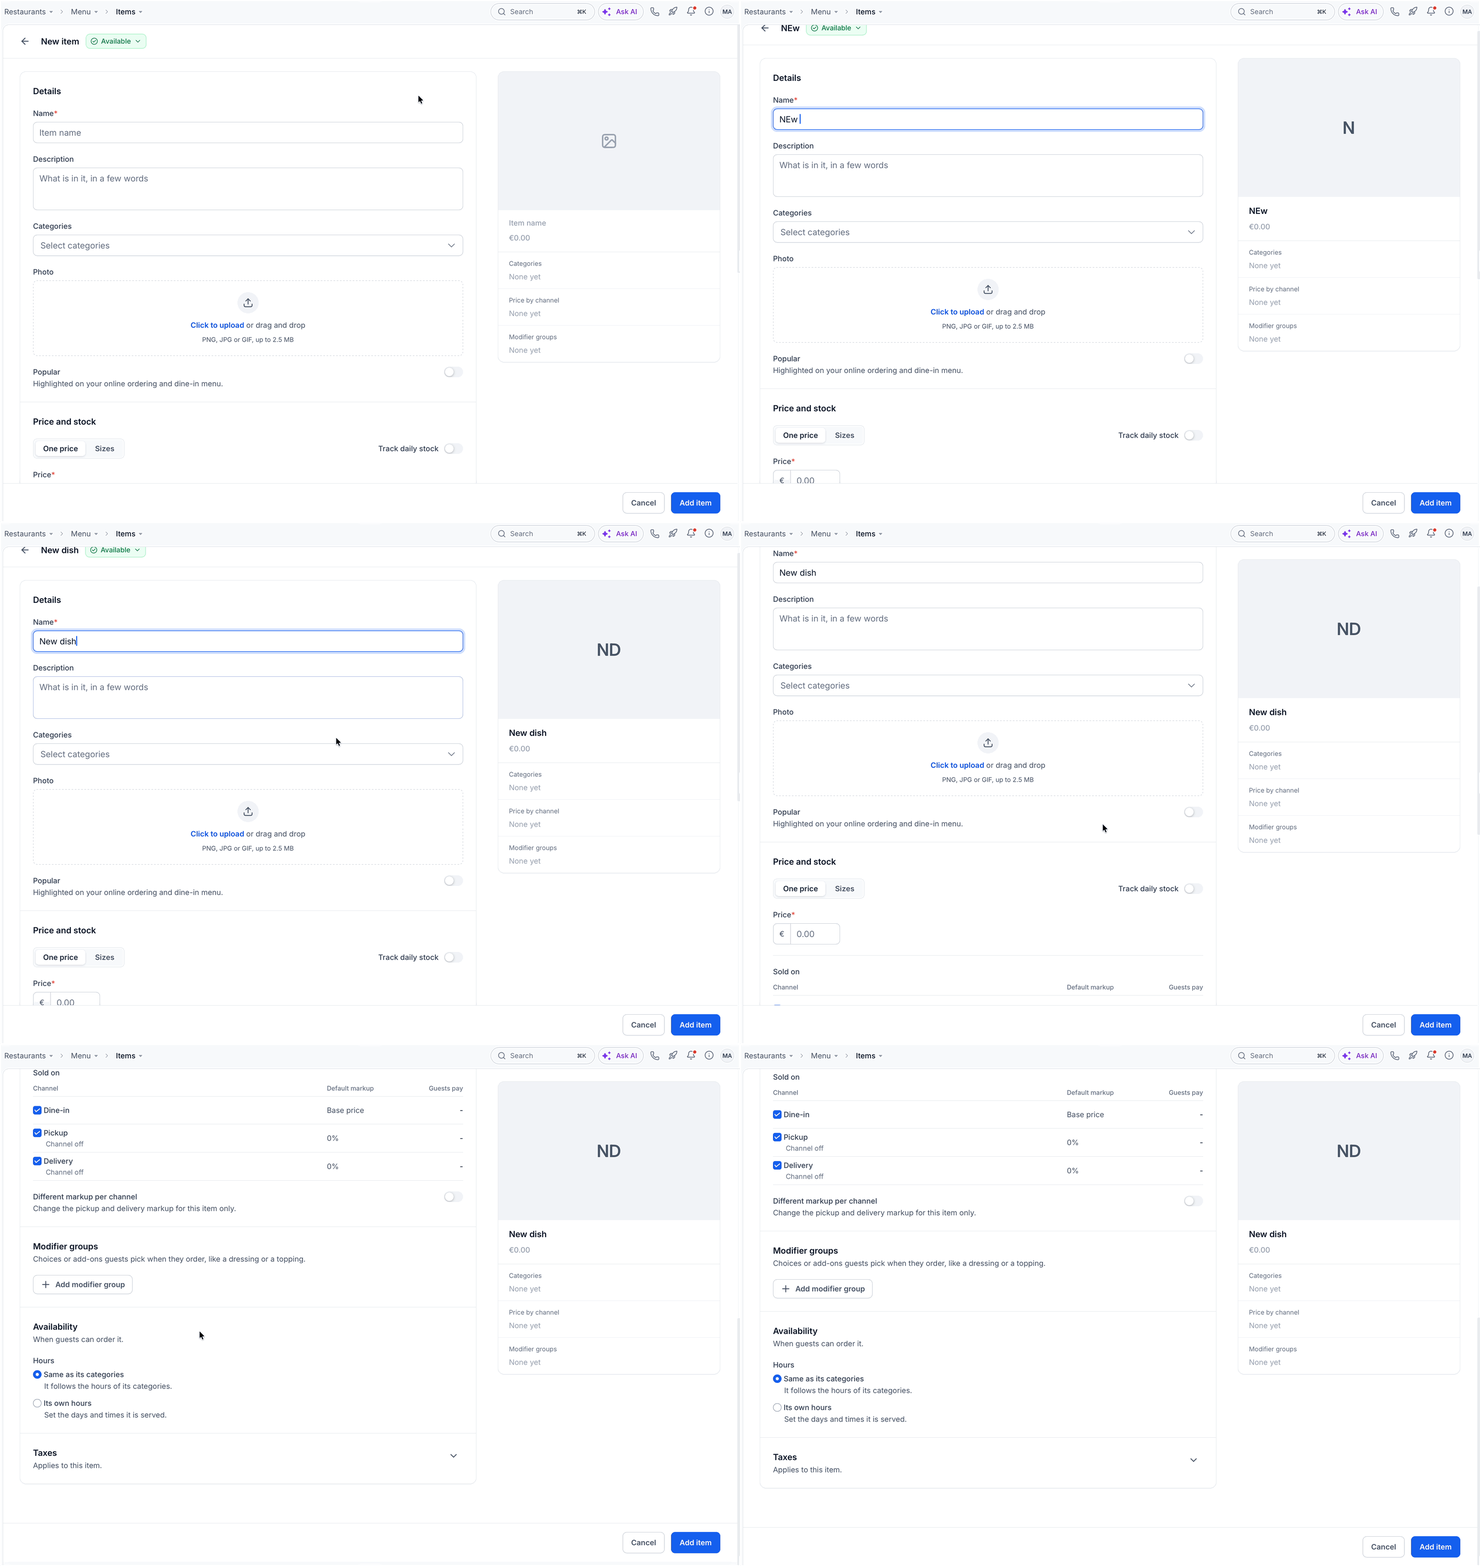
Under Details, enter the item Name and a short Description of what is in it.
In Categories, select one or more categories for the item.
Under Photo, click to upload or drag in a PNG, JPG or GIF, up to 2.5 MB.
Turn on Popular to highlight the item on your online ordering and dine-in menu.
Set the price under Price and stock. Use the available fields in the item editor to review its price and stock information.
Optional: add modifier groups, choose when the item is available, and choose its taxes using the fields provided in the item editor.
Check the summary card, which shows the item’s price, categories, price by channel and modifier groups.
Click Add item.
Frequently Asked Questions
Q: Can an item be in more than one category?
Yes. Select more than one category on the item. You edit the item once, and the change shows in every category it is in.
Q: Can I import my menu from a spreadsheet?
Yes. Click Upload menu and upload a CSV or XLSX file. To start from our layout, click Download a sample spreadsheet
Q: What happens to items when I delete a category?
You choose. Keep the items and move them to another category, or delete them too. Items with no category stay in Items but are not shown on your online menu.
Related Articles
- Restaurant Setup Guide: Get Ready to Take Orders and Reservations
- Restaurant Orders: How to Manage Orders and Payments
- Restaurant Reservations: Manage Bookings, Tables, and Guests
- Restaurant Website: How to Customize and Publish Your Site
- How to Manage and Customize a Restaurant Menu in Chat To Clients CRM
- Restaurant Settings: Change Your Restaurant’s Details and Rules