
Restaurant Website: How to Customize and Publish Your Site
Restaurant Website lets you create a branded website where guests can order pickup or delivery and reserve a table. Your website uses your existing restaurant details, menu, and settings, so you can focus on customizing its appearance and making it your own. This article explains how to edit your pages, configure your website settings, track visitor activity, and publish your website.
TABLE OF CONTENTS
- What Is Restaurant Website?
- Key Benefits of Restaurant Website
- Accessing Restaurant Website and the Dashboard
- Customize Your Restaurant Website Pages
- Customize Your Website Design
- Configure Website Setup, Domain, and Tracking
- How to Preview and Publish Restaurant Website
- Frequently Asked Questions
- Related Articles
What Is Restaurant Website?
Restaurant Website is a built-in website solution in Chat To Clients CRM that helps restaurants manage their online presence without building a website from scratch. It connects your menu, restaurant details, ordering options, and reservations to a customizable website.
Restaurant Website includes three main tabs:
| Tab | Description |
|---|---|
| Dashboard | See whether pickup, delivery and reservations are ready, see how your website is doing, and preview or publish it. |
| Restaurant pages | Edit every page guests see, with a live preview, and choose your template, colors and fonts. |
| Setup and sharing | Choose the page your web address opens on, how guests sign in, your contact details, your web address, how links look when shared, and tracking. |
Key Benefits of Restaurant Website
Restaurant Website helps you create a consistent online experience while keeping your restaurant's website connected to the information you already manage in Chat To Clients CRM.
Ready from day one: Your website uses the menu, hours, address and brand you already added, so it is ready to preview right after setup.
Orders and bookings in one place: Guests order pickup or delivery and book a table on the same website.
Edit with a live preview: Turn sections on or off, reorder them and change the text, and see each change as you make it.
Your brand, your way: Choose a template, your color, light or dark mode, spacing, corners and fonts.
Your own domain: Use the free web address, or connect a domain you own.
Accessing Restaurant Website and the Dashboard
The Restaurant Website dashboard provides an overview of your website's readiness and performance. Before accessing it, complete Restaurant Setup, including your restaurant details, menu, payment provider, and relevant pickup, delivery, and reservation settings.
To access Restaurant Website:
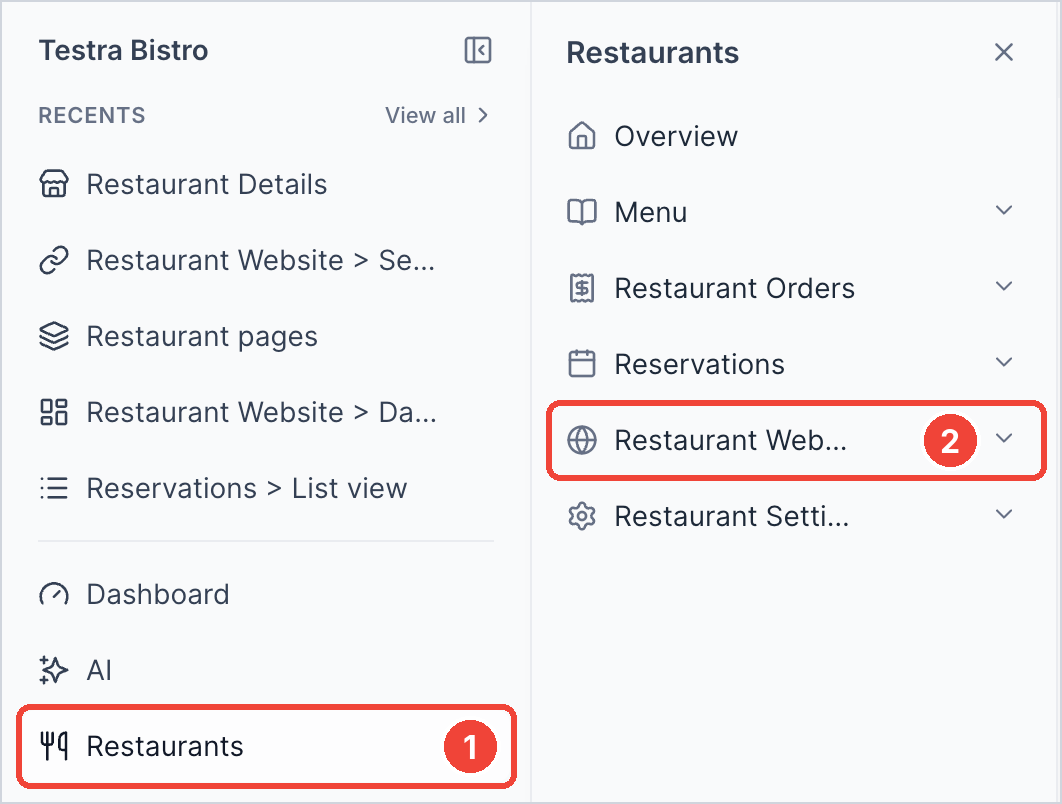
- Navigate to Restaurants from the left navigation menu.
- Select Restaurant Website.
- The Dashboard tab opens automatically.
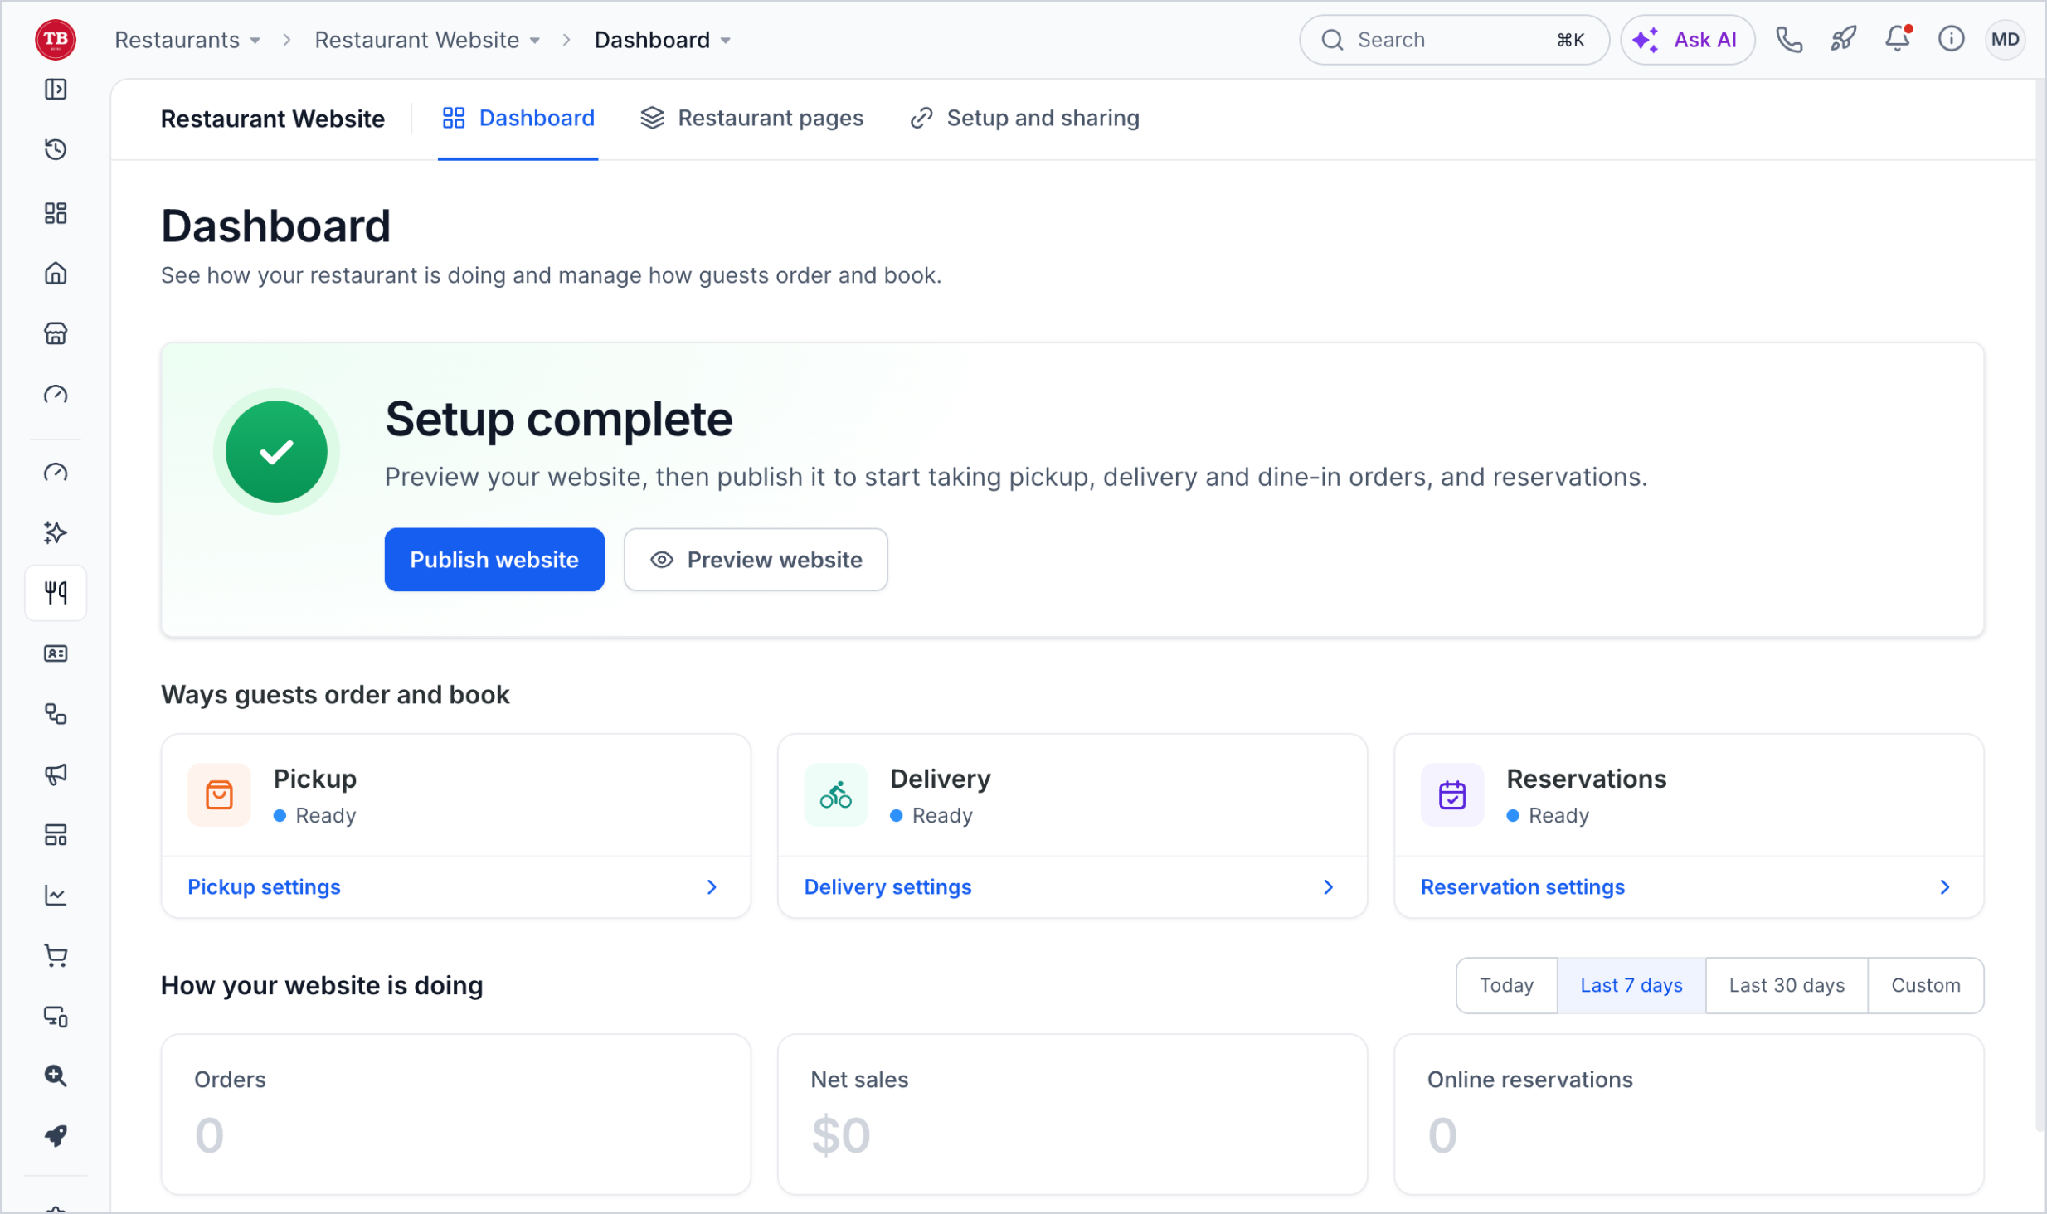
The dashboard contains the following information:
Setup complete: Click Preview website to check your website, or Publish website to make it live.
Ways guests order and book: Pickup, Delivery and Reservations each show whether they are ready. Click Pickup settings, Delivery settings or Reservation settings to change them.
How your website is doing: Choose Today, Last 7 days, Last 30 days or Custom to see your online Orders, Net sales and Online reservations, with a chart for each day.
Tip: Select the arrow next to Restaurant Website in the navigation panel to access its tabs directly. The dashboard also opens automatically after completing Restaurant Setup.Customize Your Restaurant Website Pages
The Restaurant pages editor lets you manage the content visitors see on your website. Changes appear in a live preview, allowing you to review the layout while customizing each page.
Your website includes the following pages:
| Page | Purpose |
|---|---|
| Home | The page a guest lands on. It can show your best dishes, categories, photos, hours and location. |
| Menu page, Cart drawer, Checkout, and Order confirmation | Browse your menu, add items to the cart, check the order and pay, then see the order confirmation. |
| Reservations page, Booking page, Booking confirmation, and Manage reservation | Choose a time, book a table, see the confirmation, and change or cancel the booking later. |
| Sign-in page | Sign in with their email and a 6-digit code. |
| Dine-in menu | Look at your menu at the table after they scan the code on their table. Your team takes their order. |
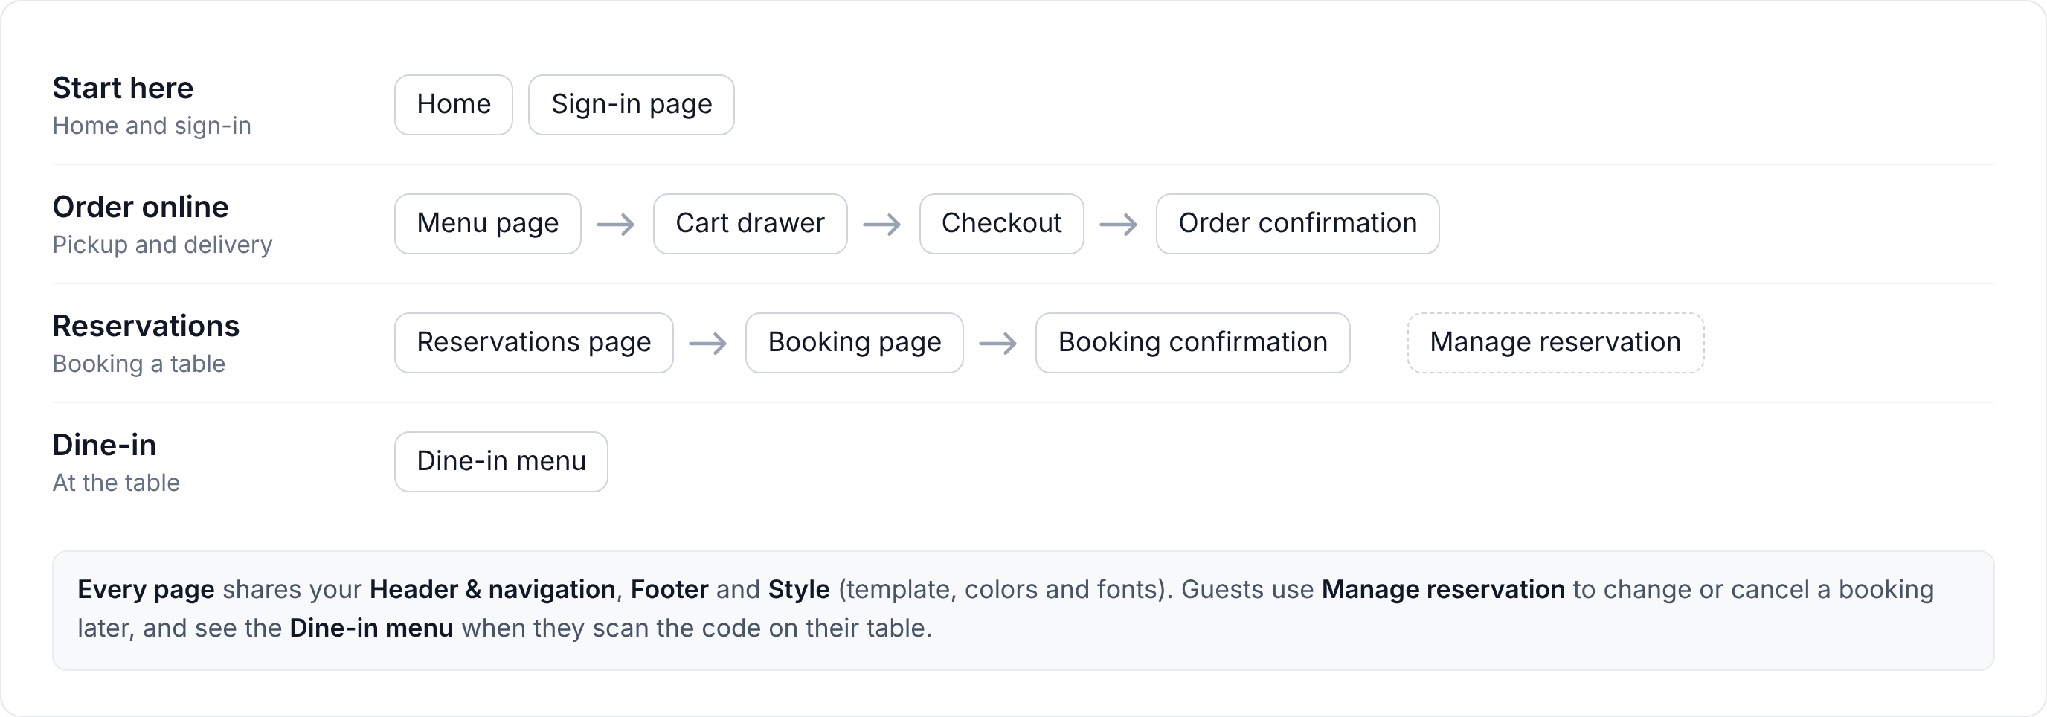
Edit Website Pages
The page editor separates content editing from the live preview, helping you update individual pages without changing your restaurant's underlying menu configuration.
Click the Restaurant pages tab.
In the list on the left, click the page you want to edit, for example Home.
Make your changes. The preview on the right shows them as you go.
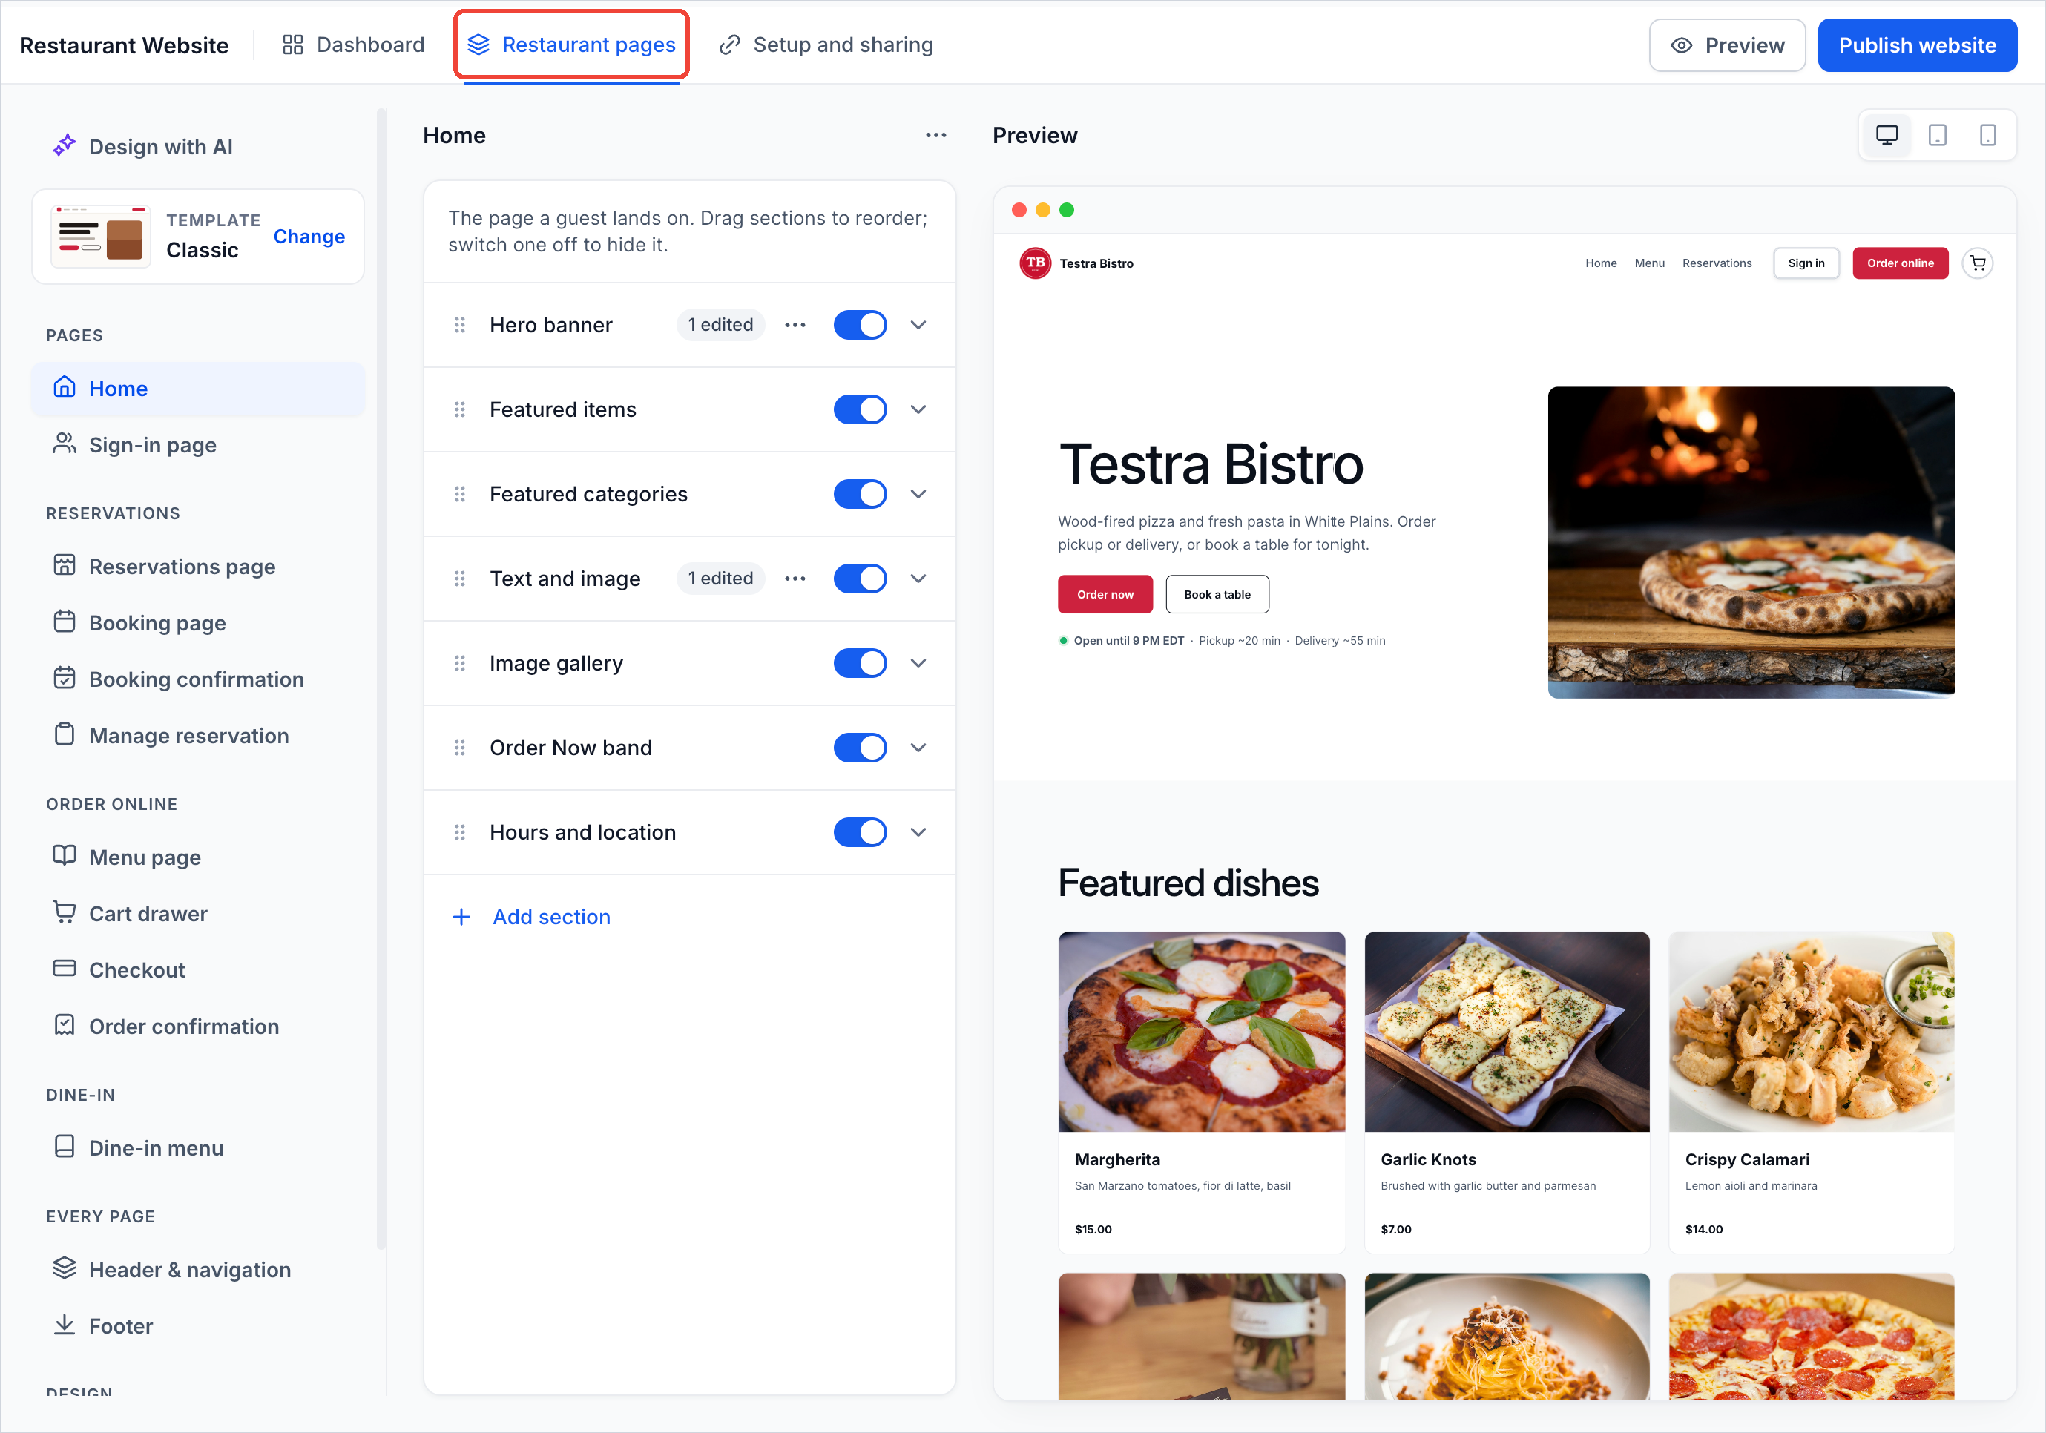
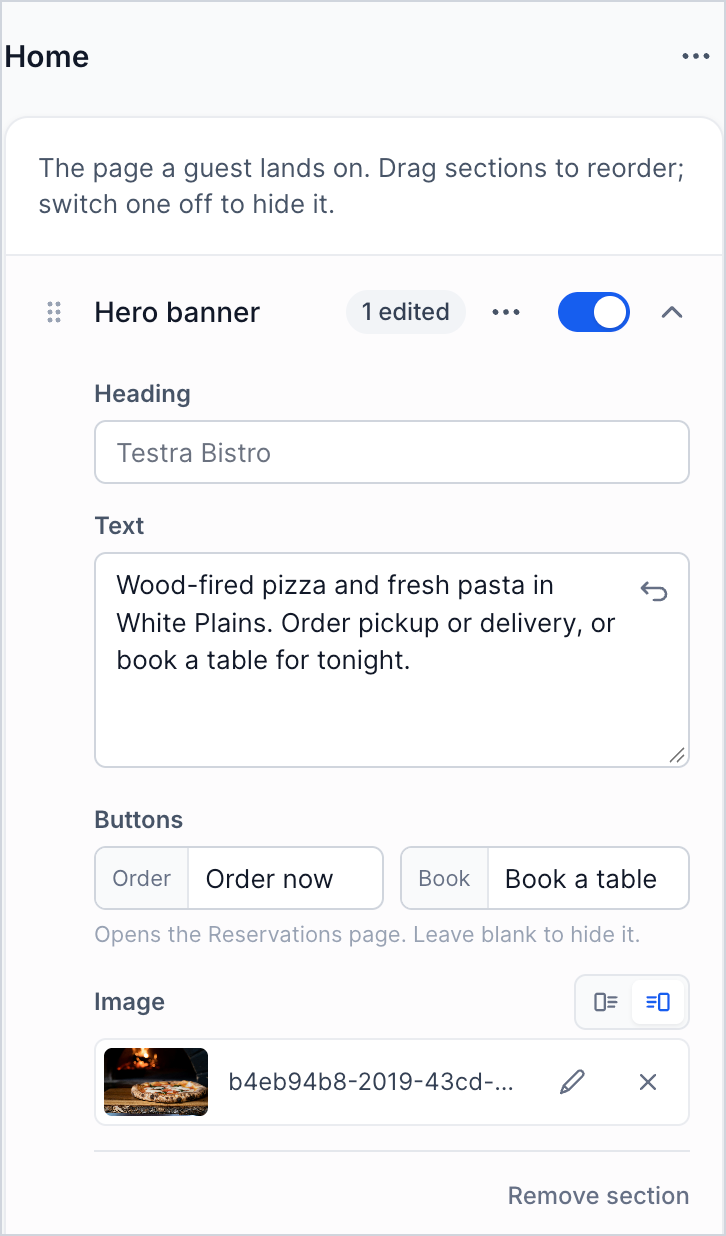
For the Home page, you can customize these sections:
Hero banner: The first thing guests see, with your name, a short line of text, buttons and a photo.
Featured items and Featured categories: Dishes and categories from your menu.
Text and image and Image gallery: Your story and photos.
Order Now band: A strip that sends guests to order.
Hours and location: Your address, phone, opening hours and directions.
Select any section to edit its content. You can also:
- Drag sections to change their order.
- Toggle sections on or off to control visibility.
- Click Add section to include more content.
- Select Remove section to delete an existing section.
For the Hero banner, you can update the heading, text, Order and Book buttons, and image. Leaving the Book button field empty hides that button.
Supported image formats include PNG, JPG, GIF, and WEBP, with a maximum file size of 5 MB. A resolution of 2160 × 1080 pixels is recommended.
Other pages have their own editable options. For example, you can modify the Sign-in page title or the Checkout page text and tip settings.
Use Header & navigation and Footer under Every page to update elements shared across your website.
Note: Menu items, prices, and categories are managed separately under Restaurants → Menu. Their visibility may depend on menu availability and ordering channel settings.
Customize Your Website Design
Website styles control the visual appearance of your pages. Choosing a consistent design helps keep your restaurant's branding recognizable throughout the ordering and reservation experience.
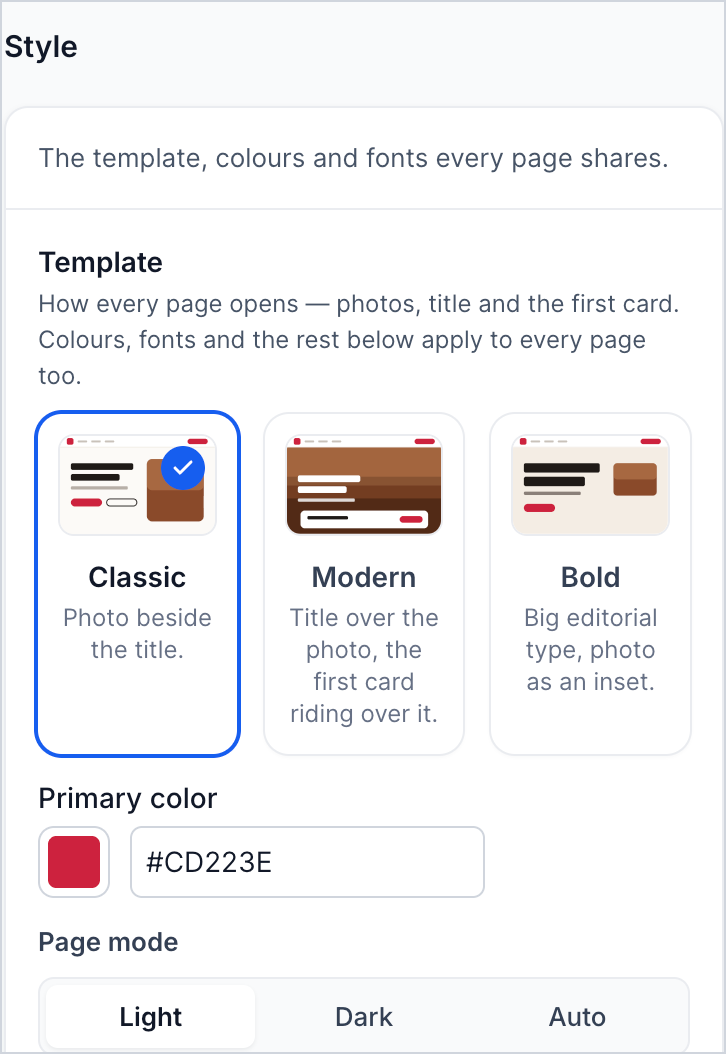
Navigate to Restaurant pages → Design → Style to configure:
| Setting | Available options |
|---|---|
| Template | Classic, Modern, or Bold |
| Primary color | Choose your brand's primary color, initially derived from your logo. |
| Page mode | Light, Dark, or Auto |
| Density | Compact, Comfortable, or Spacious |
| Corners | Sharp, Soft, or Rounded |
| Fonts | Preset font pairings, such as Modern sans, Editorial, or Classic, or individually selected heading and body fonts. |
The templates have different layouts: Classic positions the image beside the title, Modern places the title over the image, and Bold uses larger text with an inset image.
Configure Website Setup, Domain, and Tracking
The Setup and sharing tab controls how guests access your website, how your website appears when shared, and how supported visitor actions are tracked.
Landing Page, Guest Sign-In, and Contact Information
These settings determine which page guests see first, how they sign in during checkout, and where they find your restaurant's support information.
- Navigate to Setup and sharing → Setup.
- Under Landing page, select the page visitors should see when opening your website address.
- Review the Sign-in settings. Guests sign in using a one-time code sent to their email, and their saved details make future checkouts faster.
- Under Contact and footer, enter your Support email and Copyright line.
- Click Save changes.
You can use {{name}} and {{year}} in the copyright line to keep the restaurant name and year updated automatically.
Note: Under When guests check out, Require it is currently the available option. Never ask and Offer it are marked Coming soon.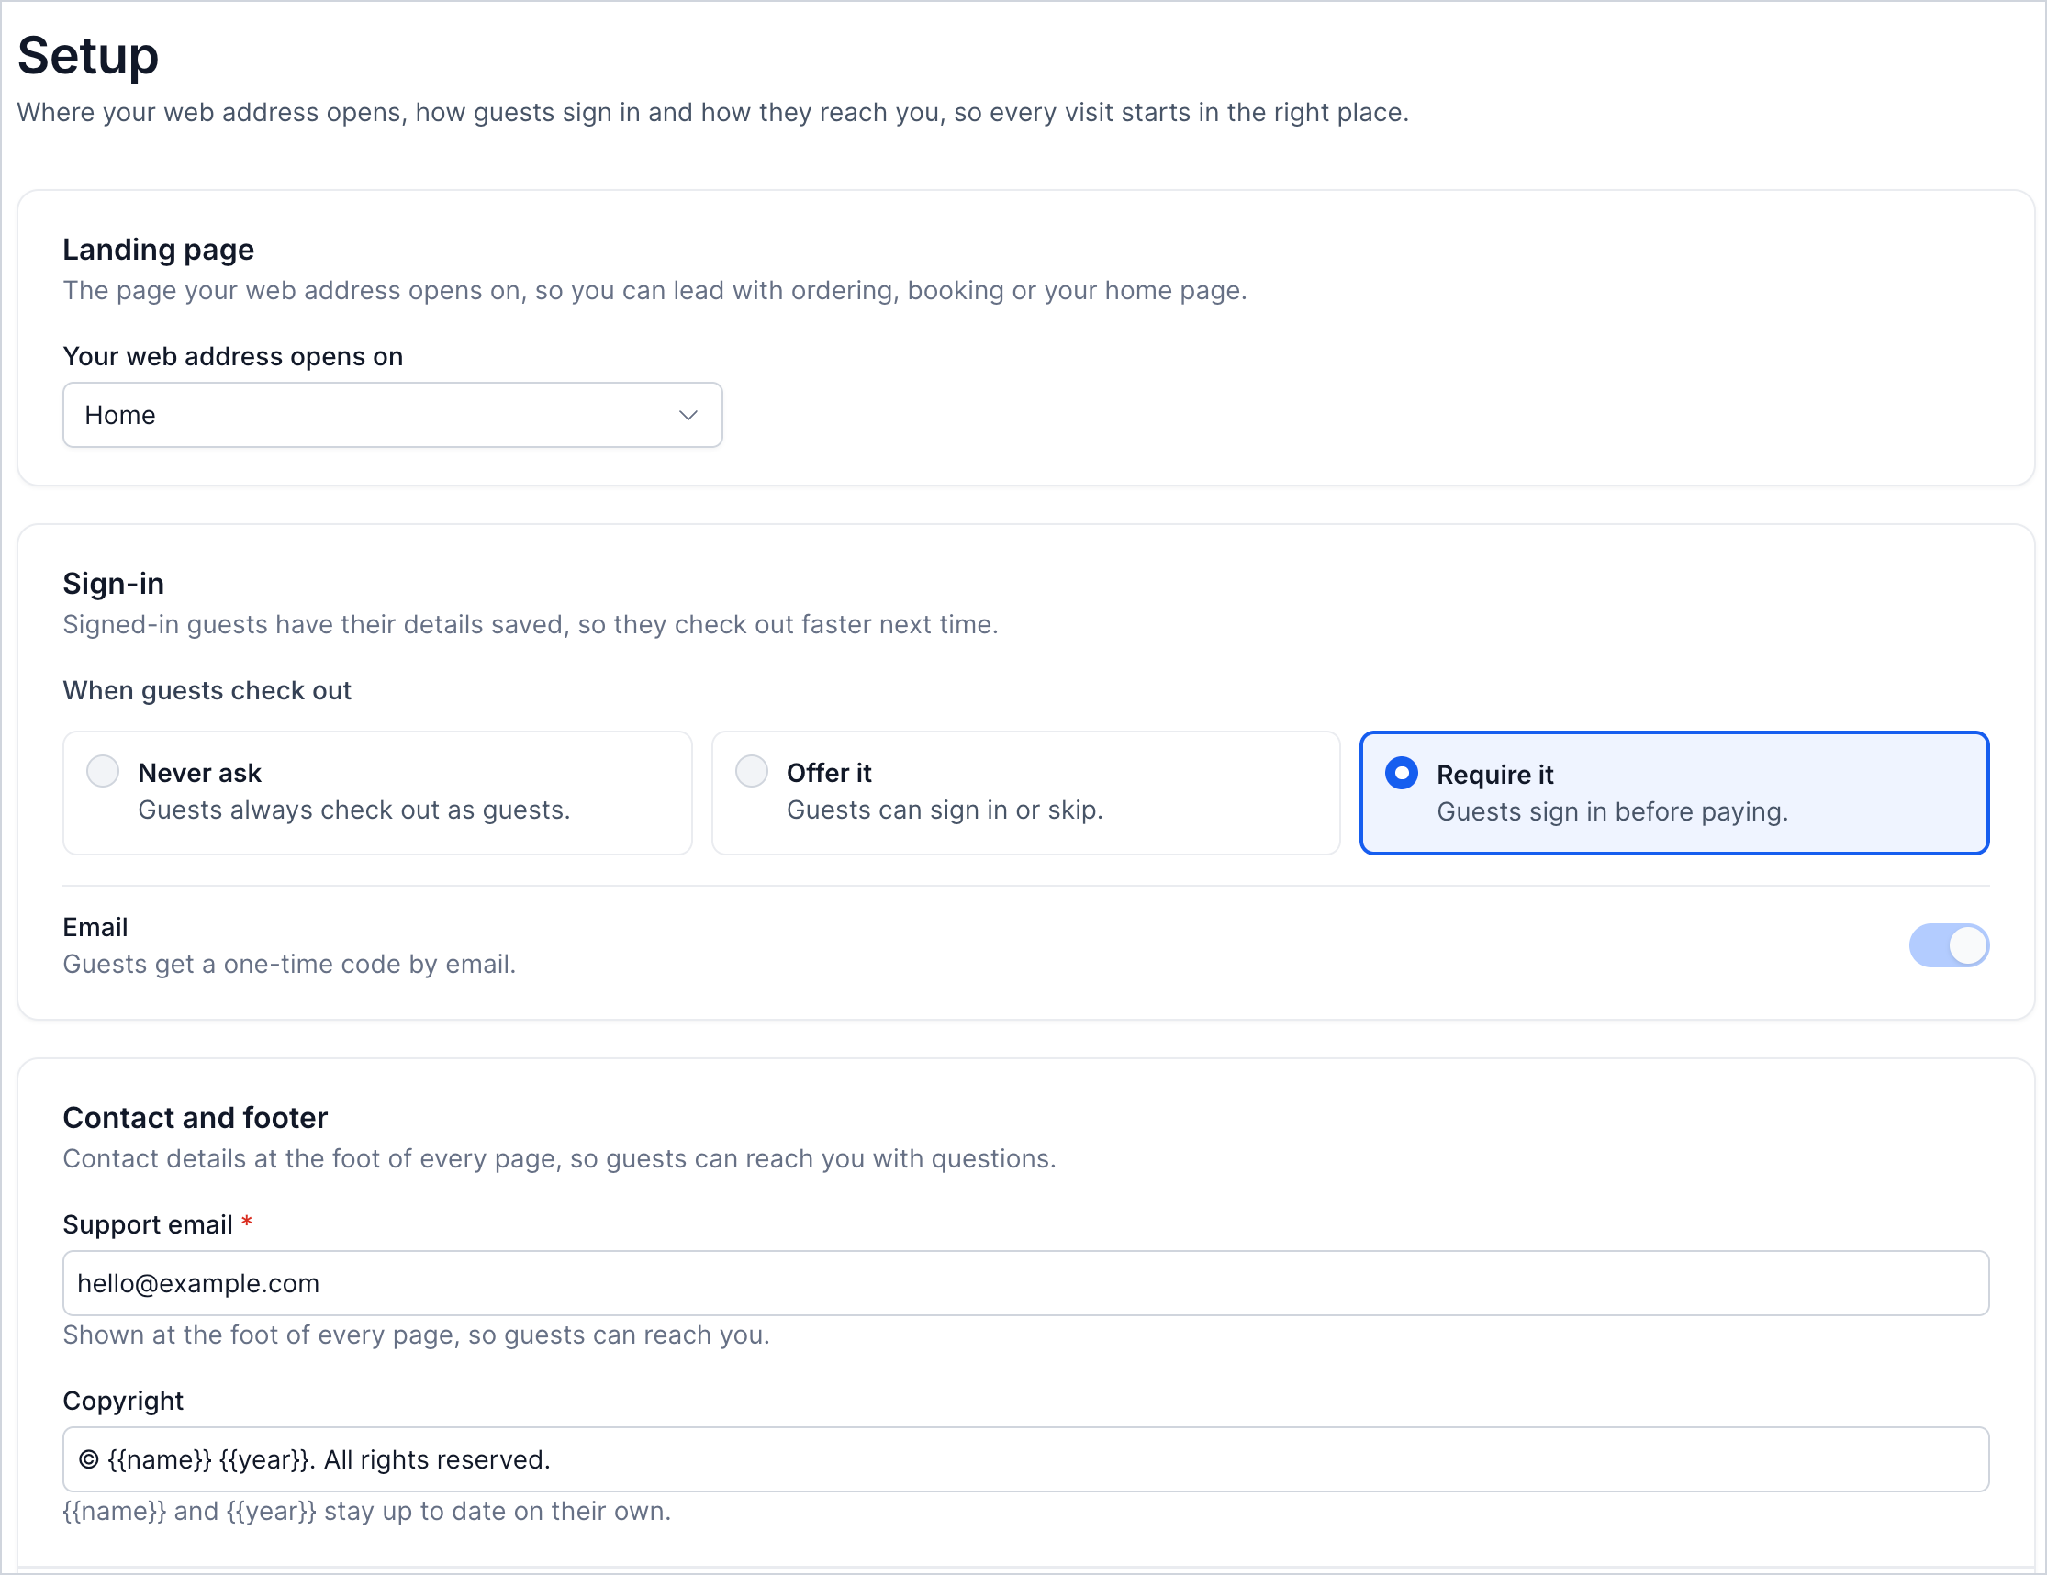
Domain and SEO Settings
Domain and SEO settings control your website address and how your restaurant website appears in browser tabs and shared links.
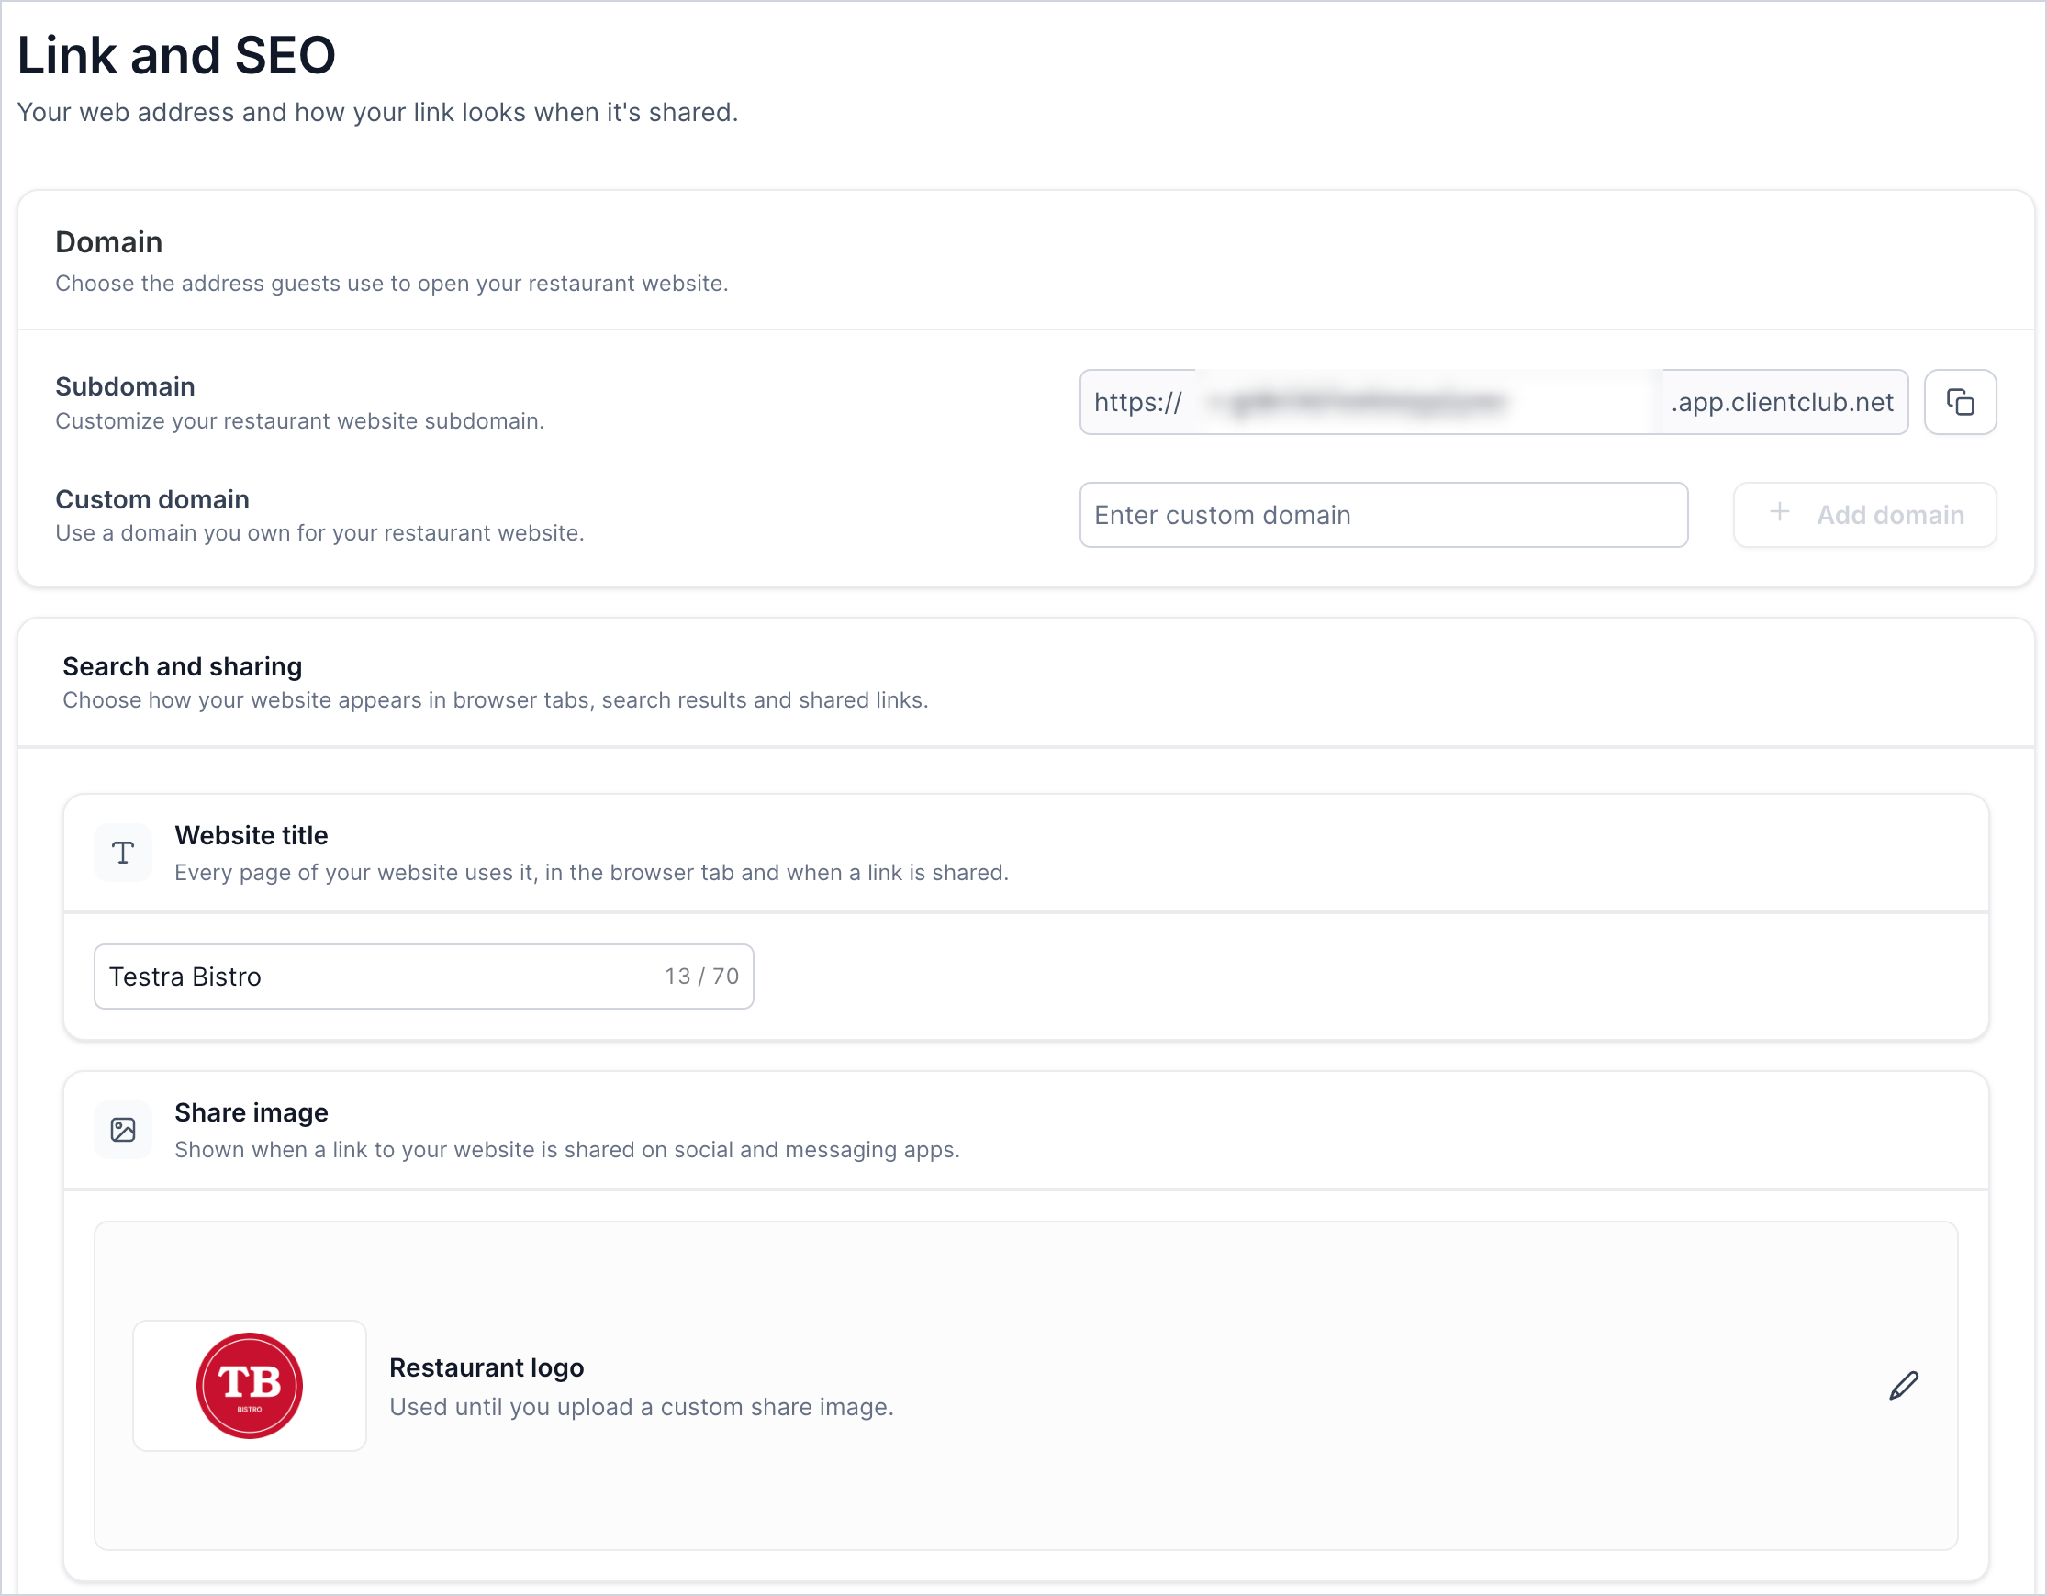
- Navigate to Setup and sharing → Link and SEO.
- Under Web Address, configure either:
- Subdomain: Edit the first part of your free website address, which ends in .app.clientclub.net. Use the copy icon to copy the full address.
- Custom domain: Enter a domain you own and click Add domain.
- Under Search and Sharing, configure:
- Website title: The title displayed in browser tabs and shared links, up to 70 characters.
- Share image: The image shown when your website link is shared. Your logo is used by default until you replace it.
- Favicon: The icon displayed in the browser tab. Your logo is used by default.
- Click Save changes.
Meta Pixel Tracking
Meta Pixel tracking helps you measure supported visitor interactions on your published restaurant website. Event mapping connects website actions to Meta events for reporting and campaign measurement.
To configure tracking:
Click the Setup and sharing tab, then Tracking.
Enter your Meta Pixel ID. You can find it in Meta Events Manager under Data sources.
Check the Event mapping. It shows which Meta event is sent when guests view a page, view or add a dish, start checkout, enter payment details, complete an order, start a booking, pay a deposit or complete a booking.
Click Save changes.
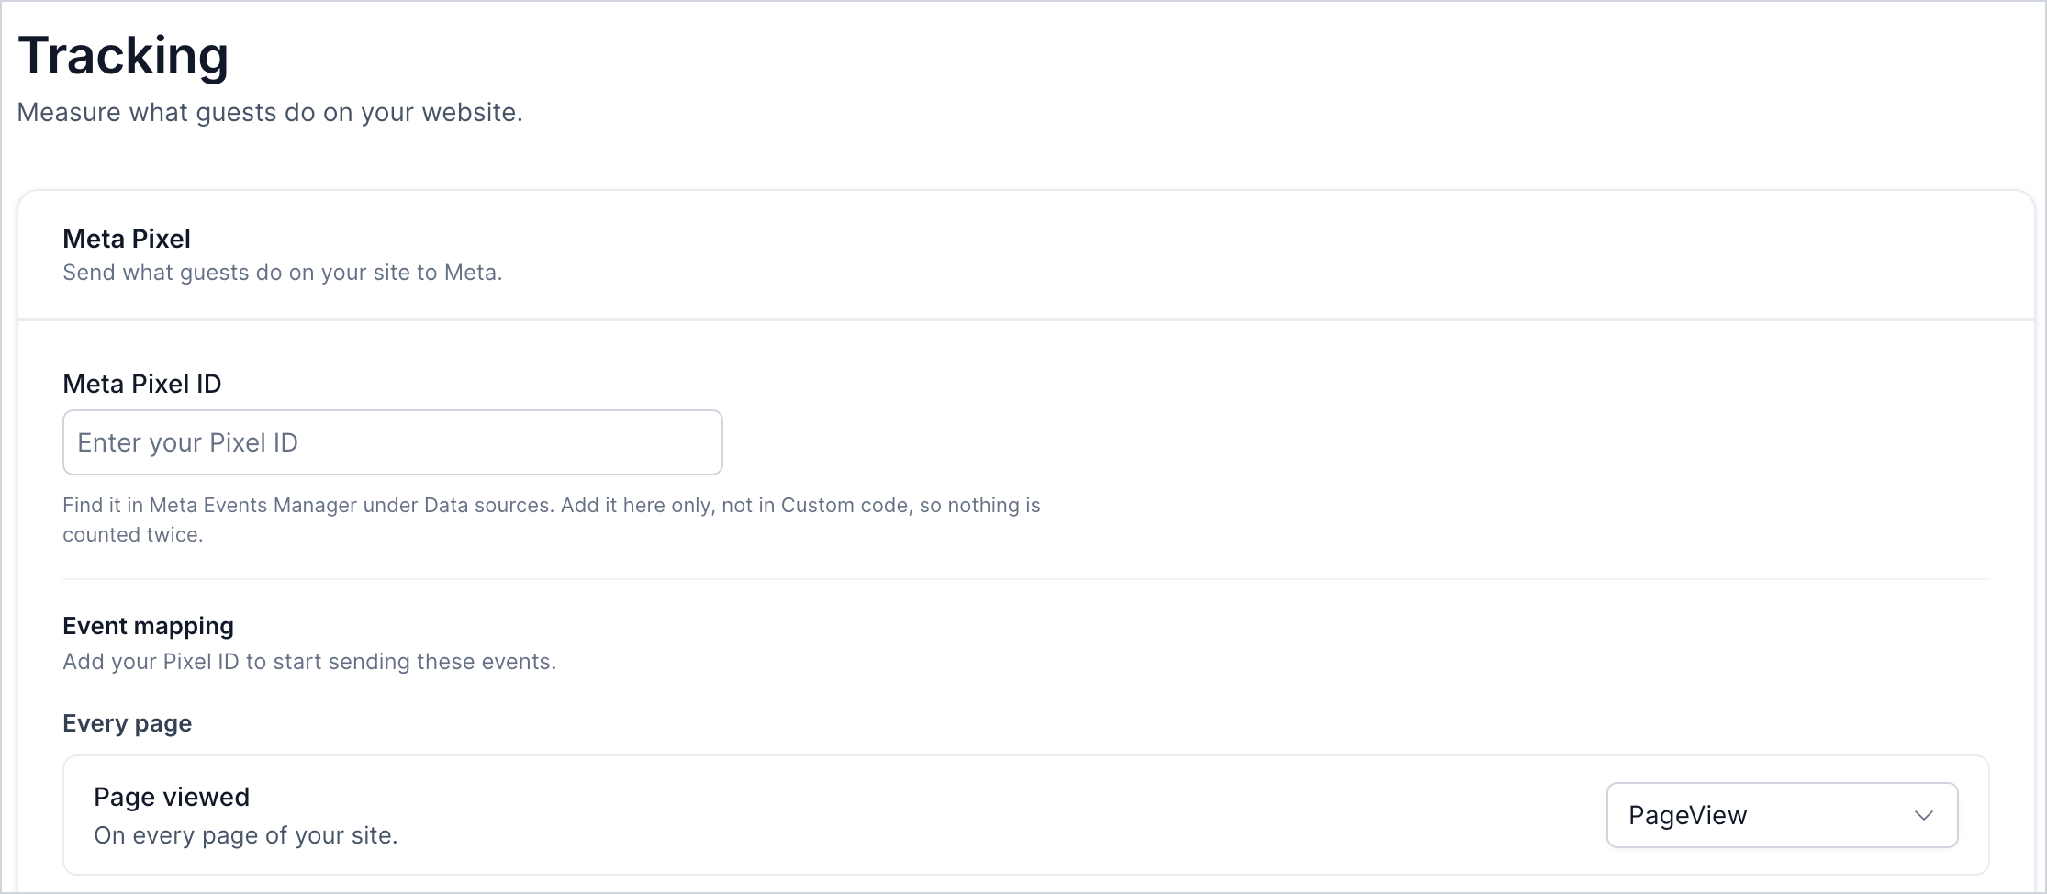
Important: Enter your Pixel ID only in the dedicated Tracking settings, not in Custom code, to avoid duplicate tracking. Events are sent from the published website, not from the editor.How to Preview and Publish Restaurant Website
Previewing your website before publishing helps you confirm that guests can navigate the pages, view your menu, and access the ordering and reservation options you have configured.
Click Preview in Restaurant pages, or Preview website on the dashboard, and check every page as a guest would.
If you made changes, save them first. Publish website asks you to save your changes before it publishes.
Click Publish website.
Once published, guests can access the website to place pickup and delivery orders or make reservations, based on your configured services.
Publishing also removes the Ordering off state in Restaurant Orders and makes online reservations available through your website.
Important: Before publishing, review Restaurant Settings → Checkout and payments and make sure Live mode is enabled to accept real orders and payments.Frequently Asked Questions
Q: Do I need a website to take orders?
Guests need your website to order pickup and delivery and to book a table online. Your team can take dine-in orders and book tables without it.
Q: Where does my website get my menu and hours?
From Menu and Restaurant Settings > Restaurant details. Change them there, and your website shows the change.
Q: Can I use my own domain?
Yes. In Setup and sharing > Link and SEO, enter your domain under Custom domain and click Add domain.
Q: How do guests sign in?
With their email. They get a one-time 6-digit code, and their details are saved so they check out faster next time.
Q: How do I hide a section on my home page?
In Restaurant pages > Home, switch the section off.
Q: Why does Publish website ask me to save first?
You have changes that are not saved yet. Save them, then publish.
Related Articles
- How to Create a Restaurant Menu in Chat To Clients CRM
- How to Manage and Customize a Restaurant Menu in Chat To Clients CRM
- Restaurant Orders: How to Manage Orders and Payments