
Restaurant Setup Guide: Get Ready to Take Orders and Reservations
Restaurant Setup in Chat To Clients CRM helps you prepare your restaurant for online orders and table reservations. Follow a six-step checklist to add your business information, connect payments, create a menu, configure fulfillment, and set up seating and bookings. Once completed, preview and publish your restaurant website so customers can order and reserve tables.
TABLE OF CONTENTS
- What Is Restaurant Setup Guide?
- Key Benefits of Restaurant Setup
- Before You Start
- How to Open Restaurant Setup
- Step 1: Add Your Restaurant Details
- Step 2: Connect a Payment Provider
- Step 3: Add Your Menu
- Step 4: Set Up Pickup and Delivery
- Step 5: Add Your Areas and Tables
- Step 6: Set Up Reservations
- After You Finish Setup
- Change Your Settings Later
- Frequently Asked Questions
- Related Articles
What Is Restaurant Setup Guide?
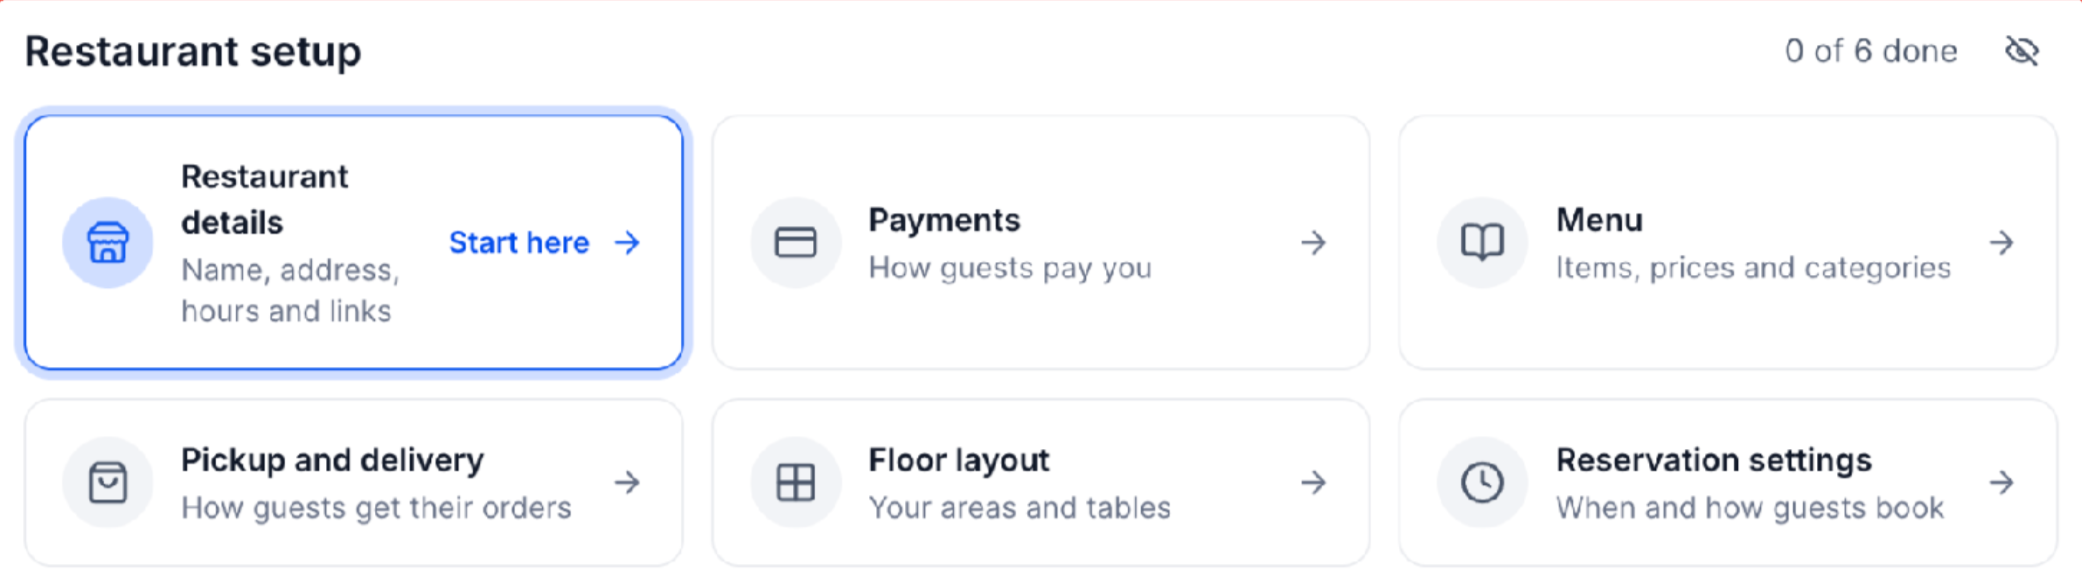
Restaurant Setup appears under Restaurants > Overview. The checklist groups tasks into Business, Ordering, and Reservations, with a counter showing how many of the six steps are complete
| Group | Step | What You Configure |
|---|---|---|
| Business | Restaurant details | Name, branding, location, hours, links |
| Business | Payments | Payment provider |
| Ordering | Menu | Categories, items, prices |
| Ordering | Pickup and delivery | Preparation time, fulfillment, delivery fees |
| Reservations | Floor layout | Dining areas, tables, capacities |
| Reservations | Reservation settings | Booking hours, deposits, table times |
Key Benefits of Restaurant Setup
The checklist organizes initial configuration and shows what remains incomplete.
- Guided progress: Green checks identify completed tasks.
- Fast menu import: Build and review items from uploaded files.
- Flexible fulfillment: Set pickup hours, delivery areas, and fees.
- Table booking: Match reservations to your seating plan.
- Shared settings: Reuse business information and store hours.
- Resume anytime: Skip and revisit steps.
Before You Start
Prepare these details before opening the checklist.
| Requirement | Have Ready |
|---|---|
| Access | Restaurants menu and permissions for business and payment settings |
| Business | Logo (PNG/JPG/GIF, up to 2.5 MB), address, contacts, hours |
| Menu | Photo, PDF, spreadsheet, or webpage |
| Delivery | Coverage distance, fees, estimated times, if offered |
| Seating | Dining areas, tables, and seat counts |
How to Open Restaurant Setup
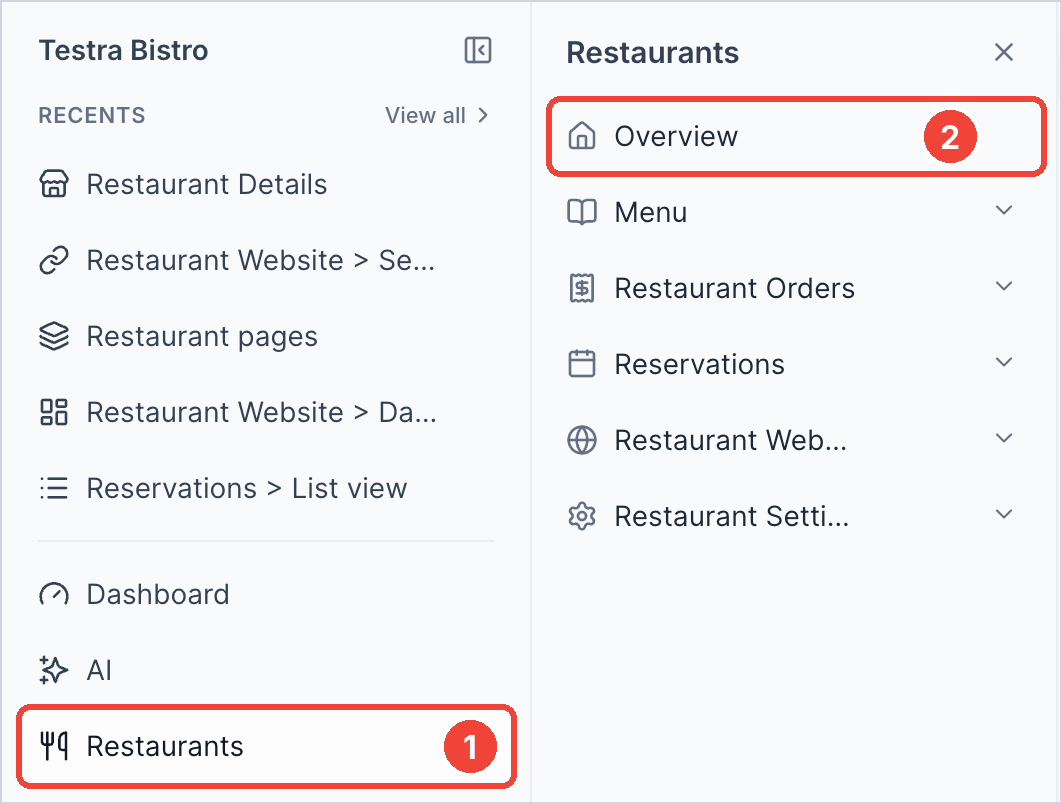
Access the six-step checklist from your restaurant dashboard.
- Open Restaurants > Overview.
- Find Restaurant setup and select Restaurant details (Start here) or another step.
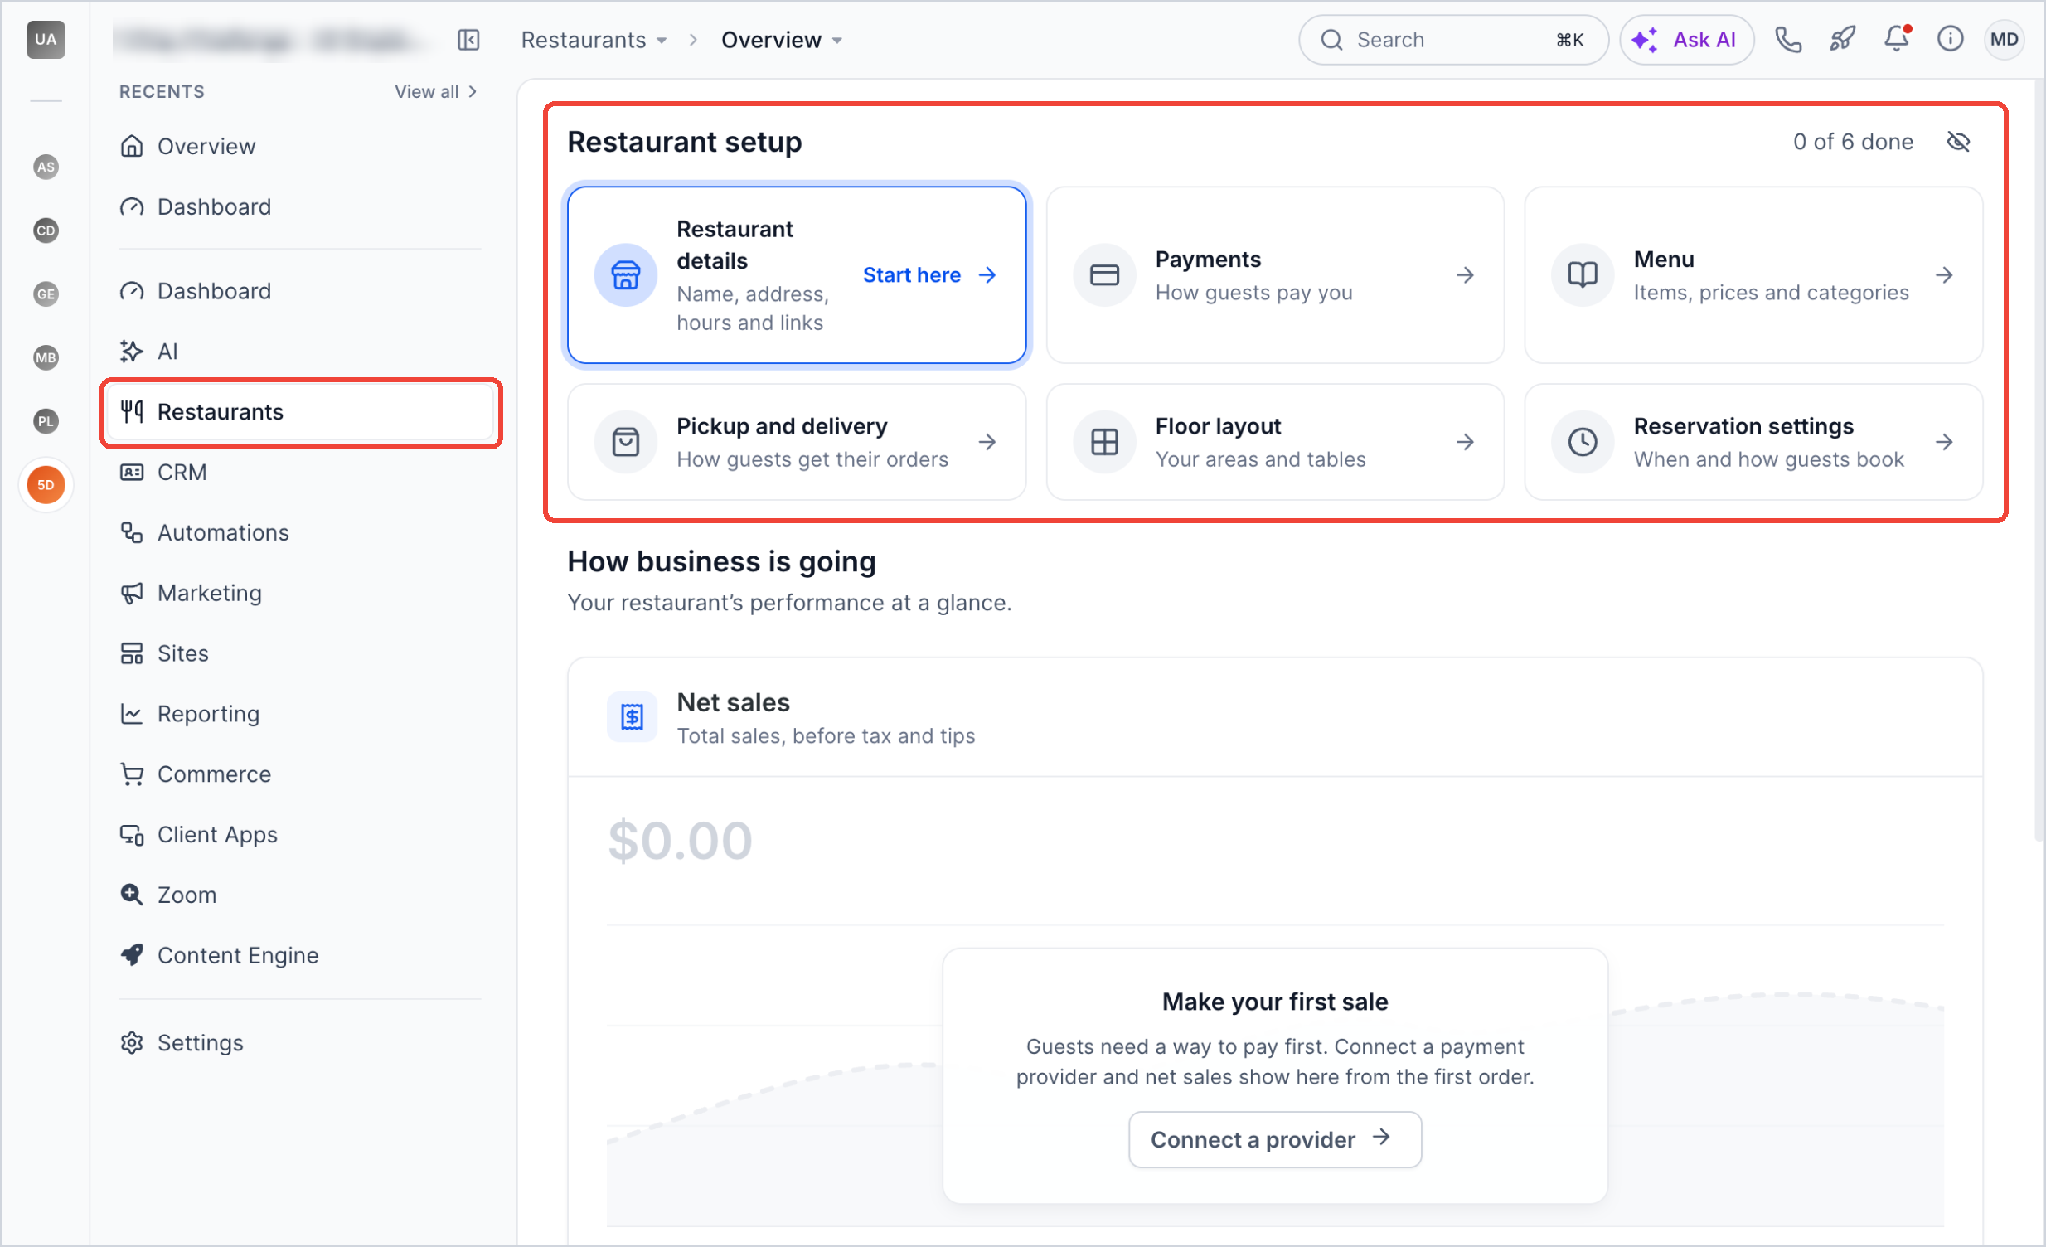
Completed steps show a green check. Use Back, Skip for now, or the left panel to navigate.
Step 1: Add Your Restaurant Details
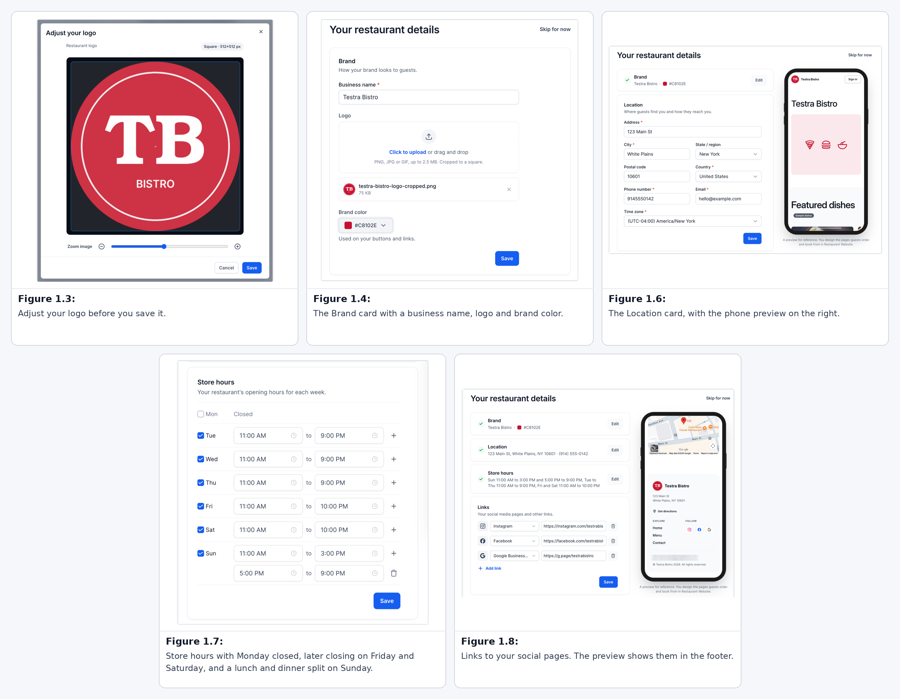
Configure the information customers see and the hours used by restaurant services. Save each card.
| Card | How to Configure |
|---|---|
| Brand | Enter the business name, upload a PNG/JPG/GIF logo, adjust its square crop using Zoom image, and choose a brand color. |
| Location | Enter address, city, state/region, postal code, country, phone, email, and time zone. |
| Store hours | Check open days and select times. Use + for another shift; uncheck closed days. |
| Links | Choose a link type, enter the URL, and use Add link for more. |
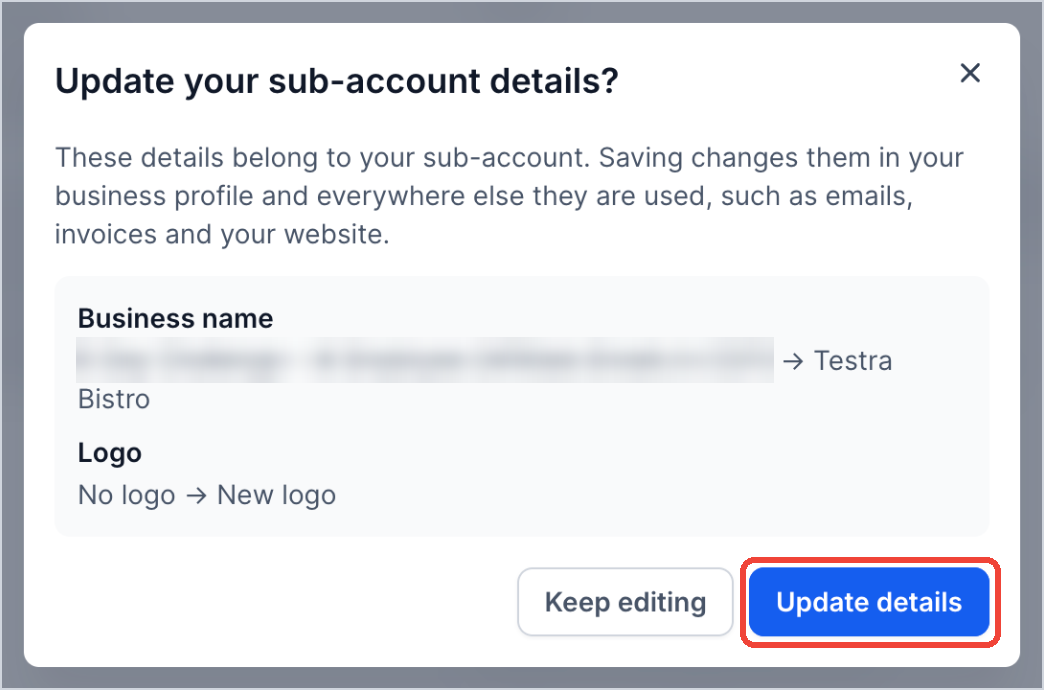
Important: Changing your name, logo, or location may affect your sub-account's business profile, emails, invoices, and website. Choose Update details to confirm or Keep editing to return.
Holiday closures can be added later under Restaurant Settings > Restaurant details > Add closure.
When all four cards are saved, the step gets a green check.
Step 2: Connect a Payment Provider
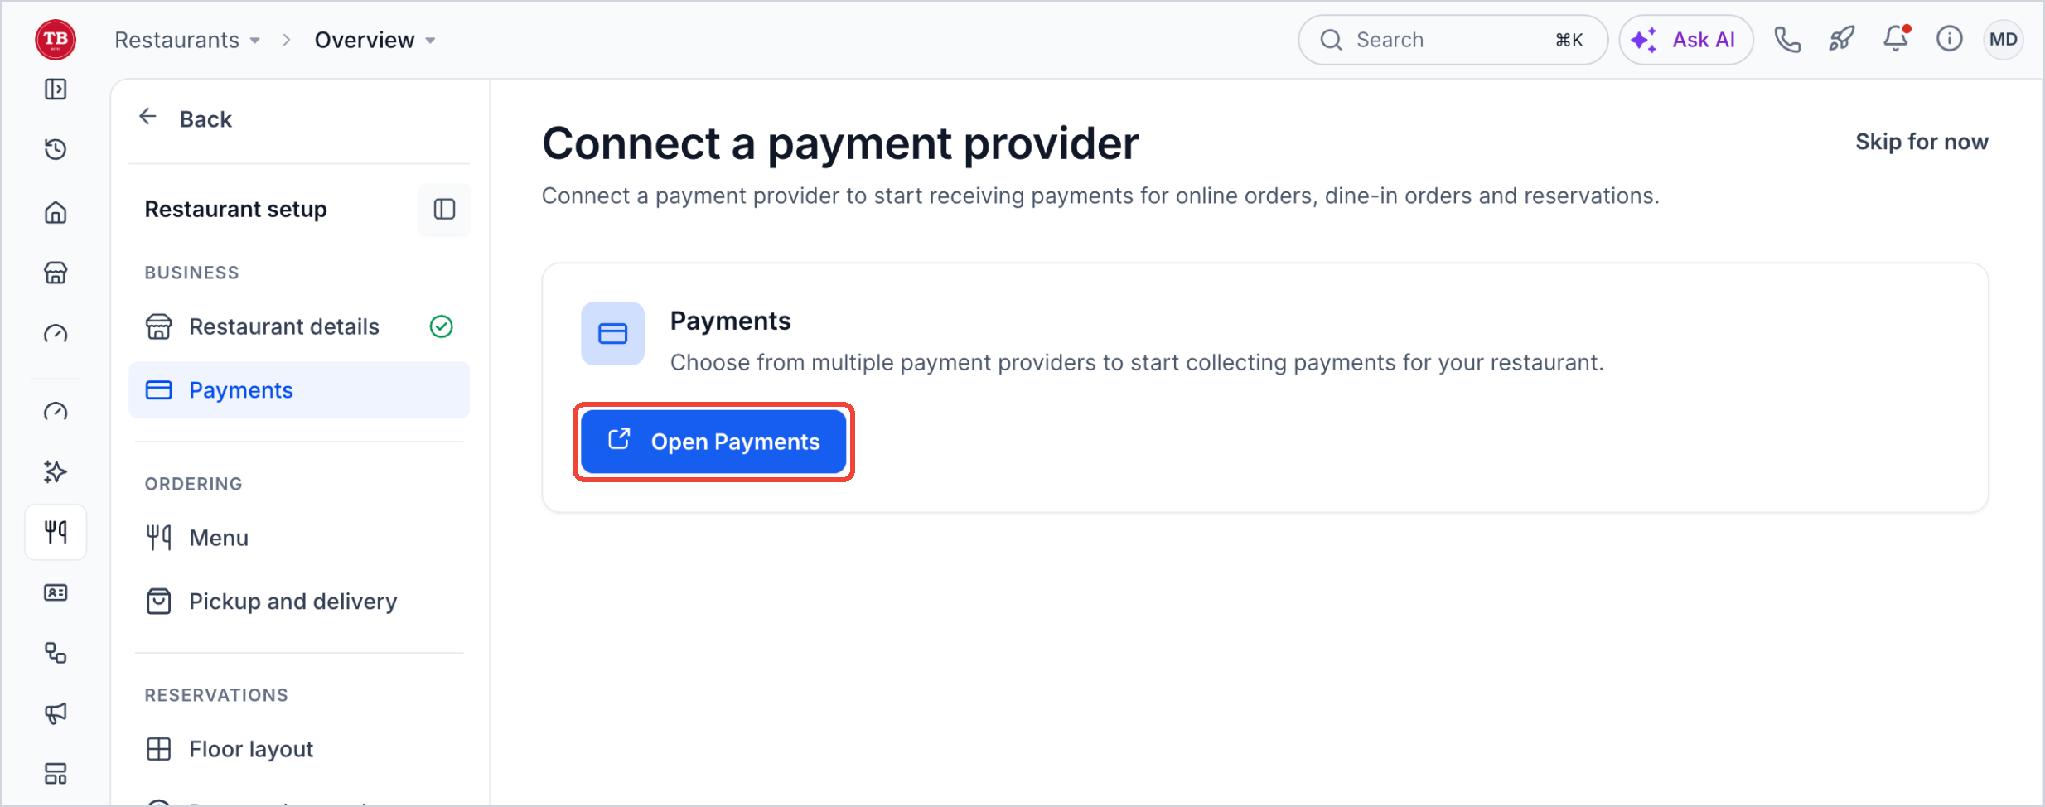
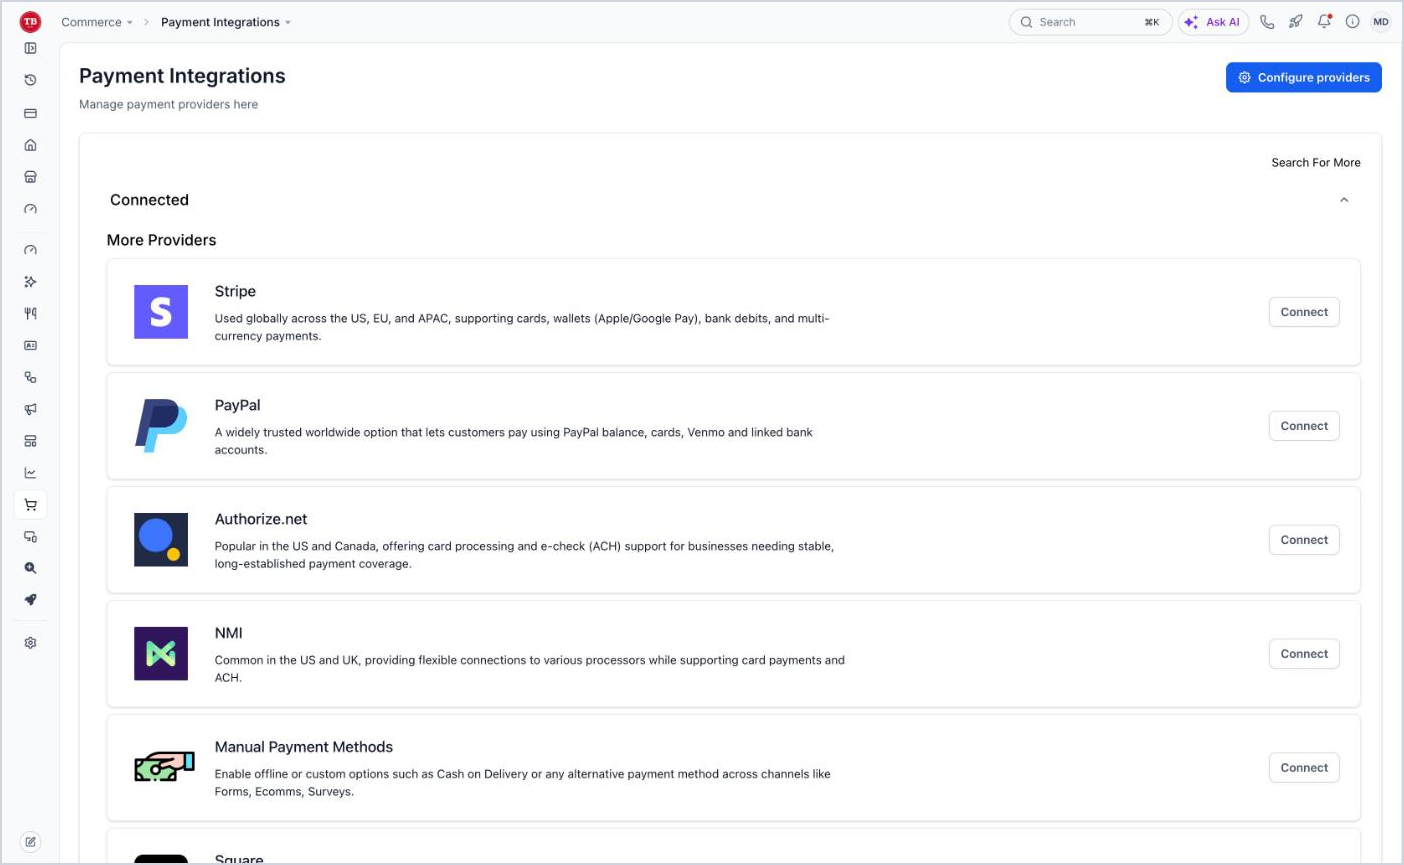
Connect a provider for restaurant payments. Payment Integrations opens in another browser tab.
- Select Open Payments.
- In Payment Integrations, select Connect beside your provider and follow the prompts.
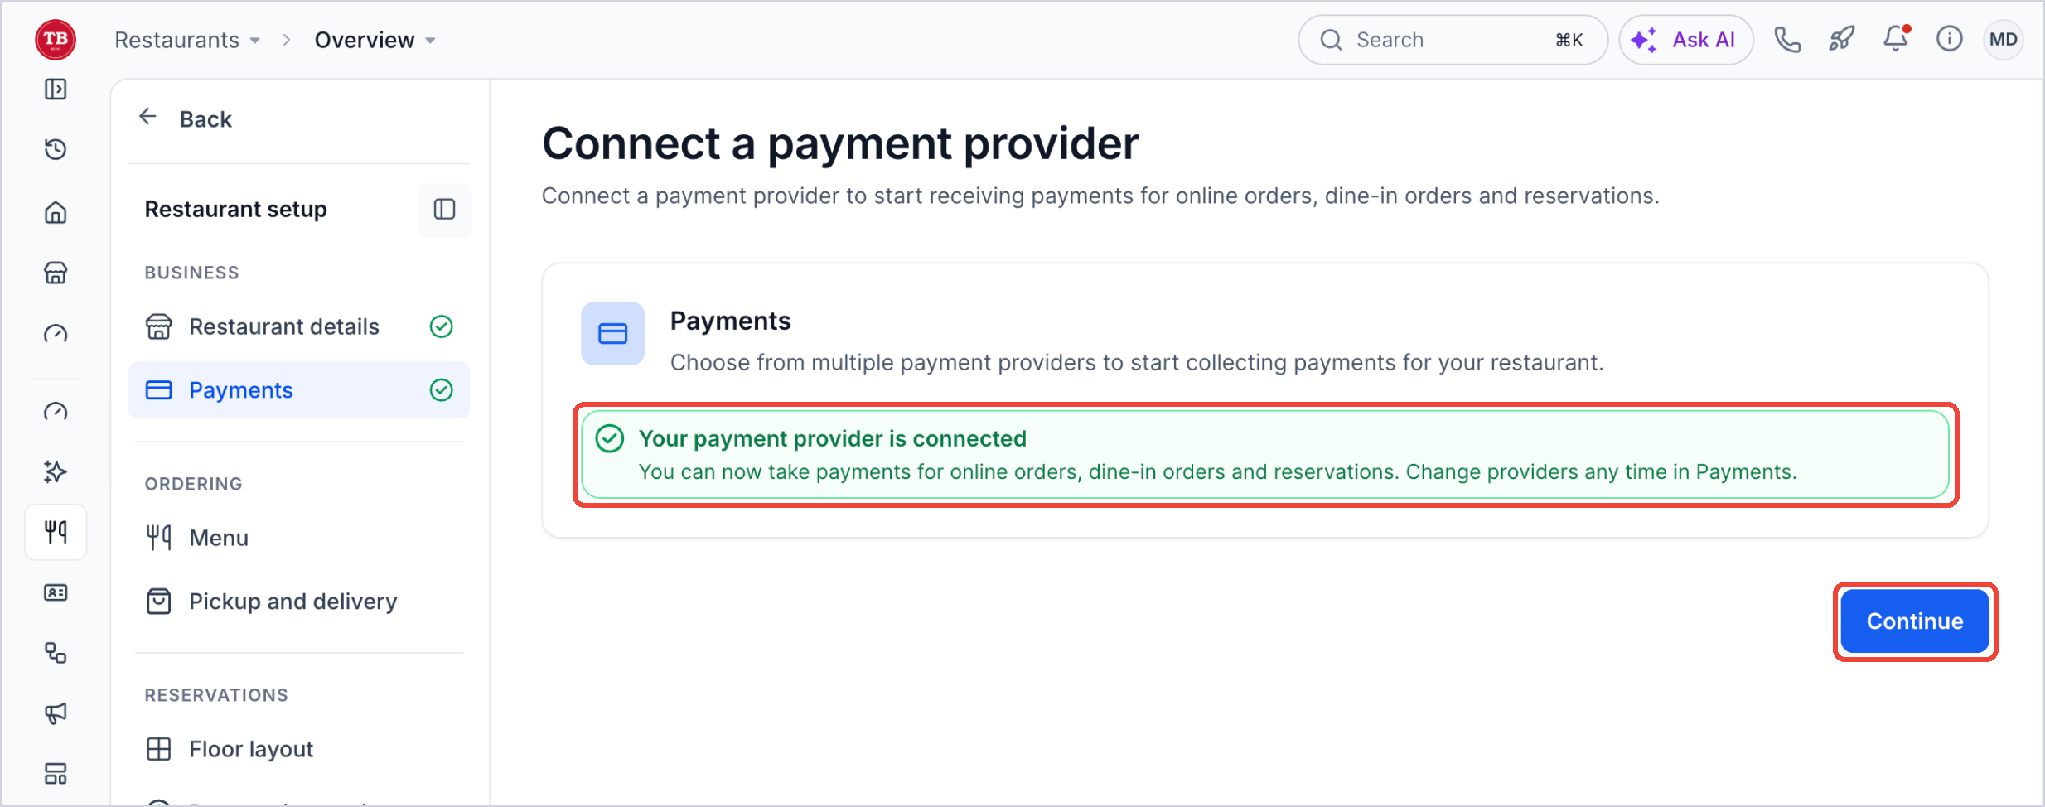
- Return to setup, confirm Your payment provider is connected, and select Continue.
For Stripe, see Getting Started - Connect Stripe. Change providers later in Payments.
Step 3: Add Your Menu
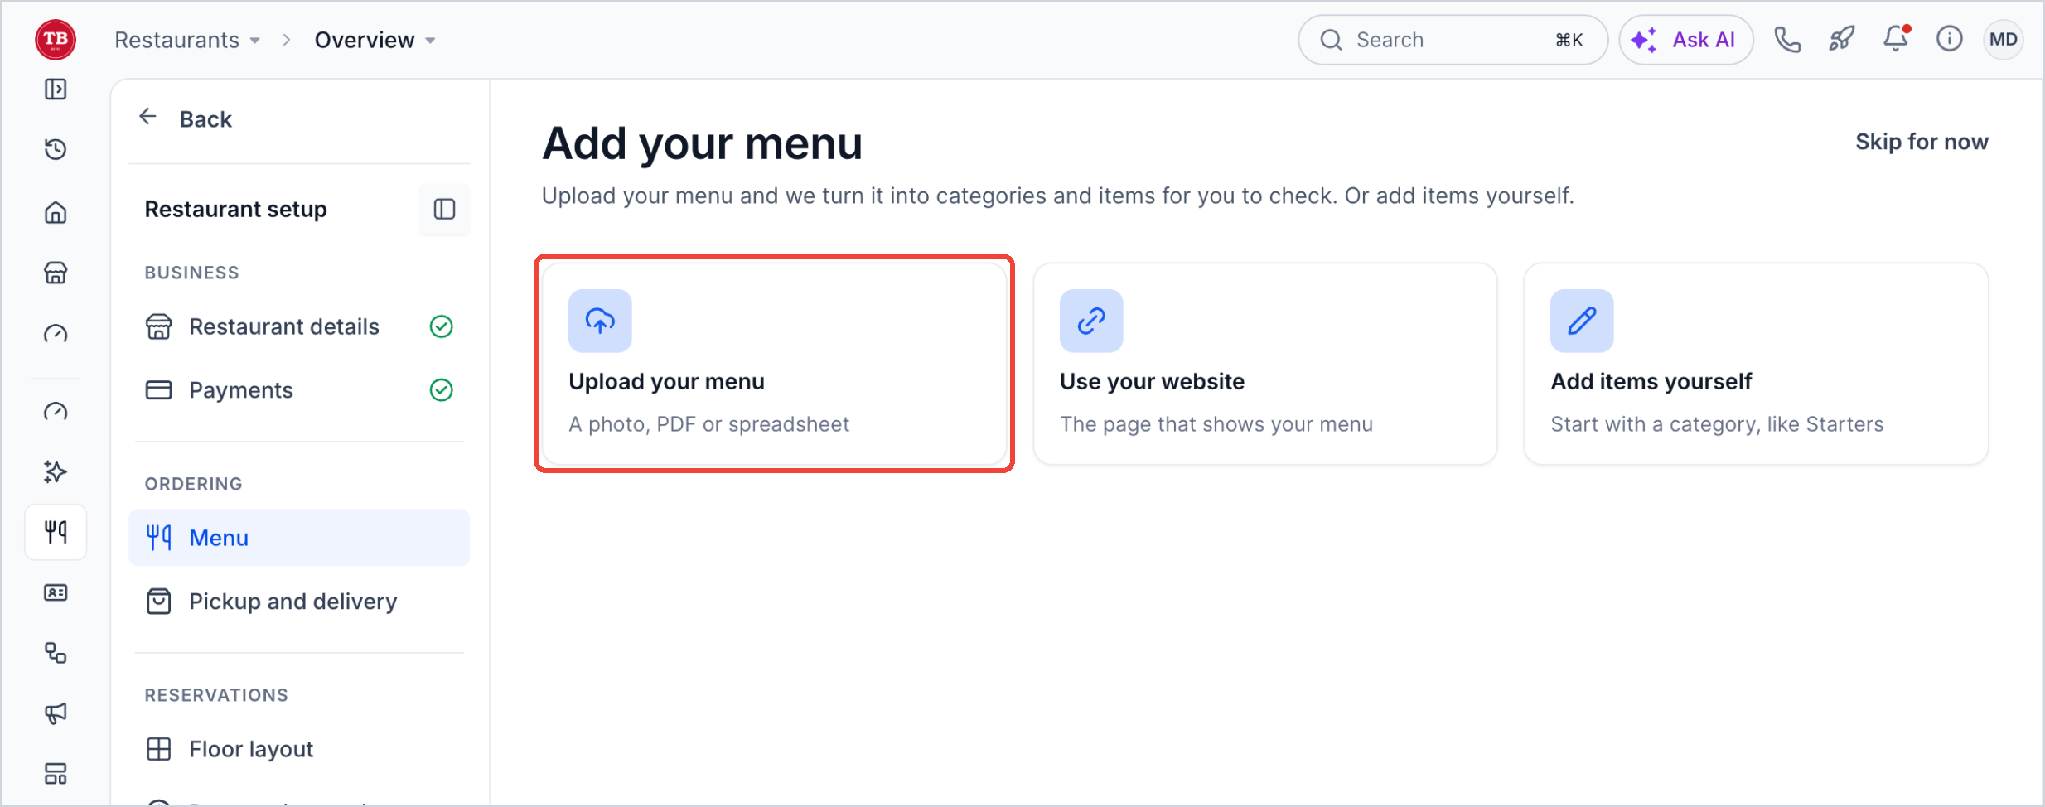
Create categories, items, and prices using one of three methods.
| Method | Description |
|---|---|
| Upload your menu | Import a photo, PDF, or spreadsheet for review. |
| Use your website | Use your existing online menu page. |
| Add items yourself | Build categories and items manually. |
Upload Your Menu
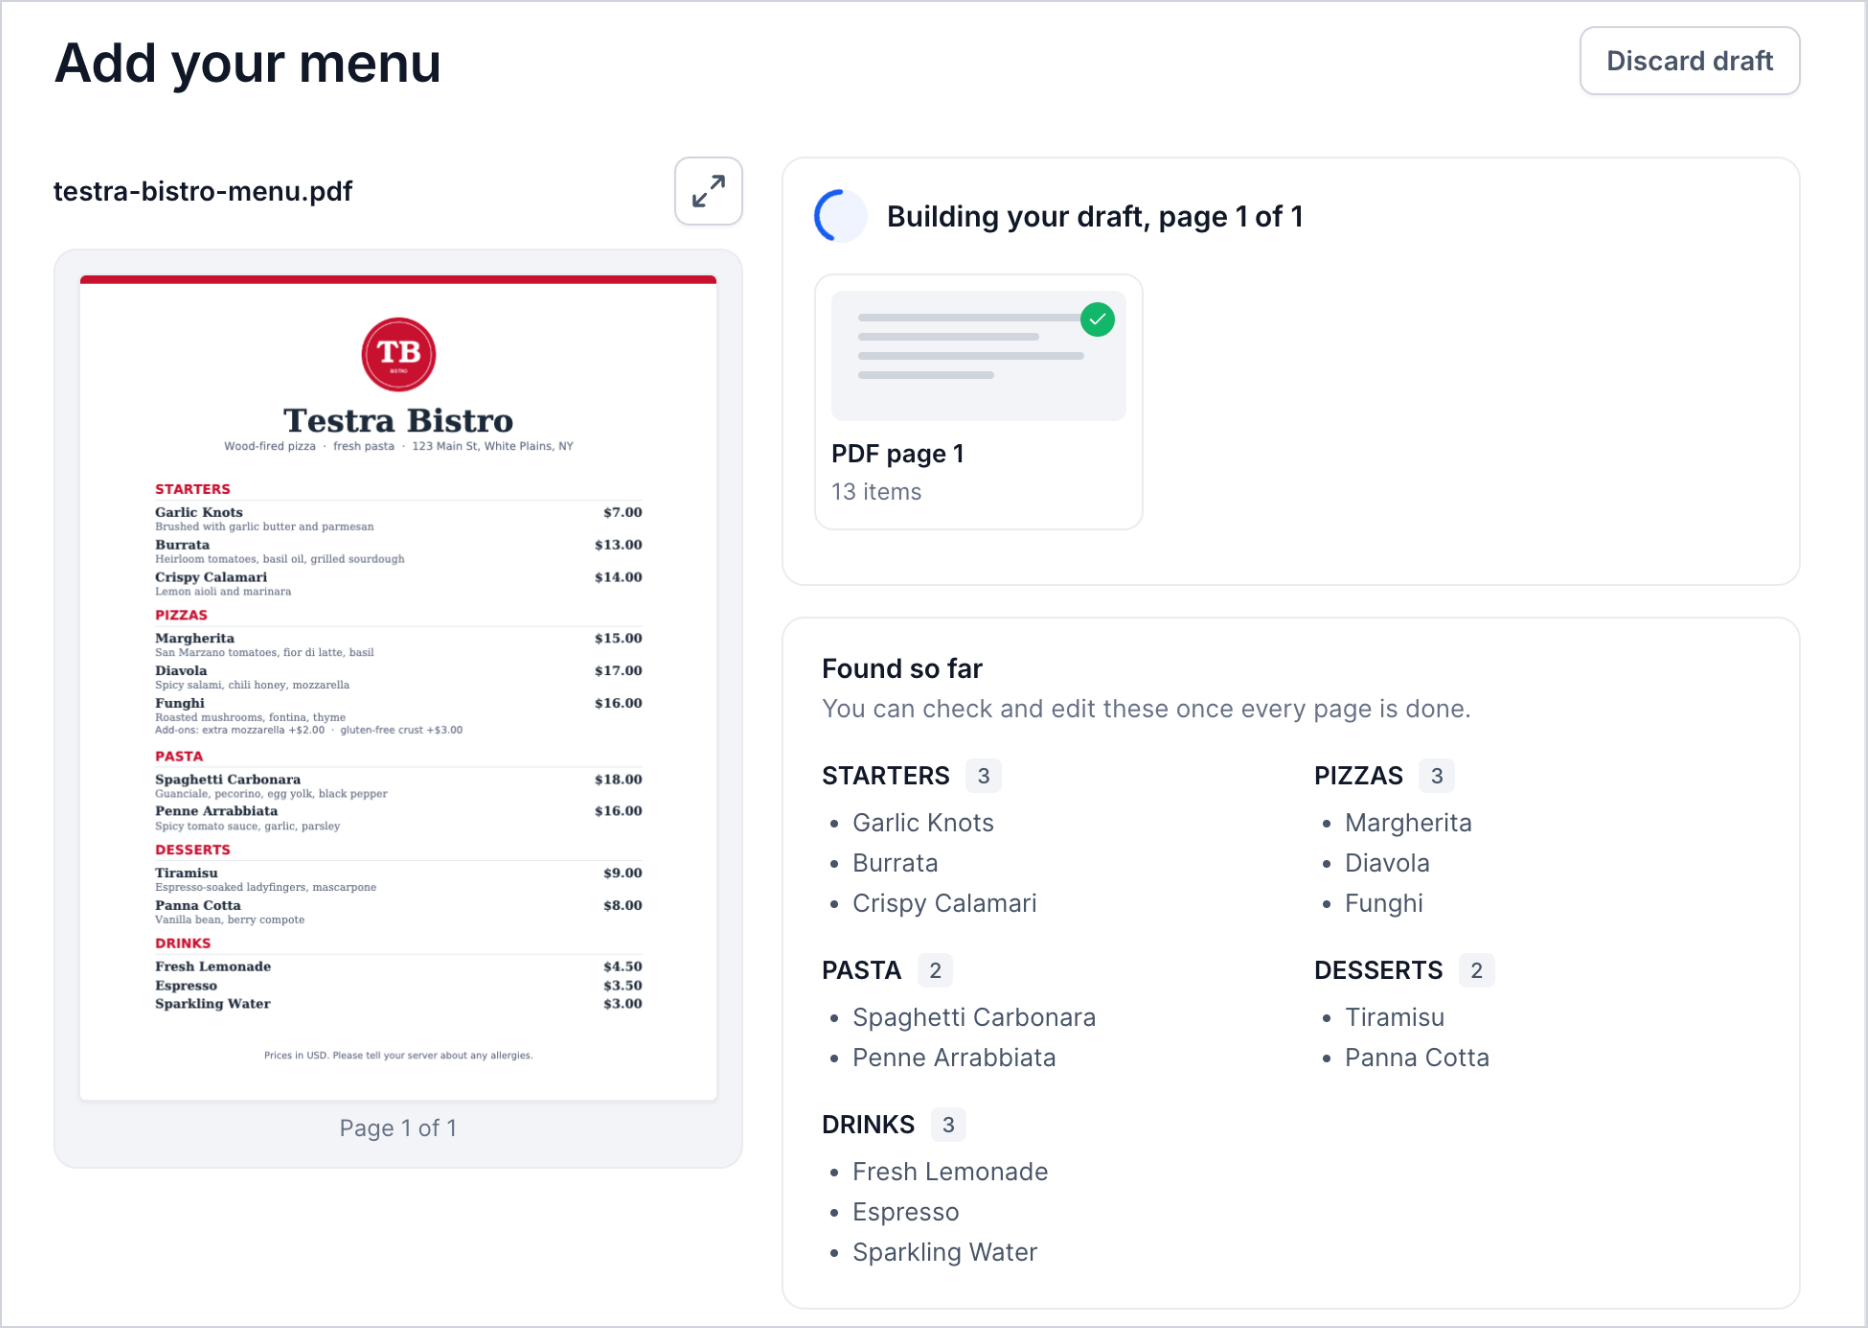
The import creates an editable draft before anything is added.
- Select Upload your menu, choose files, and click Upload menu. Supports PDF, JPG, PNG, WEBP, CSV, and XLSX (up to 50 MB each, 15 files per upload). A sample spreadsheet is available.
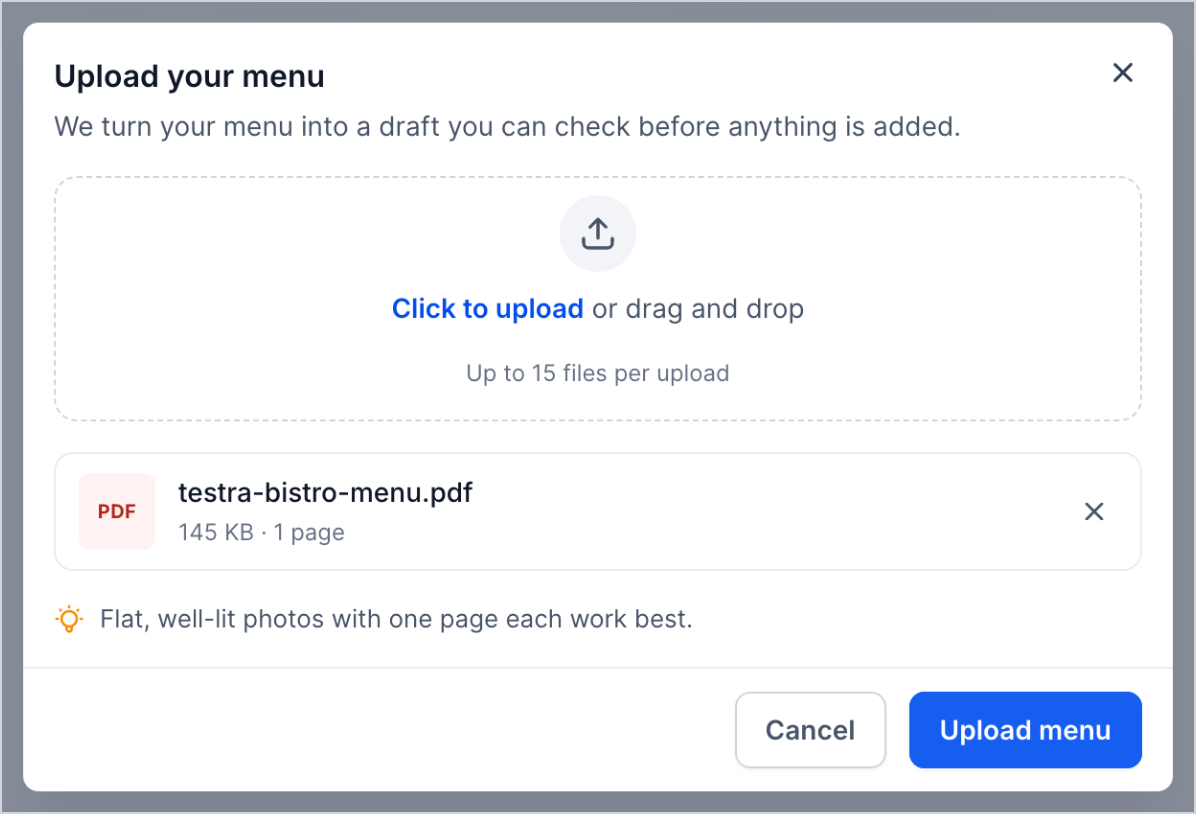
- Wait while Found so far lists recognized categories and items.
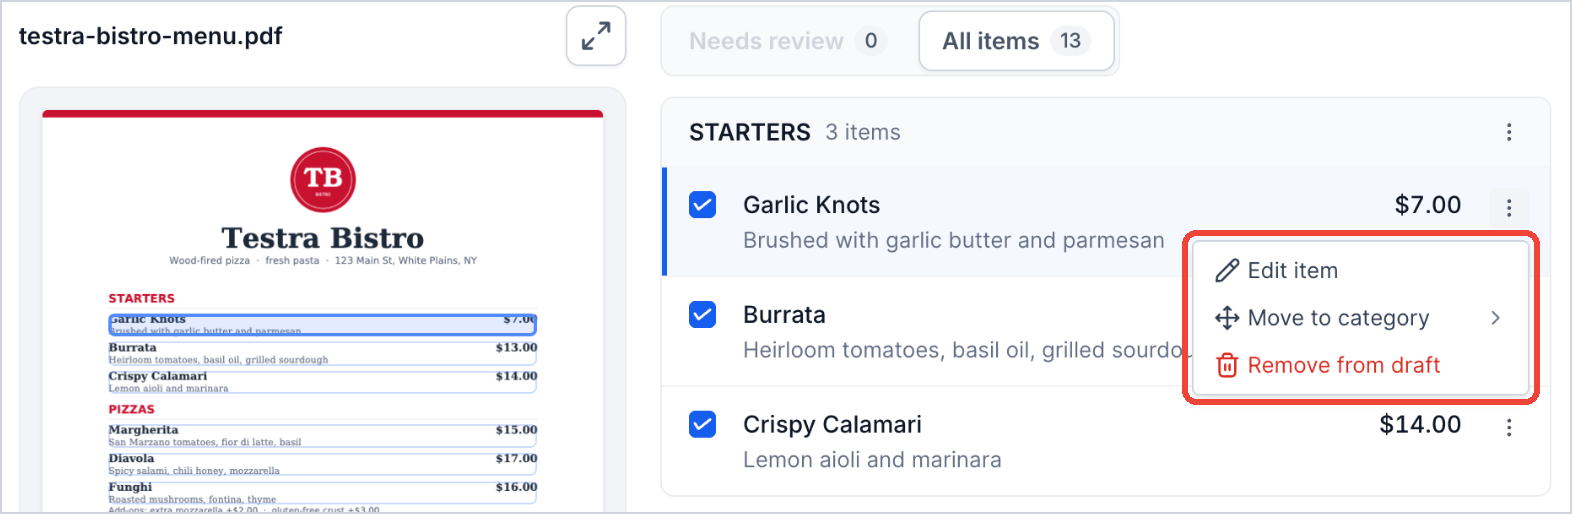
- Check All items and Needs review. Use the three-dot menu to Edit item, Move to category, or Remove from draft.
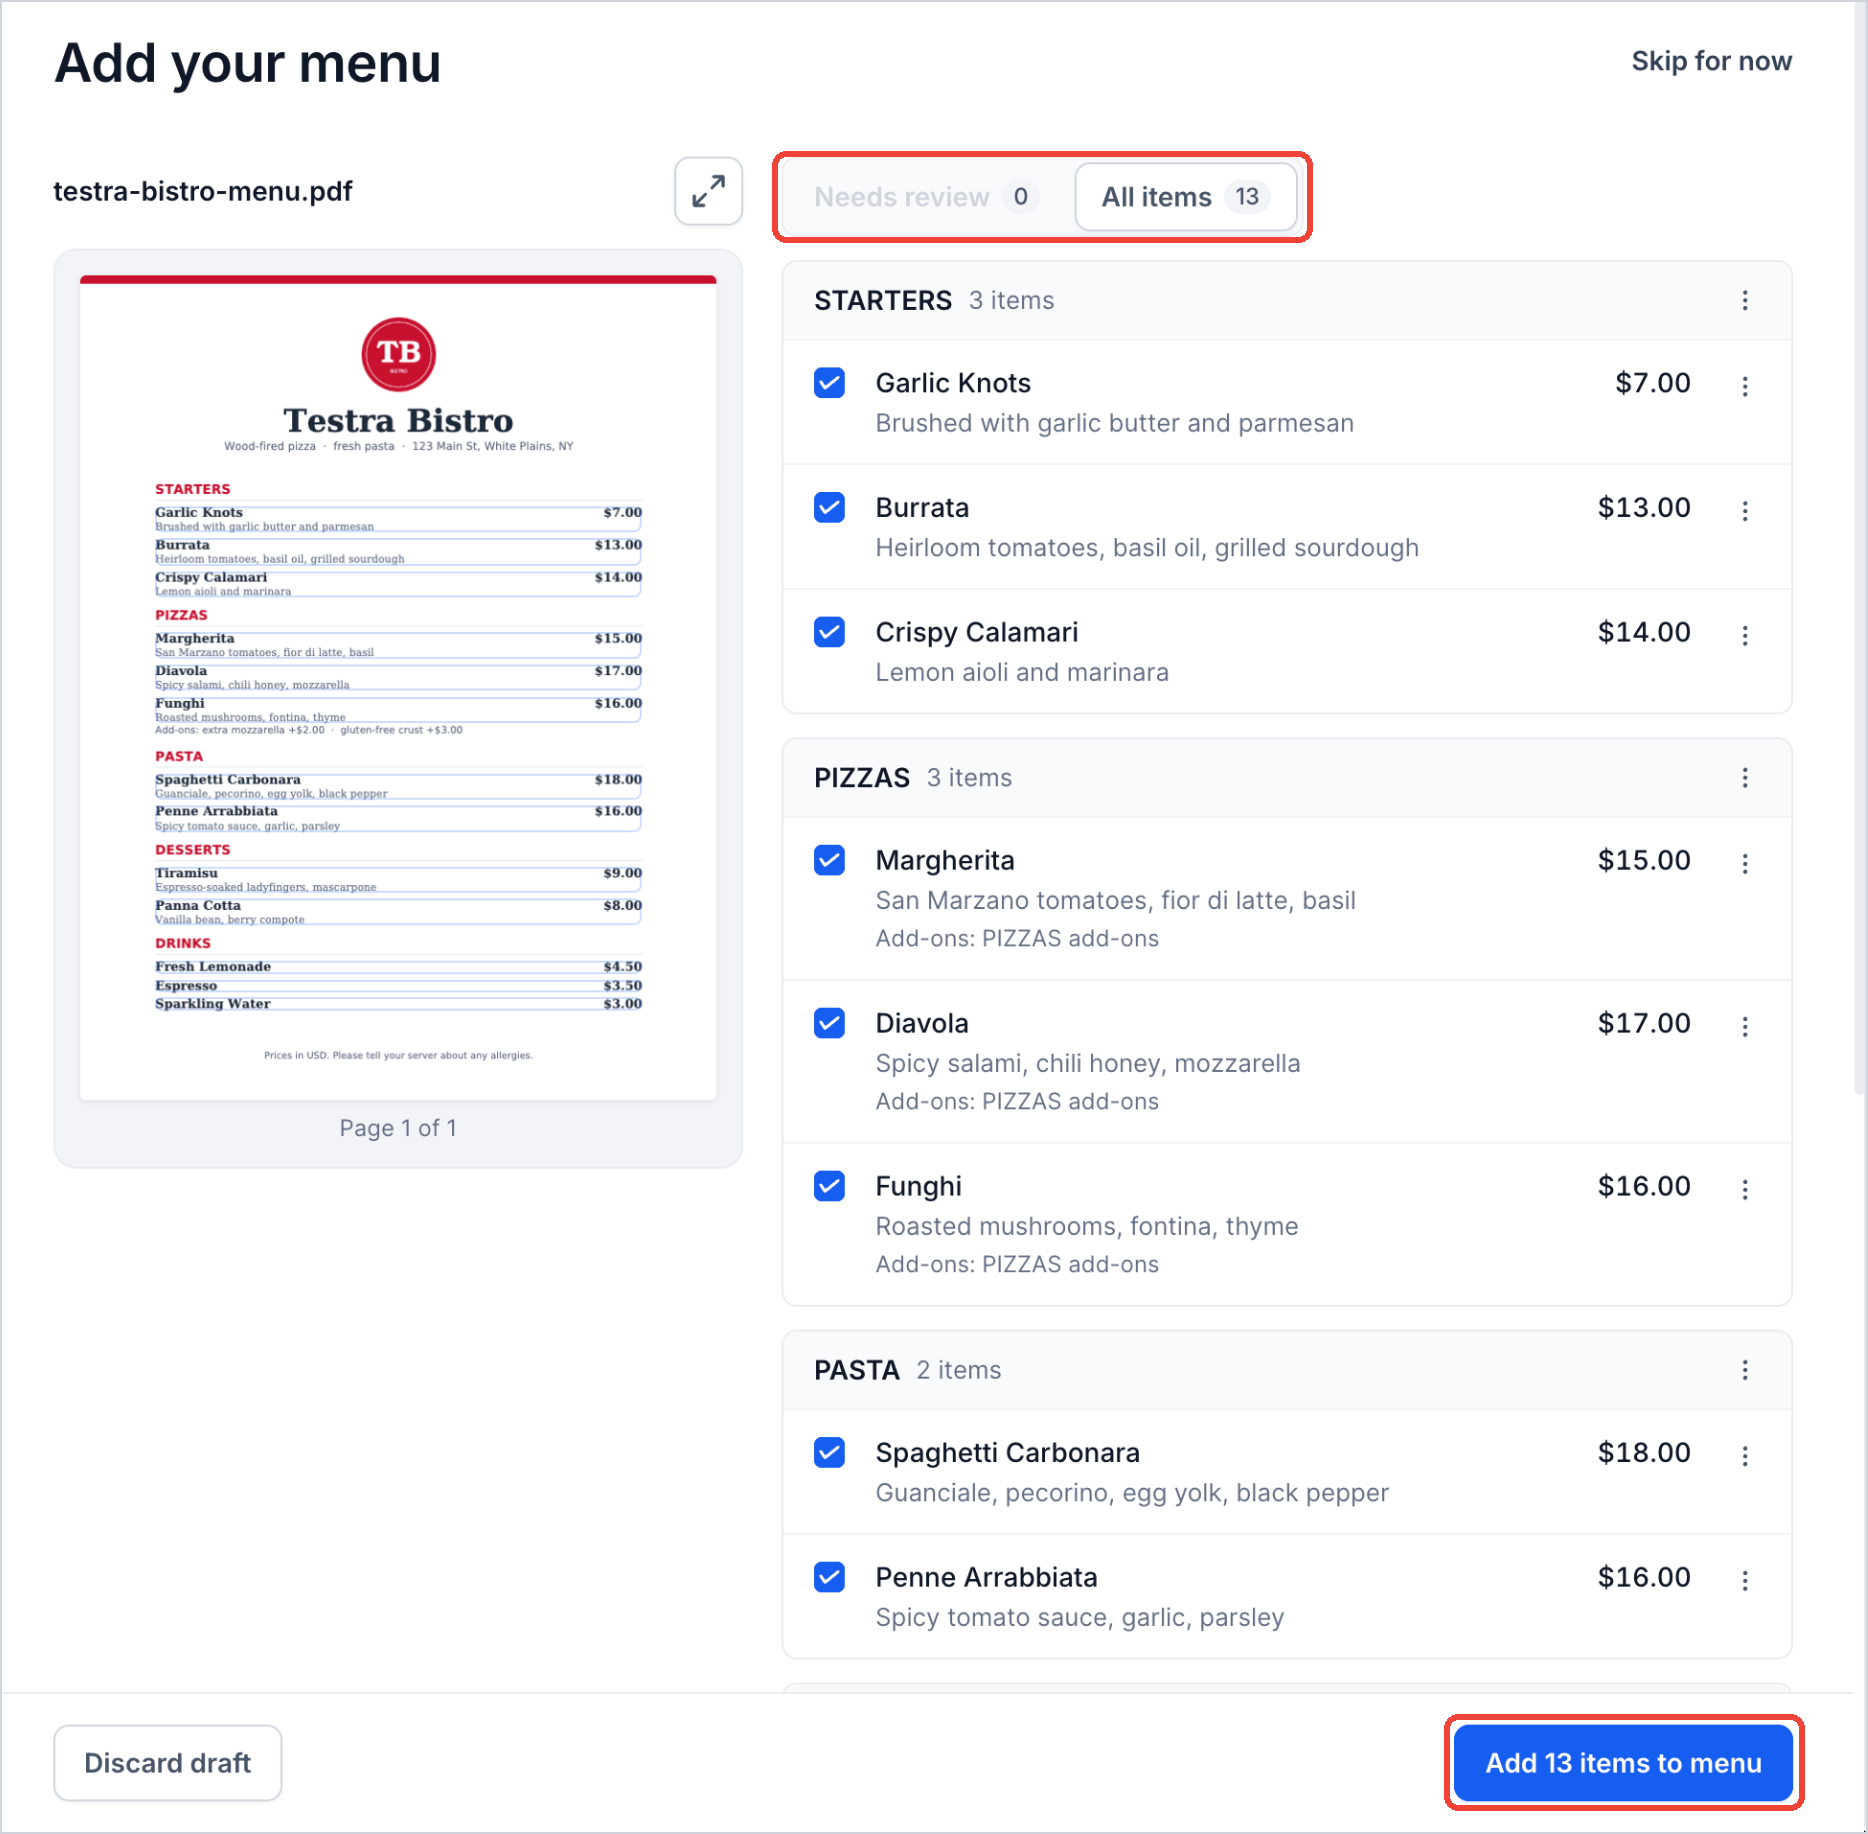
- Select Add items to menu, review Your menu, add missing items or categories, and click Continue.
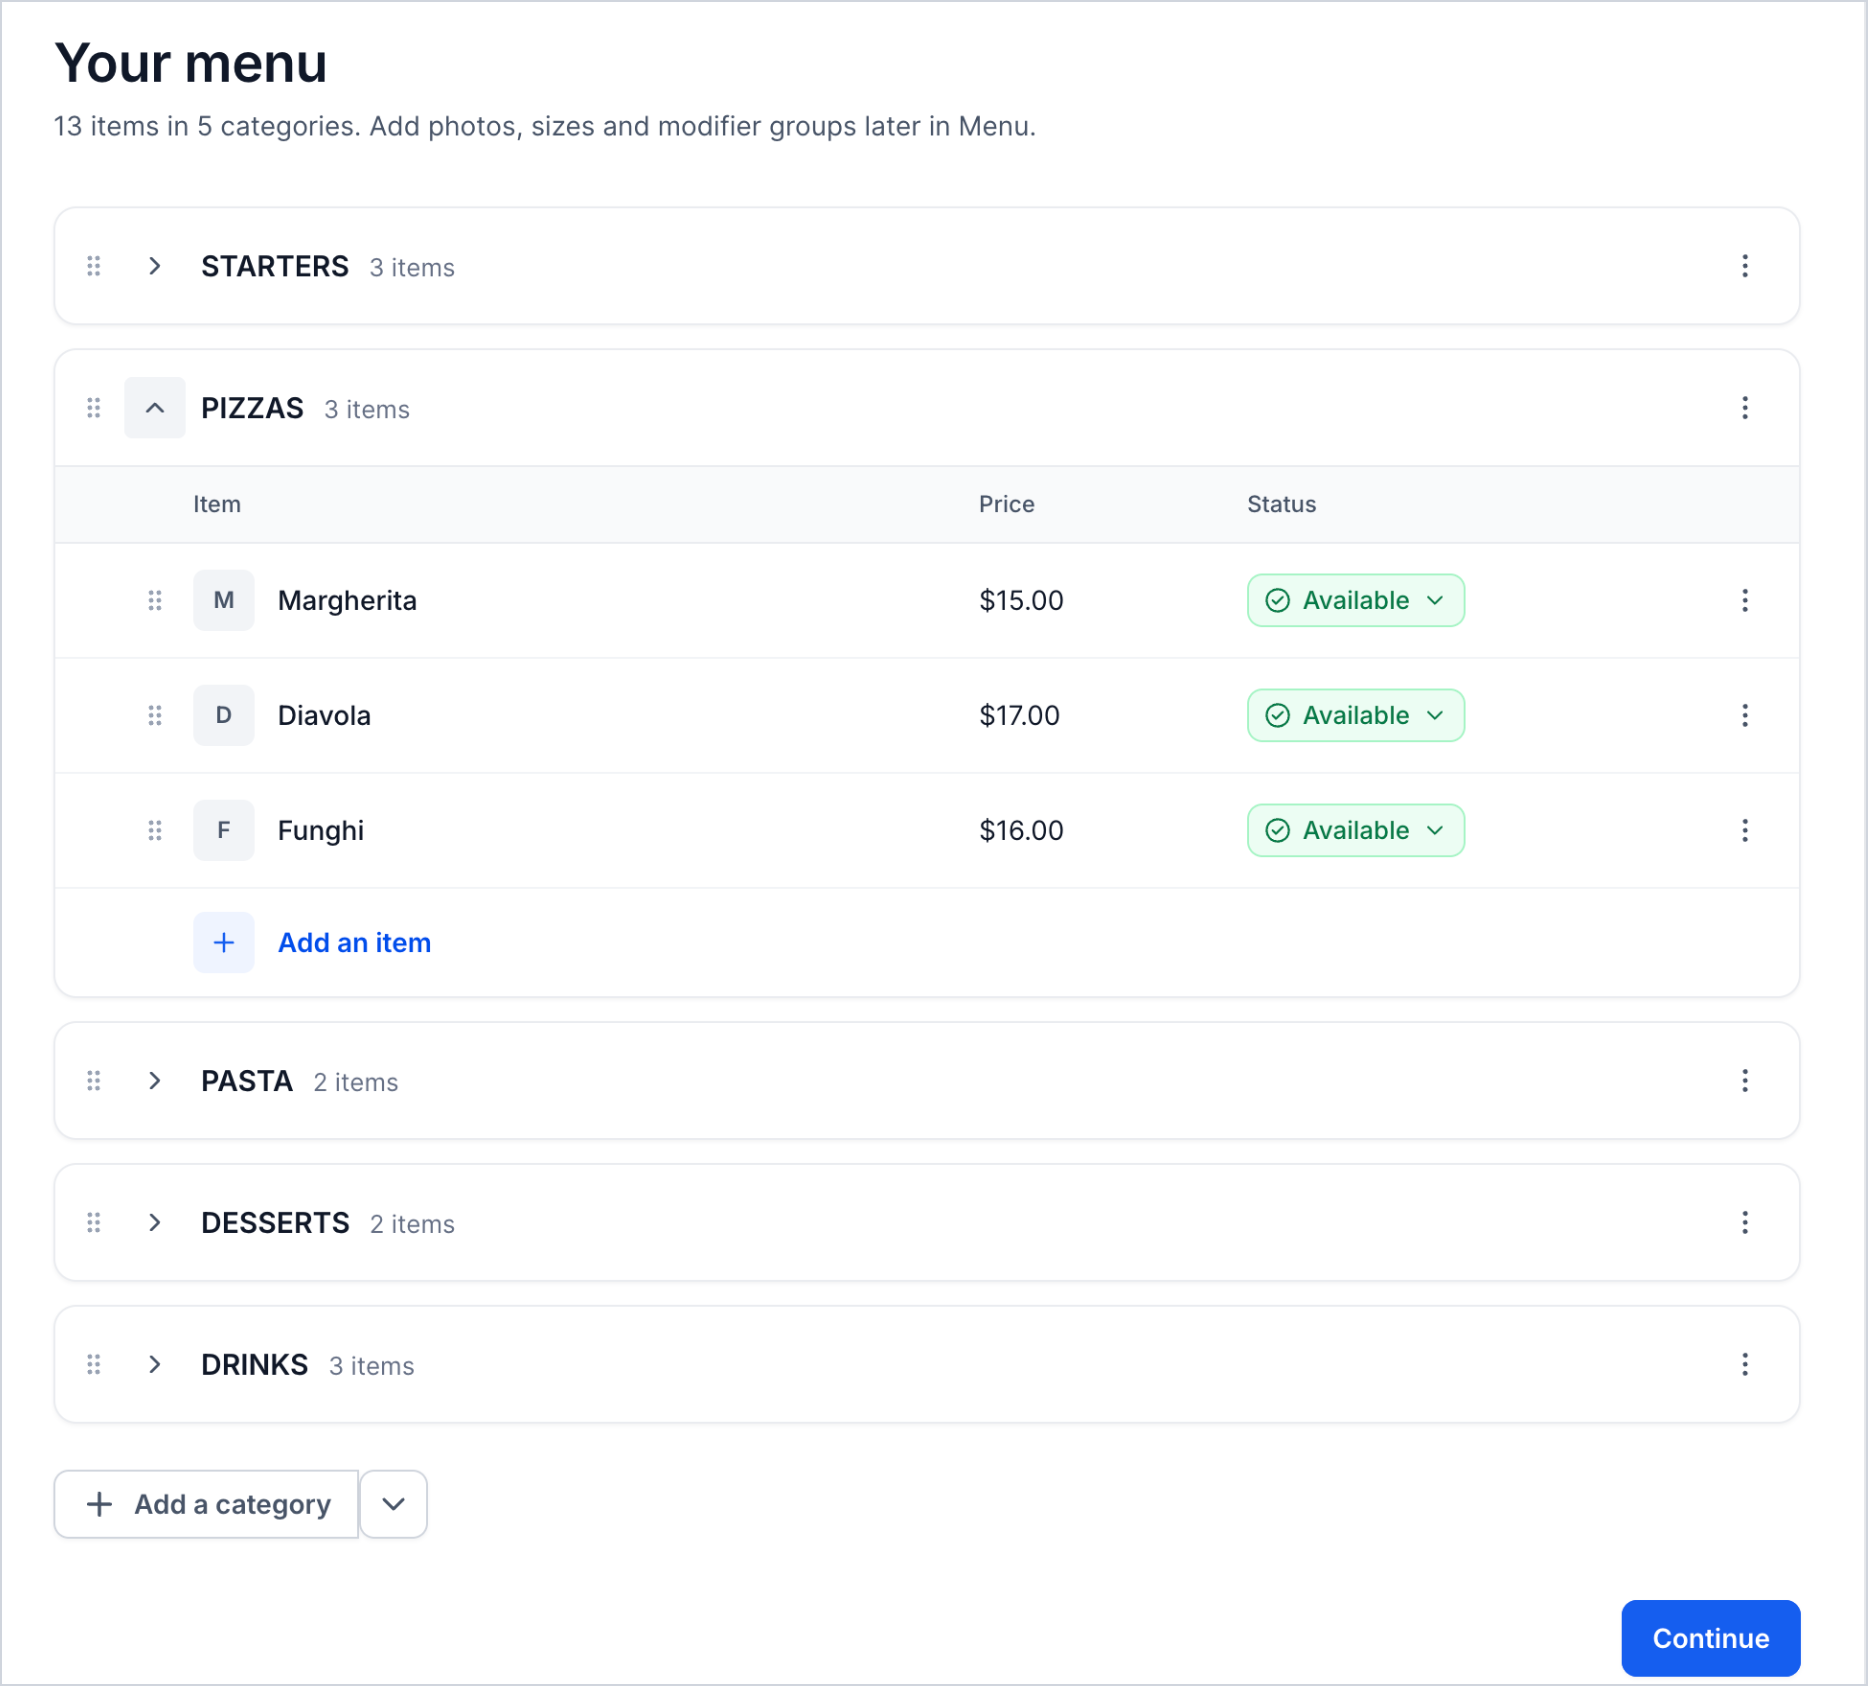
Note: Items are not saved to your menu until you confirm the draft. Use Discard draft to restart. Add photos, sizes, and modifiers later in Menu.
Step 4: Set Up Pickup and Delivery
Choose when guests can order, how orders are fulfilled, and what they pay. Restaurant staff handles delivery.
Prep Time and Pickup
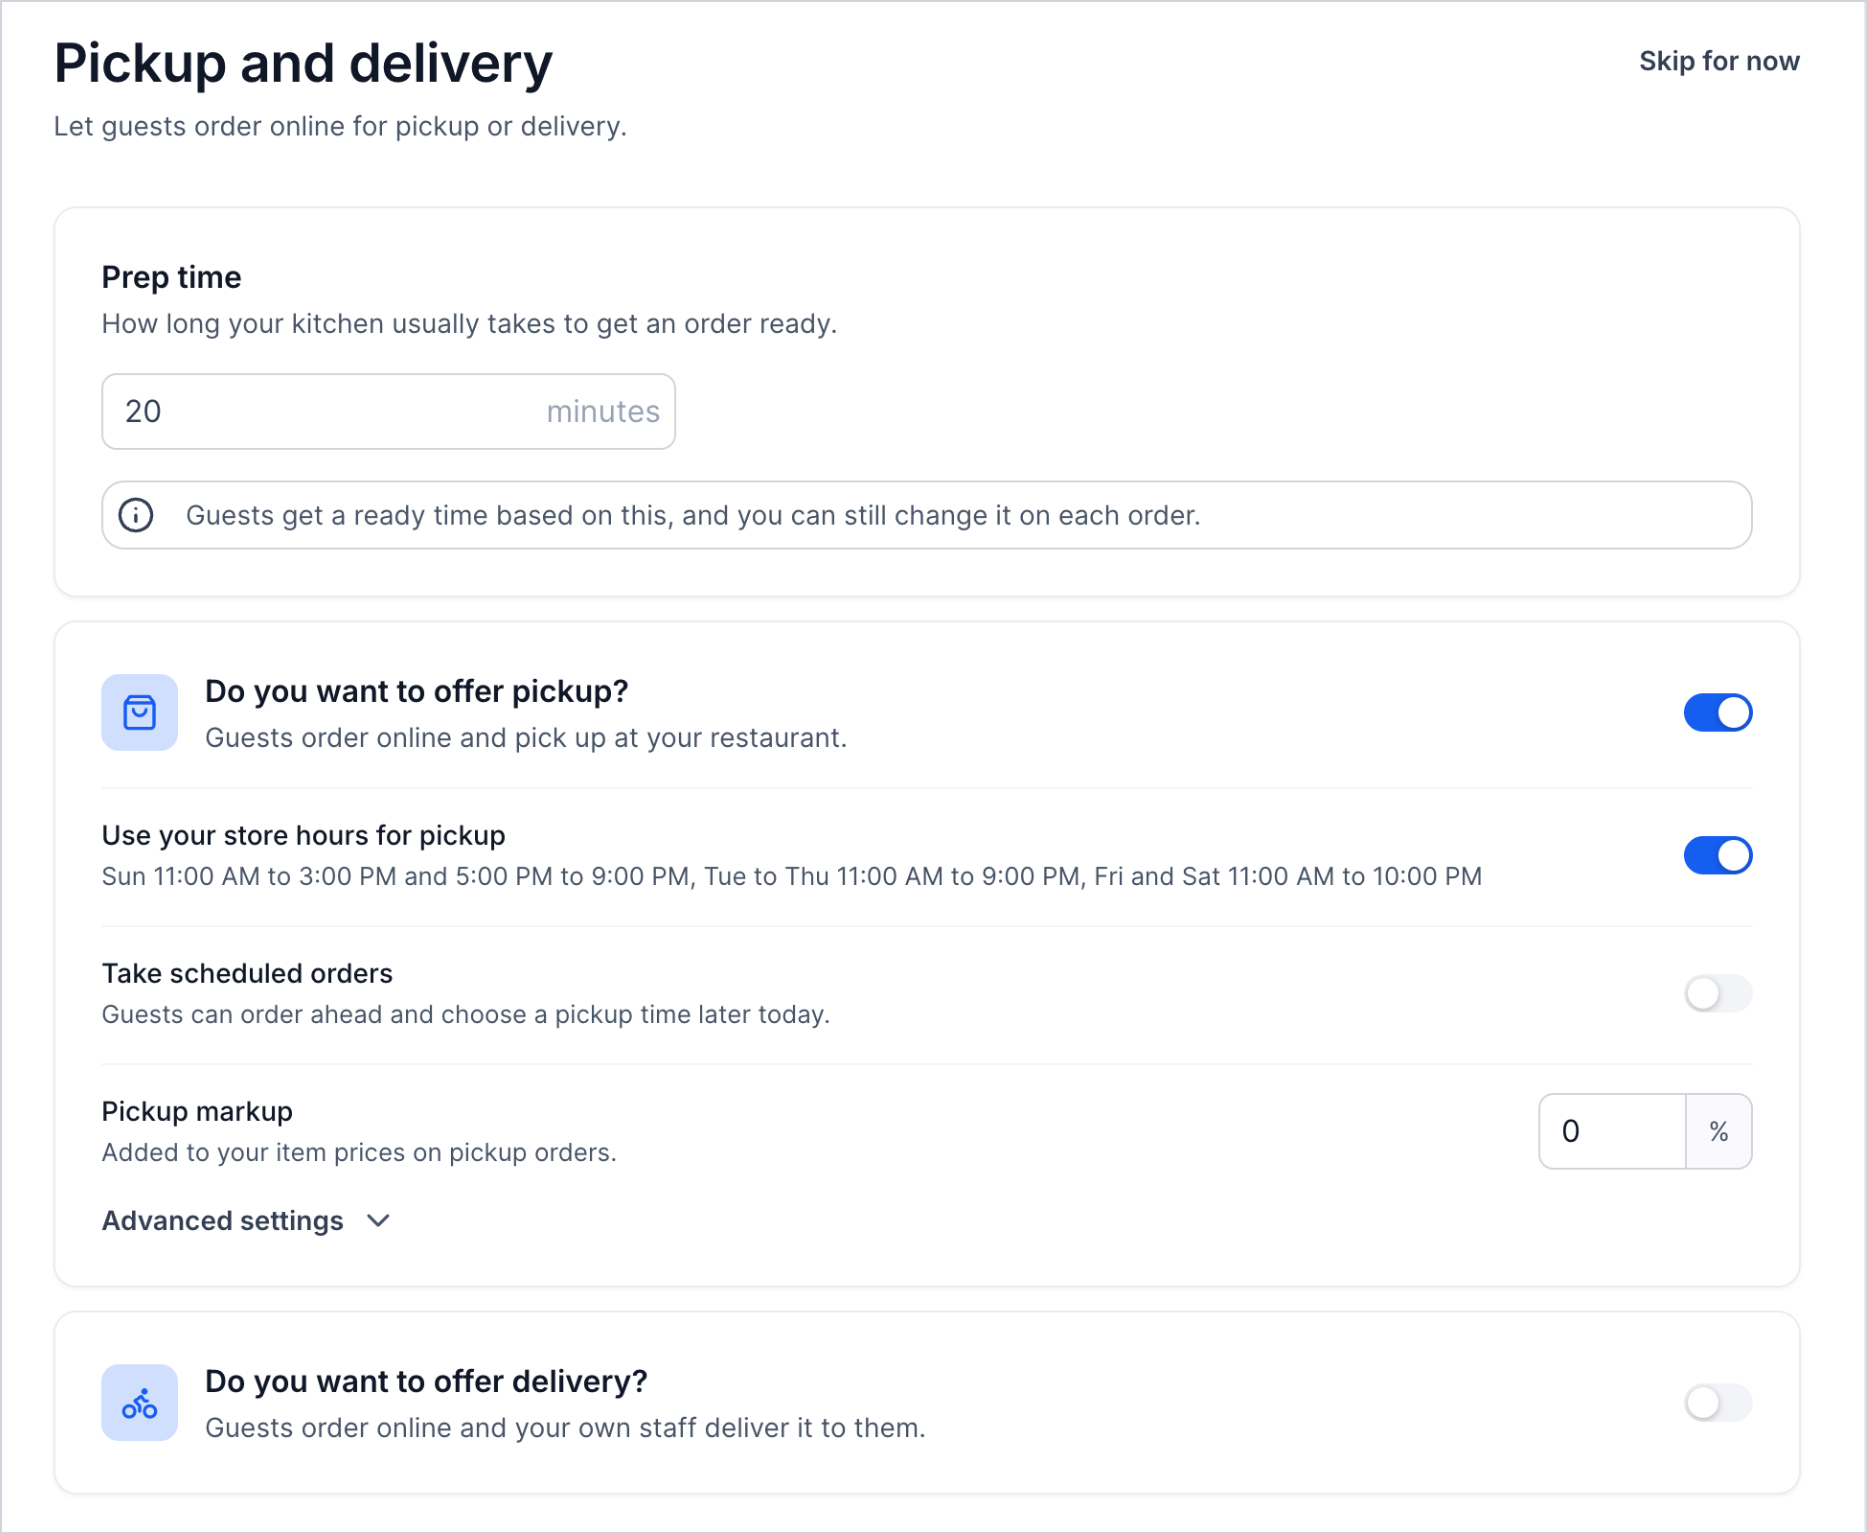
Set Prep time (initially 20 minutes) to your kitchen's usual preparation time; individual orders can be adjusted.
| Setting | Configuration |
|---|---|
| Pickup | Turn on Do you want to offer pickup? |
| Hours | Use store hours or separate pickup hours |
| Scheduled orders | Allow guests to choose a later pickup time |
| Markup | Percentage added to prices; 0 keeps menu prices |
| Minimum order | Optional amount before tax under Advanced settings |
Delivery
Select Do you want to offer delivery?, then choose Distance bands or Per mile pricing and Miles or Kilometers. Distances are measured in a straight line from your restaurant.
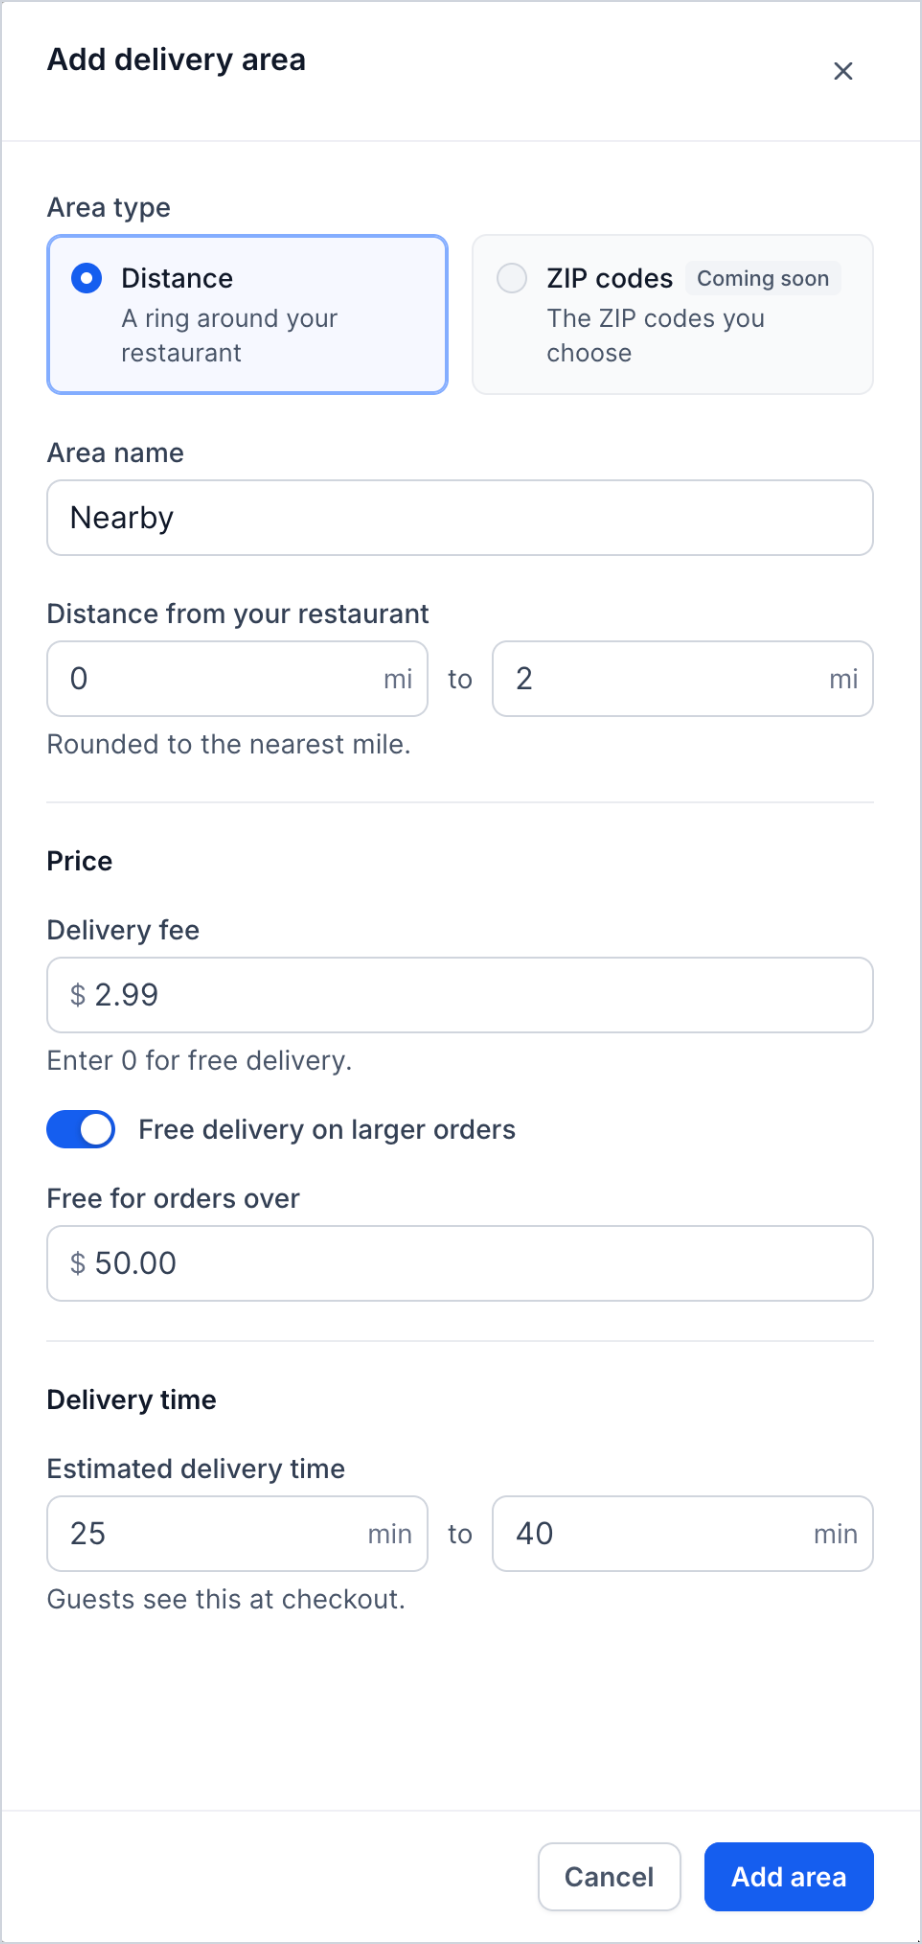
- Select Add area and enter the following:
| Field | What to Enter |
|---|---|
| Area type/name | Distance and an identifying name |
| Distance | Start and end of coverage range |
| Delivery fee | Charge, or 0 for free delivery |
| Free for orders over | Optional free-delivery threshold |
| Estimated delivery time | Time range shown at checkout |
- Add further areas as needed; Already covered indicates used distances.
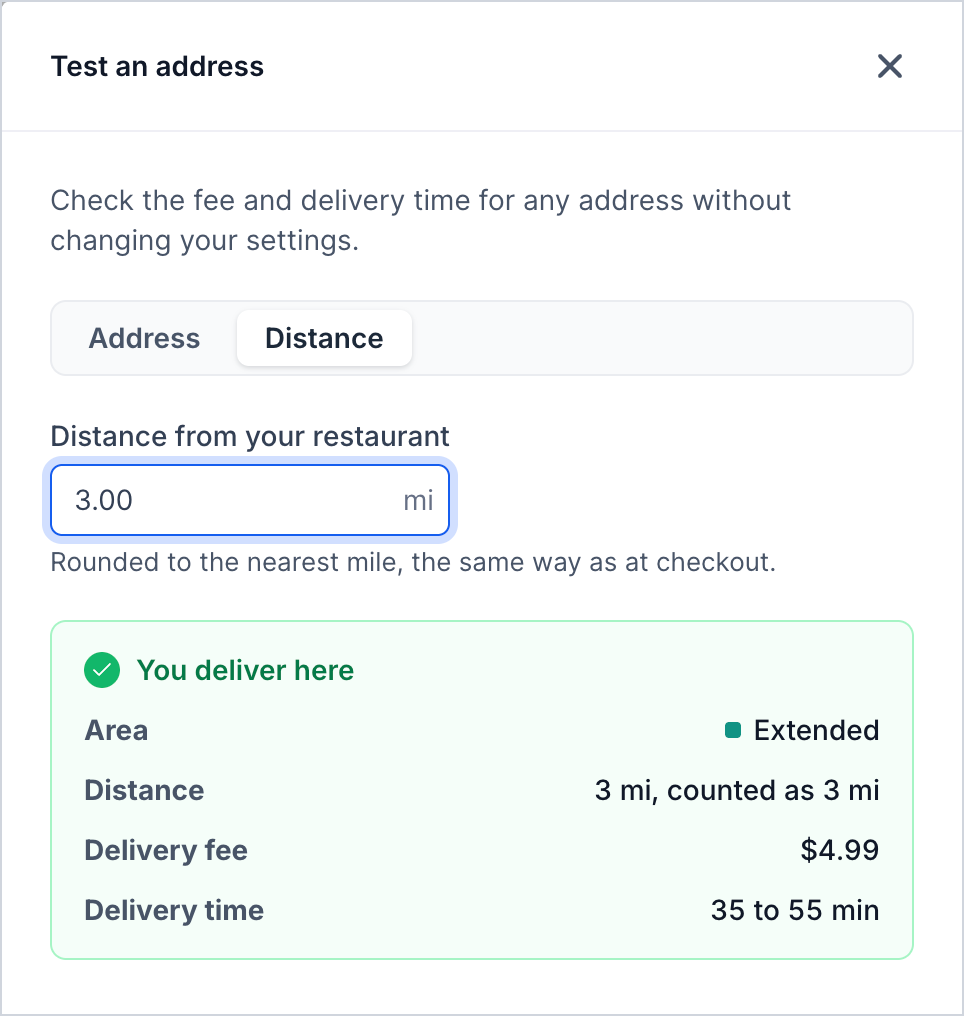
- Use Test an address to preview delivery coverage, fee, and time without modifying settings.
- Set delivery hours, scheduling, markup, and optional minimum order; click Save and continue.
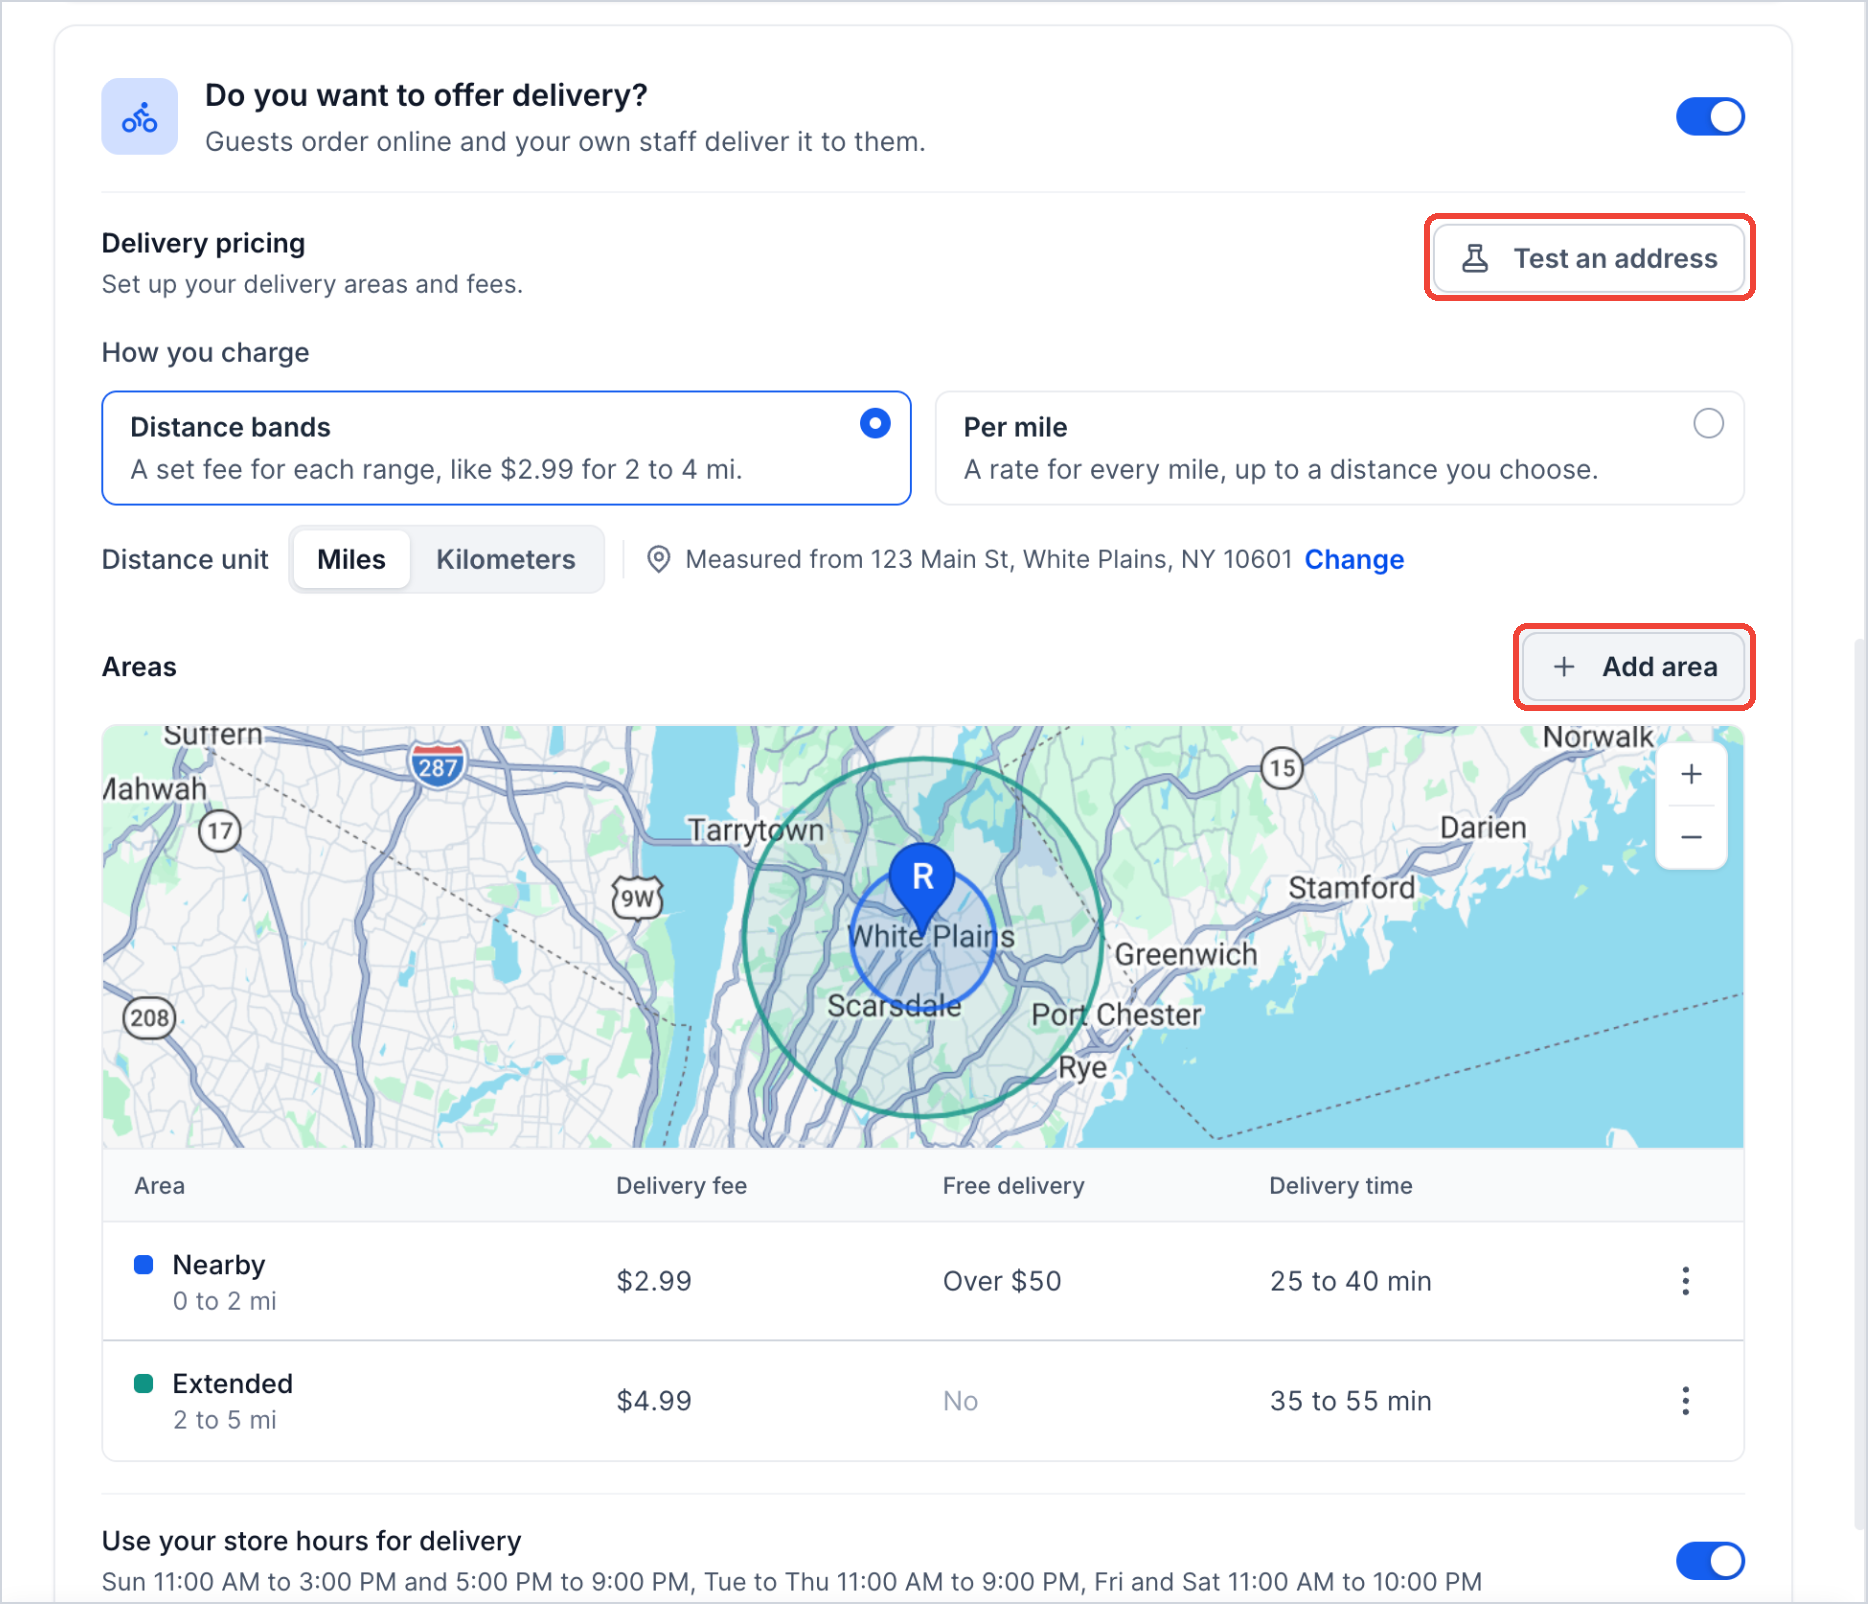
Delivery requires at least one area and a connected payment provider. ZIP code areas are marked Coming soon.
Step 5: Add Your Areas and Tables
Your floor layout represents the tables used for reservations and walk-ins.
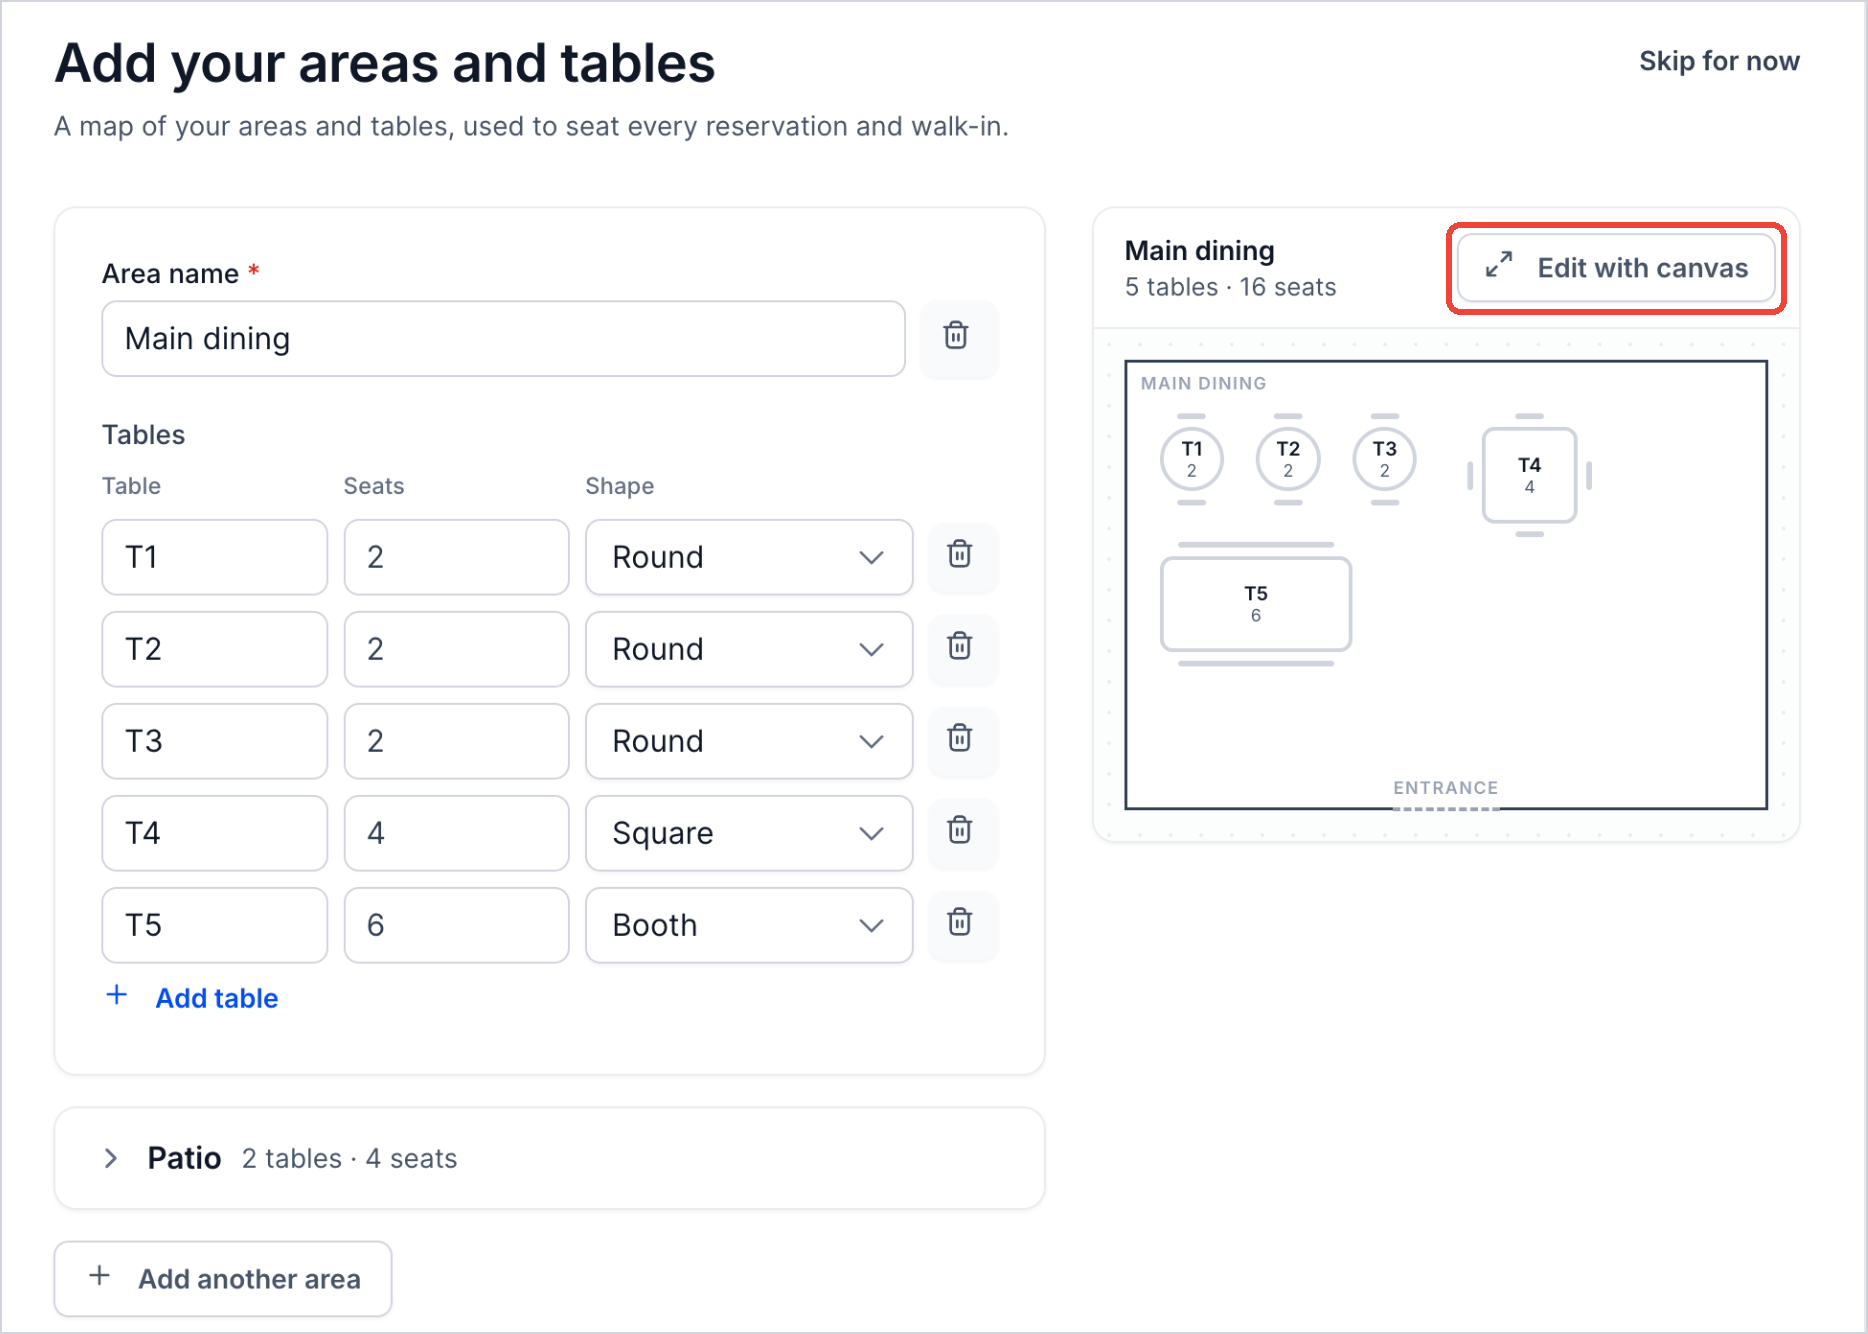
- Rename Main dining if needed. Setup starts with five round tables.
- Set each table's name, seats, and shape: Round, Square, Rectangle, Booth, or Bar seat.
- Use Add table, the trash icon, or Add another area to match your restaurant.
- Review the preview's table and seat counts.
Arrange Tables With Canvas (Optional)
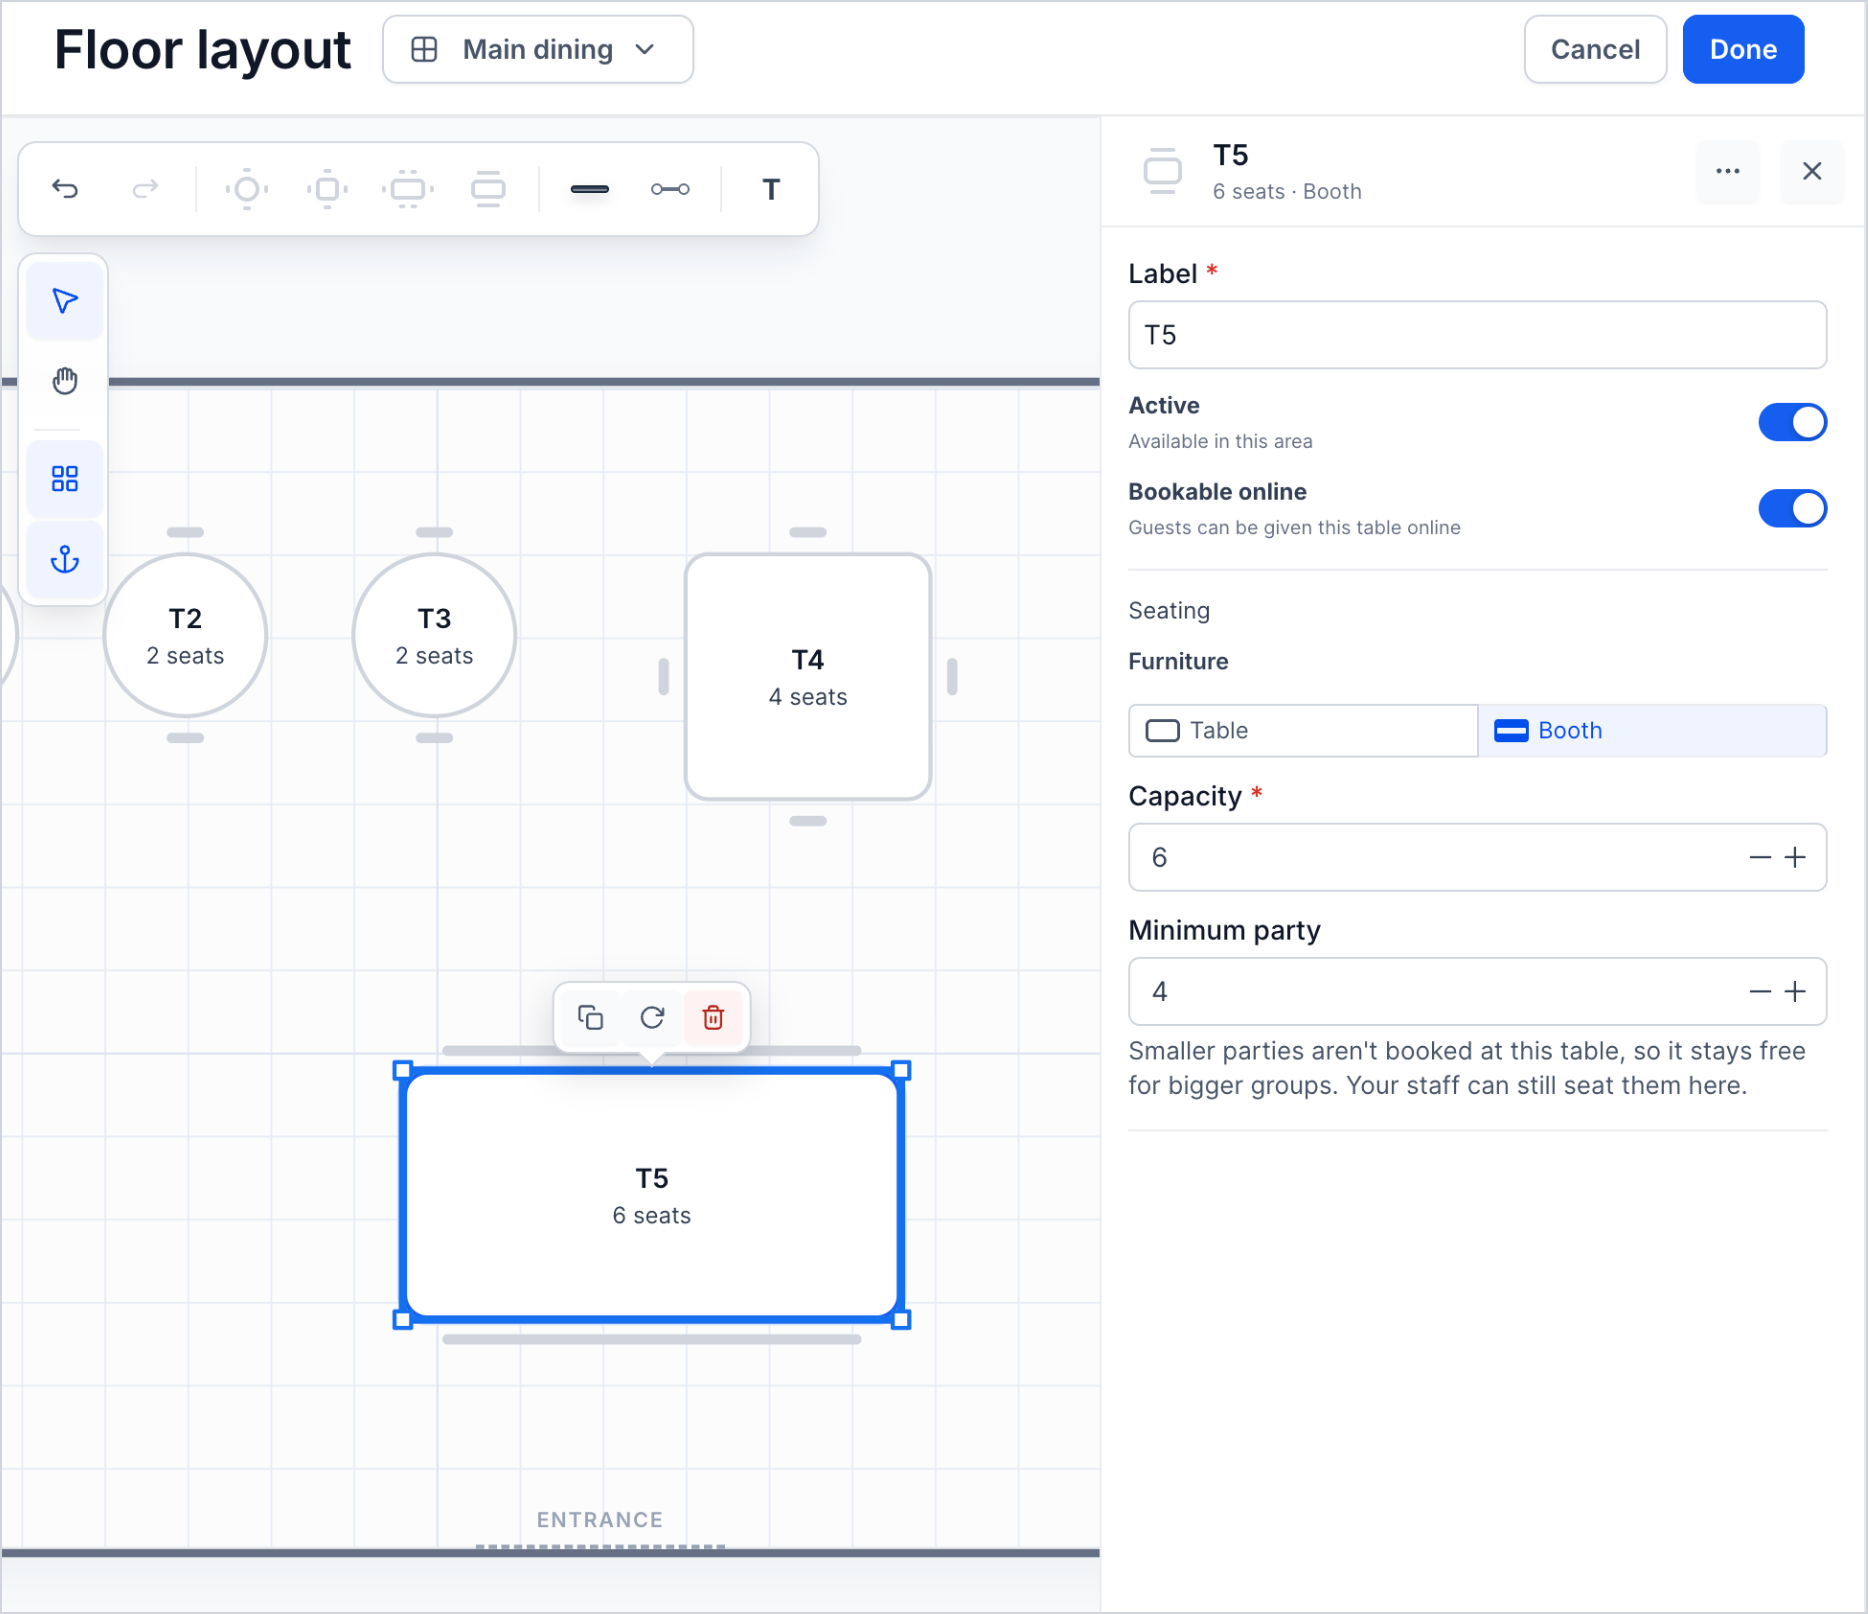
Select Edit with canvas to drag tables, add walls or labels, and adjust layout tools. Select a table to set its label, capacity, Active, Bookable online, or Minimum party options. Click Done, then Save and continue.
Step 6: Set Up Reservations
Choose booking availability, deposits, and table times. Reservations need a completed floor layout; if prompted, select Set up floor layout first.

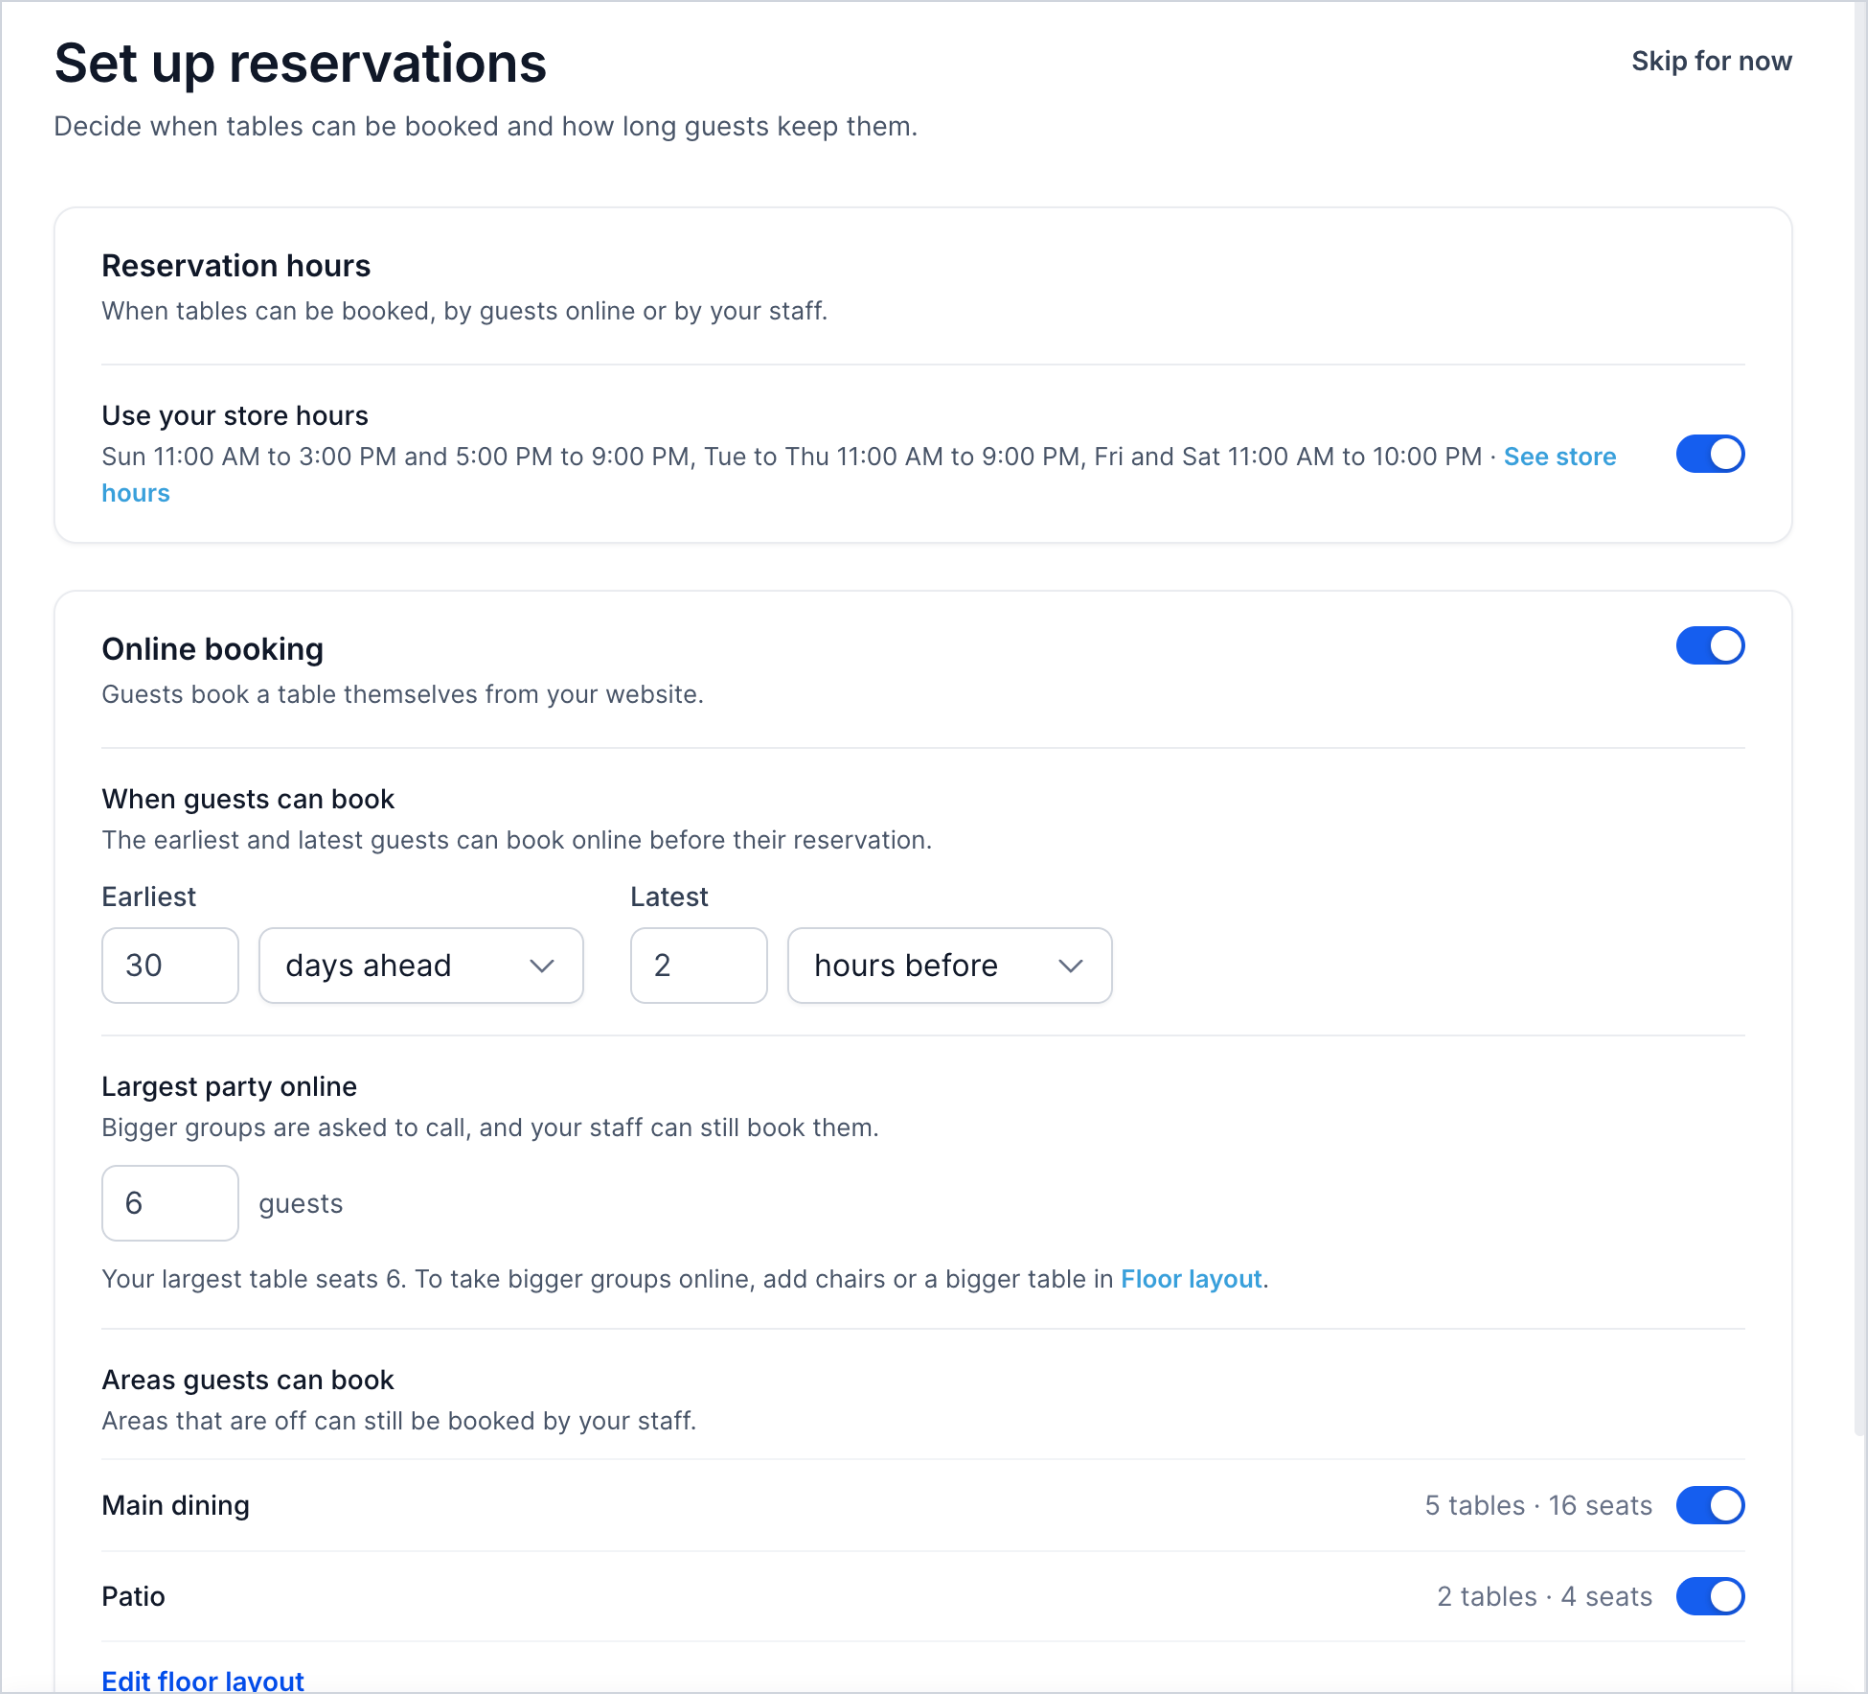
Reservation Hours and Online Booking
Keep Use your store hours on or set separate reservation hours. Enable Online booking for website reservations.
| Setting | What It Controls |
|---|---|
| Earliest / Latest | How far ahead or close to arrival guests may book |
| Largest party online | Maximum online party size |
| Areas guests can book | Which dining areas are offered online |
| Let guests choose their area | Guest preference for a dining area |
Deposits (Optional)
Deposits are upfront payments applied to the final bill and require a payment provider. Turn on Deposits and configure:
| Setting | Options |
|---|---|
| Amount | Per guest or per reservation |
| Deposit rules | Every booking or selected party sizes, days, or times |
| Staff bookings | Apply deposits to staff-created bookings or exempt them |
| Full refund until | Deadline for a full refund |
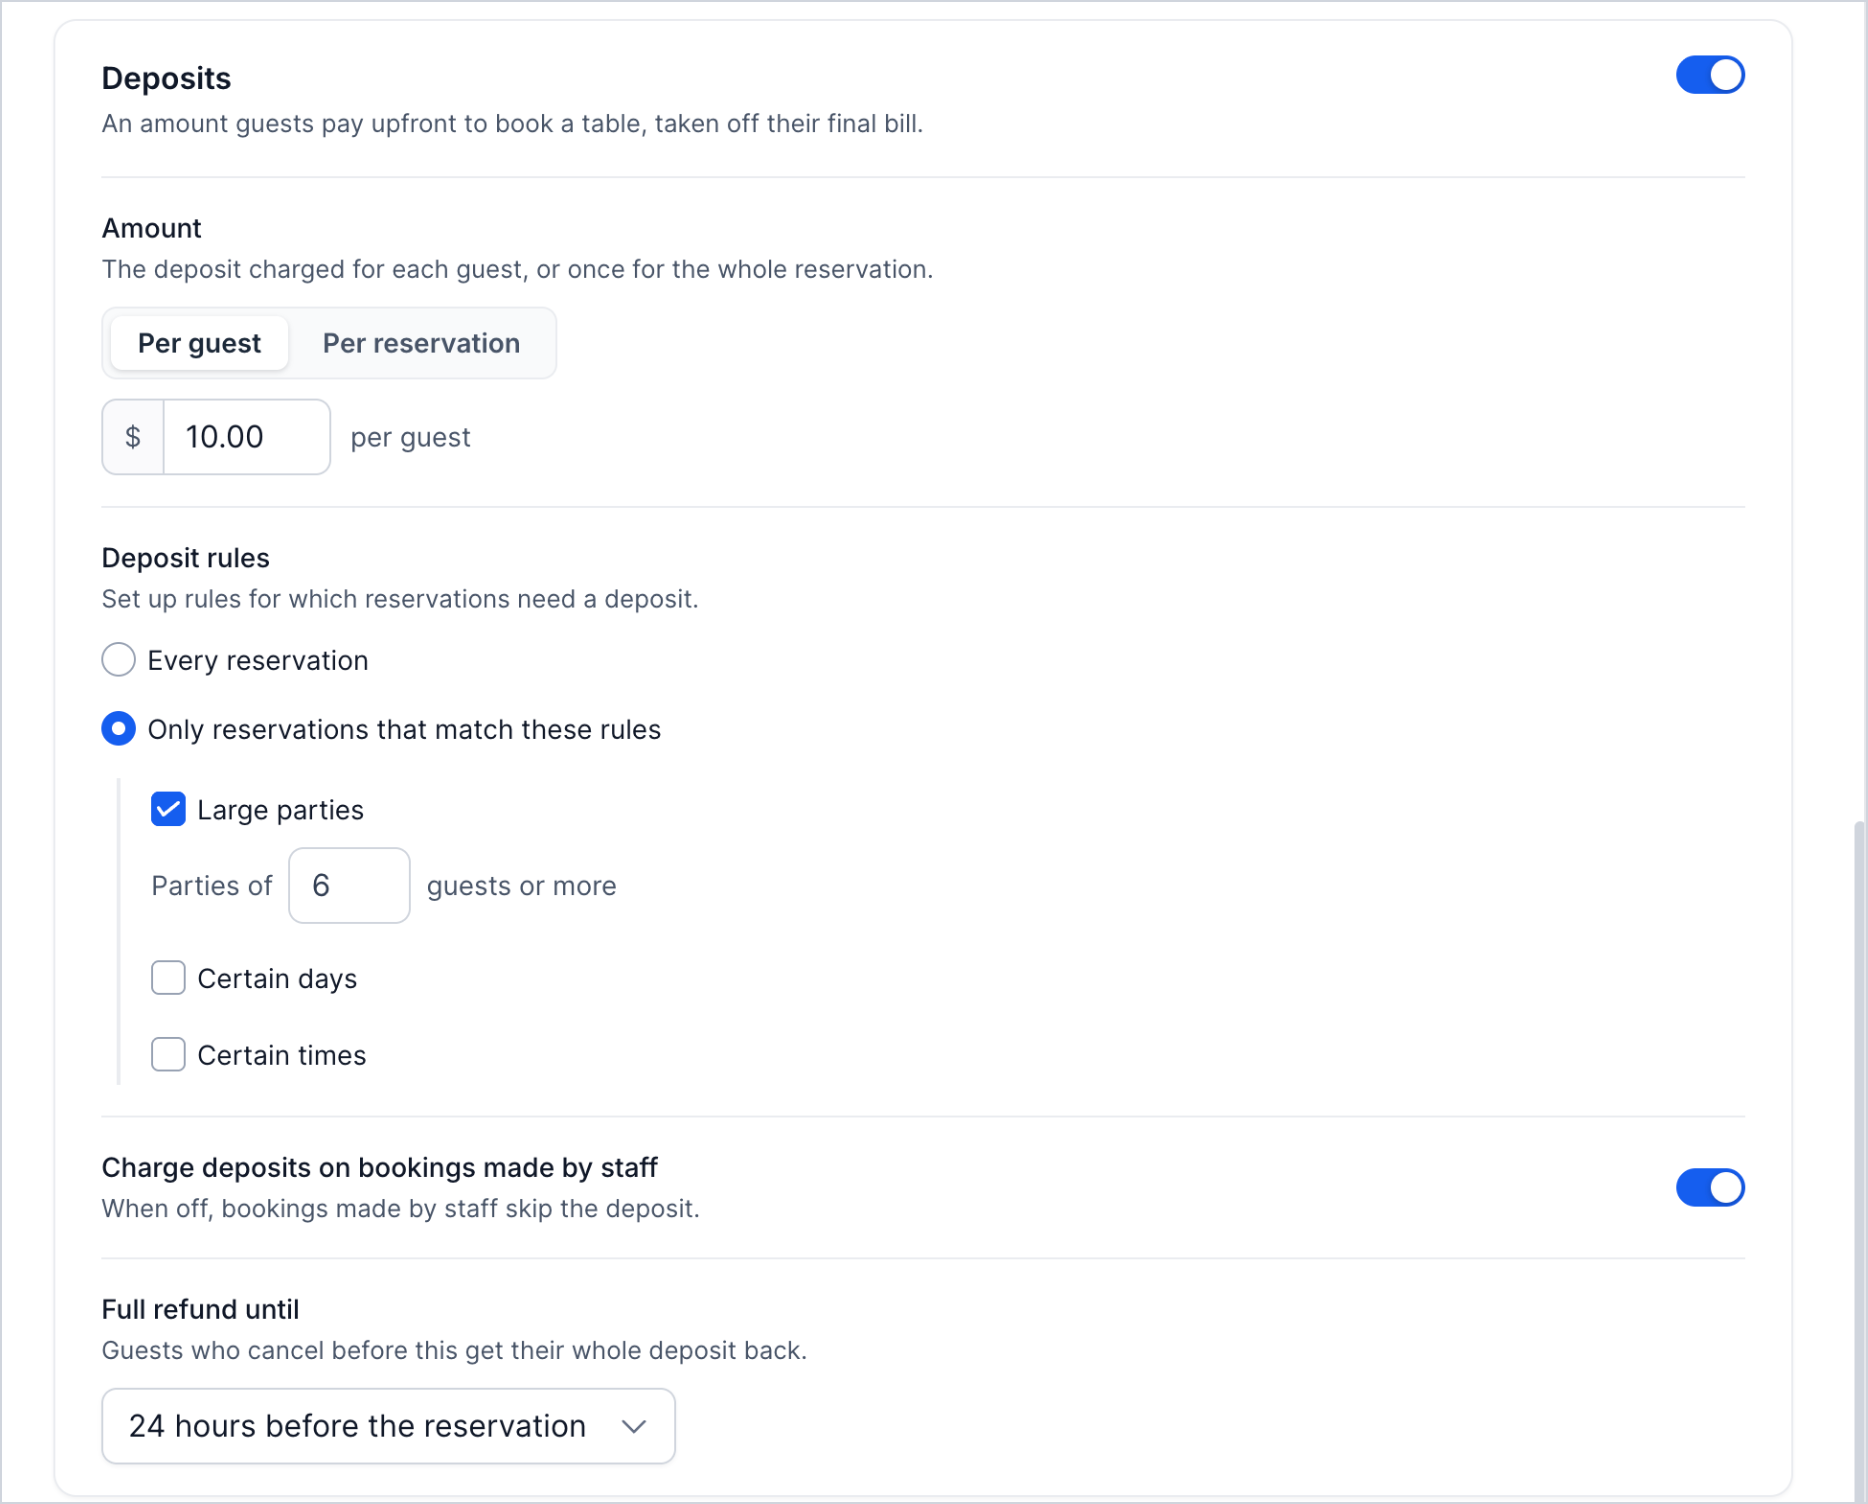
Table Rules (Advanced Settings)
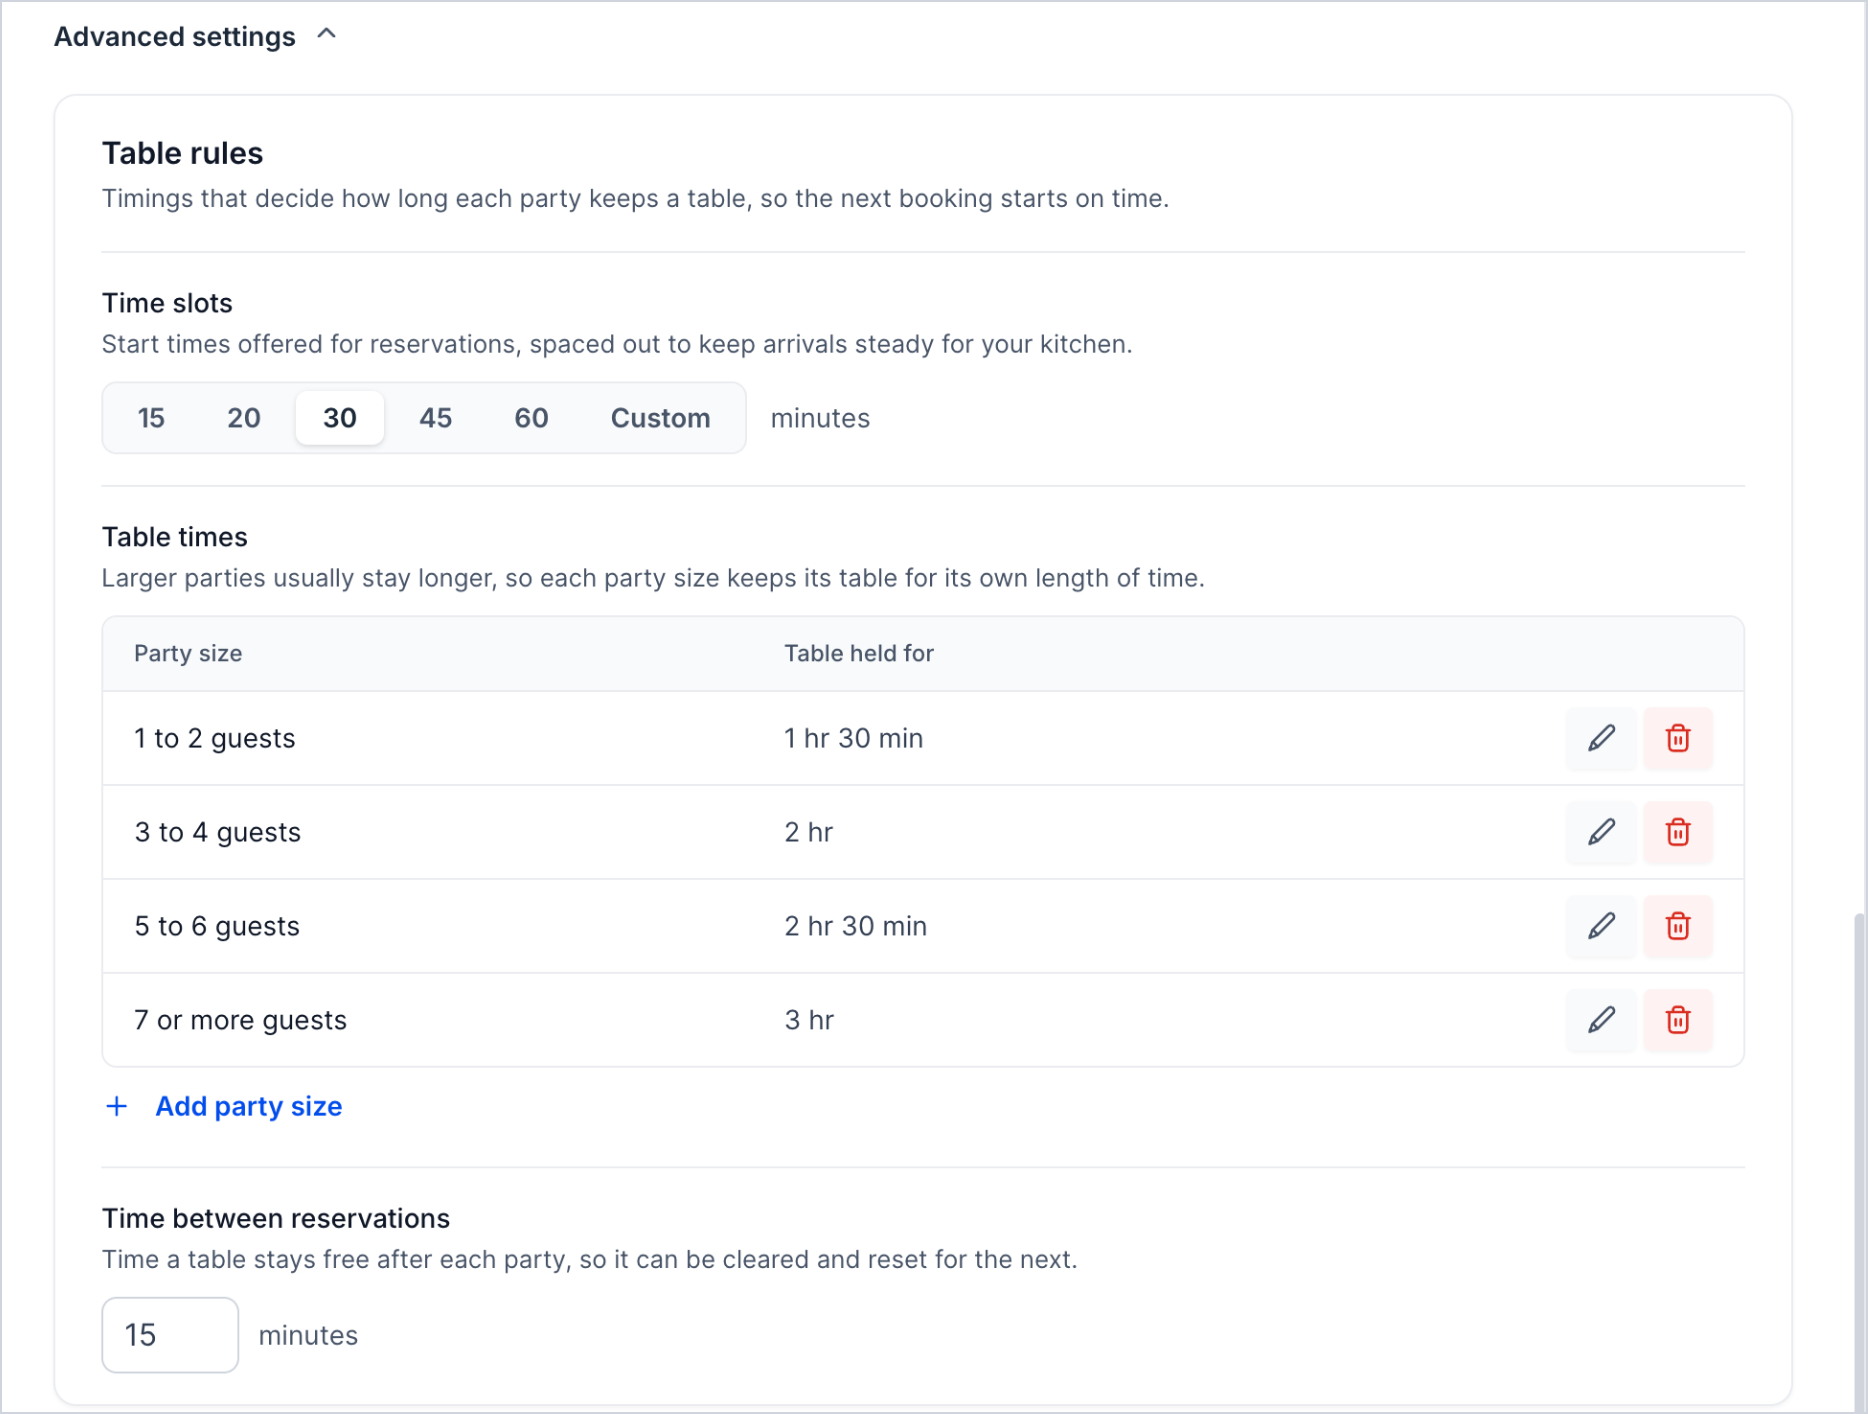
Define how booking times and table turnover work.
| Rule | What It Means |
|---|---|
| Time slots | 15, 20, 30, 45, 60 minutes, or Custom |
| Table times | Booking duration by party size |
| Time between reservations | Time for clearing and resetting tables |
Click Save and complete setup.
After You Finish Setup
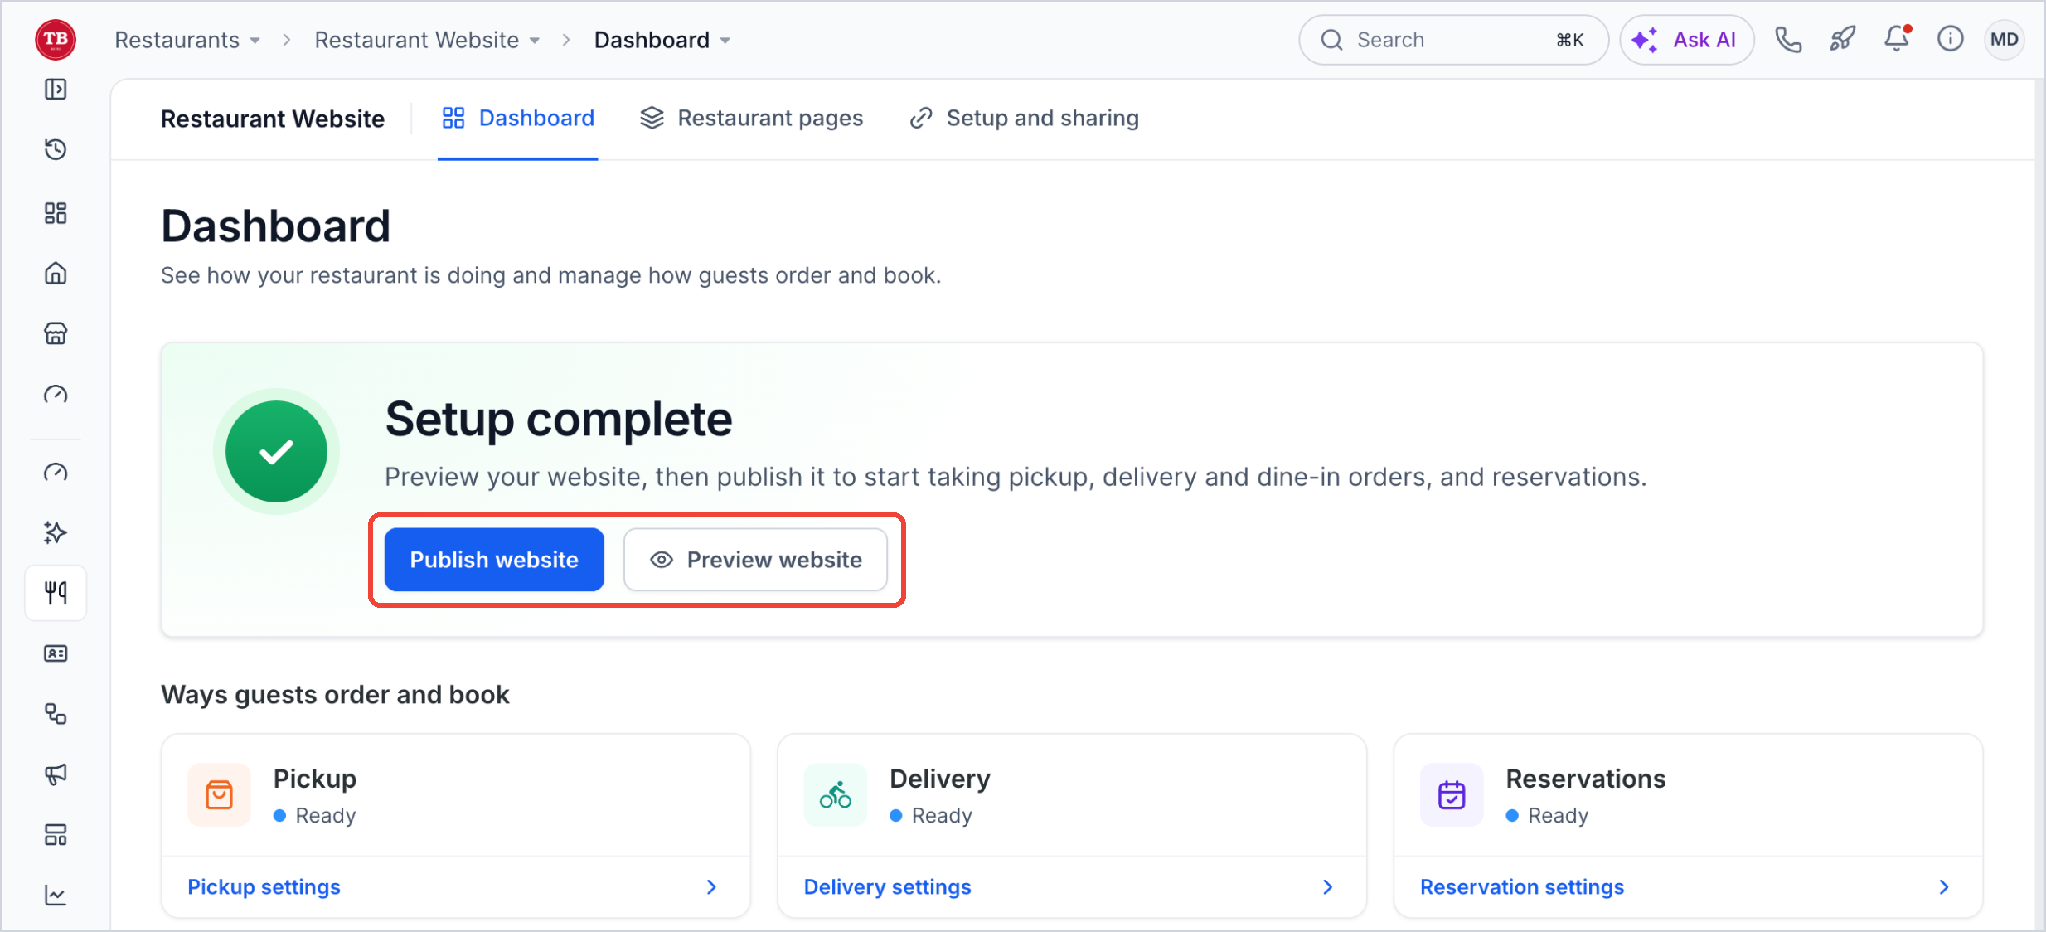
After Save and complete setup, Restaurant Website > Dashboard displays Setup complete, with Pickup, Delivery, and Reservations marked Ready.
- Select Preview website to review your restaurant site.
- Select Publish website to enable customer-facing online ordering and reservations.
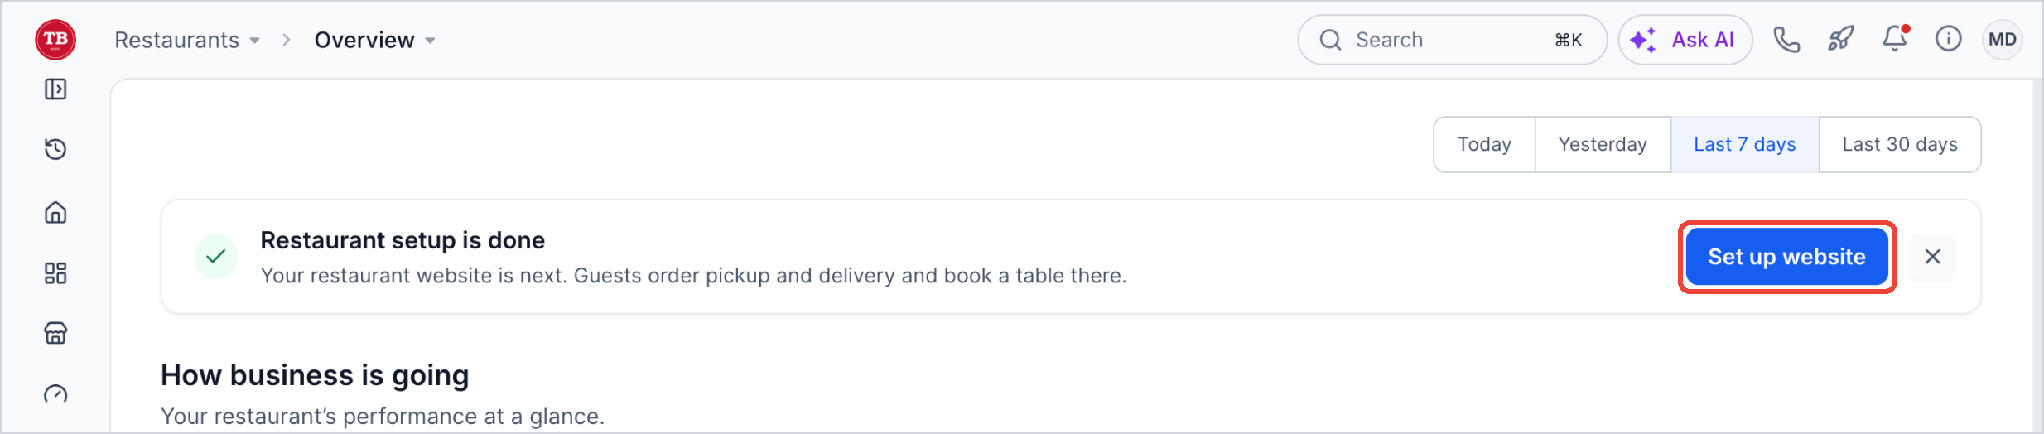
Overview then shows Restaurant setup is done. Select Set up website to continue.
Change Your Settings Later
All setup information can be edited from Restaurants after onboarding.
| Change | Location |
|---|---|
| Branding, address, hours, closures, links | Restaurant Settings > Restaurant details |
| Prep time, pickup, delivery | Restaurant Settings > Prep time, Pickup, or Delivery |
| Tables, booking rules | Restaurant Settings > Floor layout or Reservation settings |
| Menu categories, items, prices | Restaurants > Menu |
| Provider | Payments > Payment Integrations |
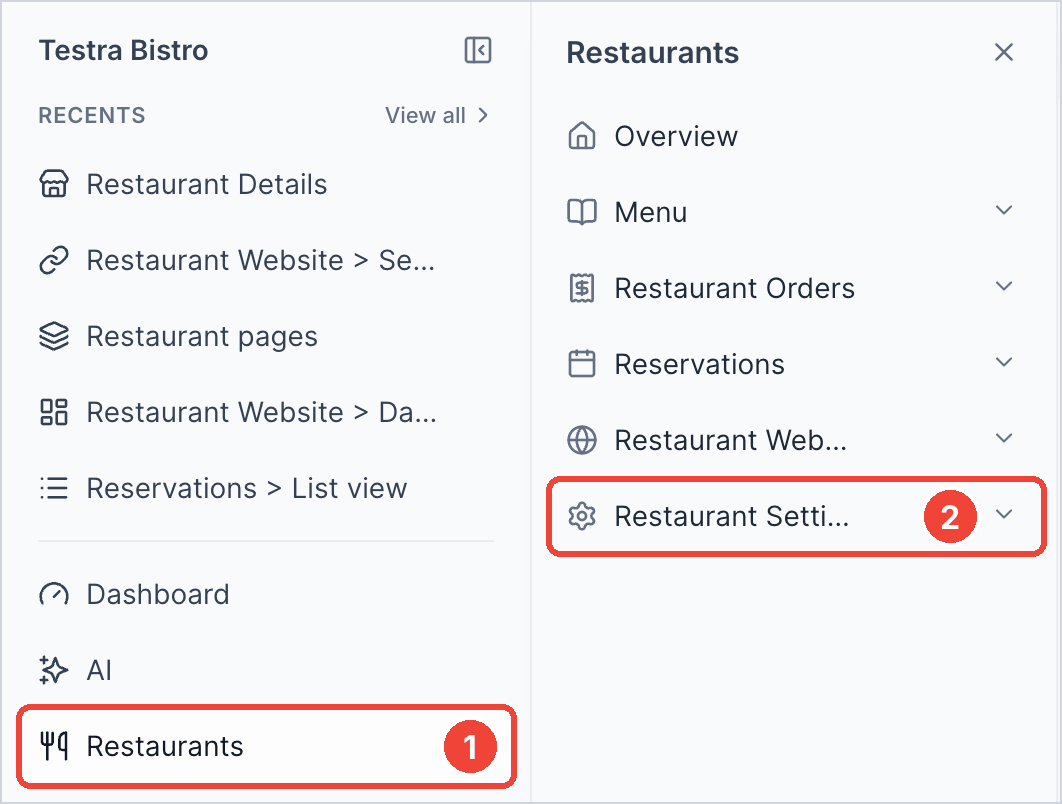
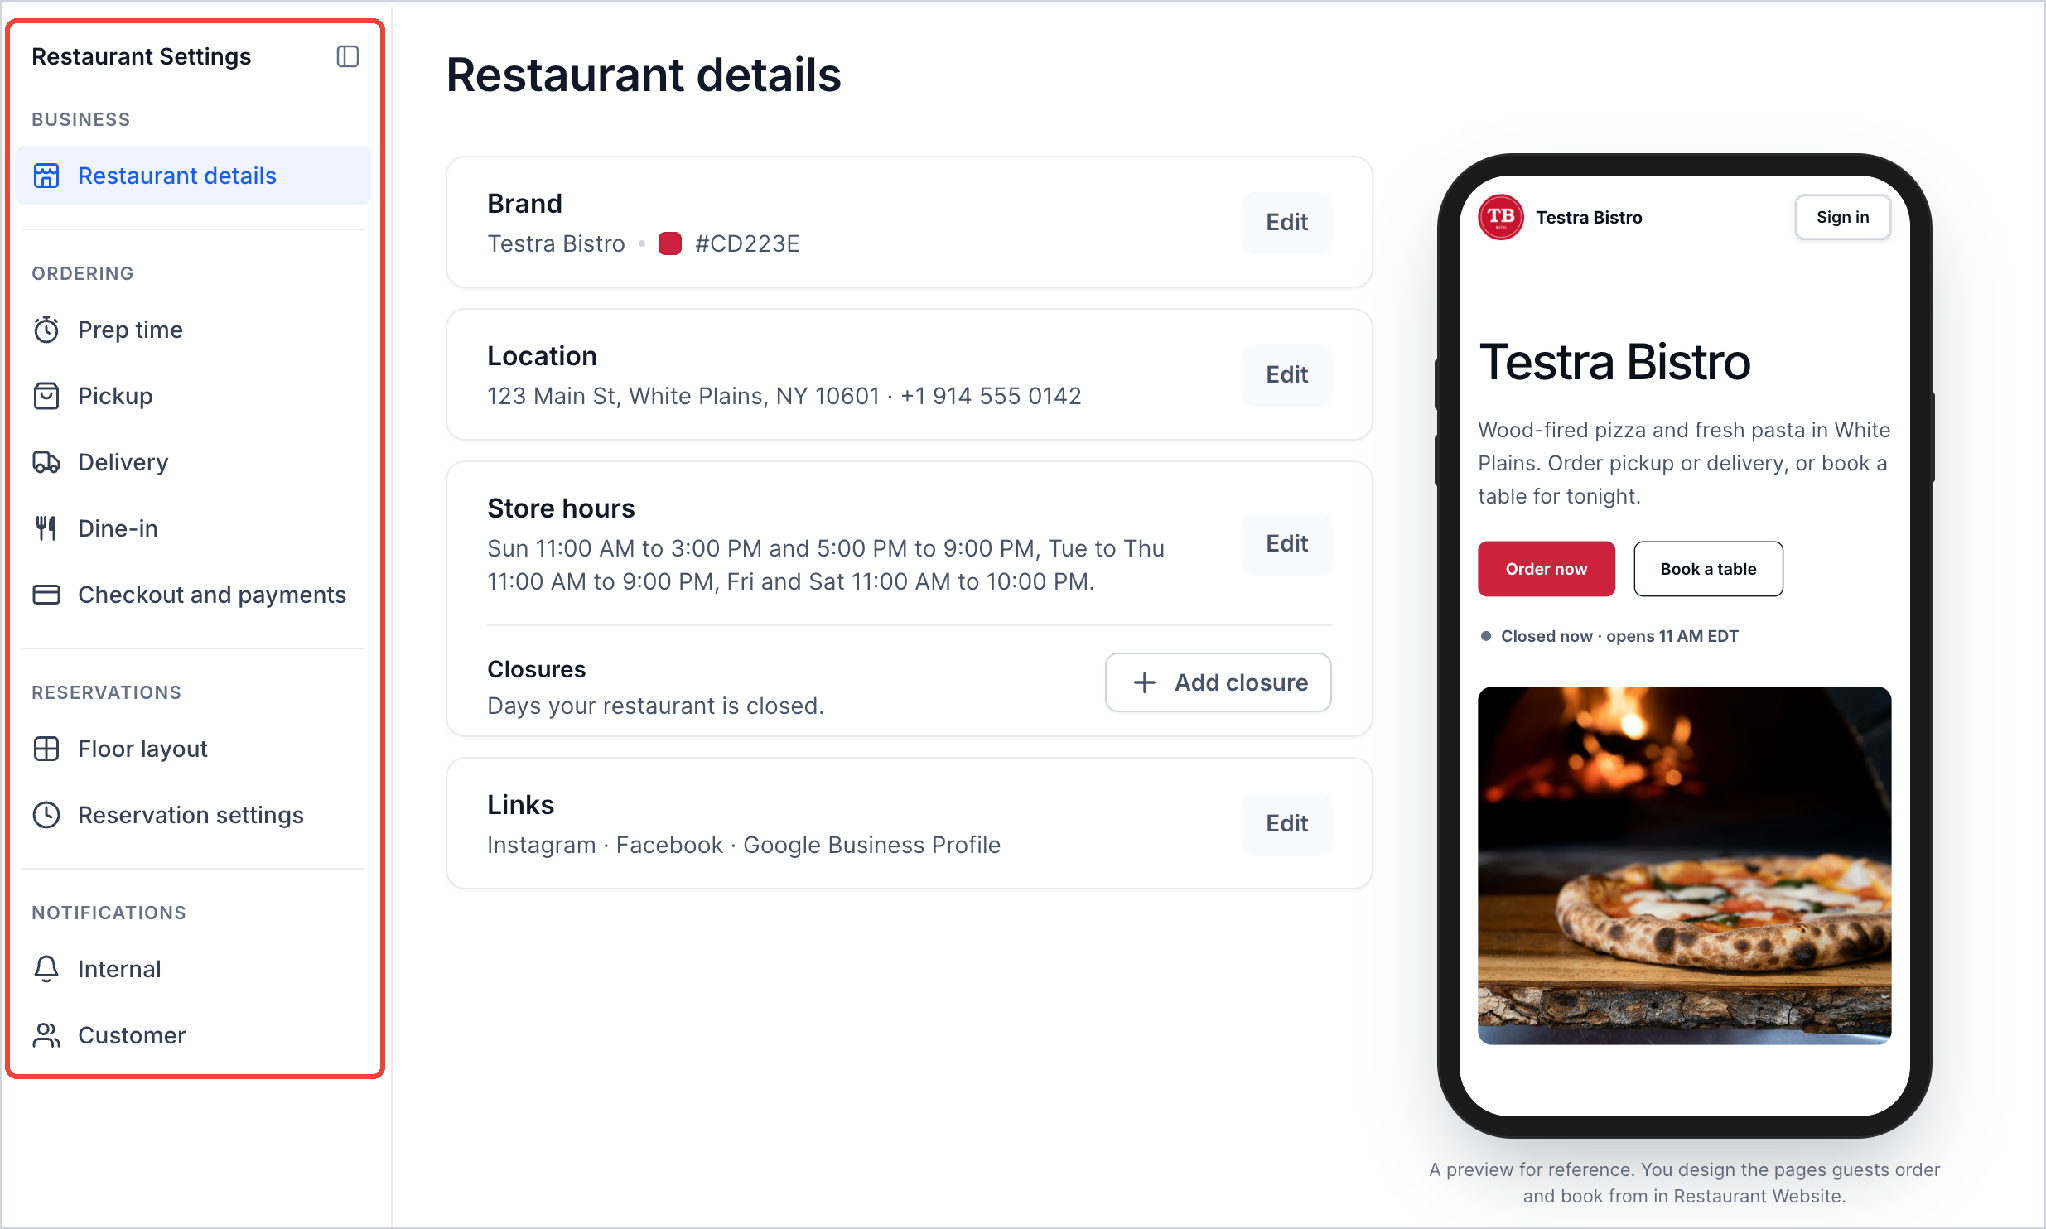
Other Restaurant Settings include Dine-in, Checkout and payments, and Internal and Customer Notifications.
Frequently Asked Questions
Q: Do I have to finish the steps in order?
No. Click any step in the setup panel to open it. Some steps depend on others: guests can order once a payment provider is connected, delivery starts once you add a delivery area, reservations start once your floor layout is ready, and deposits need a payment provider.
Q: Why does Chat To Clients CRM ask me to update my sub-account details?
Your business name, logo and location are part of your sub-account’s business profile. Saving them in setup changes them everywhere they are used, such as emails, invoices and your website. Click Update details to confirm, or Keep editing to go back.
Q: My uploaded menu missed or misread something. What should I do?
Fix it in the draft before you add it: click the three-dot menu next to an item and choose Edit item, Move to category or Remove from draft. You can also add and edit items any time later in Menu.
Q: How can I check what a guest pays for delivery?
In Delivery pricing, click Test an address and enter an address or a distance. You see the area, distance, delivery fee and delivery time. It includes changes you have not saved yet and does not change your settings.
Q: Does finishing setup make my restaurant live?
Not on its own. Guests can order and book once you publish your restaurant website. Click Publish website on Restaurant Website > Dashboard.
Q: Where do I change these settings after setup?
In Restaurants > Restaurant Settings. Change your menu in Menu and your payment providers in Payments.
Related Articles
- How to Create a Restaurant Menu in Chat To Clients CRM
- How to Manage and Customize a Restaurant Menu in Chat To Clients CRM
- Restaurant Orders: How to Manage Orders and Payments
- Getting Started - Connect Stripe