
Restaurant Orders: How to Manage Orders and Payments
Restaurant Orders in Chat To Clients CRM brings pickup, delivery, and dine-in orders into one place, making it easier to track and manage your restaurant's daily operations. You can view incoming orders, update preparation statuses, manage dine-in orders, and collect payments without switching between multiple tools. This article explains how to navigate Restaurant Orders, process orders, and manage payments from start to finish.
TABLE OF CONTENTS
- What Is Restaurant Orders?
- Key Benefits of Restaurant Orders
- Before You Start
- How to Access and Navigate Restaurant Orders
- How to Manage Order Statuses
- How to Manage Dine-in Orders and Payments
- How to Find Completed and Canceled Orders
- Restaurant Settings That Affect Orders
- Frequently Asked Questions
- Related Articles
What Is Restaurant Orders?
Restaurant Orders is a centralized workspace where your team can manage orders throughout their lifecycle, from receiving an order to preparing, serving, or delivering it. It helps staff stay organized and track each order's progress while keeping order and payment information accessible.
Orders can originate from two sources:
- Pickup and delivery: Customers place orders through your published restaurant website.
- Dine-in: Staff create orders for seated guests through Reservations and send them to the kitchen. Each round of items ordered appears separately in Restaurant Orders.
Each order displays important information, including order type, items, preparation status, timing, customer details, total amount, and payment status.
Key Benefits of Restaurant Orders
Managing all restaurant orders from a central location helps your team coordinate food preparation, reduce missed orders, and provide a smoother customer experience.
- One list for every order: Pickup, delivery and dine-in orders sit side by side, so nothing is missed.
- One click to the next step: The button next to each status moves the order forward, for example from Accepted to In progress.
- Guests stay informed: Guests get updates when their order is received, accepted, ready, on its way or delivered, based on your notification settings.
- See what is late: Turn on Running late to see only the orders that are behind.
- Payments in the same place: Take payment for a table from its order, by card or recorded by hand.
Before You Start
A few restaurant settings must be configured before your team can begin processing orders. The requirements depend on whether you offer online ordering, dine-in service, or both.
- Menu: Add your restaurant's menu items so customers and staff can select them when placing orders.
- Restaurant website: Publish your restaurant website to make online ordering available. Until it is published, the Orders page may display Ordering off.
- Payments: Connect a supported payment provider to accept online or card payments.
- Dine-in setup: Configure your restaurant's floor layout and tables in Reservations before taking dine-in orders.
How to Access and Navigate Restaurant Orders
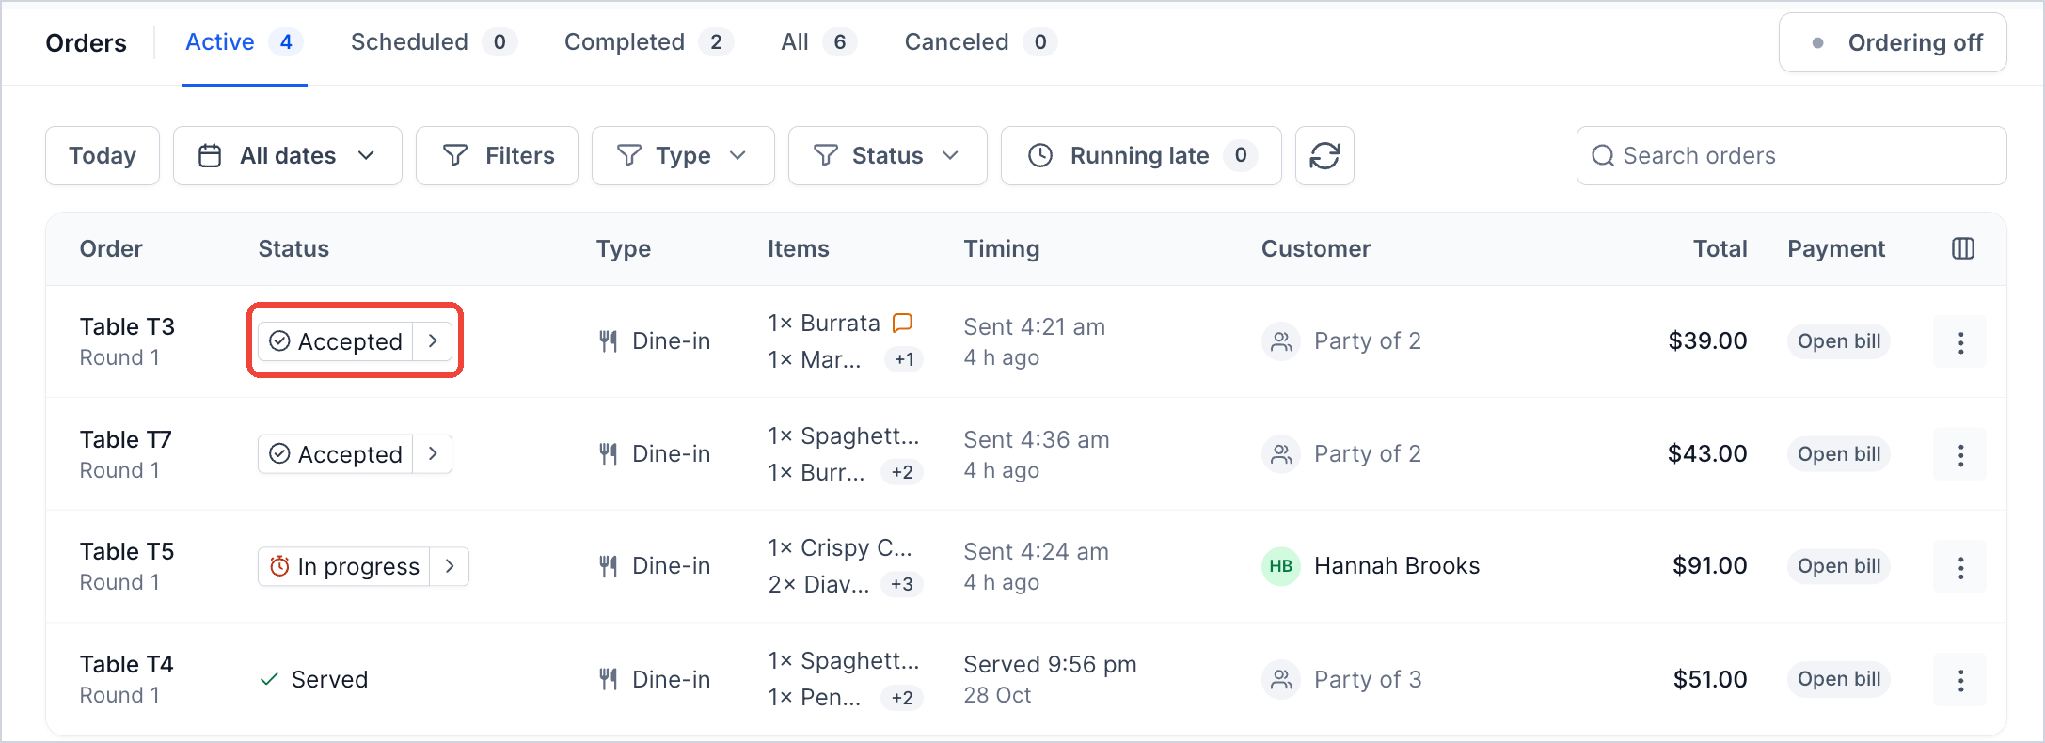
The Restaurant Orders workspace organizes orders by their progress and provides filters to help your team focus on what needs attention. Understanding the available tabs and controls makes it easier to manage orders during busy service hours.
Open Restaurant Orders
- In your Chat To Clients CRM sub-account, click Restaurants in the left navigation.
- Select Restaurant Orders.
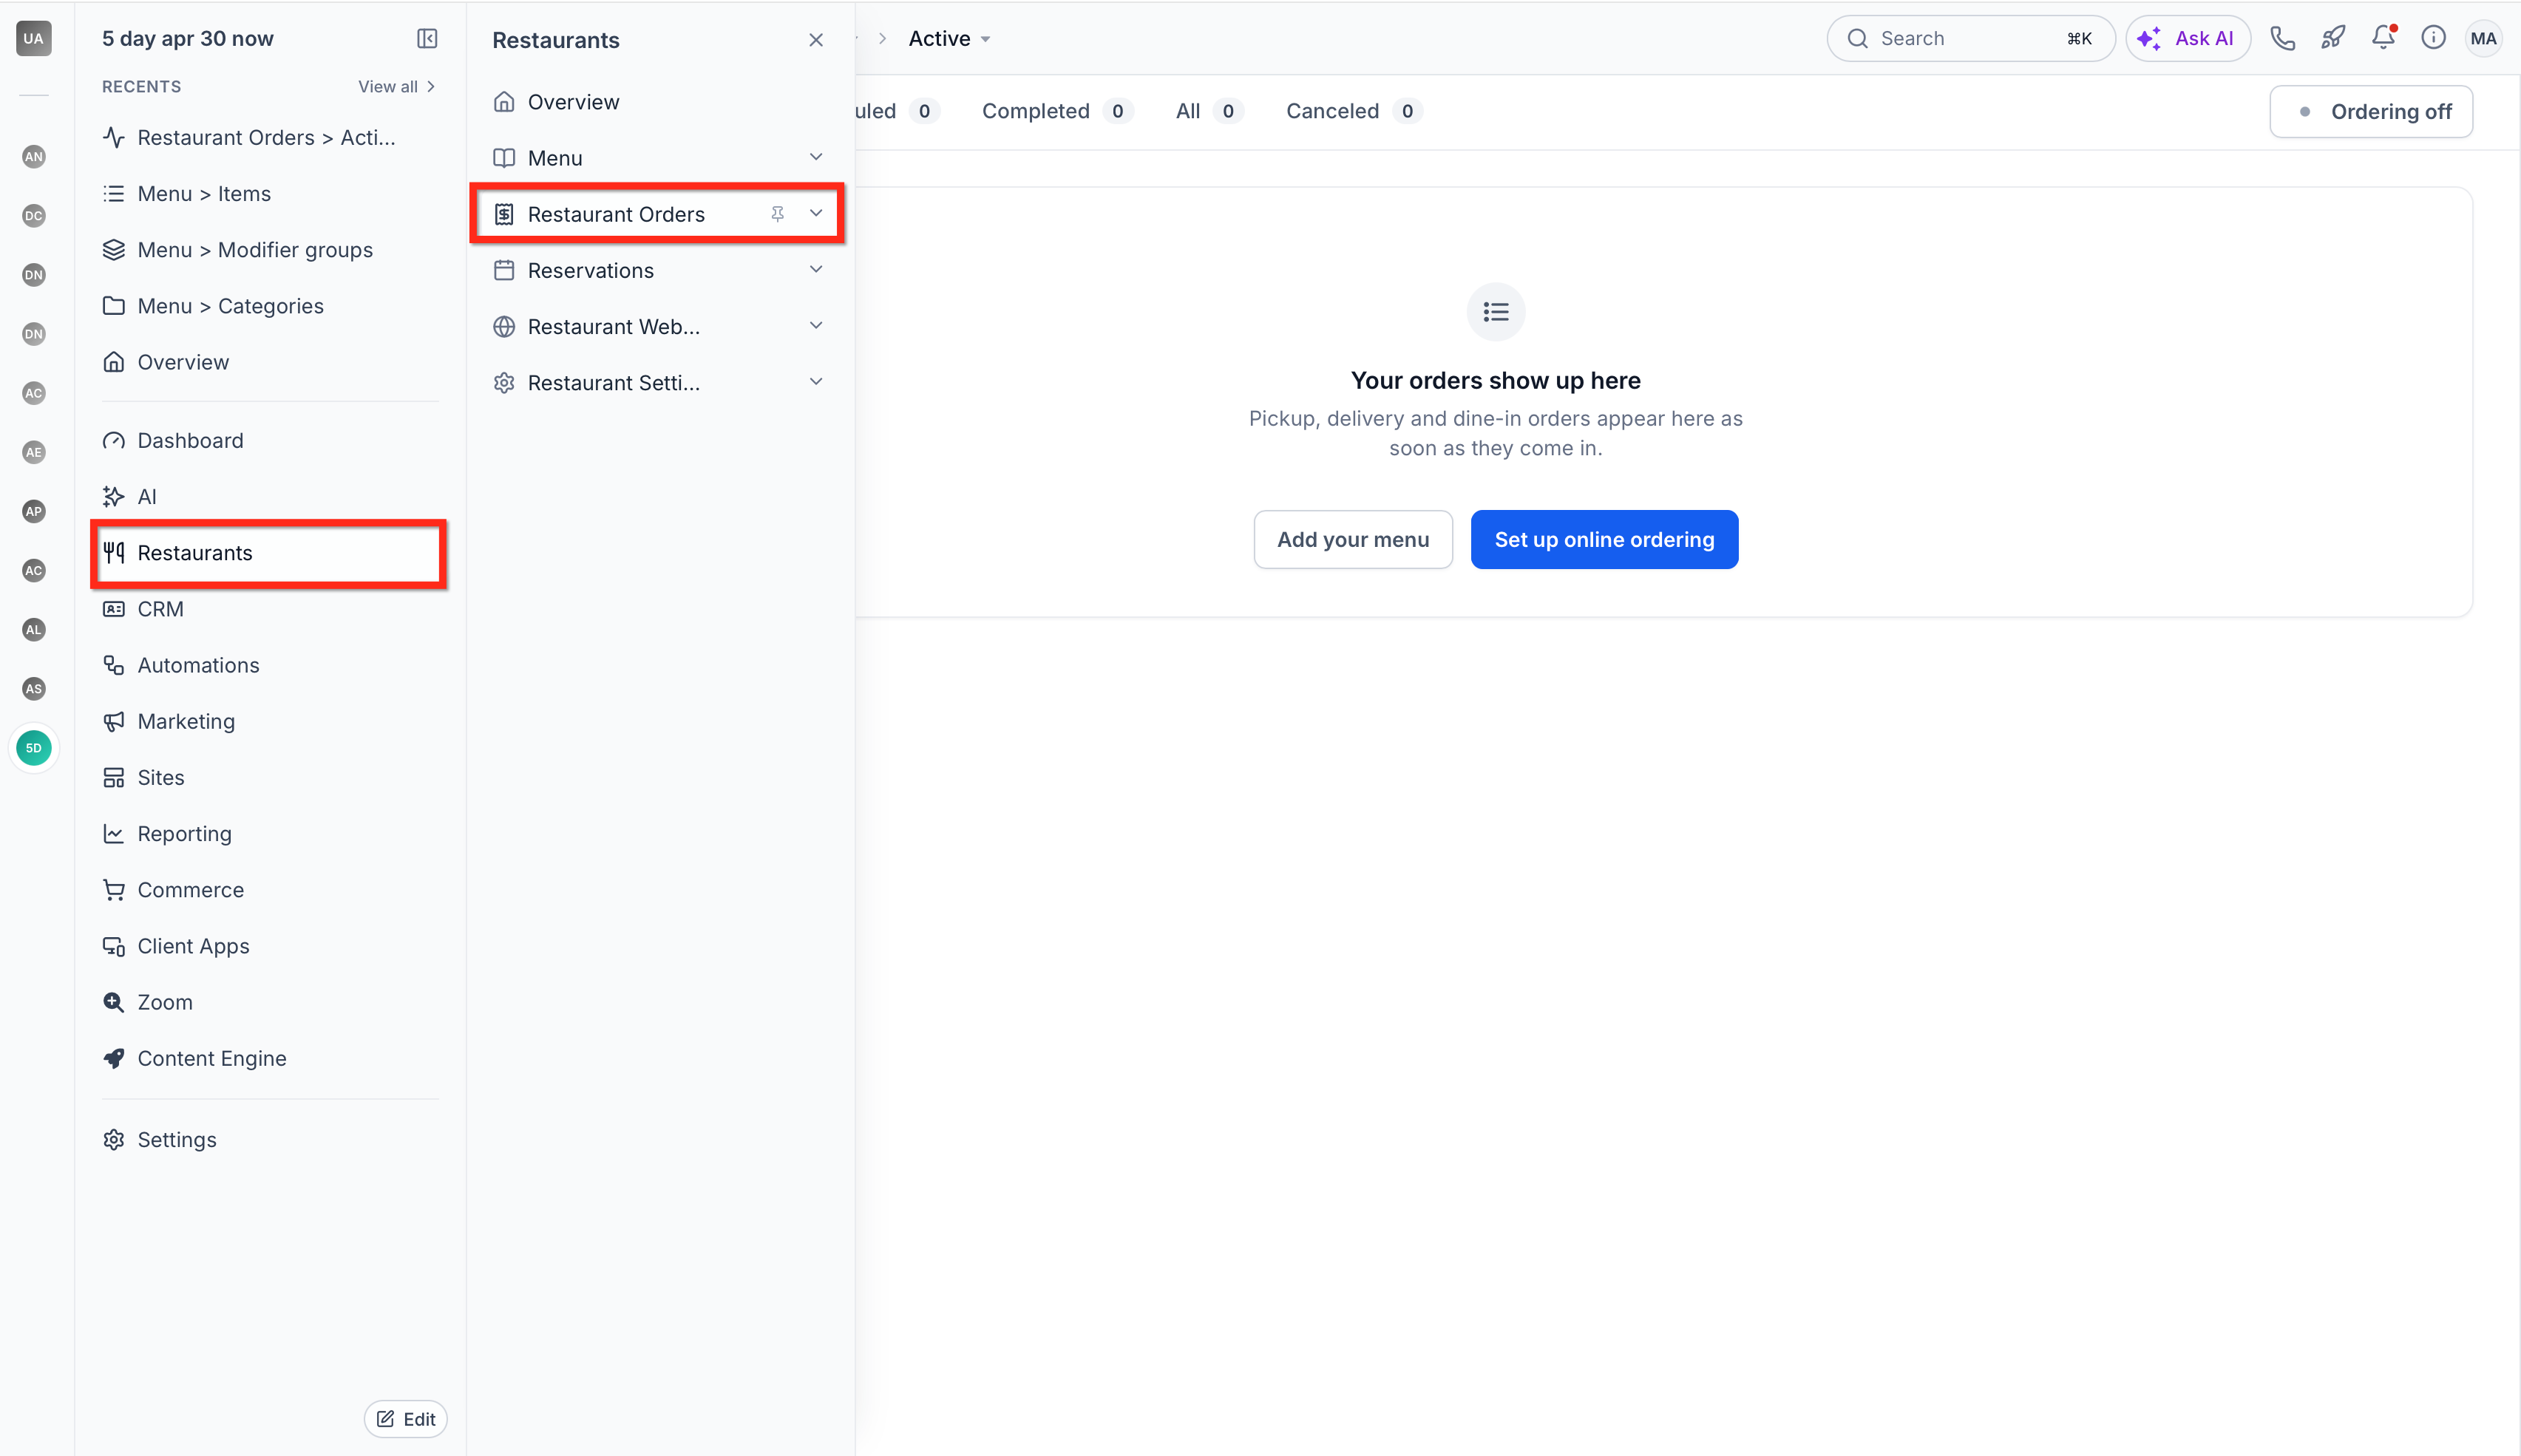
- The Active tab opens by default, displaying orders currently being processed.
If your restaurant has not received any orders, the page displays Your orders show up here, along with options to add a menu and configure online ordering.
Tip: Expand Restaurant Orders in the navigation panel to access individual tabs, such as Scheduled or Completed.Understand the Order Tabs
Orders are grouped into tabs based on their current stage, allowing staff to focus on active work while keeping scheduled and historical orders accessible.
| Tab | Description |
|---|---|
| Active | Orders currently being processed, from new orders through fulfillment. Dine-in orders remain active until the table's bill is paid. |
| Scheduled | Orders customers have placed in advance for a later time. |
| Completed | Finished orders, including dine-in tables that have paid and closed. |
| All | Displays orders across all stages. |
| Canceled | Orders that have been canceled. |
Find and Filter Orders
Filters help staff quickly locate specific orders, monitor delays, and prioritize work without searching through the entire order list.
- Today or All dates: Choose the dates to show.
- Type: Show All types, or only Pickup, Delivery or Dine-in orders.
- Status: Show orders at one step. Each status shows how many orders it holds.
- Filters: Filter by Payment status.
- Running late: Turn it on to show only the orders running late.
- Search orders: Find an order by what you know about it.
- Refresh: Load the newest orders.
The order list displays columns for Order, Status, Type, Items, Timing, Customer, Total, Payment, and Actions.
Completed orders display Outcome and Finished instead of Status and Timing.
Click Manage columns to customize the information visible in the list.
How to Manage Order Statuses
Each order follows a sequence of statuses that reflects its preparation and fulfillment progress. Updating these statuses helps your team coordinate kitchen operations and, for pickup and delivery orders, communicate progress to customers.
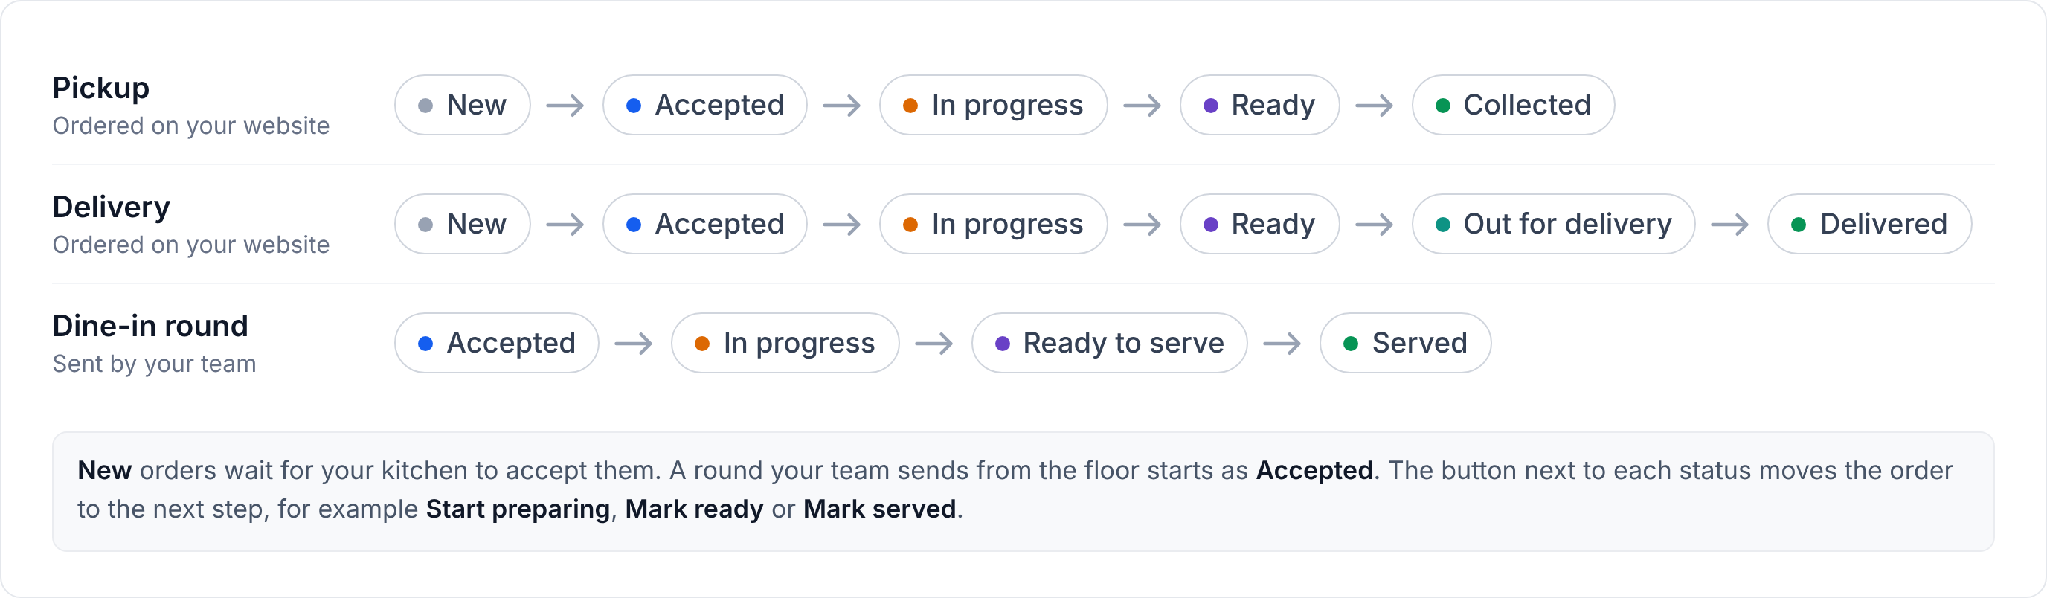
How an Order Moves
Pickup and delivery orders placed through your website initially appear as New and wait for your team to accept them.
Dine-in orders follow a slightly different process. When staff send an order round to the kitchen, it enters Restaurant Orders with the Accepted status.
The typical fulfillment flow depends on the order type:
- Pickup: New → Accepted → In progress → Ready to collect → Collected.
- Delivery: New → Accepted → In progress → Ready for delivery → On its way → Delivered.
- Dine-in: Accepted → In progress → Ready to serve → Served.
Move an Order to the Next Status
Order statuses can be updated using the action button beside each order or by selecting a status directly.
- Open Restaurants → Restaurant Orders.
- Locate the order in the Active tab.
- Click the action button next to its current status.
- The order advances to the next stage.
For dine-in orders, the following actions are available:
| Current Status | Action | New Status |
|---|---|---|
| Accepted | Start preparing | In progress |
| In progress | Mark ready | Ready to serve |
| Ready to serve | Mark served | Served |
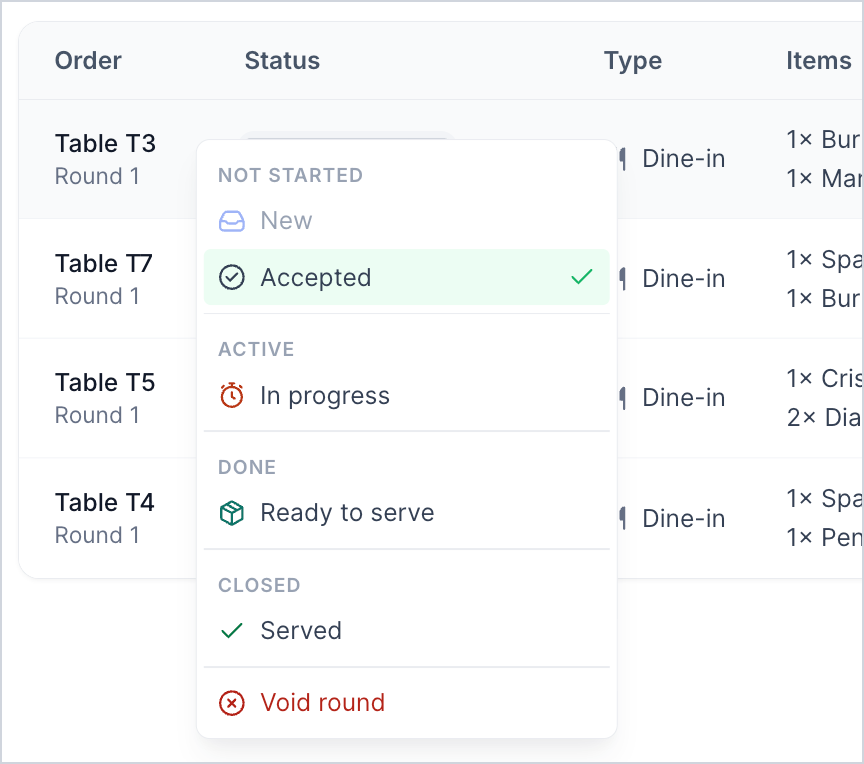
To select a different status manually, click the order's current status and choose an option from the dropdown.
For dine-in rounds, the available options include New, Accepted, In progress, Ready to serve, Served, and Void round.
Note: Pickup and delivery customers can receive notifications when their orders reach certain stages, such as Order accepted or Ready to collect. These messages depend on the customer notification settings configured for your restaurant.View Order Details
Opening an order provides additional information about its items, status, customer, and payment. For dine-in orders, it also helps staff review the table's activity and manage additional rounds.
- Locate an order in Restaurant Orders.
- Click the order to open its details.
- Review the available information and actions.
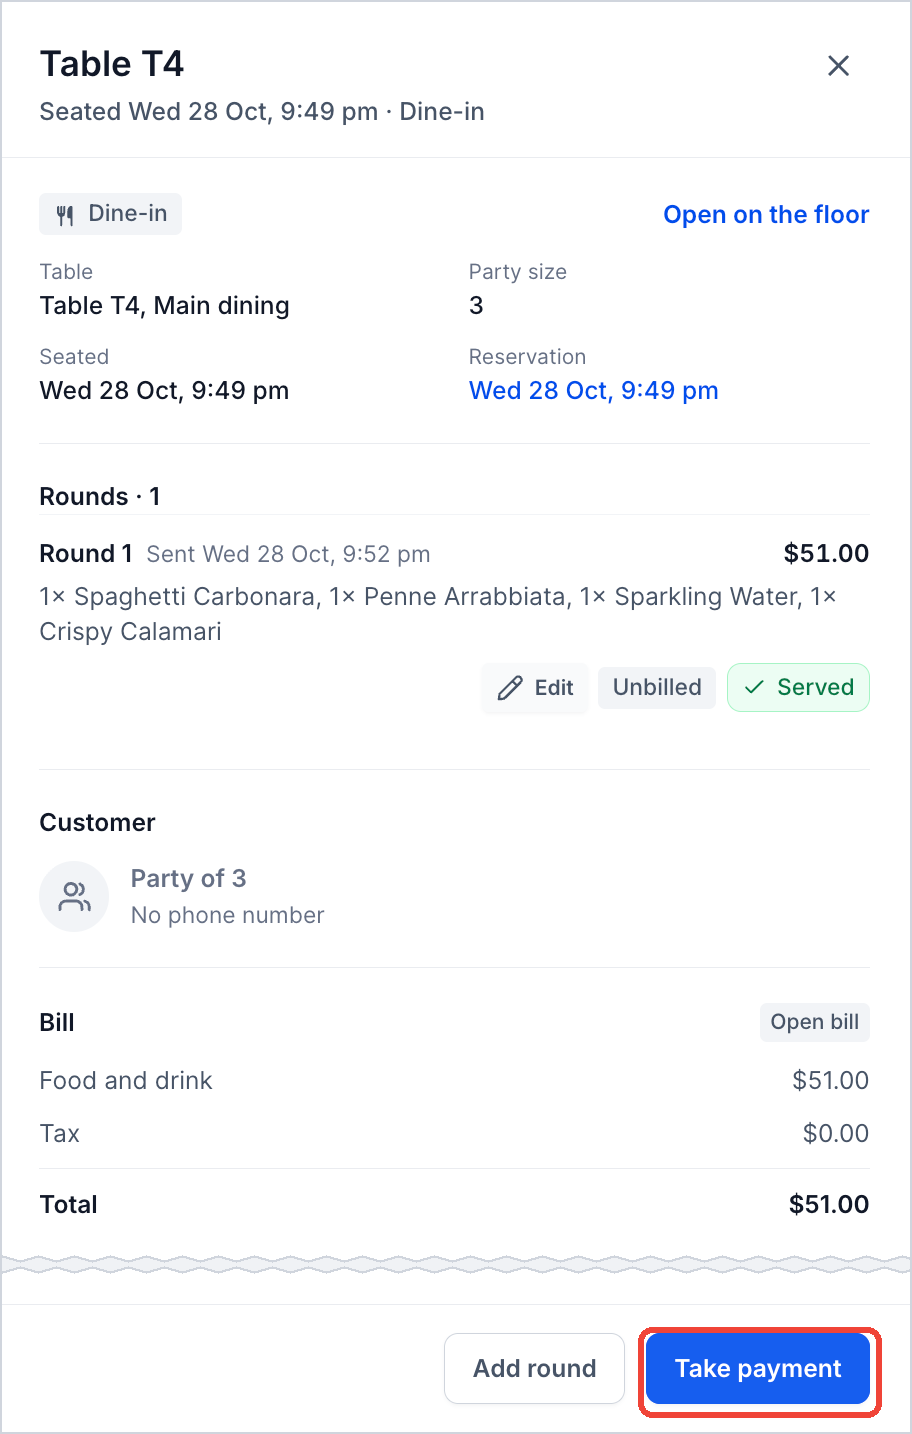
Dine-in order details include the table and area, party size, seating time, reservation, individual rounds, ordered items, guest information, and bill.
You can also click the three-dot menu beside an order to access quick actions.
For an open dine-in table, these include:
- View table
- Add round
- Take payment
- Open on the floor
For completed tables, available actions include View table, Open on the floor, and View guest history.
How to Manage Dine-in Orders and Payments
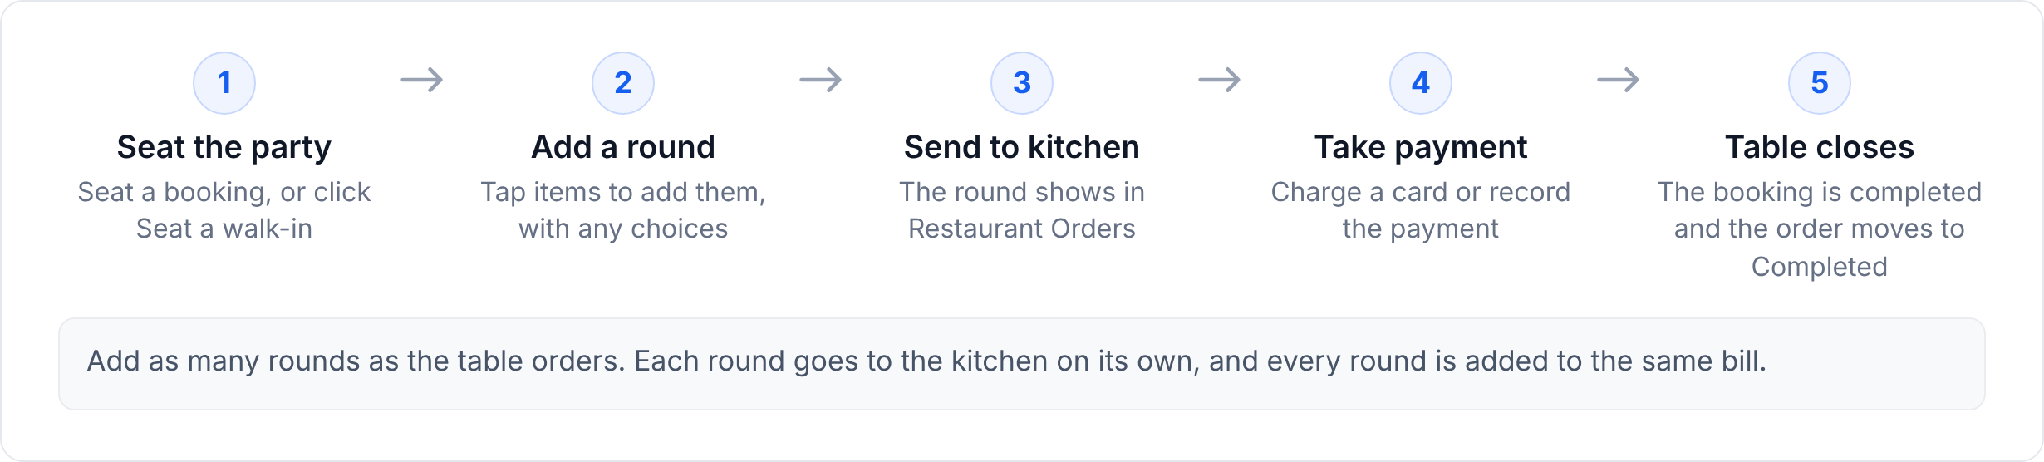
Dine-in orders are managed through individual rounds associated with a seated table. Each round is sent to the kitchen separately, while the overall table bill combines the charges for the visit. This allows staff to handle multiple rounds of food and drinks before collecting payment.
Create and Send a Dine-in Order
Staff create dine-in orders from Reservations, where they can select menu items, customize them, and send each round to the kitchen.
In Reservations, open a seated table and go to Order.
Click Add round, then tap each item the table orders. Items with choices, such as add-ons, open first so you can pick them, add a Kitchen note and set the Quantity.
Check the round. You can add one more of an item, remove it, or edit it. The Round subtotal shows the total, and tax is added to the bill.
- Click Send to kitchen. The round appears in Restaurant Orders with an Accepted status, labeled with its table and round number, such as Table T4 – Round 1.
To add another round, open the three-dot menu next to the table's order and select Add round.
Each round is tracked separately, but the table's bill includes the charges from its rounds.
Collect Payment for a Dine-in Table
A dine-in order remains in the Active tab until the table's bill is paid, even when all food has been served. Staff can collect payment directly from Restaurant Orders or from the table in Reservations.
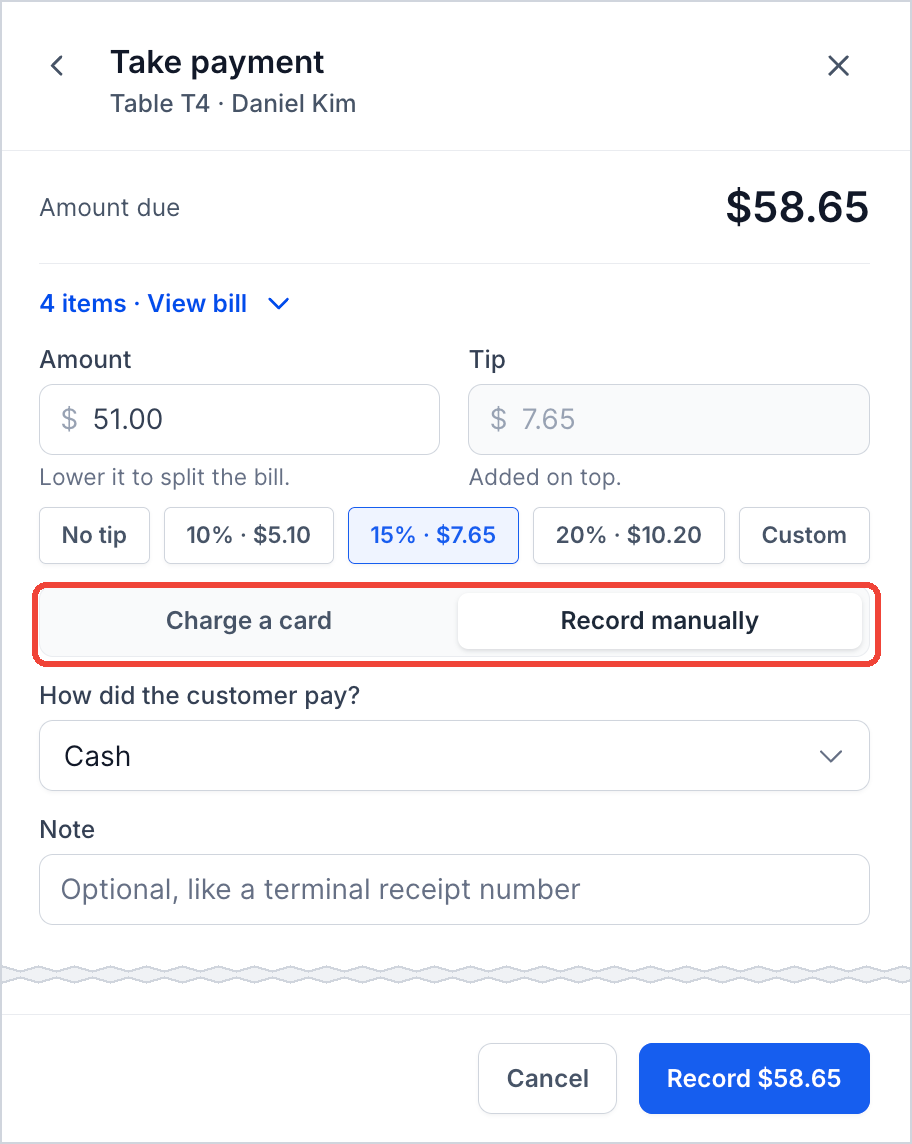
Click the three-dot menu next to the order and choose Take payment, or click Take payment in the order’s details.
Check the Amount due. Click View bill to see every item.
Choose a tip: No tip, one of your suggested amounts (for example 15%), or Custom.
Search for the guest, or add them as a new guest with a phone number or email. A guest is needed to take payment.
Choose how the guest pays. Charge a card uses your card payment provider. Record manually is for a payment you took another way: choose Cash, Card, Cheque, Bank transfer or Other, and add an optional Note, like a terminal receipt number.
Optional: to split the bill, choose Record manually and lower the Amount to what this guest pays. Take payment again for the rest. A card payment always pays the full amount due.
Click Charge or Record. The button shows the amount.
Important: Card payments require a connected payment provider. If no provider is connected, the system displays No payment provider found. You can still use Record manually to record payments collected through another method.
Once the table's full bill is paid:
- The payment status changes to Paid.
- The table is closed.
- The booking is marked as completed.
- The order moves from Active to Completed.
How to Find Completed and Canceled Orders
Completed and canceled orders remain accessible for reviewing previous transactions, checking fulfillment outcomes, and looking up customer order information.
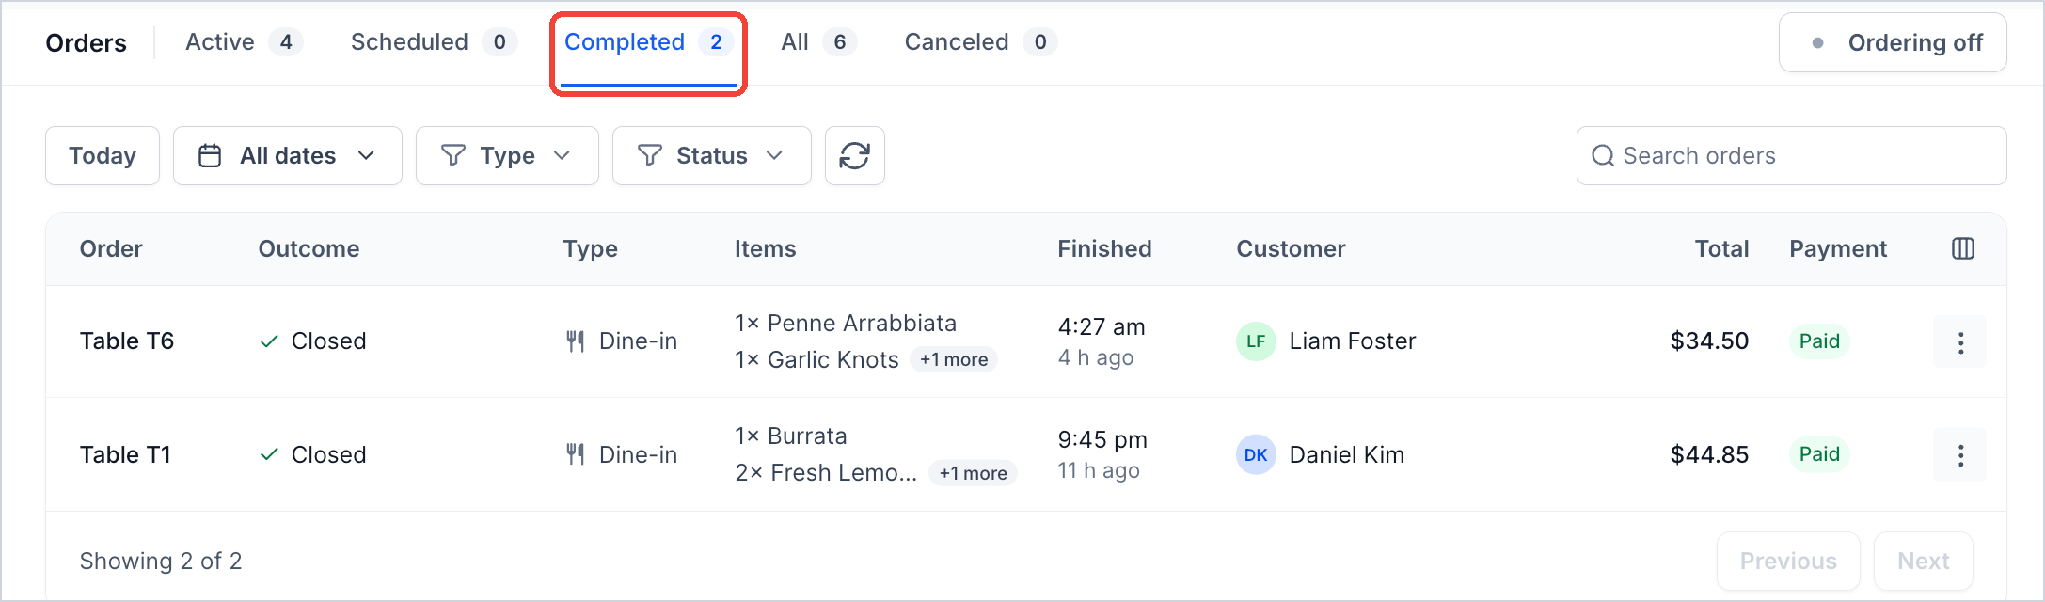
Click Completed, Canceled or All.
Choose All dates to see orders from before today.
Use Type, Filters or Search orders to narrow the list.
Completed orders show their Outcome, for example Closed for a table that paid, and when they Finished. Click the three-dot menu and choose View guest history to see a guest’s past visits
Restaurant Settings That Affect Orders
Restaurant Settings determine how orders are accepted, prepared, paid for, and communicated to customers. Keeping these settings up to date helps your team manage order availability, fulfillment times, and notifications accurately.
| Setting | What It Controls |
|---|---|
| Prep time | The estimated preparation duration used to calculate when an order should be ready. |
| Pickup and Delivery | Ordering availability, operating hours, scheduled orders, price markup, delivery areas, fees, and downtime. |
| Checkout and payments | Payment provider configuration, live payment mode, and available tip options. |
| Notifications → Internal | On-screen alerts, sounds for new orders, and staff notifications. |
| Notifications → Customer | Messages customers receive as pickup and delivery orders progress. |
These options are managed through Restaurant Settings.
Frequently Asked Questions
Q: Why does Restaurant Orders display "Ordering off"?
The restaurant website may not be published yet. Publish your restaurant website and ensure your online ordering settings are configured. Dine-in orders can still be created from seated tables in Reservations.
Q: Why is a served dine-in order still showing as Active?
A dine-in order remains active until the table's bill is fully paid, even if all rounds have been served.
Q: Can I accept cash payments for dine-in orders?
Yes. Select Take payment, choose Record manually, select Cash, and record the amount received.
Q: How will my staff know when a new online order arrives?
New orders can trigger on-screen notifications and sounds until an order is accepted. Configure staff alerts under Restaurant Settings → Notifications → Internal.
Q: What order notifications can customers receive?
Pickup notifications can include Order received, Order accepted, Ready to collect, Collected, and Order canceled. Delivery notifications can include Order received, Order accepted, On its way, Delivered, and Order canceled. Available messages are managed under Restaurant Settings → Notifications → Customer.
Q: Can I modify the suggested tip amounts?
Yes. Open Restaurant Settings → Checkout and payments to adjust the suggested tip amounts and default tip.
Q: Can customers place orders in advance?
Scheduled orders can be enabled through the restaurant's pickup and delivery settings. Advance orders are displayed under the Scheduled tab.
Q: Can I see previous orders from a particular customer?
Yes. Use the All or Completed tab and the available search and filters. For completed dine-in orders, the View guest history action provides access to past guest visits.
Related Articles
- Restaurant Setup Guide: Get Ready to Take Orders and Reservations
- How to Create a Restaurant Menu in Chat To Clients CRM
- Restaurant Reservations: Manage Bookings, Tables, and Guests
- Restaurant Website: How to Customize and Publish Your Site
- How to Manage and Customize a Restaurant Menu in Chat To Clients CRM
- Restaurant Settings: Change Your Restaurant’s Details and Rules