
Getting Started - Connect Stripe
Connecting Stripe to Chat To Clients CRM allows you to process supported payments through your sub-account and use Stripe across eligible Chat To Clients CRM payment experiences. Once connected, you can manage supported payment methods, configure how Stripe is used across payment channels, and begin collecting payments from customers. Use this guide to connect Stripe, verify the integration, and understand the most important settings to review before accepting payments.
TABLE OF CONTENTS
- What is Connecting Stripe to Chat To Clients CRM?
- Key Benefits of Connecting Stripe to Chat To Clients CRM
- Before You Connect Stripe
- Stripe Payment Methods
- Payment Provider and Channel Configuration
- How To Setup Stripe in Chat To Clients CRM
- Frequently Asked Questions
- Related Articles
What is Connecting Stripe to Chat To Clients CRM?
Connecting Stripe makes your Stripe account available as a payment provider within a Chat To Clients CRM sub-account. This connection allows supported Chat To Clients CRM payment experiences to send eligible transactions to Stripe for processing while keeping the payment workflow connected to your Chat To Clients CRM account. Each Chat To Clients CRM sub-account can connect to one Stripe account at a time.
After the connection is complete, Stripe can be used across supported Chat To Clients CRM product areas, including eligible invoices, payment links, order forms, forms, stores, calendars, courses, communities, and other payment experiences. The exact payment methods available depend on the product area, Stripe account eligibility, payment configuration, and other applicable requirements.
Key Benefits of Connecting Stripe to Chat To Clients CRM
Connecting Stripe gives you a direct way to use Stripe-supported payment processing within eligible Chat To Clients CRM experiences. It also gives you greater control over how customers can pay and where Stripe is used across your payment workflows.
Centralized Payment Setup: Connect Stripe from your Chat To Clients CRM sub-account and manage supported Stripe payment settings without leaving your payment workflow.
Multiple Payment Experiences: Use Stripe with supported Chat To Clients CRM experiences such as invoices, payment links, order forms, stores, forms, calendars, and other eligible product areas.
Payment Method Control: Manage supported cards, wallets, bank debit methods, and other eligible Stripe payment methods from Chat To Clients CRM.
Separate Test and Live Configuration: Configure supported payment methods independently for Test Mode and Live Mode.
Flexible Provider Routing: When multiple providers are connected, configure preferred providers for supported payment channels.
Integrated Selling Workflows: Connect Stripe before creating payment links, selling products, sending invoices, or using other supported checkout experiences.
Before You Connect Stripe
Having the correct account access before beginning the connection helps prevent authorization issues and makes it easier to verify the integration when setup is complete.
Before connecting Stripe:
Make sure you are working in the Chat To Clients CRM sub-account where Stripe should be connected.
Have access to the Stripe account you want to connect, or be prepared to create a Stripe account during the connection process.
Make sure you have the appropriate Stripe permissions to authorize the integration.
Confirm that Stripe is supported for the applicable country before beginning setup.
If you cannot authorize the connection, the Stripe account owner may need to adjust your permissions before you can continue.
Stripe Payment Methods
Connecting Stripe establishes the payment-provider connection, while payment-method settings determine which eligible ways customers can pay. Chat To Clients CRM allows supported Stripe payment methods to be managed for different product areas, helping you control the checkout options available to customers.
Depending on your account and payment experience, available methods may include cards, wallets, bank debit options, regional payment methods, or supported Buy Now, Pay Later options.
Payment-method availability can vary based on factors such as:
Stripe account verification and eligibility
Country or regional support
The currency being used
The Chat To Clients CRM product area or checkout type
Whether you are configuring Test Mode or Live Mode
Additional requirements from Stripe for a specific payment method
Payment methods can be configured independently for Test and Live environments. Existing Stripe payment-method settings are preserved as the default unless they are updated through Chat To Clients CRM.
For detailed configuration instructions, see How to Manage Stripe Payment Methods inside Chat To Clients CRM.
Payment Provider and Channel Configuration
Connecting Stripe makes it available as a payment provider, but the connected provider is not necessarily used for every payment channel when multiple providers are configured. Channel-level settings allow you to control which connected provider is preferred for supported payment experiences.
Chat To Clients CRM can apply payment-provider preferences to channels such as funnels, forms, stores, invoices, payment links, calendars, courses, communities, and other supported areas. When a channel has its own provider configuration, that setting can determine which provider is used instead of relying only on the account's global default.
Only providers already connected to the sub-account are available for channel configuration. If a preferred provider is disconnected, Chat To Clients CRM can fall back to the default provider for that channel.
For detailed routing instructions, see Configure Payment Providers by Channel.
How To Setup Stripe in Chat To Clients CRM
A complete Stripe setup includes connecting the Stripe account, completing Stripe's authorization process, and confirming that the integration is enabled in Chat To Clients CRM. Verifying the connection before building payment experiences helps prevent configuration issues later.
From your Chat To Clients CRM sub-account, go to Payments.
Select Integrations.
Locate Stripe and click Connect or Connect with Stripe.
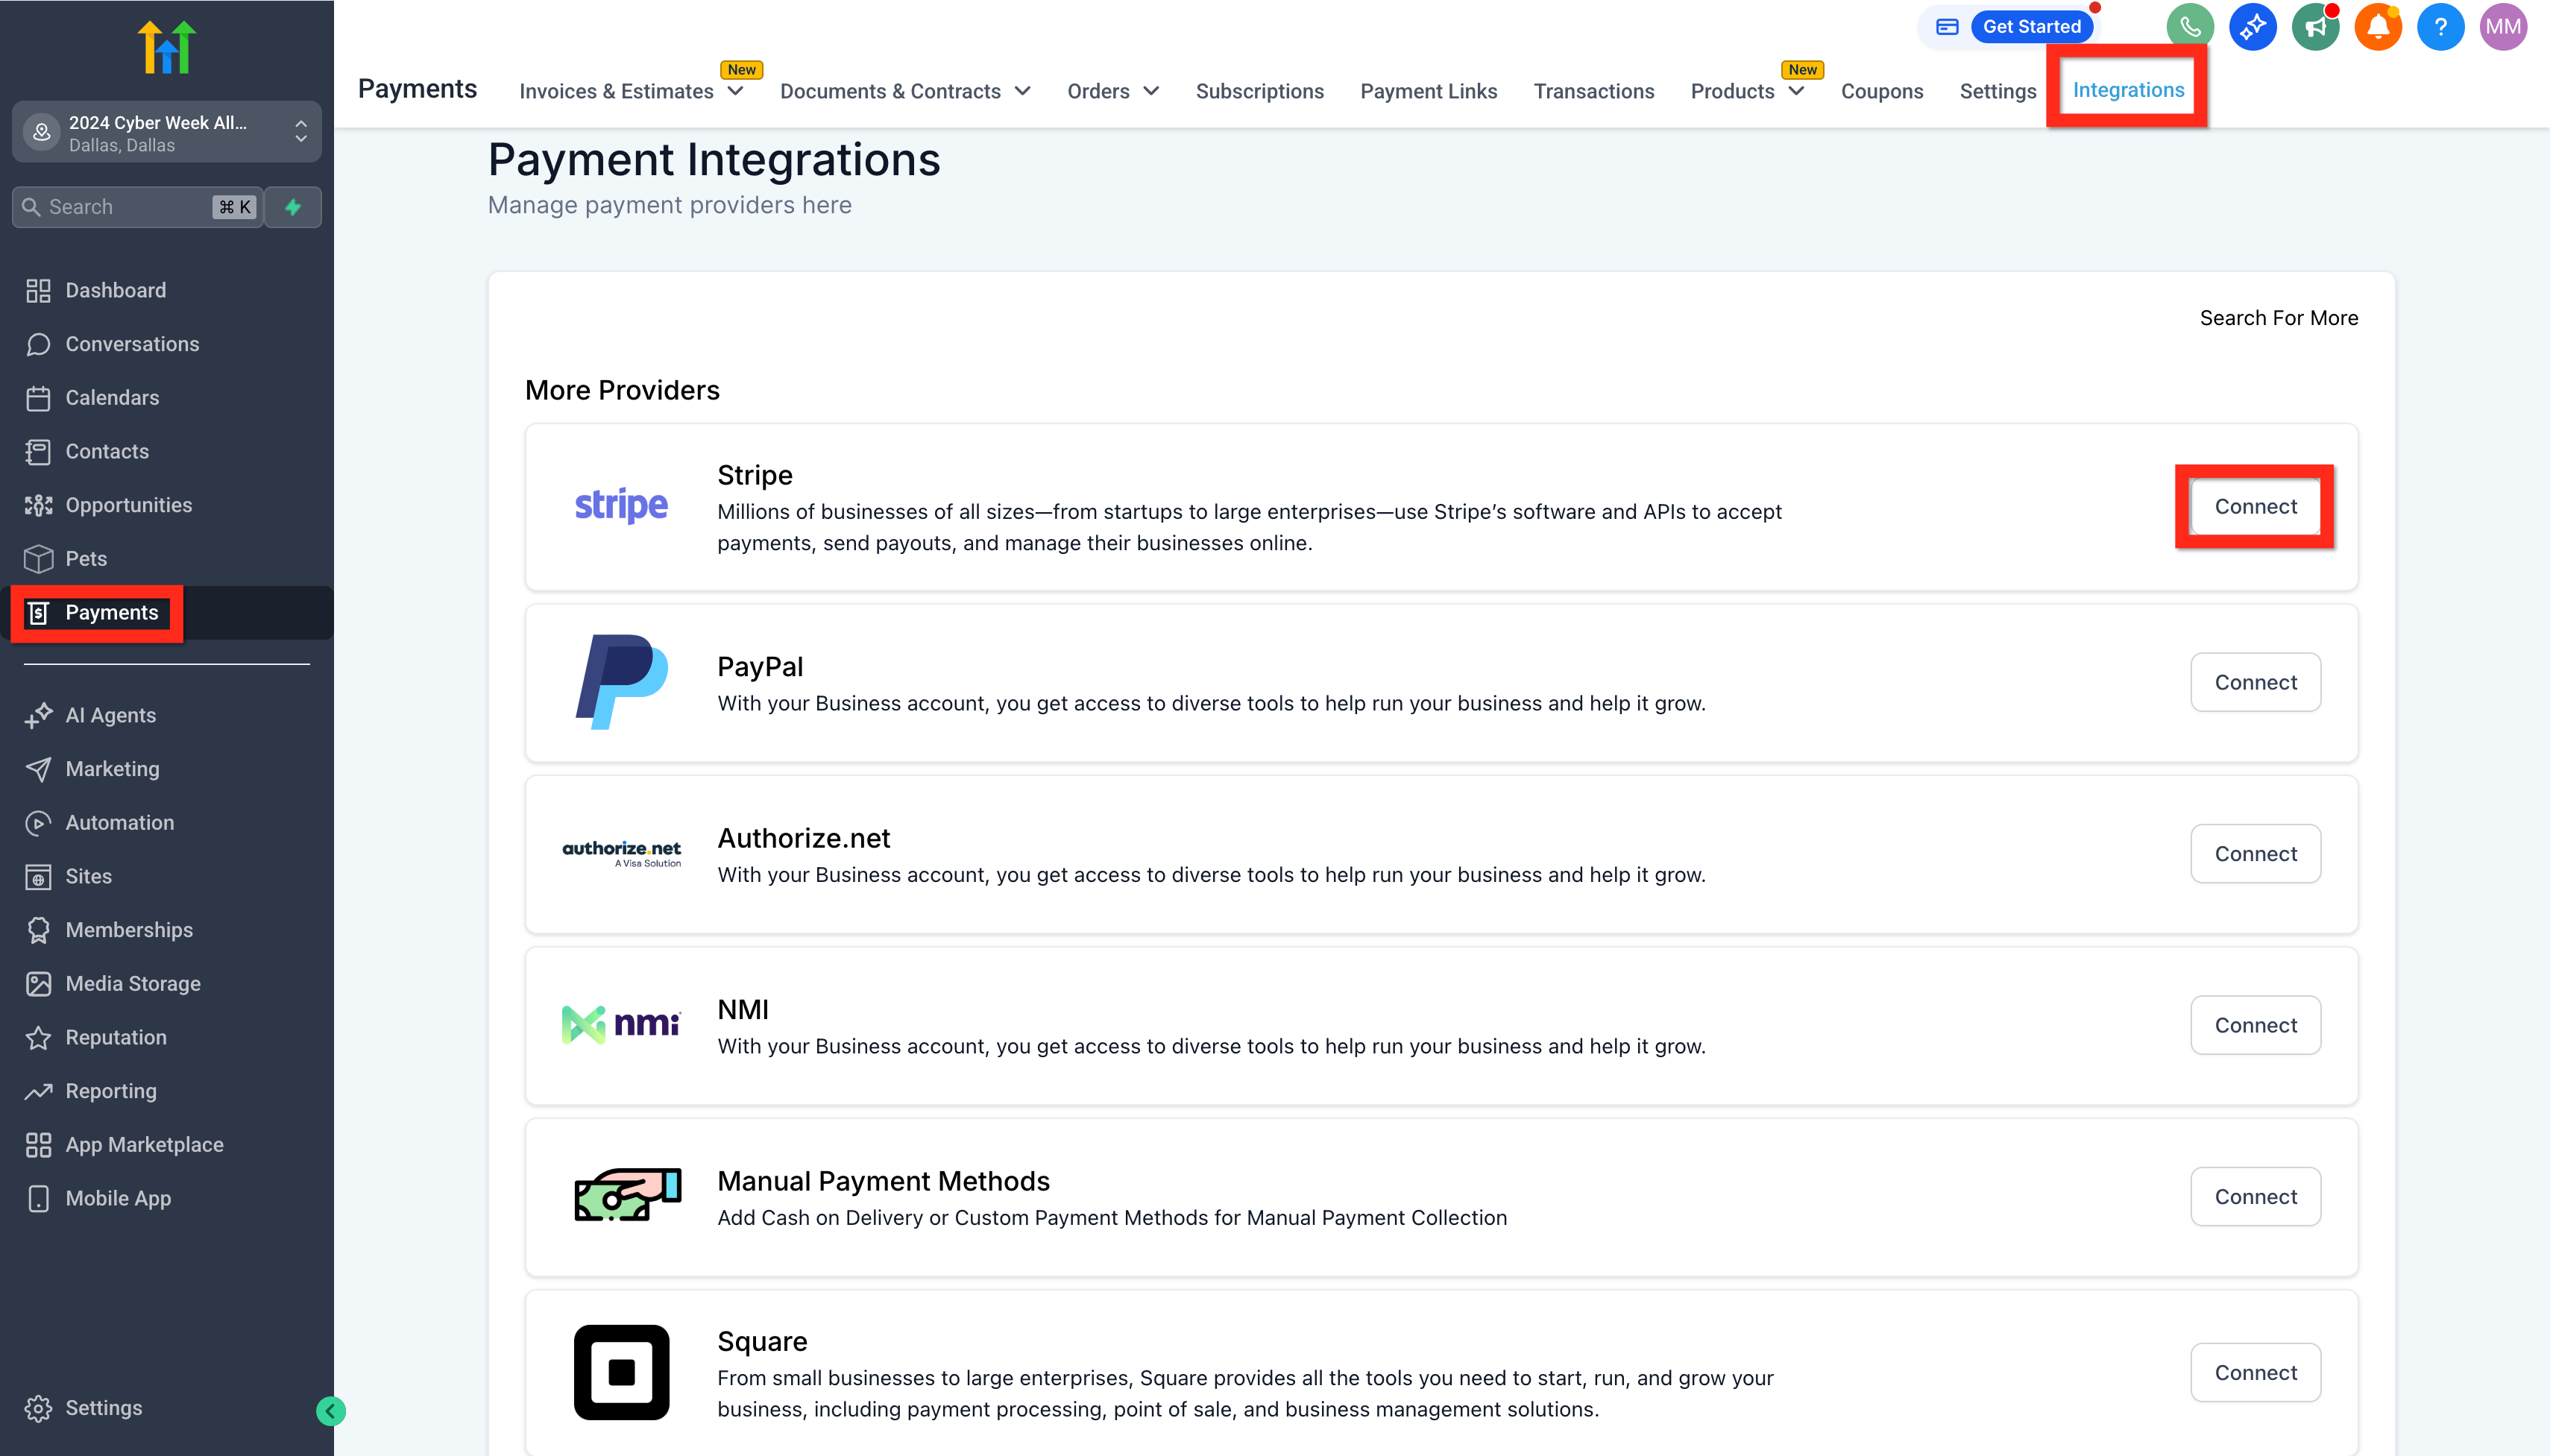
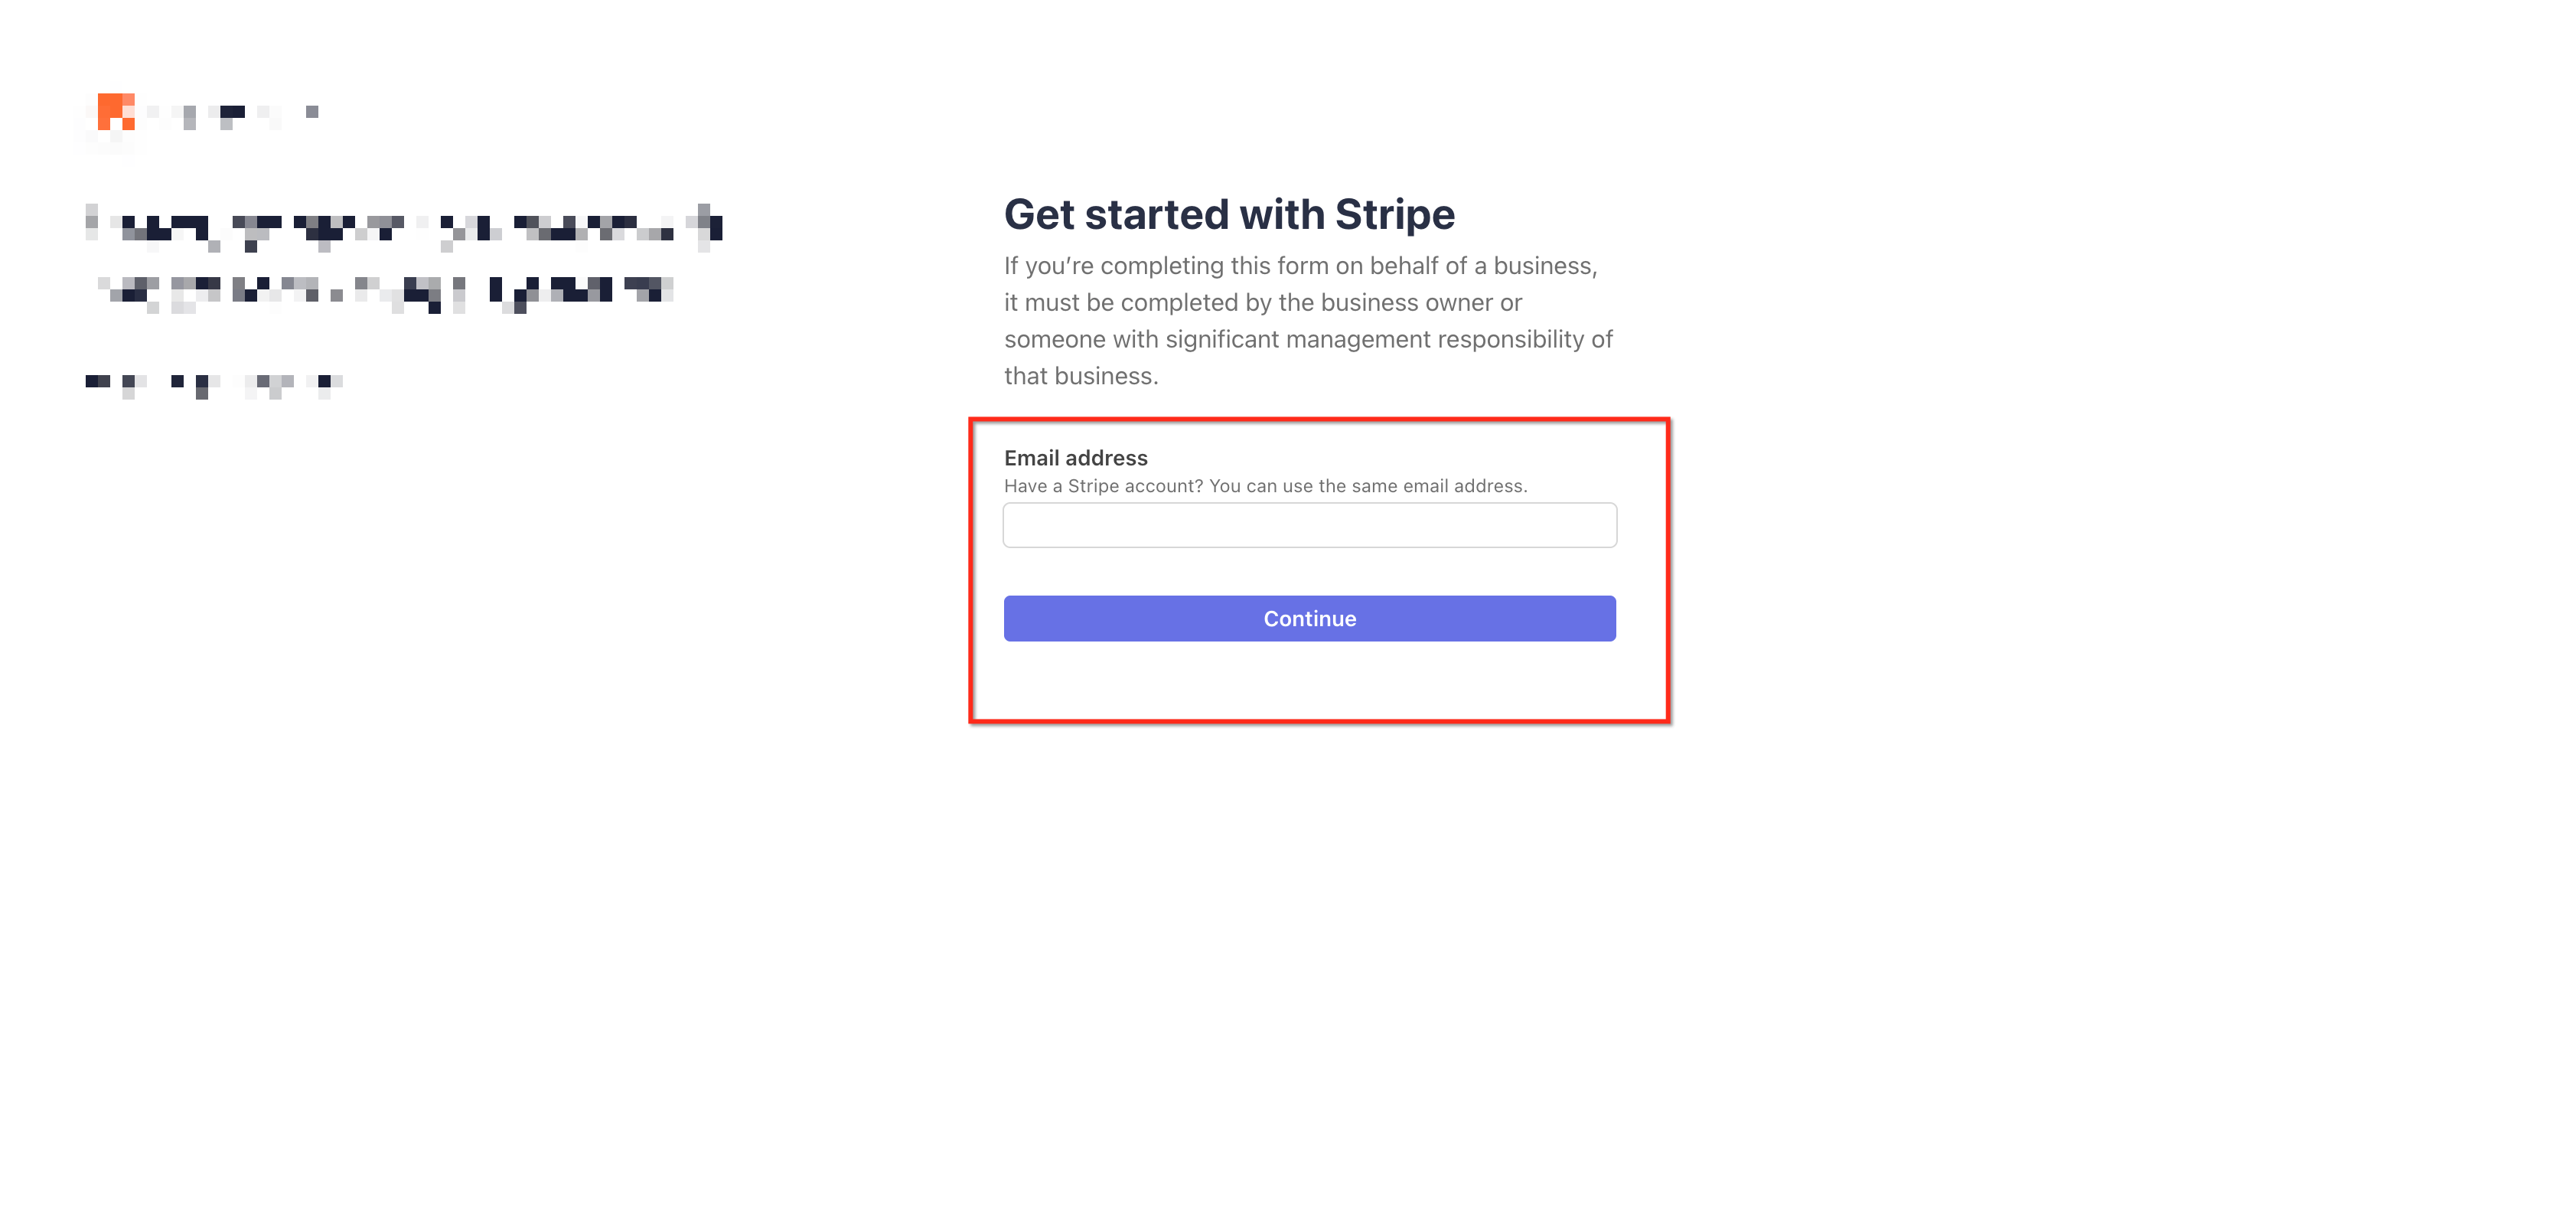
Follow the Stripe authorization instructions.
Log in to the Stripe account you want to connect. If you do not already have a Stripe account, follow the available Stripe prompts to create one.
Review the requested connection information and authorize Chat To Clients CRM to connect to the Stripe account.
After authorization is complete, return to Payments > Integrations in Chat To Clients CRM.
Confirm that Stripe displays as connected or enabled.
When available, click Manage to access supported Stripe configuration options, including payment-method settings.
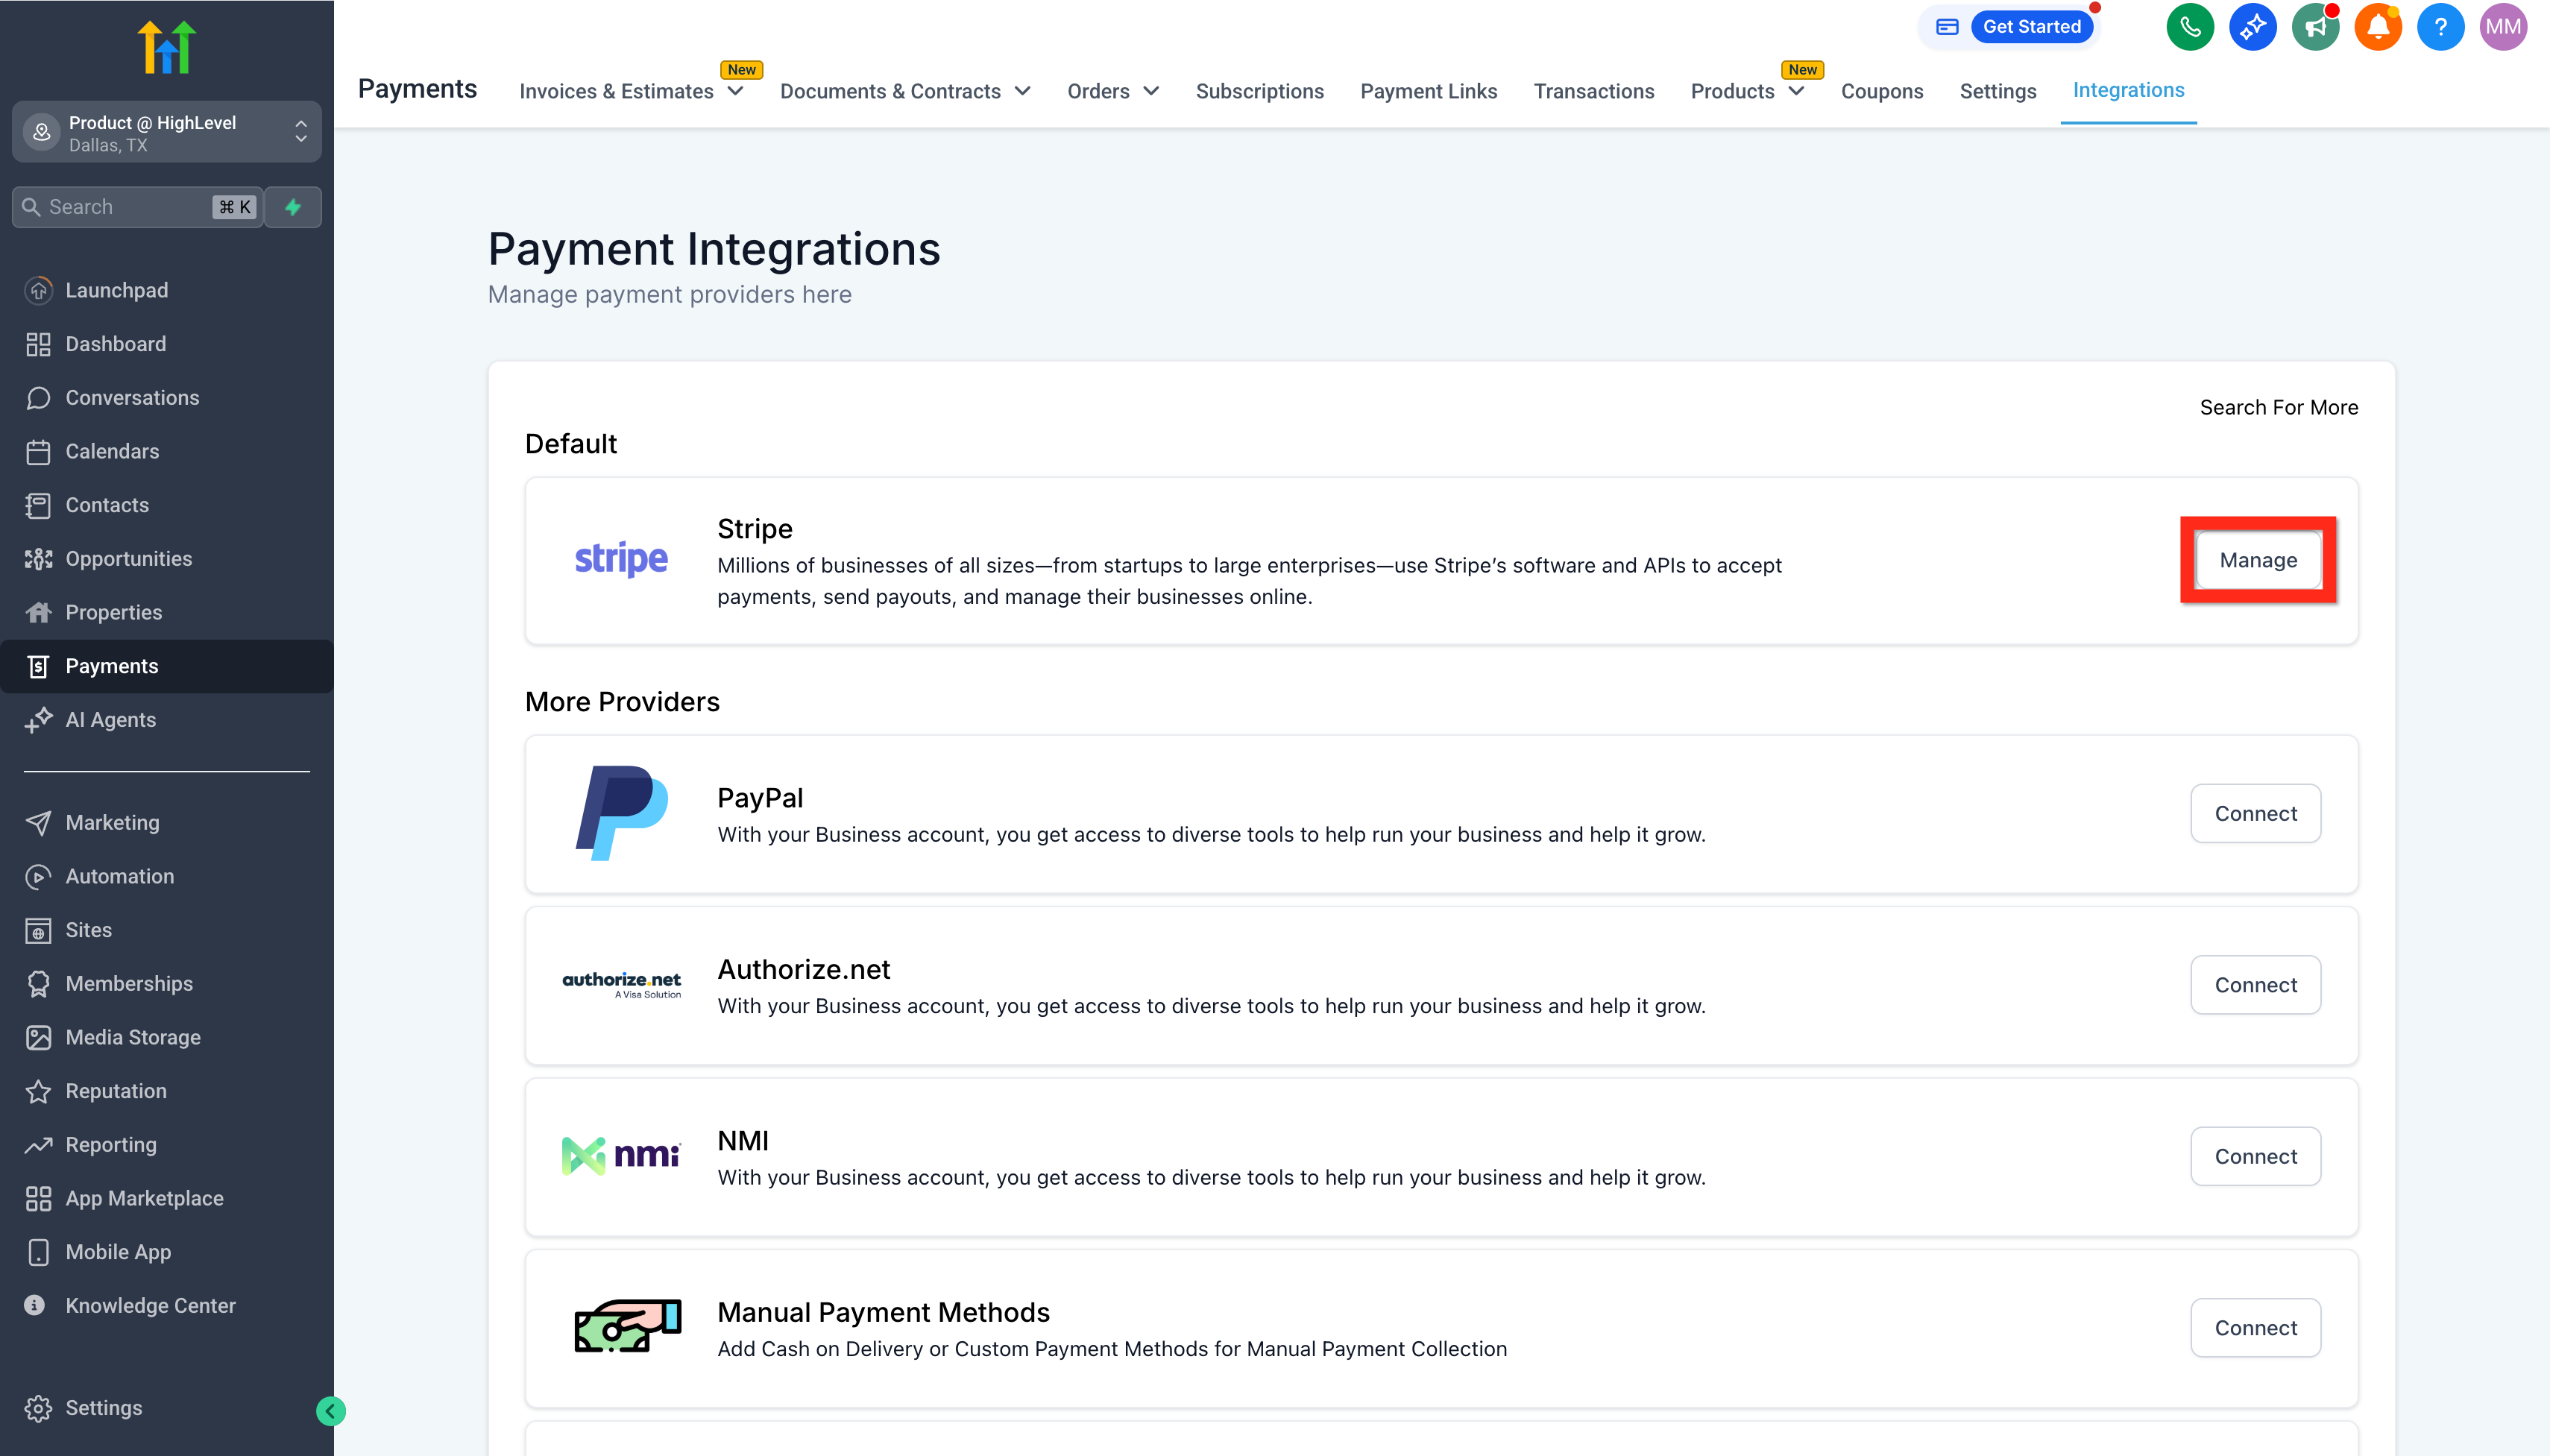
After Stripe is connected, review your payment-method and payment-provider settings before launching a customer-facing checkout. If you already use Stripe products, review the supported Stripe product-import behavior before attempting to import them into Chat To Clients CRM.
Frequently Asked Questions
Q: Can I connect more than one Stripe account to the same Chat To Clients CRM sub-account?
No. A Chat To Clients CRM sub-account supports one connected Stripe account at a time. If separate businesses or brands require different Stripe accounts, they can use separate Chat To Clients CRM sub-accounts.
Q: Why don't I see a specific Stripe payment method after connecting Stripe?
Payment-method availability can depend on your Stripe account, country, currency, checkout type, account verification status, and whether the method is enabled in the correct Test or Live environment. Some payment methods also require additional eligibility or configuration before they can appear at checkout.
Q: Does connecting Stripe automatically make it the payment provider for every Chat To Clients CRM channel?
Not necessarily. If payment-provider settings have been configured by channel, a supported channel can use its preferred connected provider rather than relying only on the global default provider. Review Payments > Integrations and your provider configuration if you use multiple payment providers.
Q: Will payments that already exist in Stripe appear in Chat To Clients CRM after I connect my account?
No. Existing payments created directly in Stripe before the connection are not automatically imported into Chat To Clients CRM. Chat To Clients CRM tracks new applicable transactions created through Chat To Clients CRM after the integration is connected.
Q: Can I use Stripe Test Mode before accepting real payments?
Yes. Stripe Test Mode can be used to simulate supported payments without charging real cards. Payment-method settings can also be configured separately for Test Mode and Live Mode, so confirm you are working in the correct environment before launching your checkout.
Q: Can I import all of my existing Stripe products into Chat To Clients CRM?
No. Chat To Clients CRM's current product documentation states that recurring or subscription products can be imported from Stripe, while one-time products should be created directly in Chat To Clients CRM. Review the product-import documentation before migrating an existing Stripe catalog.
Q: Can I use Chat To Clients CRM invoices without processing the payment through Stripe?
Some invoice workflows allow payments to be recorded manually instead of processing the transaction through Stripe. Connecting a supported payment provider is required when the payment needs to be processed through that provider and reflected through the corresponding payment-processing workflow.
Q: What should I check if Stripe does not show as connected after authorization?
Return to Payments > Integrations and verify the Stripe status. If the integration is not enabled, confirm that the Stripe authorization process was completed with an account that has sufficient permissions. If necessary, reconnect Stripe or ask the Stripe account owner to verify your access.