
Getting Started - Create & Sell Products
Chat To Clients CRM lets you create physical products, digital products, one-time offers, and recurring subscriptions, then sell them through different checkout experiences. In this guide, you'll learn how to create and price a product, set up trials when applicable, and choose how you want customers to purchase it.
TABLE OF CONTENTS
- How to Create a Product
- How to Duplicate a Existing Product
- How to Add a a Trial to a Product
- How to Make Products Available
- How to Add a Product to a Funnel
- How to Add Order Form to a Funnel
- Frequently Asked Questions
- Related Articles
How to Create a Product
First things first, let's get your amazing product listed. Think of this like setting up your store shelves—you want everything clear, attractive, and inviting!
Step 1: Navigate to Products
Navigate to Payments > Products. Then Click + Create Product.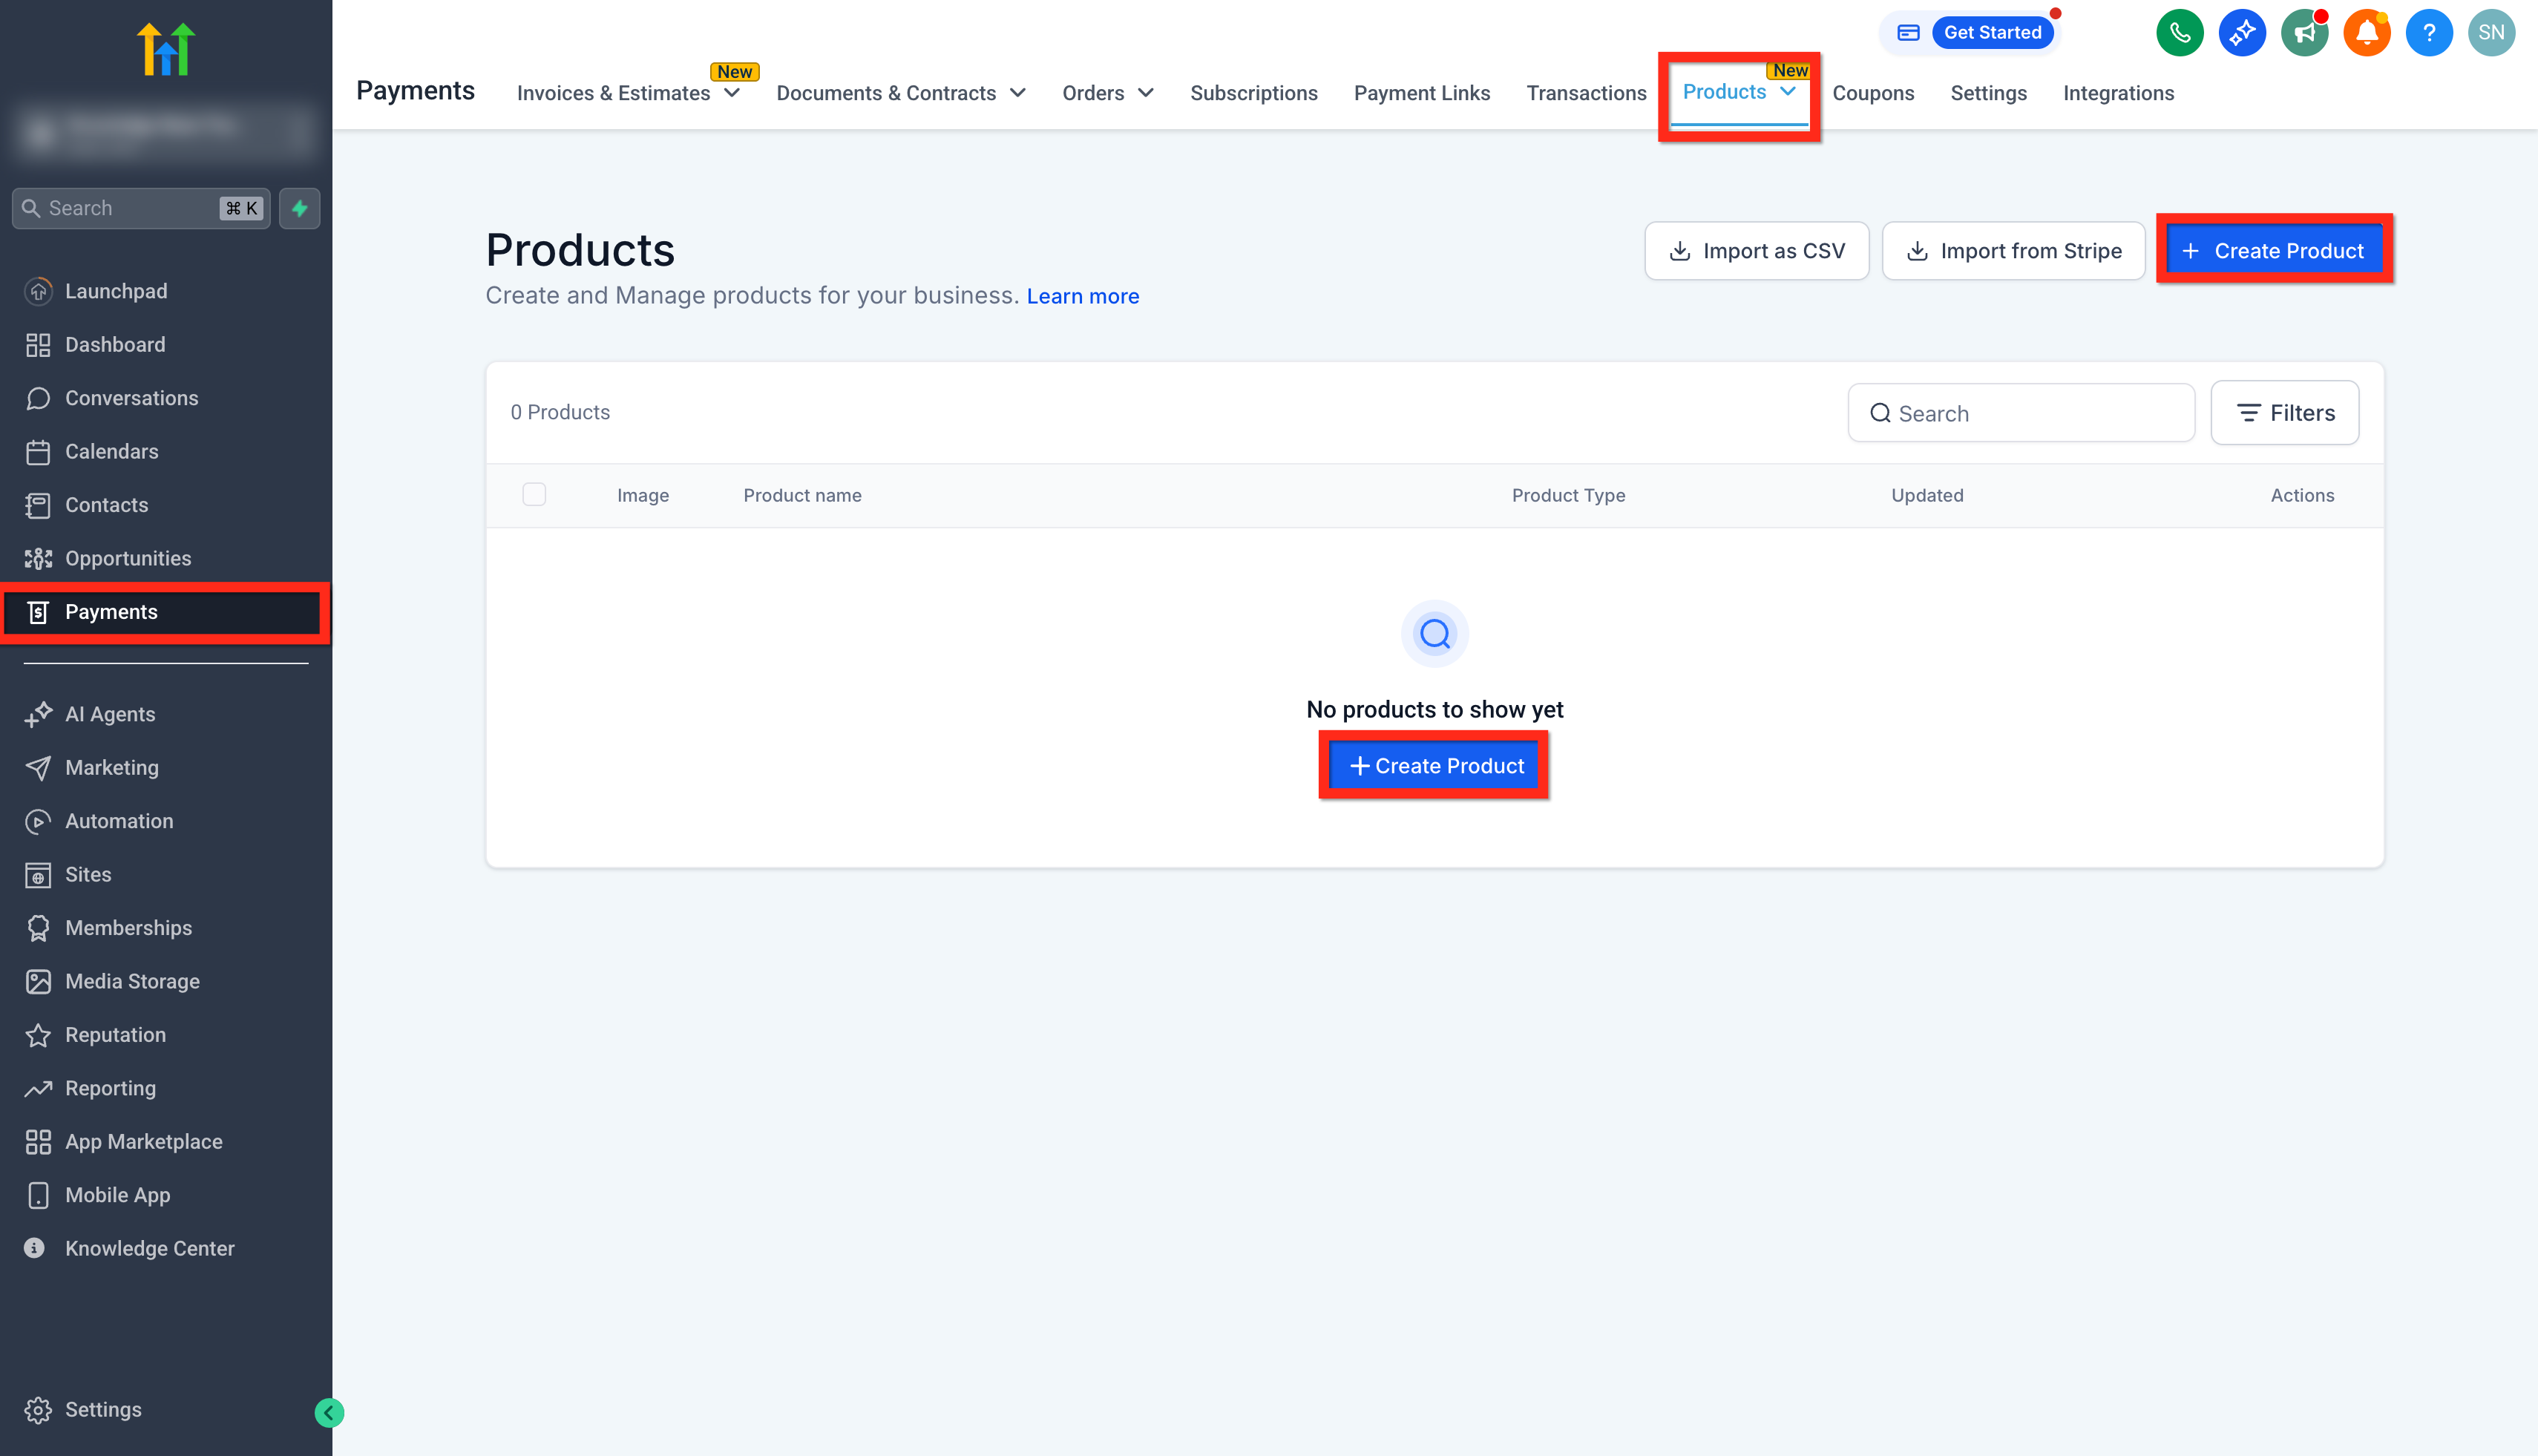
Step 2: Fill in Product Information
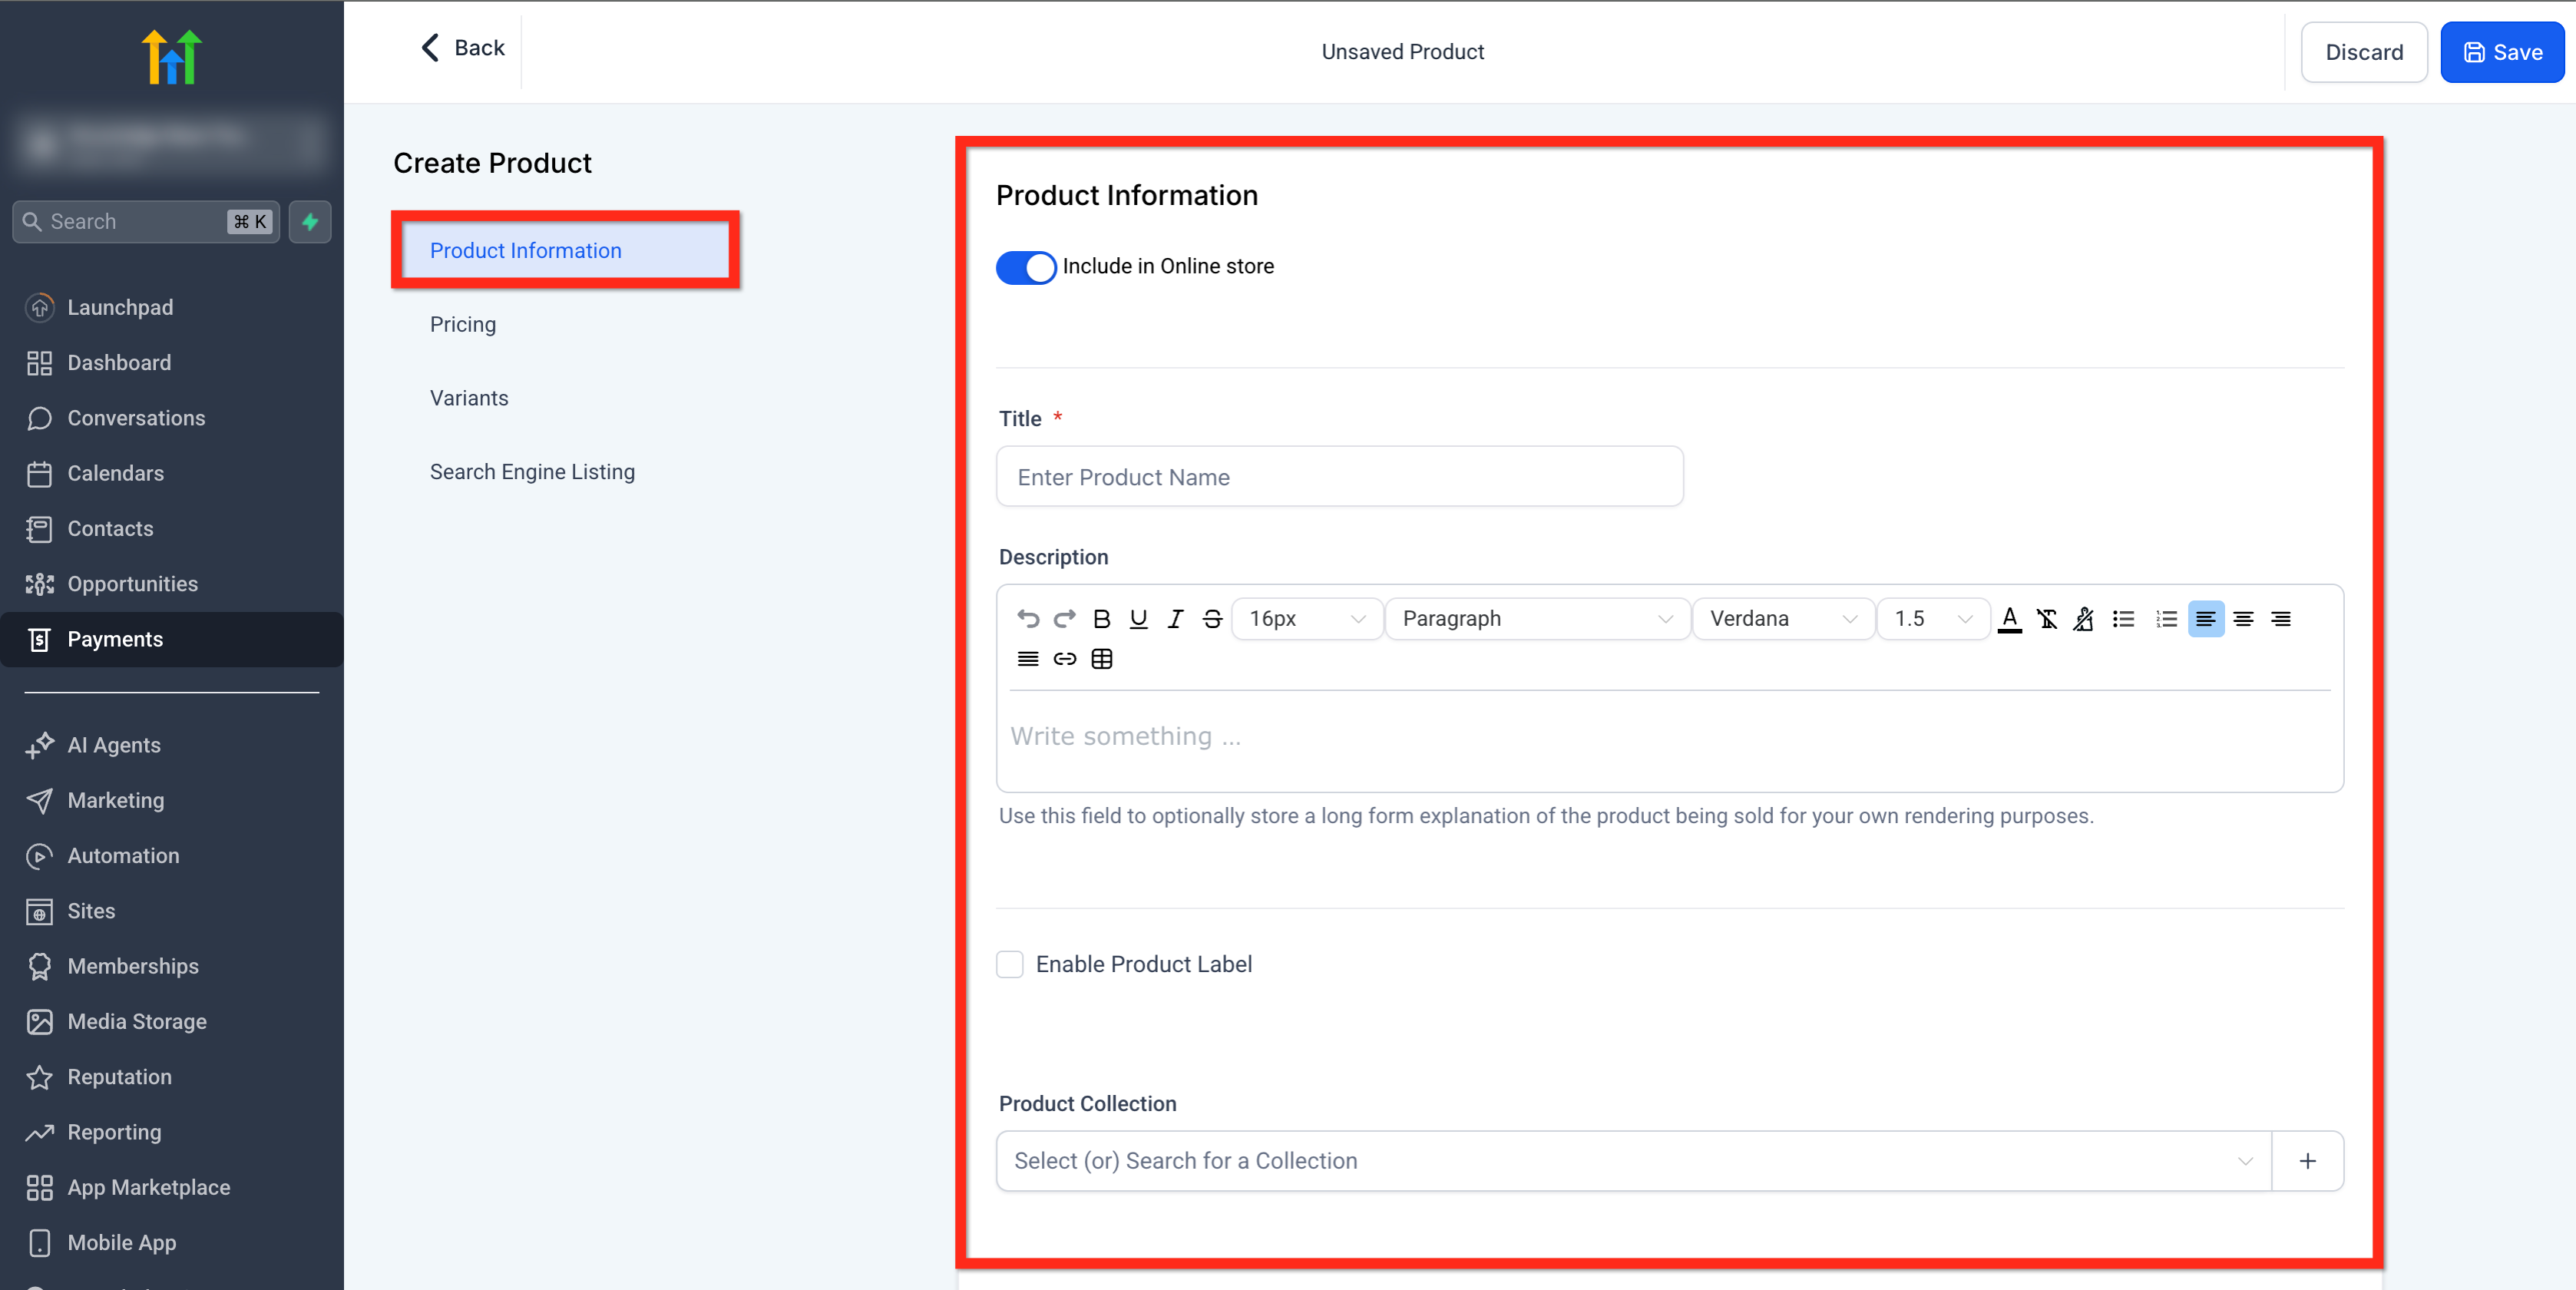
The Product Information section is where you define the foundational details for your product.
- First, the Include in Online Store toggle allows you to determine whether this product should be visible and available for purchase through your online storefront. If you want your product to be publicly available, this toggle must remain enabled.
- Next, the Title field is a required input where you name your product—this will be shown across your checkout, internal views, and potentially public listings. Below that, the Description field allows you to provide a detailed overview of the product, using rich text formatting options such as bold, italics, links, bullet points, and font customization to enhance readability and appeal.
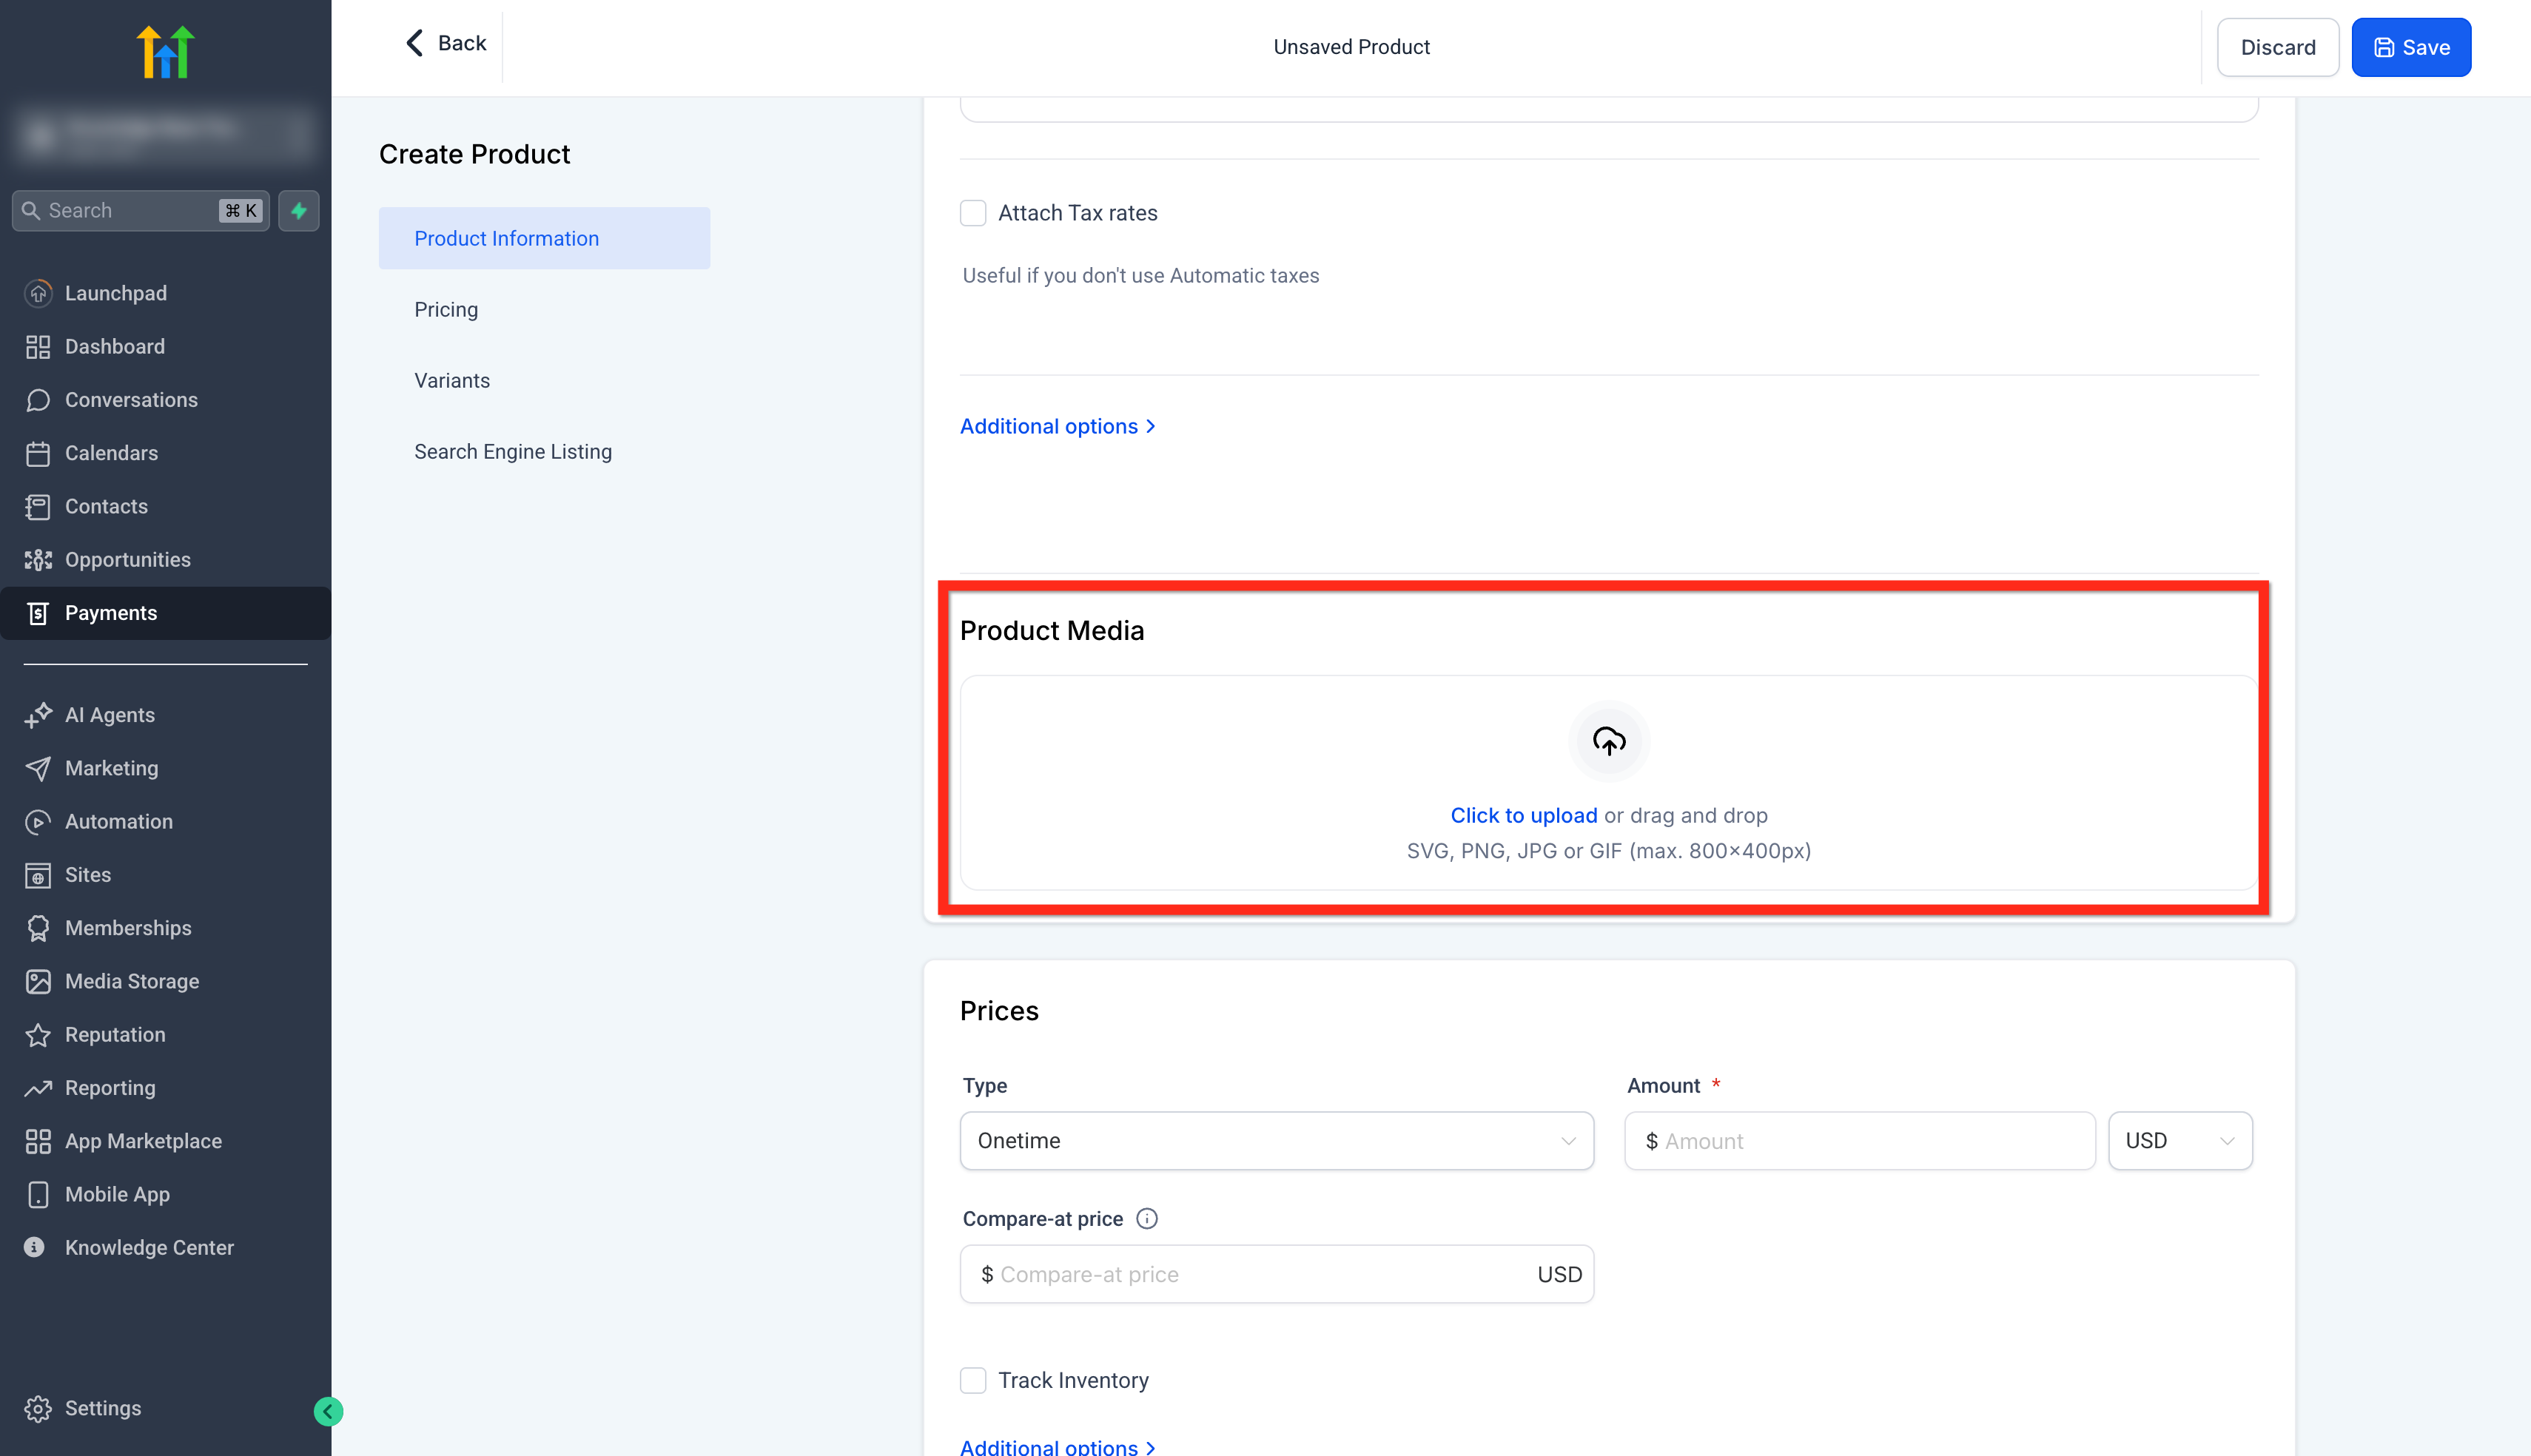
- The Media section lets you upload an image or video file to visually represent your product. This helps users quickly recognize what they’re buying. It’s recommended to upload files with a resolution of 1024×1024 and a size not exceeding 10MB for optimal display and performance.
- There is also an Enable Product Label checkbox. If enabled, you can assign a custom label (e.g., “New,” “Top Pick,” etc.) to the product which may be used for visual badges or internal organization.
- Lastly, the Product Collection dropdown lets you assign this product to an existing collection. Collections help group similar products together for better organization and presentation, especially when managing a larger catalog.
Step 3: Configure Tax Options
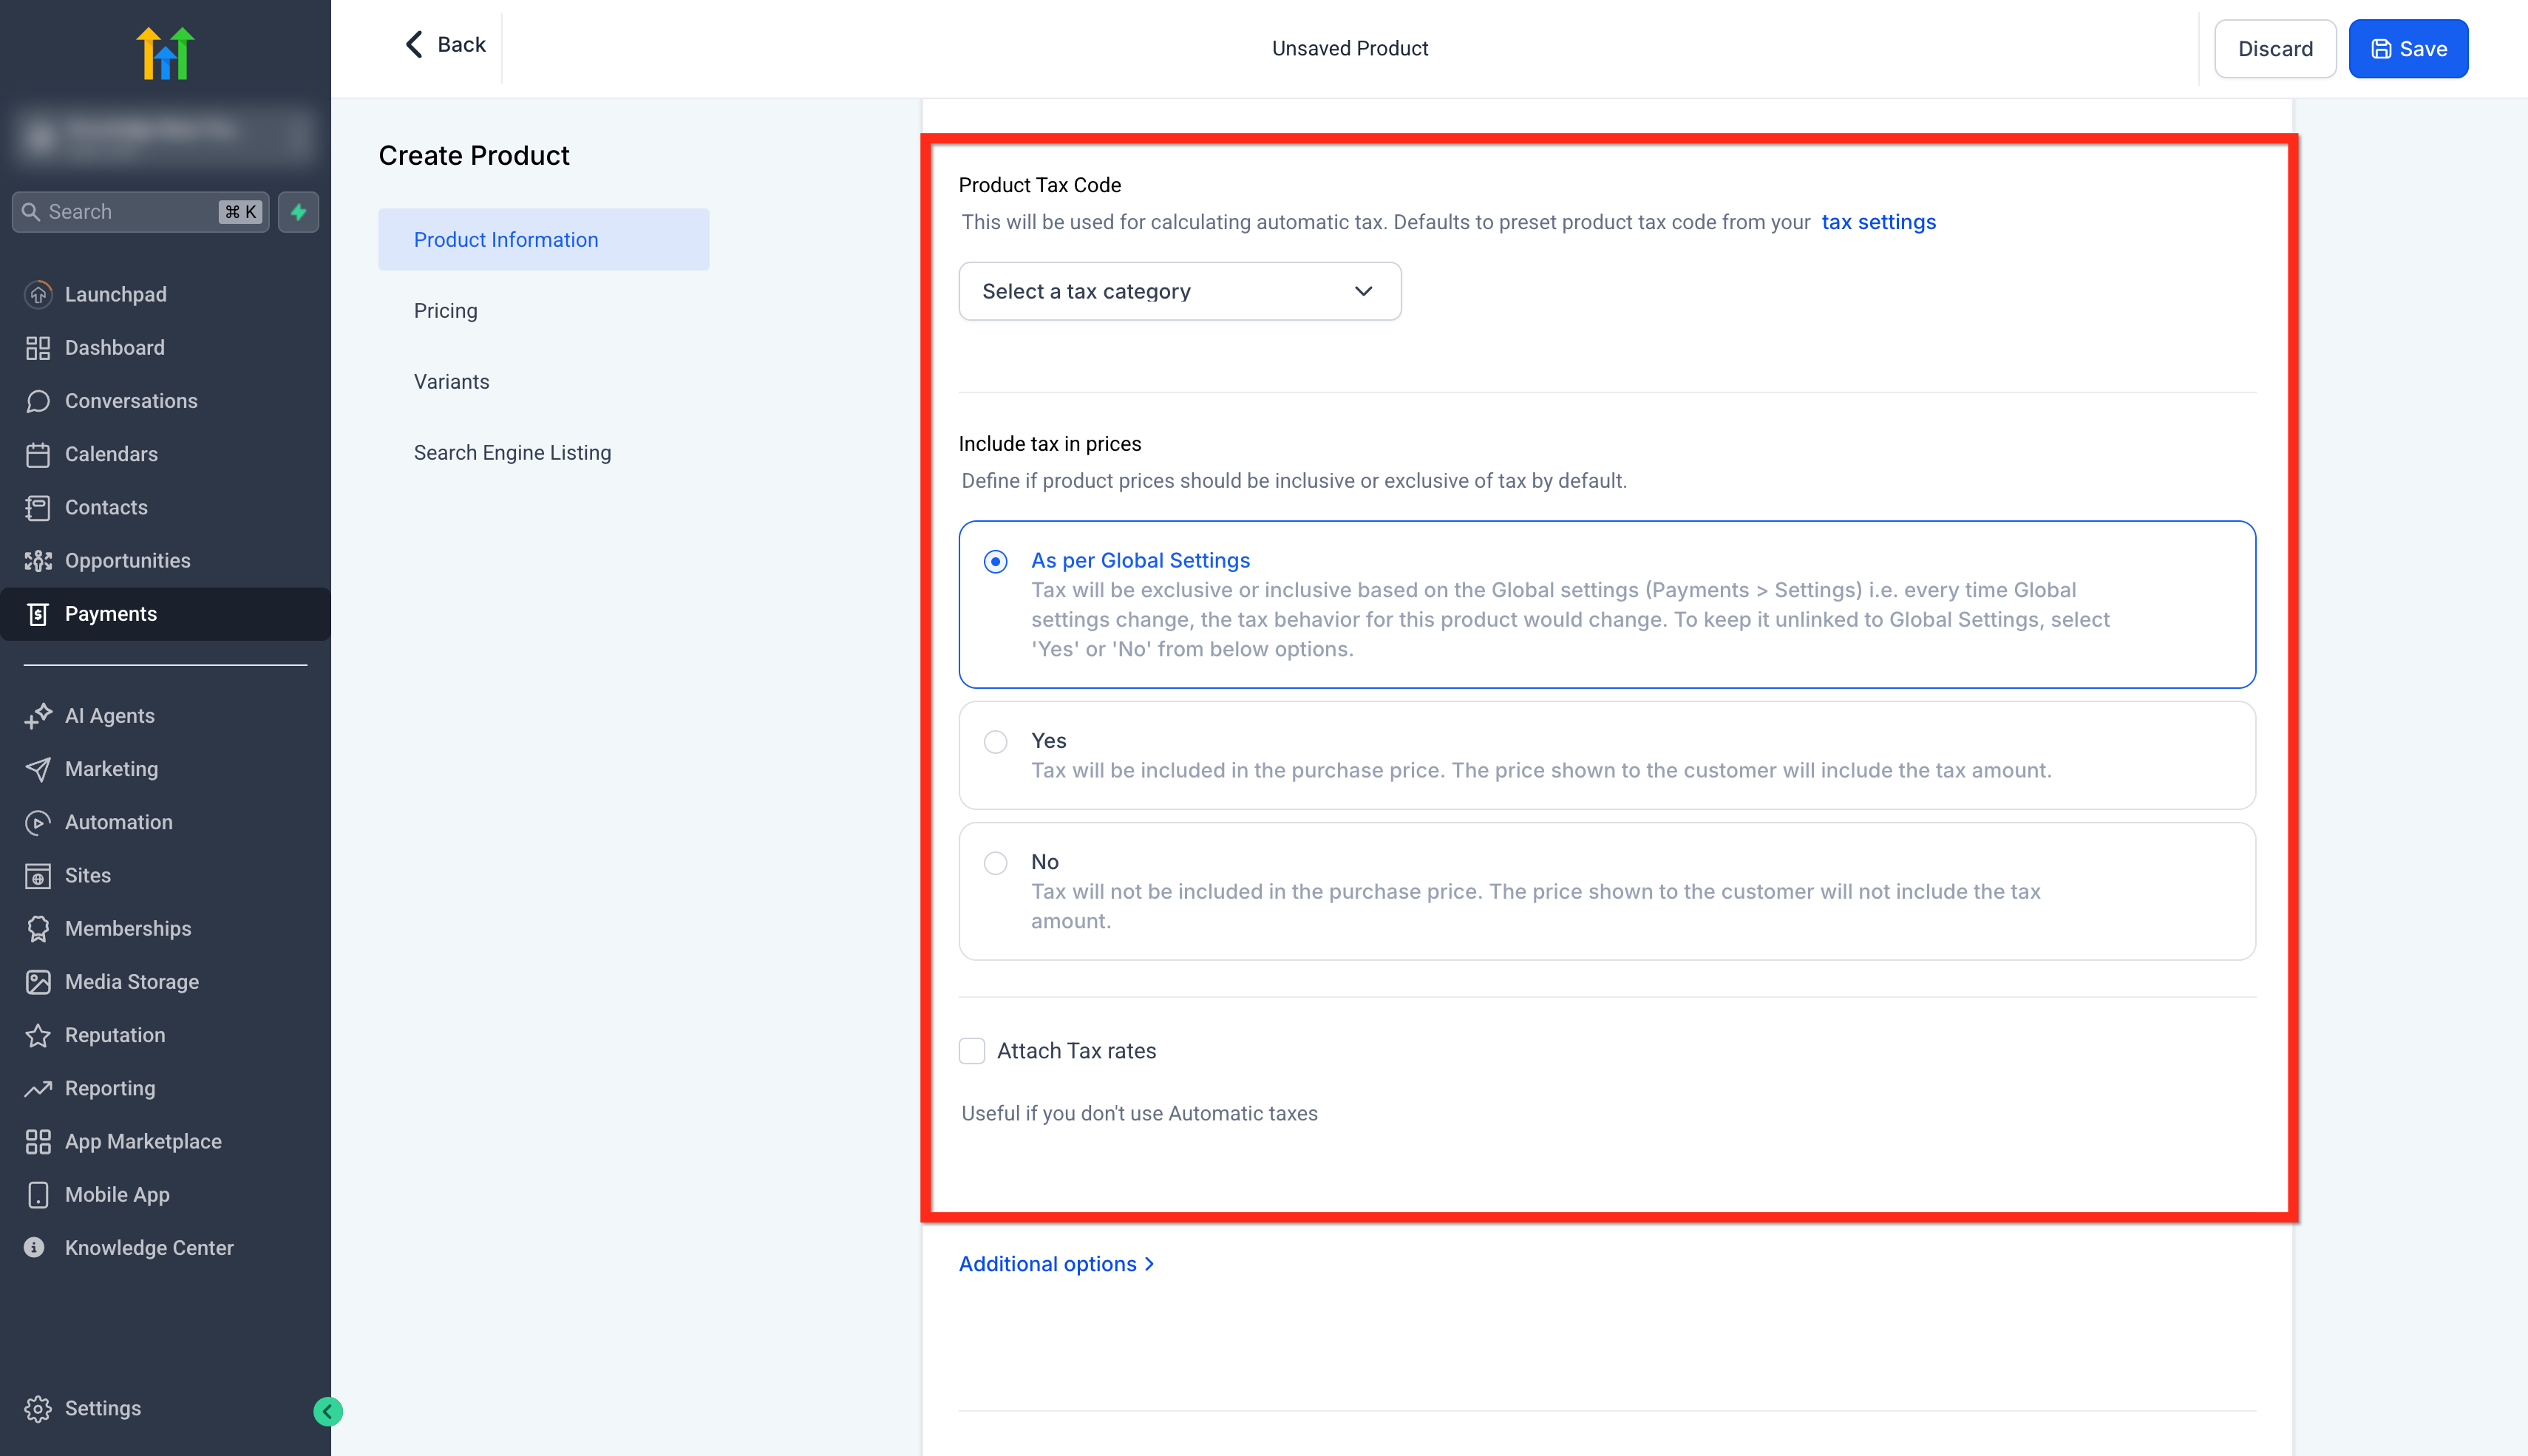
The Product Information section includes several key fields to define how the product is presented and taxed.
- One of the first elements here is the Product Tax Code, which allows you to select a specific tax category for your product. This is important for enabling automatic tax calculations during checkout. If left blank, the system will apply your default global tax settings.
- Next, the Include tax in prices option gives you control over whether your product pricing should be shown as tax-inclusive or tax-exclusive. You can either follow the global setting or manually choose “Yes” to include tax in the displayed price or “No” to show it as a separate charge.
- Additionally, there’s an option to Attach Tax Rates, which is useful if you’re handling taxes manually or have buyers outside the U.S.
- Finally, the Statement Descriptor that opens on clicking Additional Settings field allows you to override the default account name that appears on a customer’s bank statement. This ensures clarity for the buyer and can help reduce payment disputes or confusion.
Step 4: Set Pricing
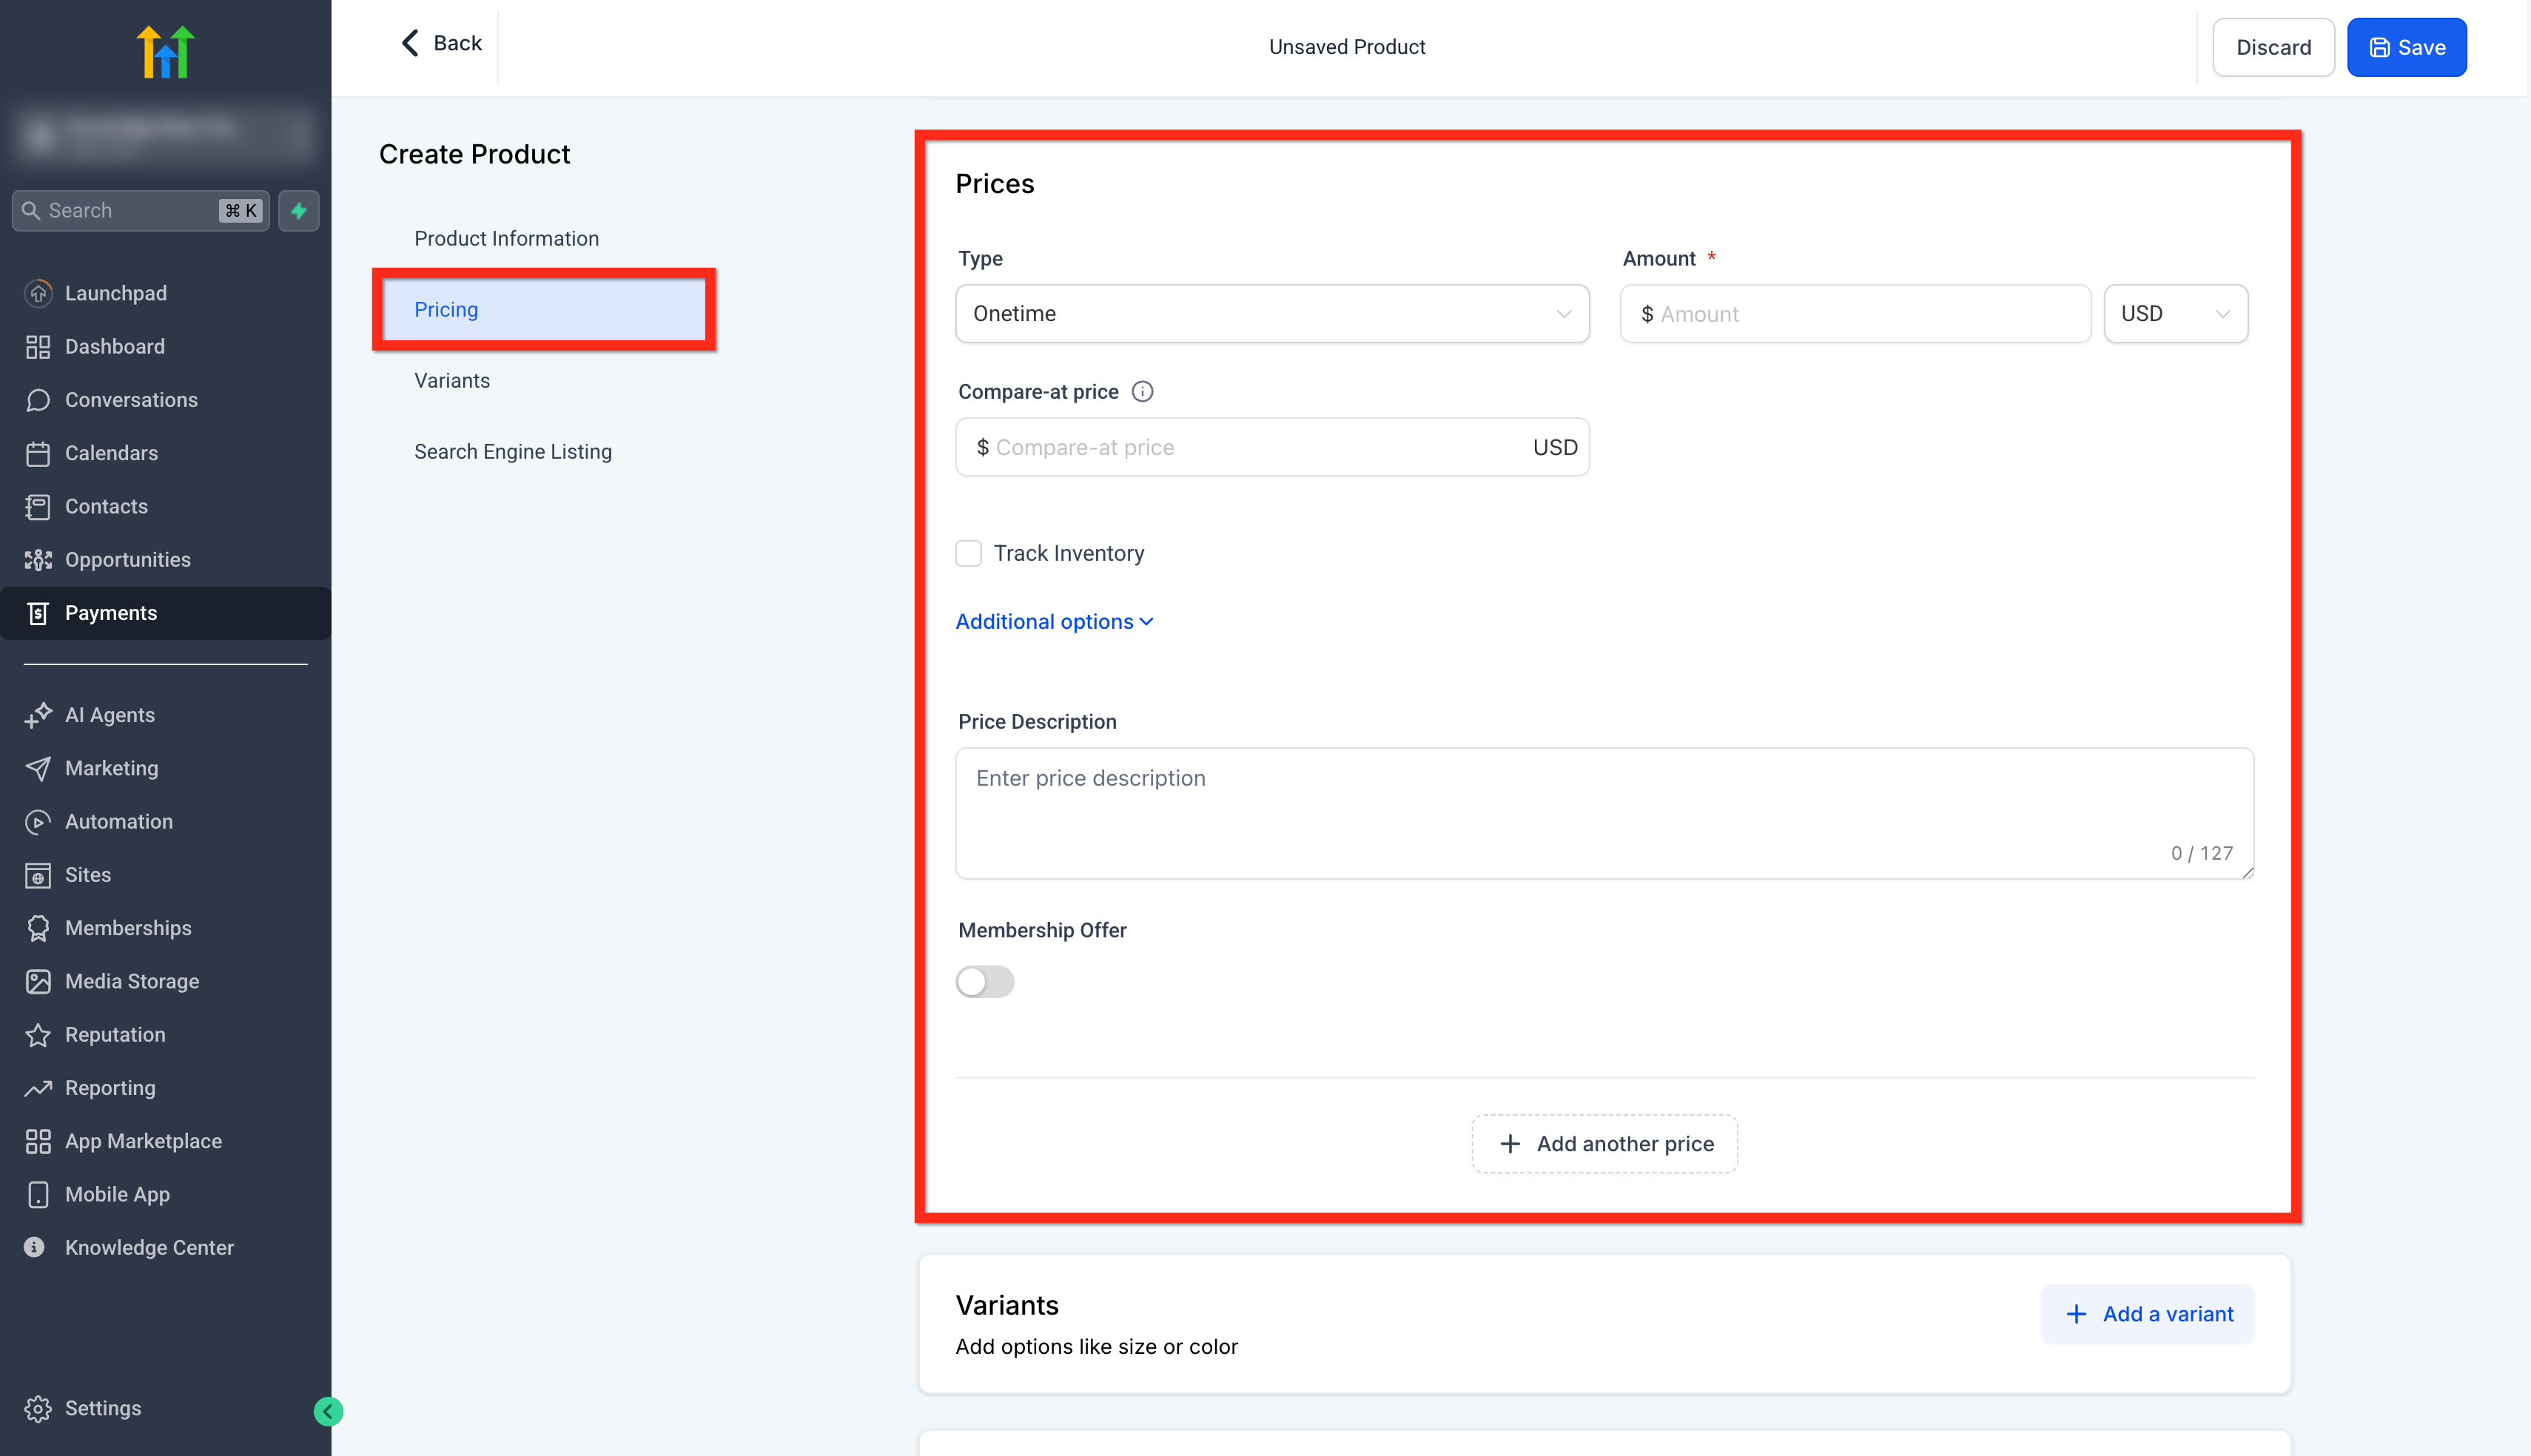
In the Pricing section of the product setup, users can define how their product will be offered to customers by configuring a range of pricing-related fields.
Choose a Pricing Type
Select the pricing type based on how you want customers to be charged.
| One-Time | Recurring | |
|---|---|---|
| How the customer is charged | Charged once | Charged repeatedly based on the selected billing period |
| Best for | One-off products, services, consultations, or setup fees | Memberships, subscriptions, retainers, or ongoing services |
| Billing period required | No | Yes |
| Trial period available | No | Yes |
| Example | $99 consultation | $99/month membership |
- Start by entering a Pricing Name, which serves as an internal label to help distinguish between different pricing options if you’re offering multiple tiers or plans.
- Next, select the Type of pricing from the dropdown - either One time, which charges the customer a single fee, or Recurring, which adds options for billing cycles, trial periods, and setup fees.
- In the Amount field, input the exact price you want to charge for the product. You can optionally enter a Compare-at Price, which is useful for showing discounted pricing by displaying the original price next to the actual price being charged.
- Below this, use the Currency selector to define which currency the payment will be made in, such as USD.
- If inventory tracking is relevant, check the Track Inventory box to manage stock levels and input available quantities.
- Clicking on Additional Options reveals more advanced pricing settings like purchase limits or metadata fields.
- Use the Price Description field to add a brief note or context for this pricing entry (visible internally).
Step 5: Add Product Variants
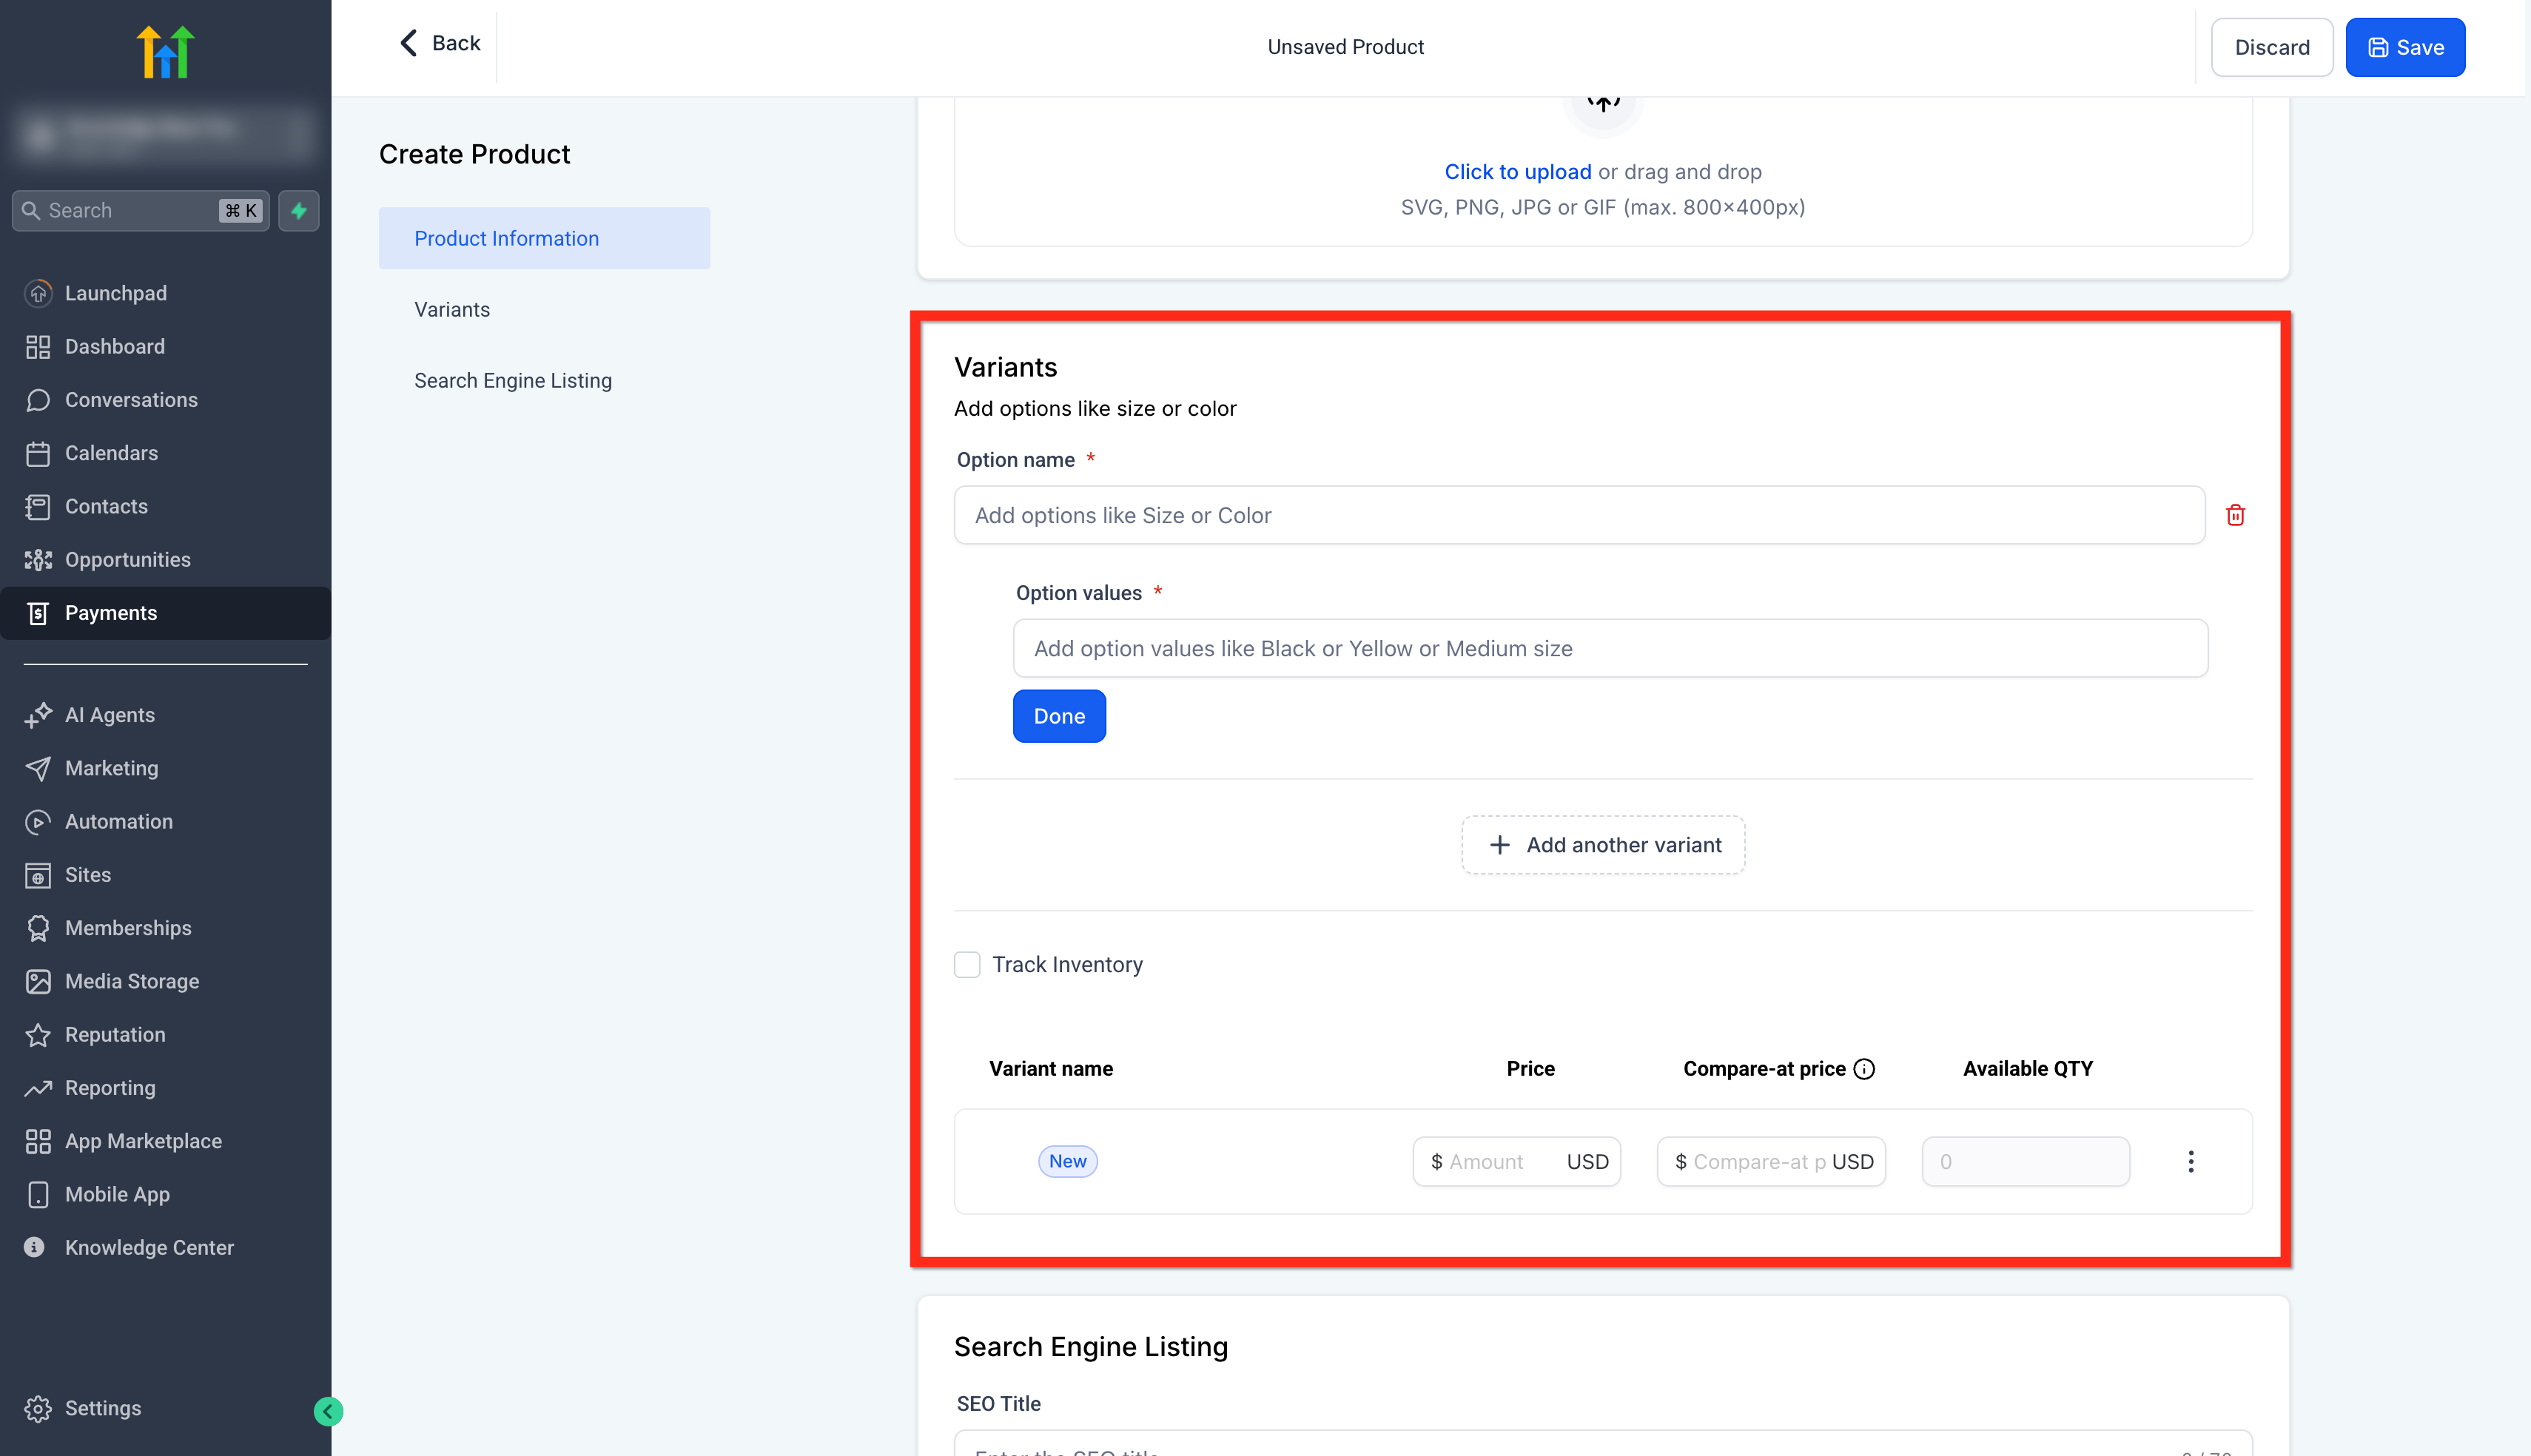
The “Variants” section lets you create different versions of a product, such as multiple pricing tiers, content levels, or access durations.
- To set this up, you first add an Option name like “Course Level” or “Access Plan.”
- Then, under Option values, you input the specific variants (e.g., “Basic,” “Premium,” “Pro”) and click Done.
- Each variant can have its own price, compare-at price, and available quantity, making it easy to manage inventory and pricing for each option.
- You can also enable Track Inventory if you want to limit how many of each variant can be sold. This is especially useful when offering bundles or time-limited enrollment.
Step 6: Optimize Search Engine Settings
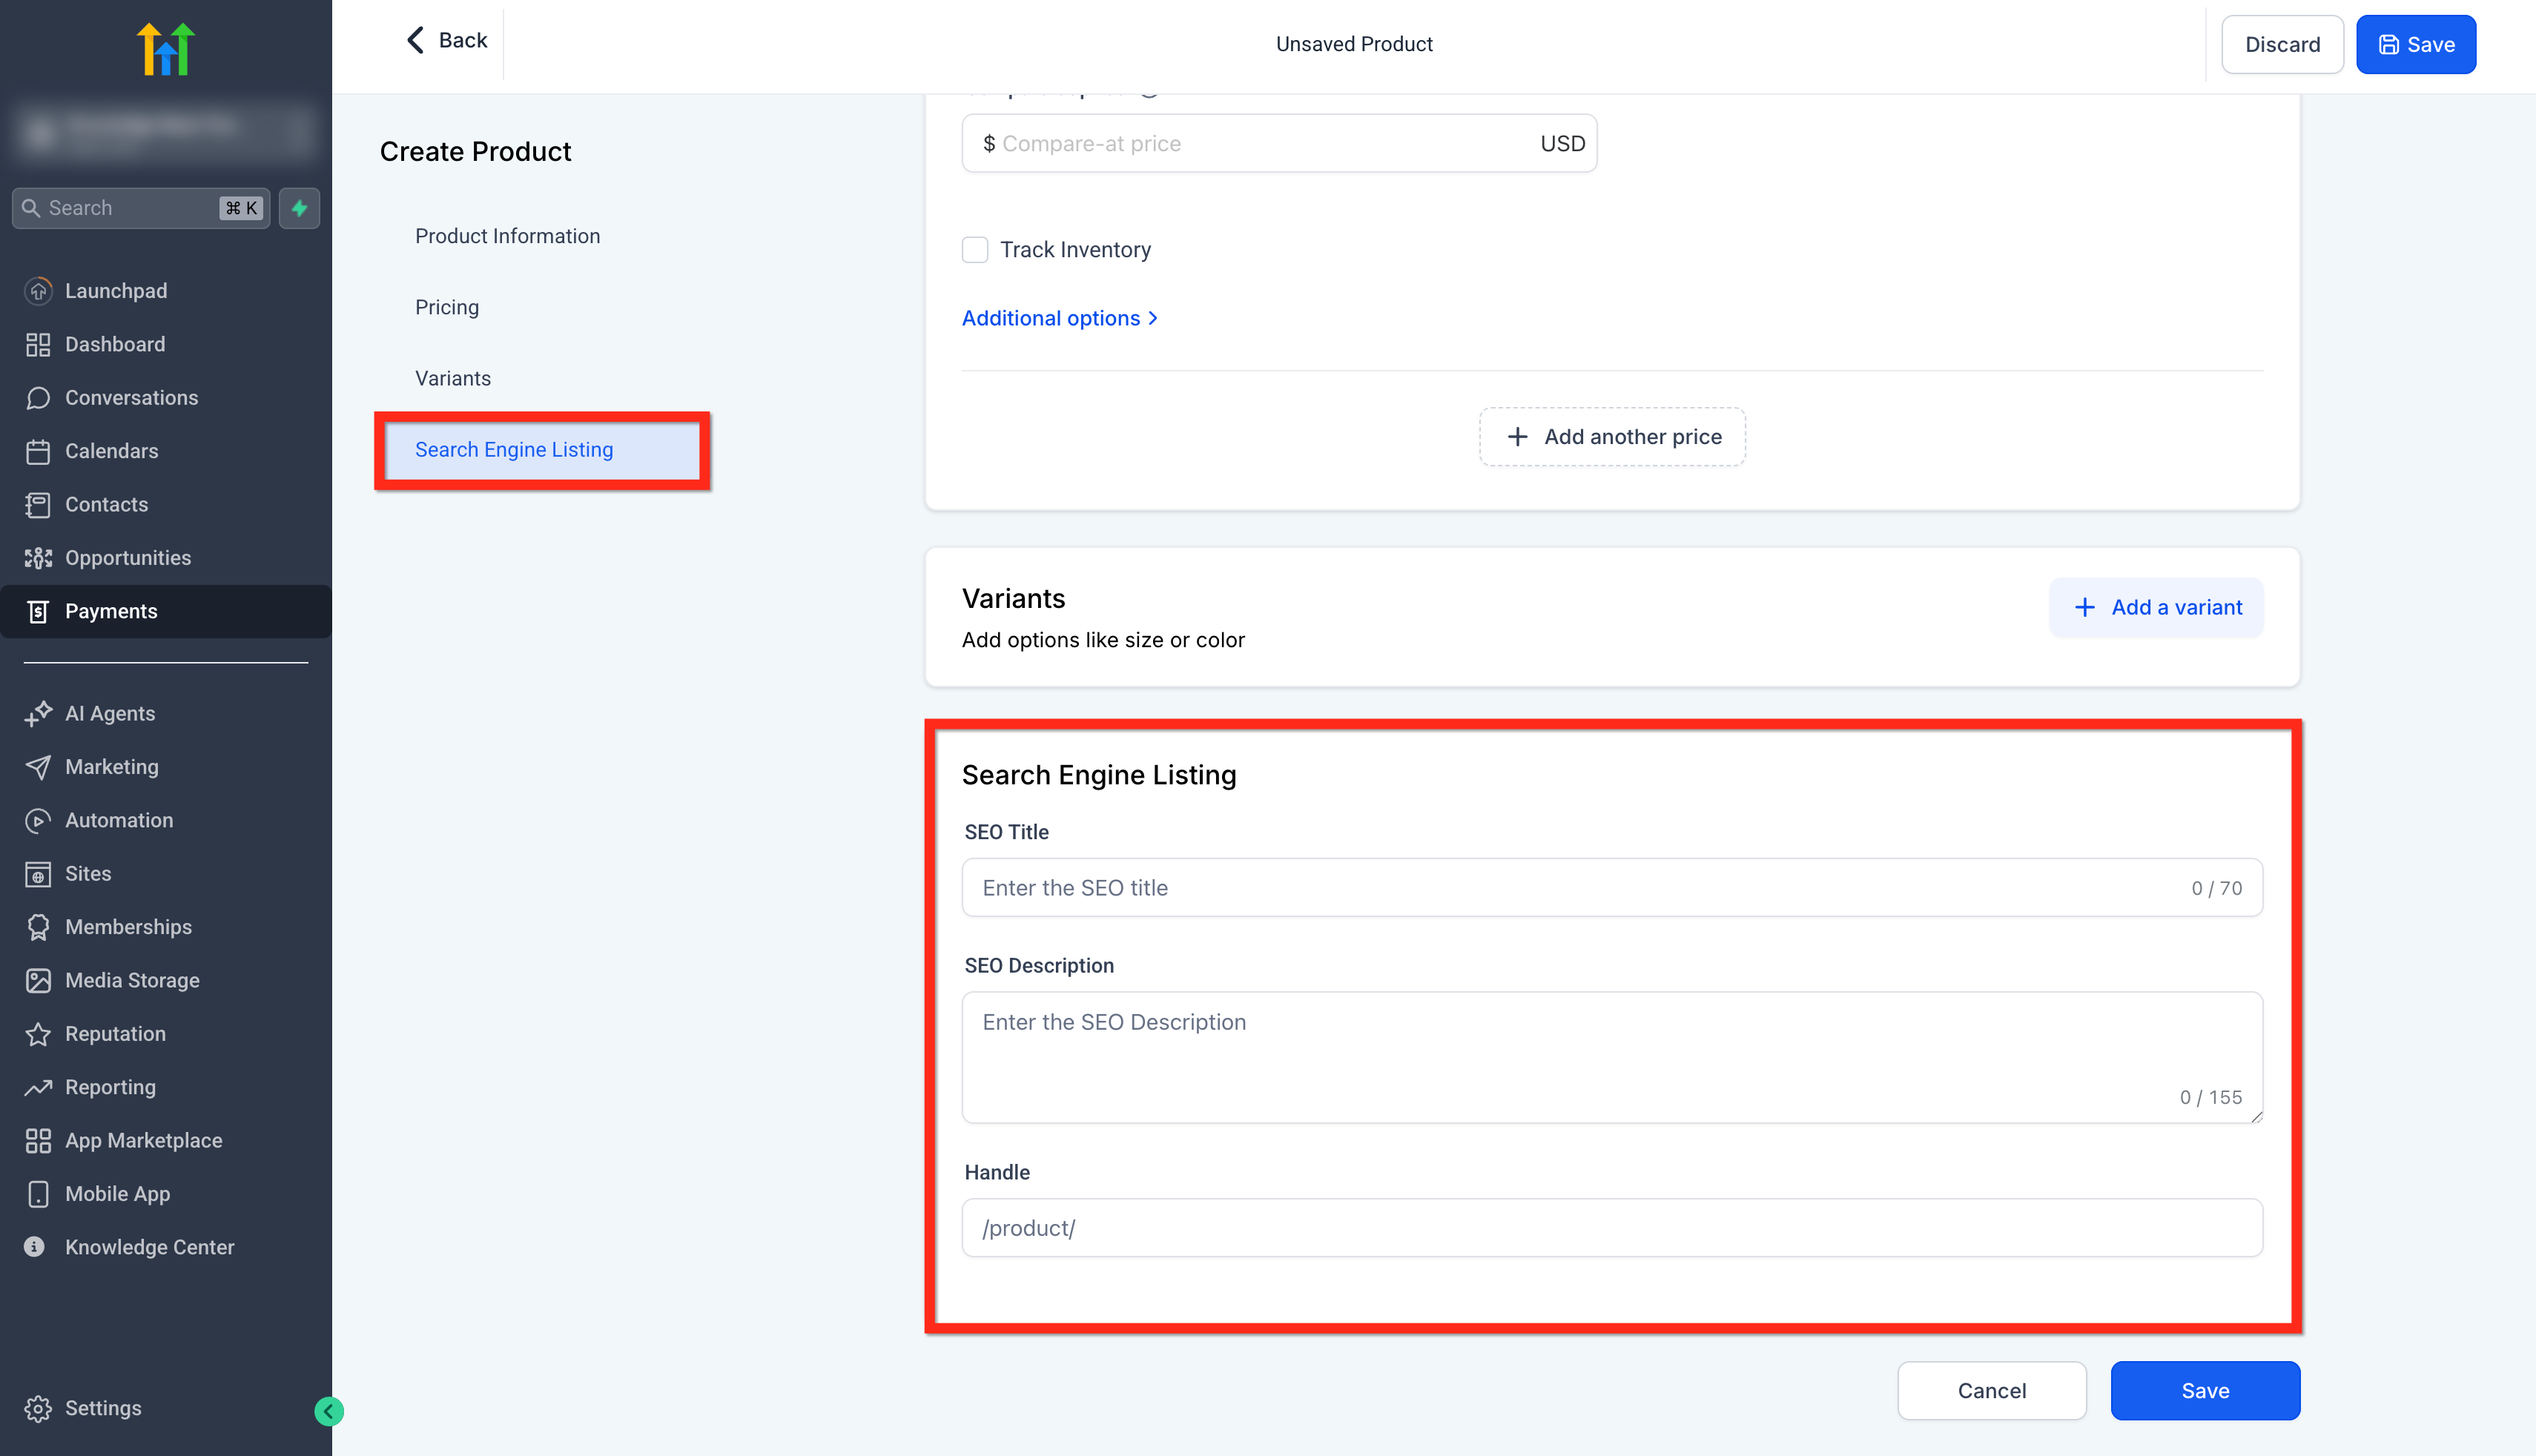
The Search Engine Listing section helps optimize your product for search engines and improves its discoverability online.
- In the SEO Title field, you can enter a concise and relevant title that clearly identifies the product and includes keywords users might search for.
- The SEO Description allows you to provide a brief summary of the product that also incorporates relevant keywords, enhancing visibility in search results.
- Lastly, the Handle defines the product’s unique URL slug (e.g., /product/my-course-name), which can be customized to make the link more readable and SEO-friendly. This section is optional but highly recommended for improving online reach.
Step 7: Save Your Changes
Click Save.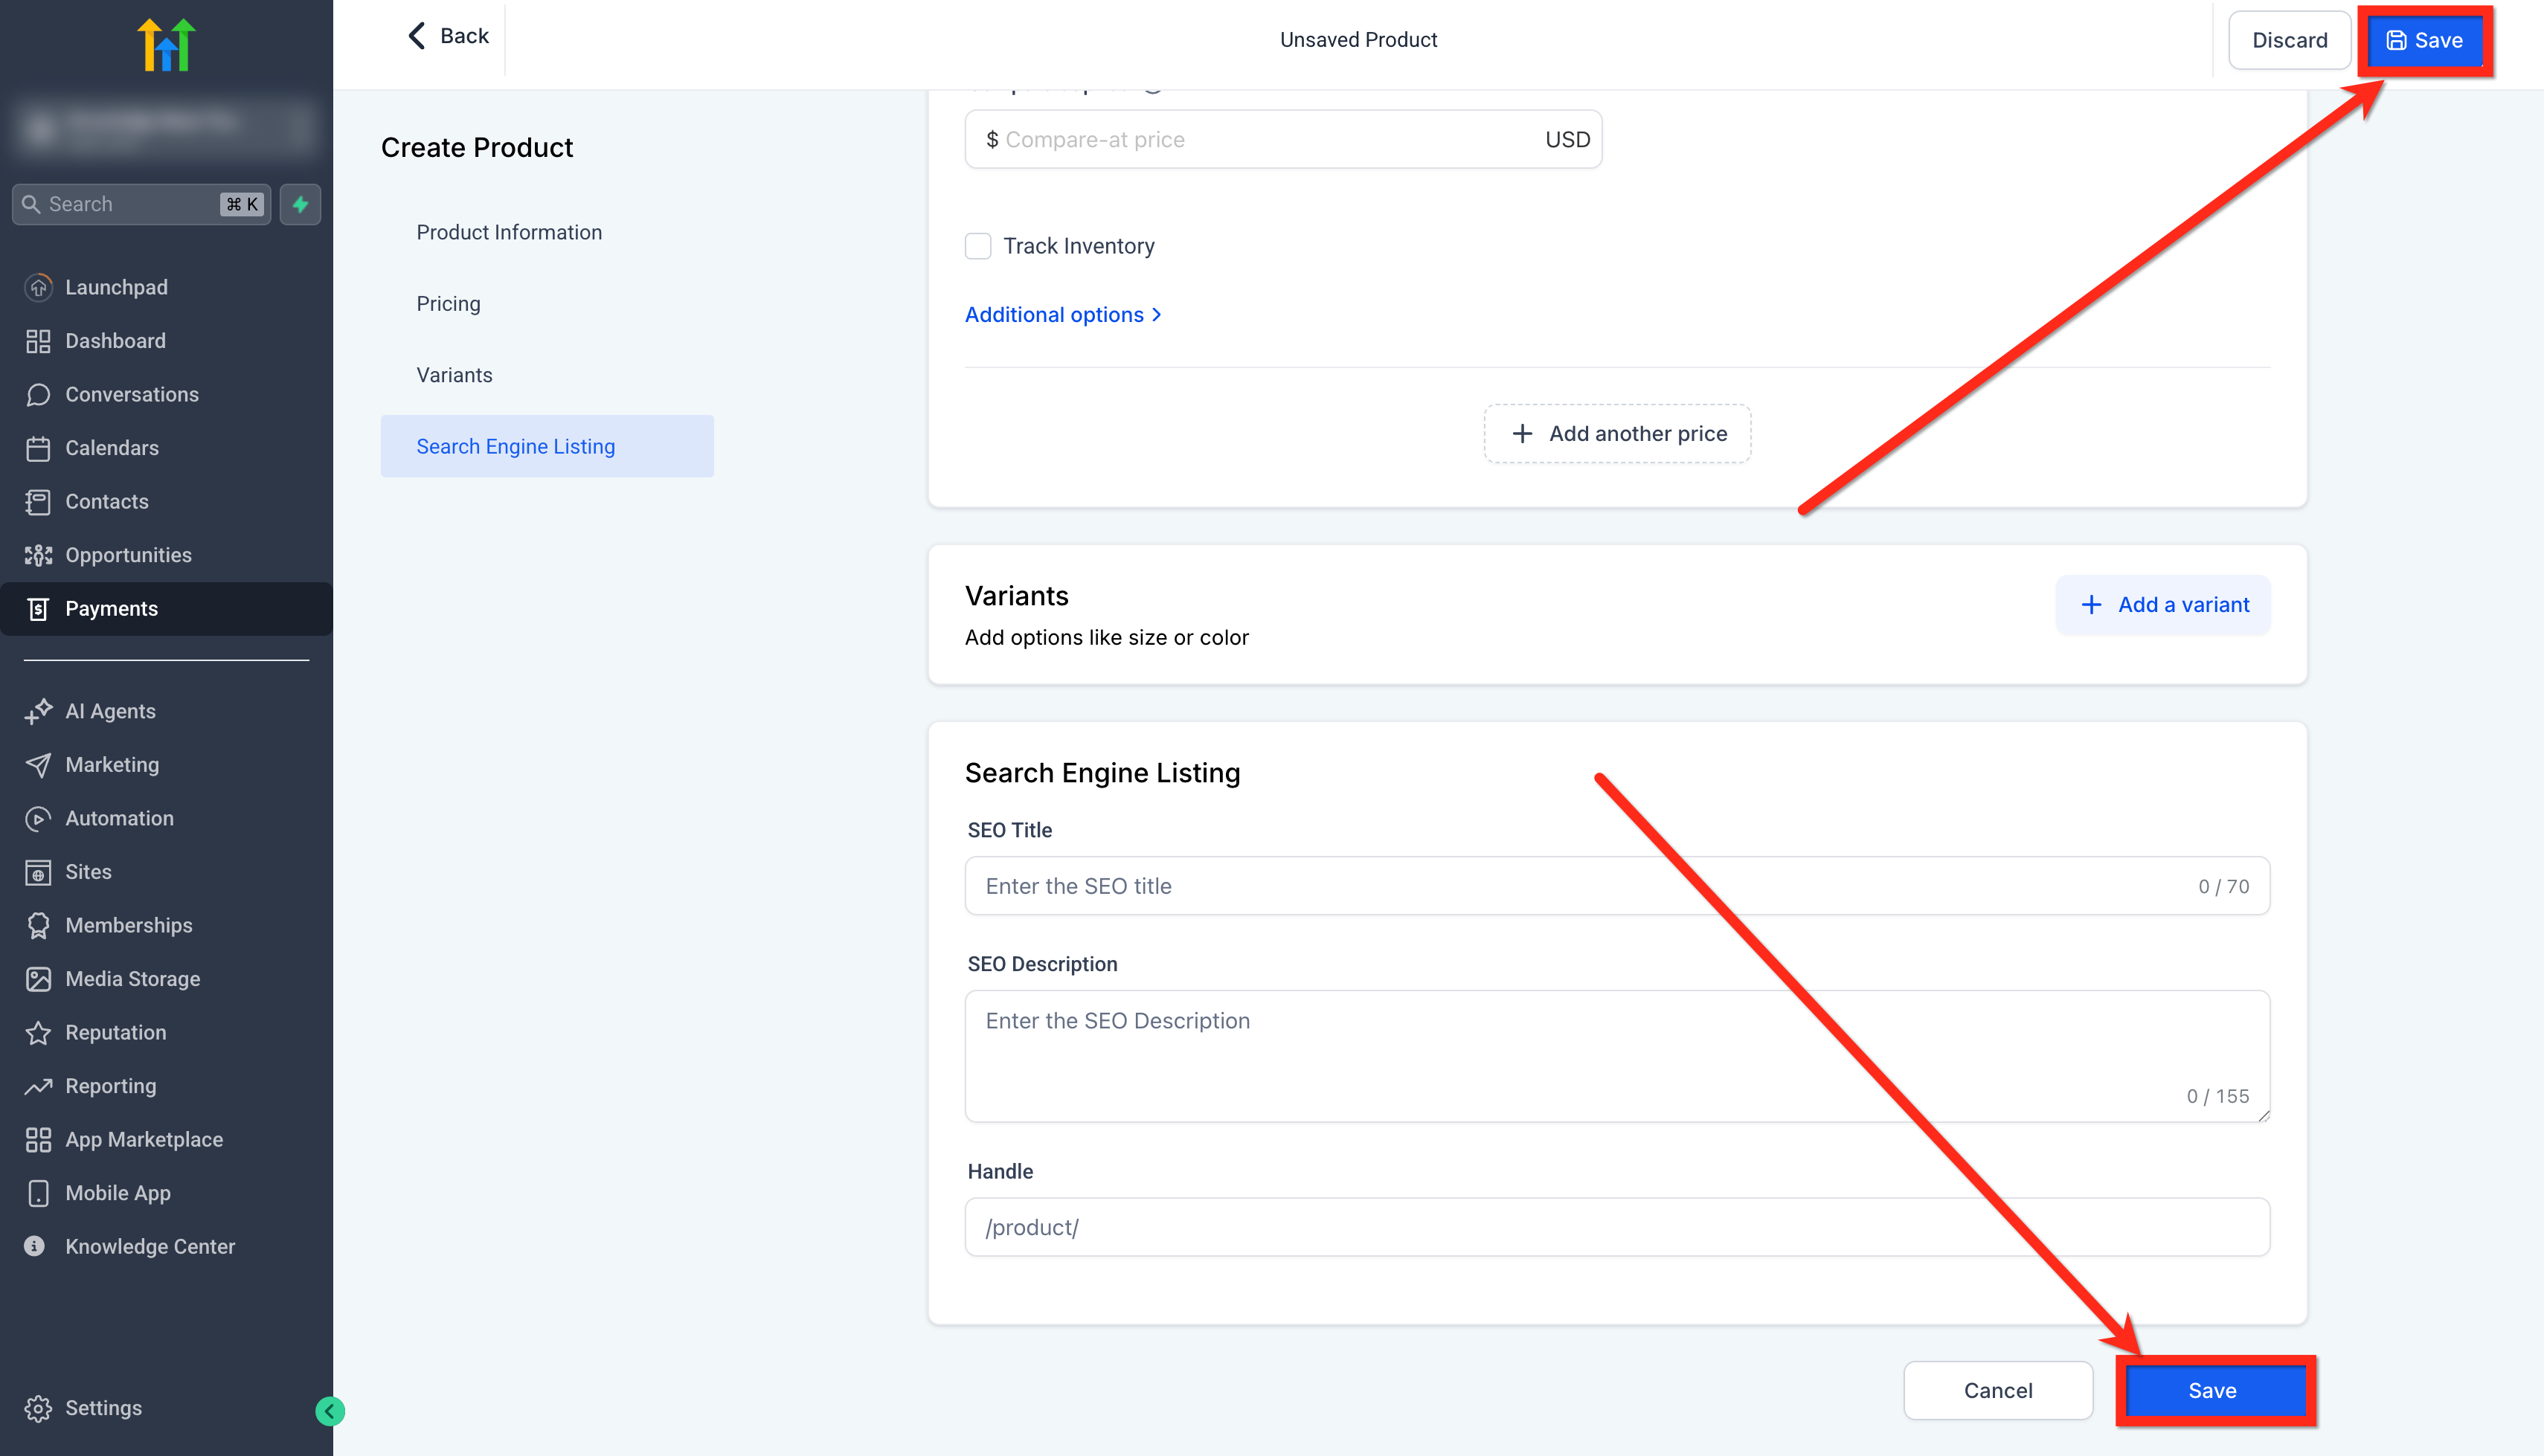
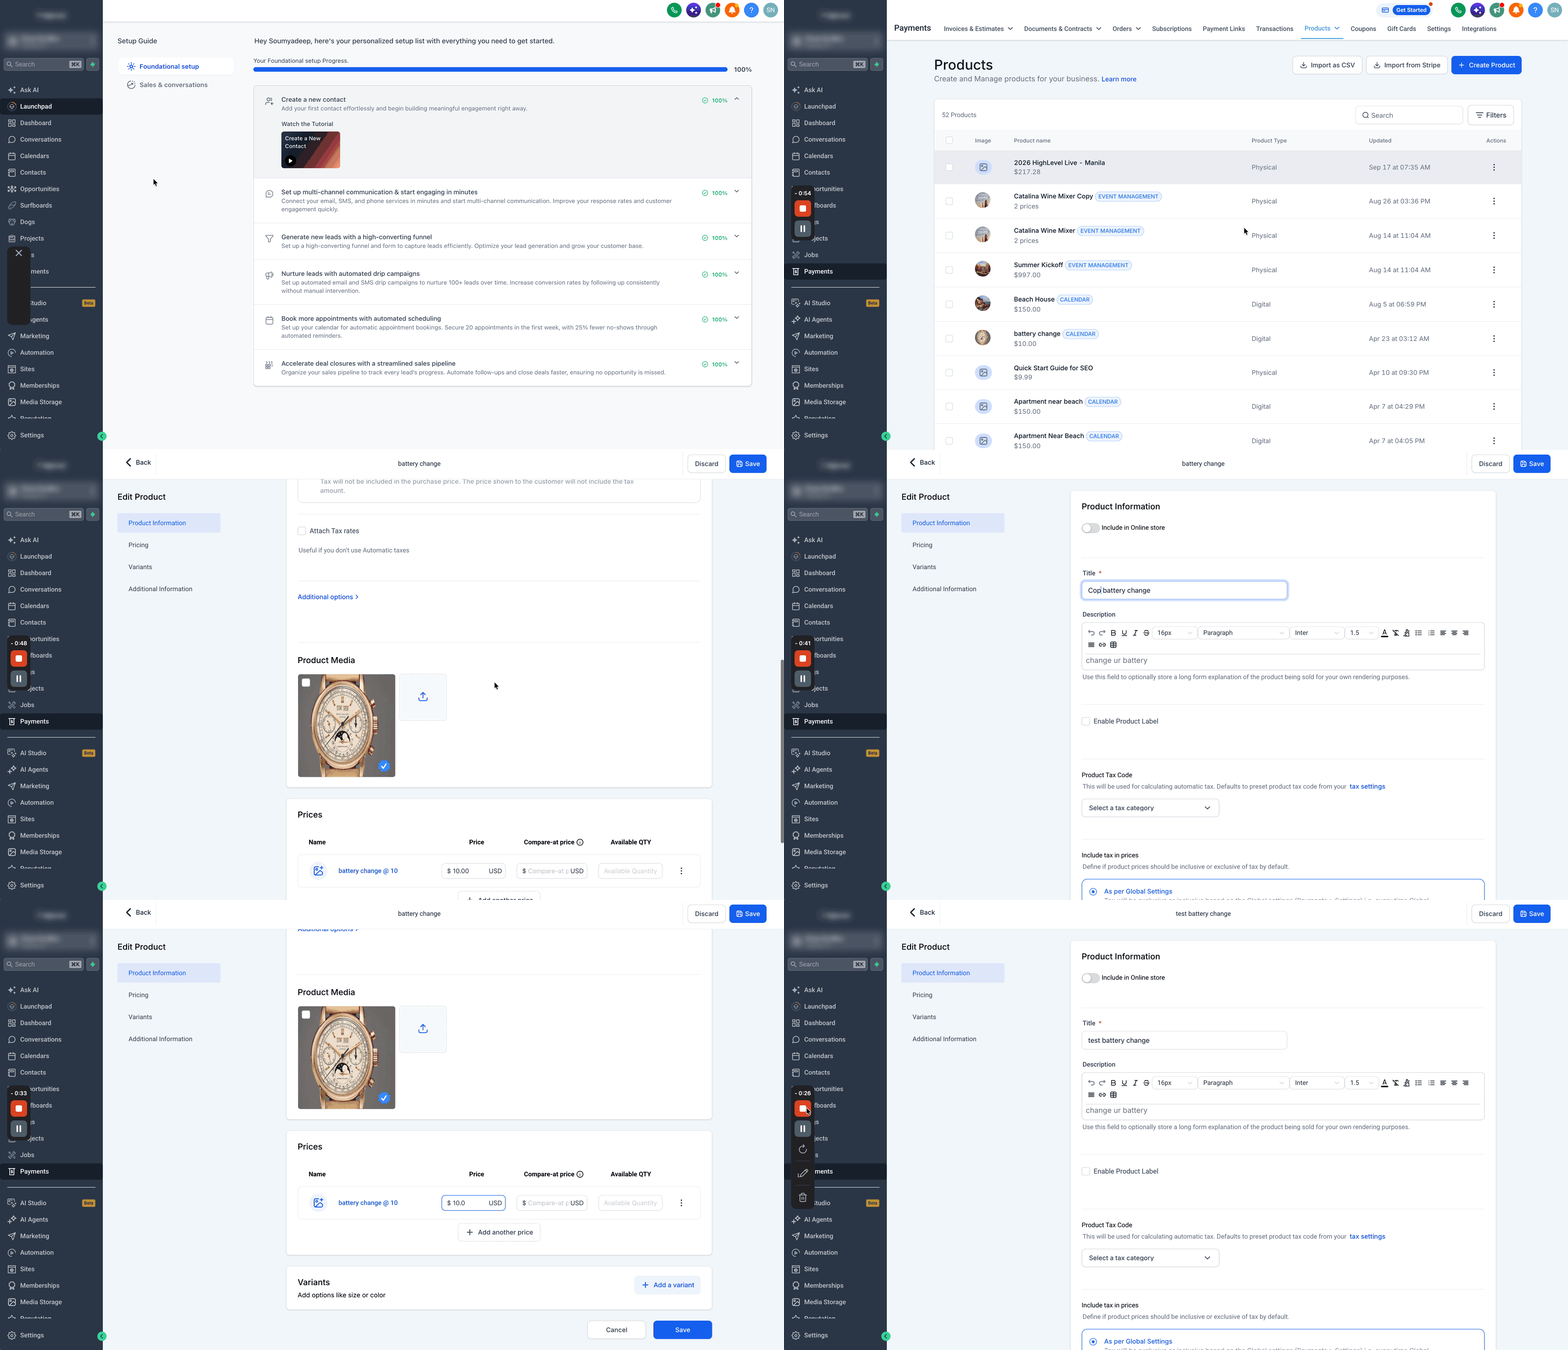
How to Duplicate an Existing Product
Duplicate an existing product when you want to use its details as the starting point for a new product.
- Go to Payments → Products.
- Find the product you want to duplicate.
- Open the product's three dotActions menu and click Duplicate.
- The duplicated product opens in the product editor and is named Copy of [Original Product Name].
- Review or update the duplicated product as needed.
- Click Save.
- The duplicate carries over the original product's title, description, pricing, variants, images, and settings.
How to Add a a Trial to a Product
Follow these steps to add a trial to your product:
- Go to Payments → Products
- Create a new product or edit an existing one
- Under Pricing, set the product to Recurring (Type)
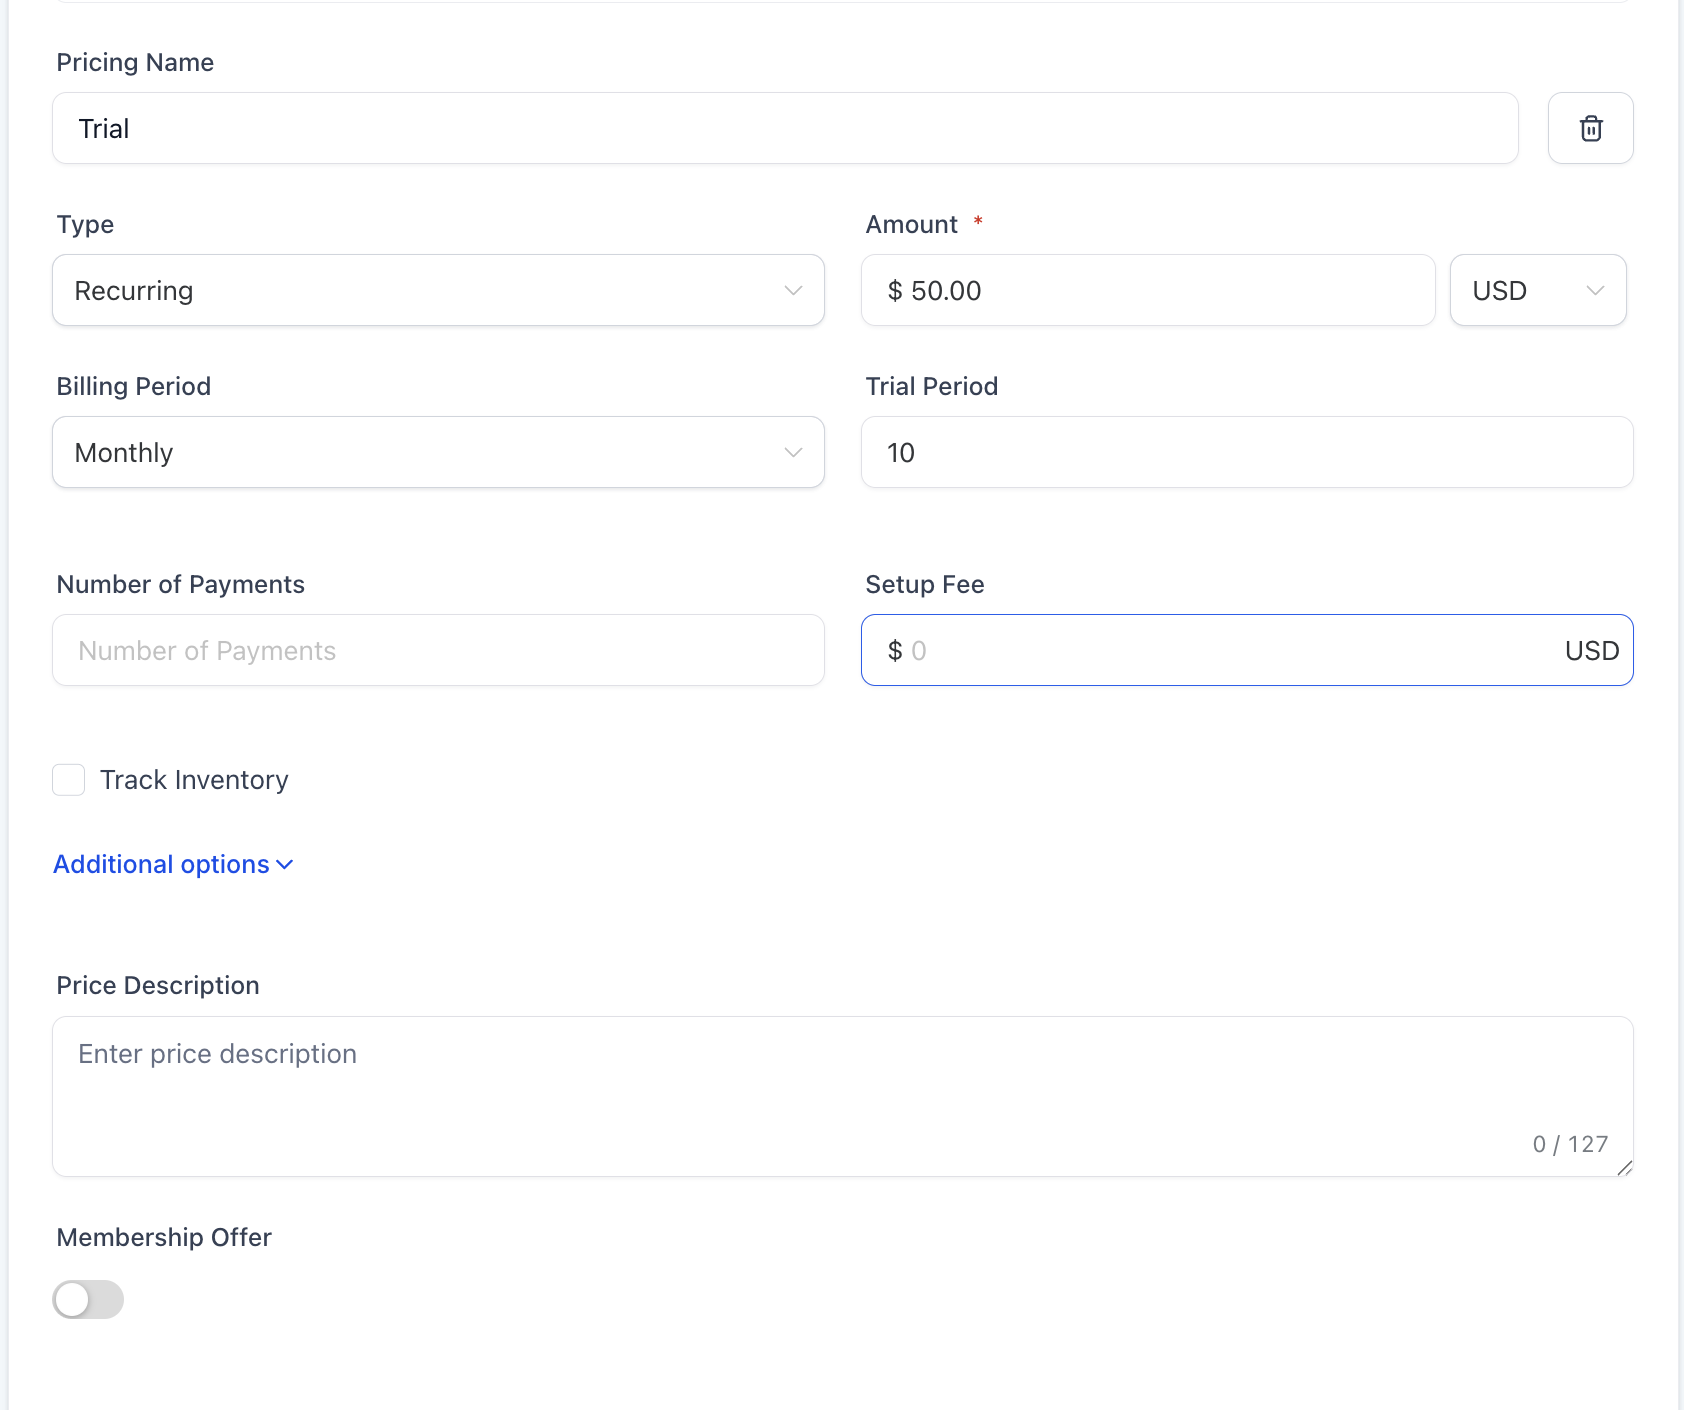
- Enter the amount
- Compare-at price (optional)
- Select billing period
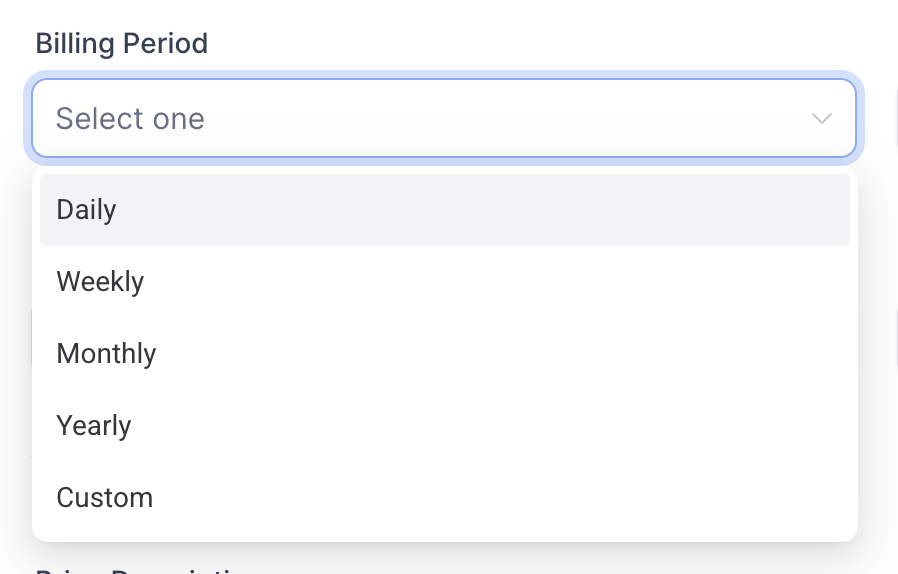
- Enter Trial period (ex: “5 days”)
- Number of payments and setup fee (Optional)
- Save your product
- Add the product to an order form, invoice, or checkout page
How to Make Products Available
Great job creating your product! Now, let's make sure customers can actually find and buy it. Think of this step like stocking your storefront—visibility is everything. If you are selling digital products, ensure that digital files are uploaded to each product variant. Without uploaded files, customers will not see download options after checkout.
Navigate to Sites and choose where you want your product to appear: Website, Funnel, or Store.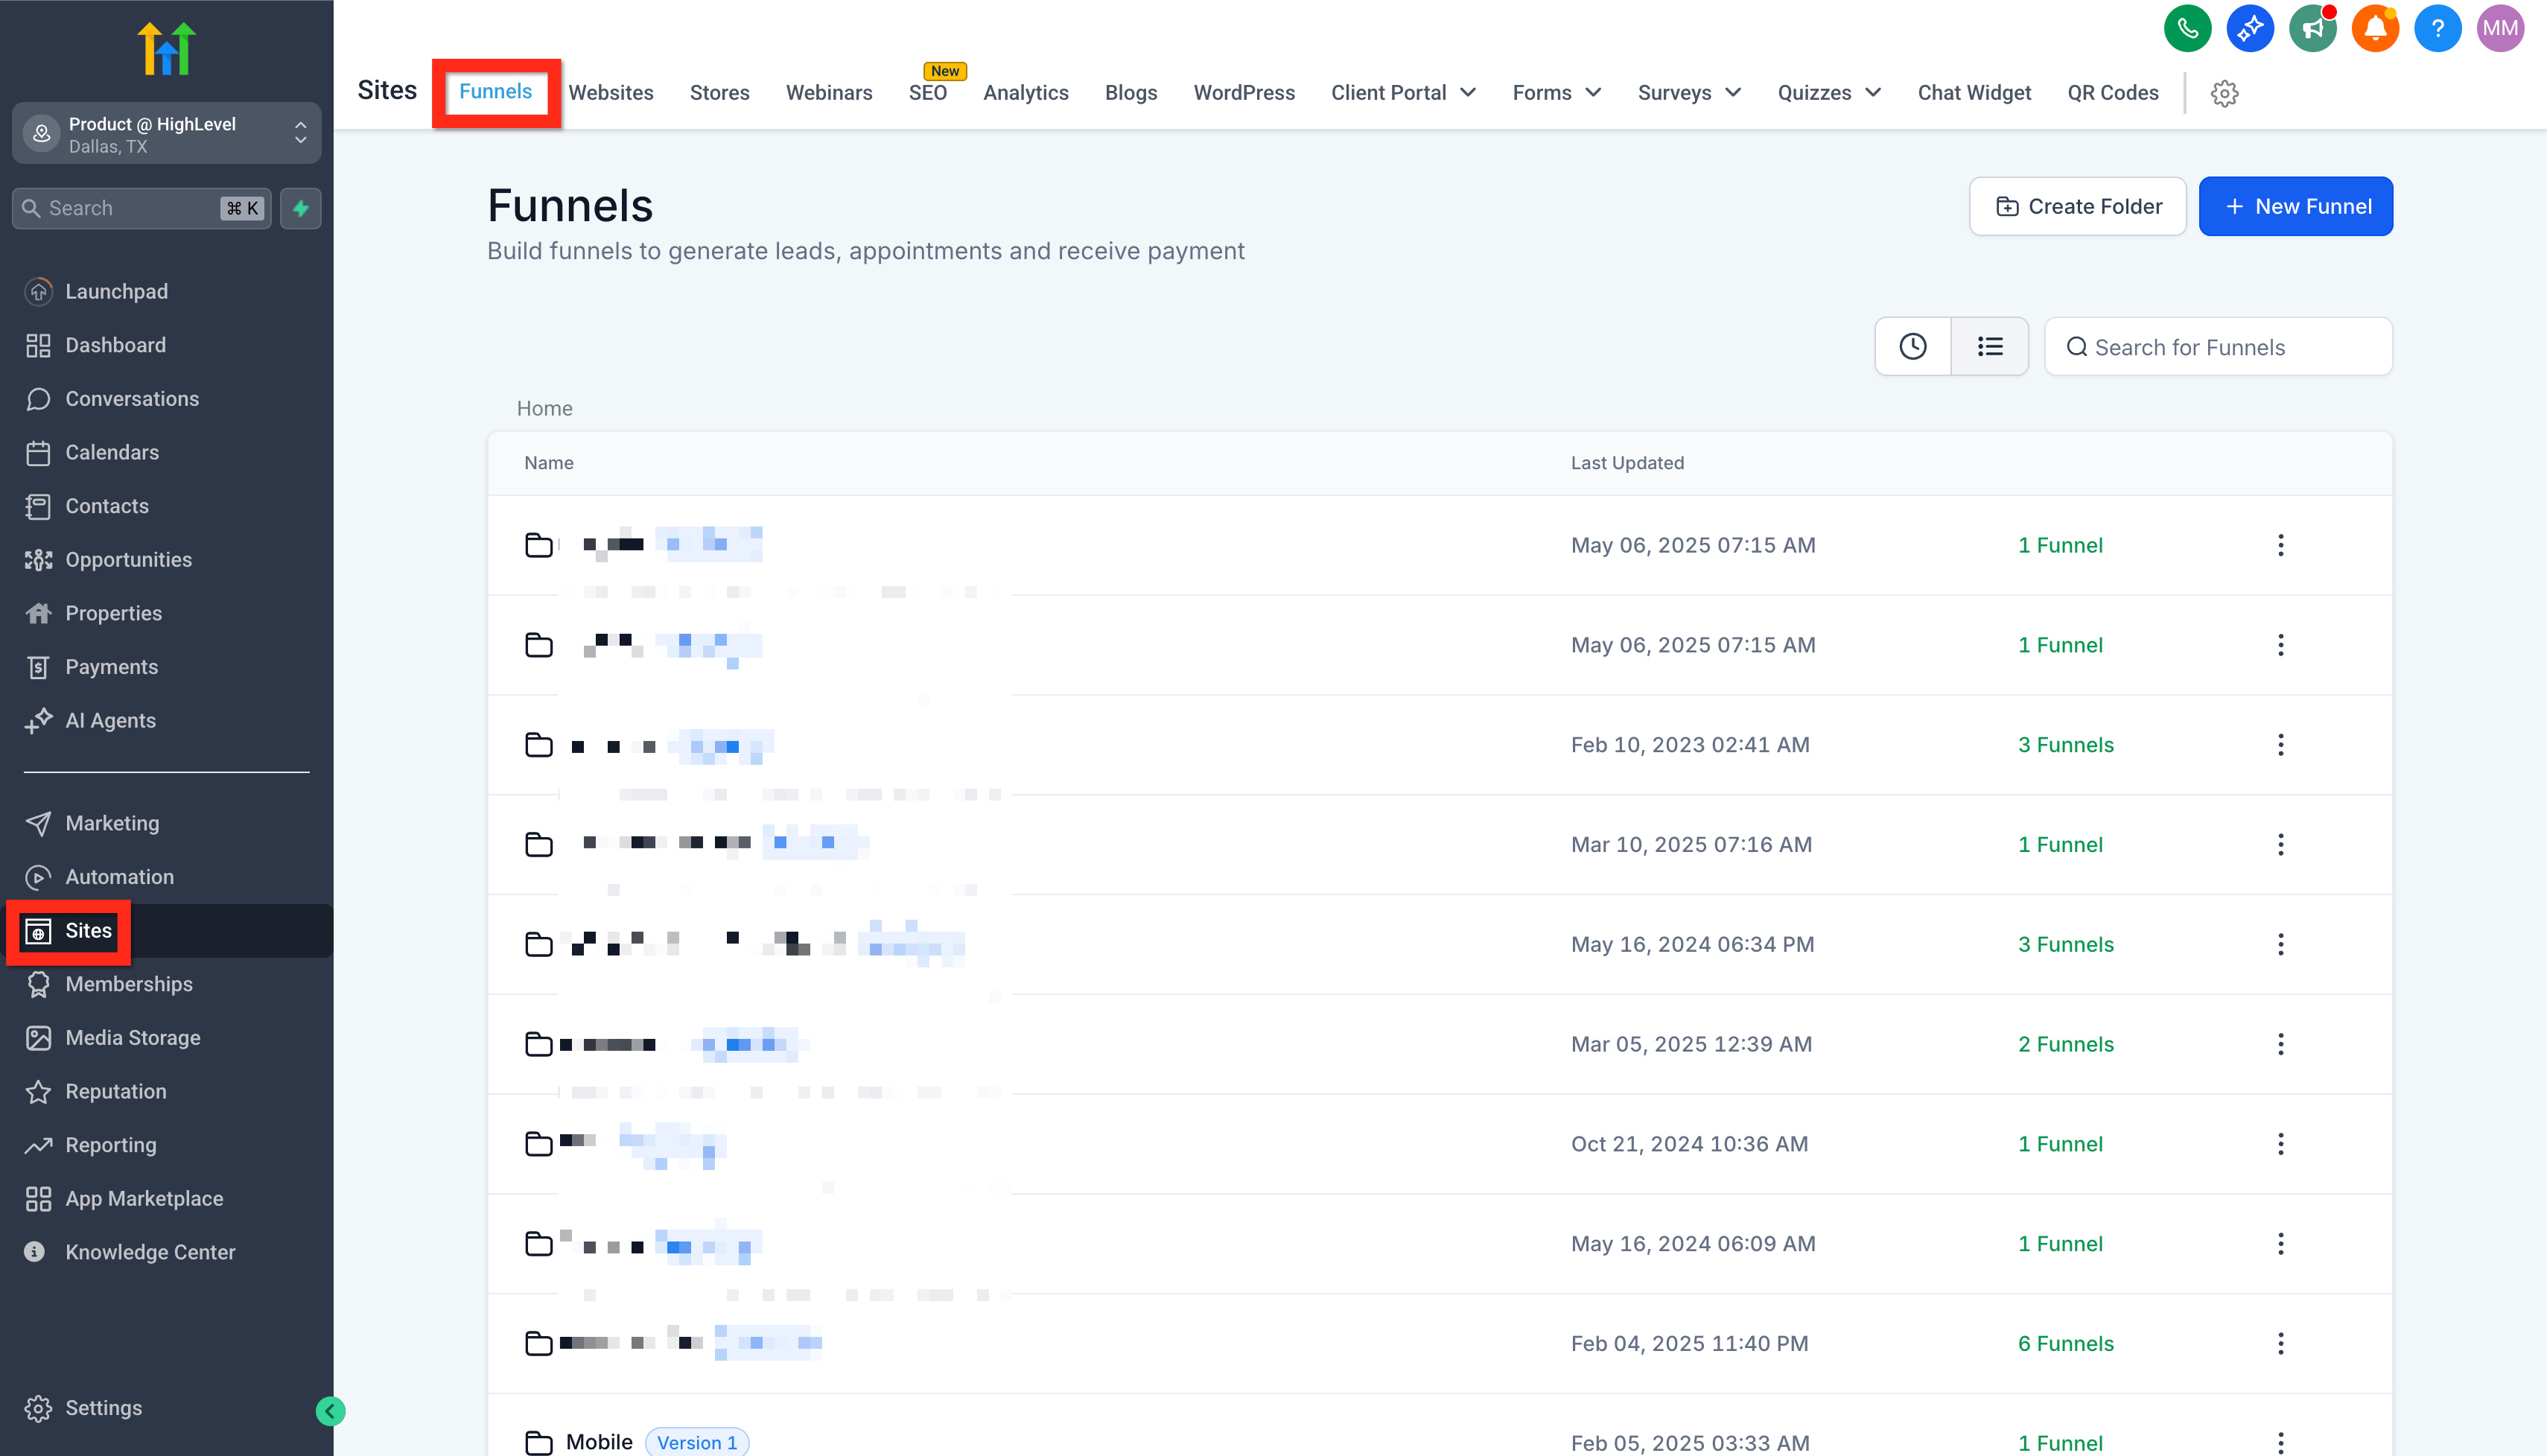
Once your product is created, choose how you want customers to purchase it. Products can be used across different Chat To Clients CRM payment and selling experiences.
| Selling Method | When to Use It | What to Do |
| Online Store | Let customers browse products and complete purchases through an e-commerce storefront. | Enable Include in Online Store for the product, then add or make the product available in your store. |
| Funnel | Sell a product through a dedicated sales or checkout funnel. | Add the product to the funnel and place an order form on the checkout page. |
| Payment Link | Share a direct checkout link by email, SMS, QR code, or another channel. | Create a Payment Link and select the product and price you want to sell. |
| Invoice | Bill a specific customer directly for a product or service. | Create an invoice and add the applicable product. Make sure the invoice type matches the product's one-time or recurring pricing. |
| Form | Collect customer information and payment from the same form. | Add the Payment element to the form and select the product you want to offer. |
Digital Products: If you're selling downloadable products through an online store, upload the required digital files to the applicable product or variant before customers purchase.
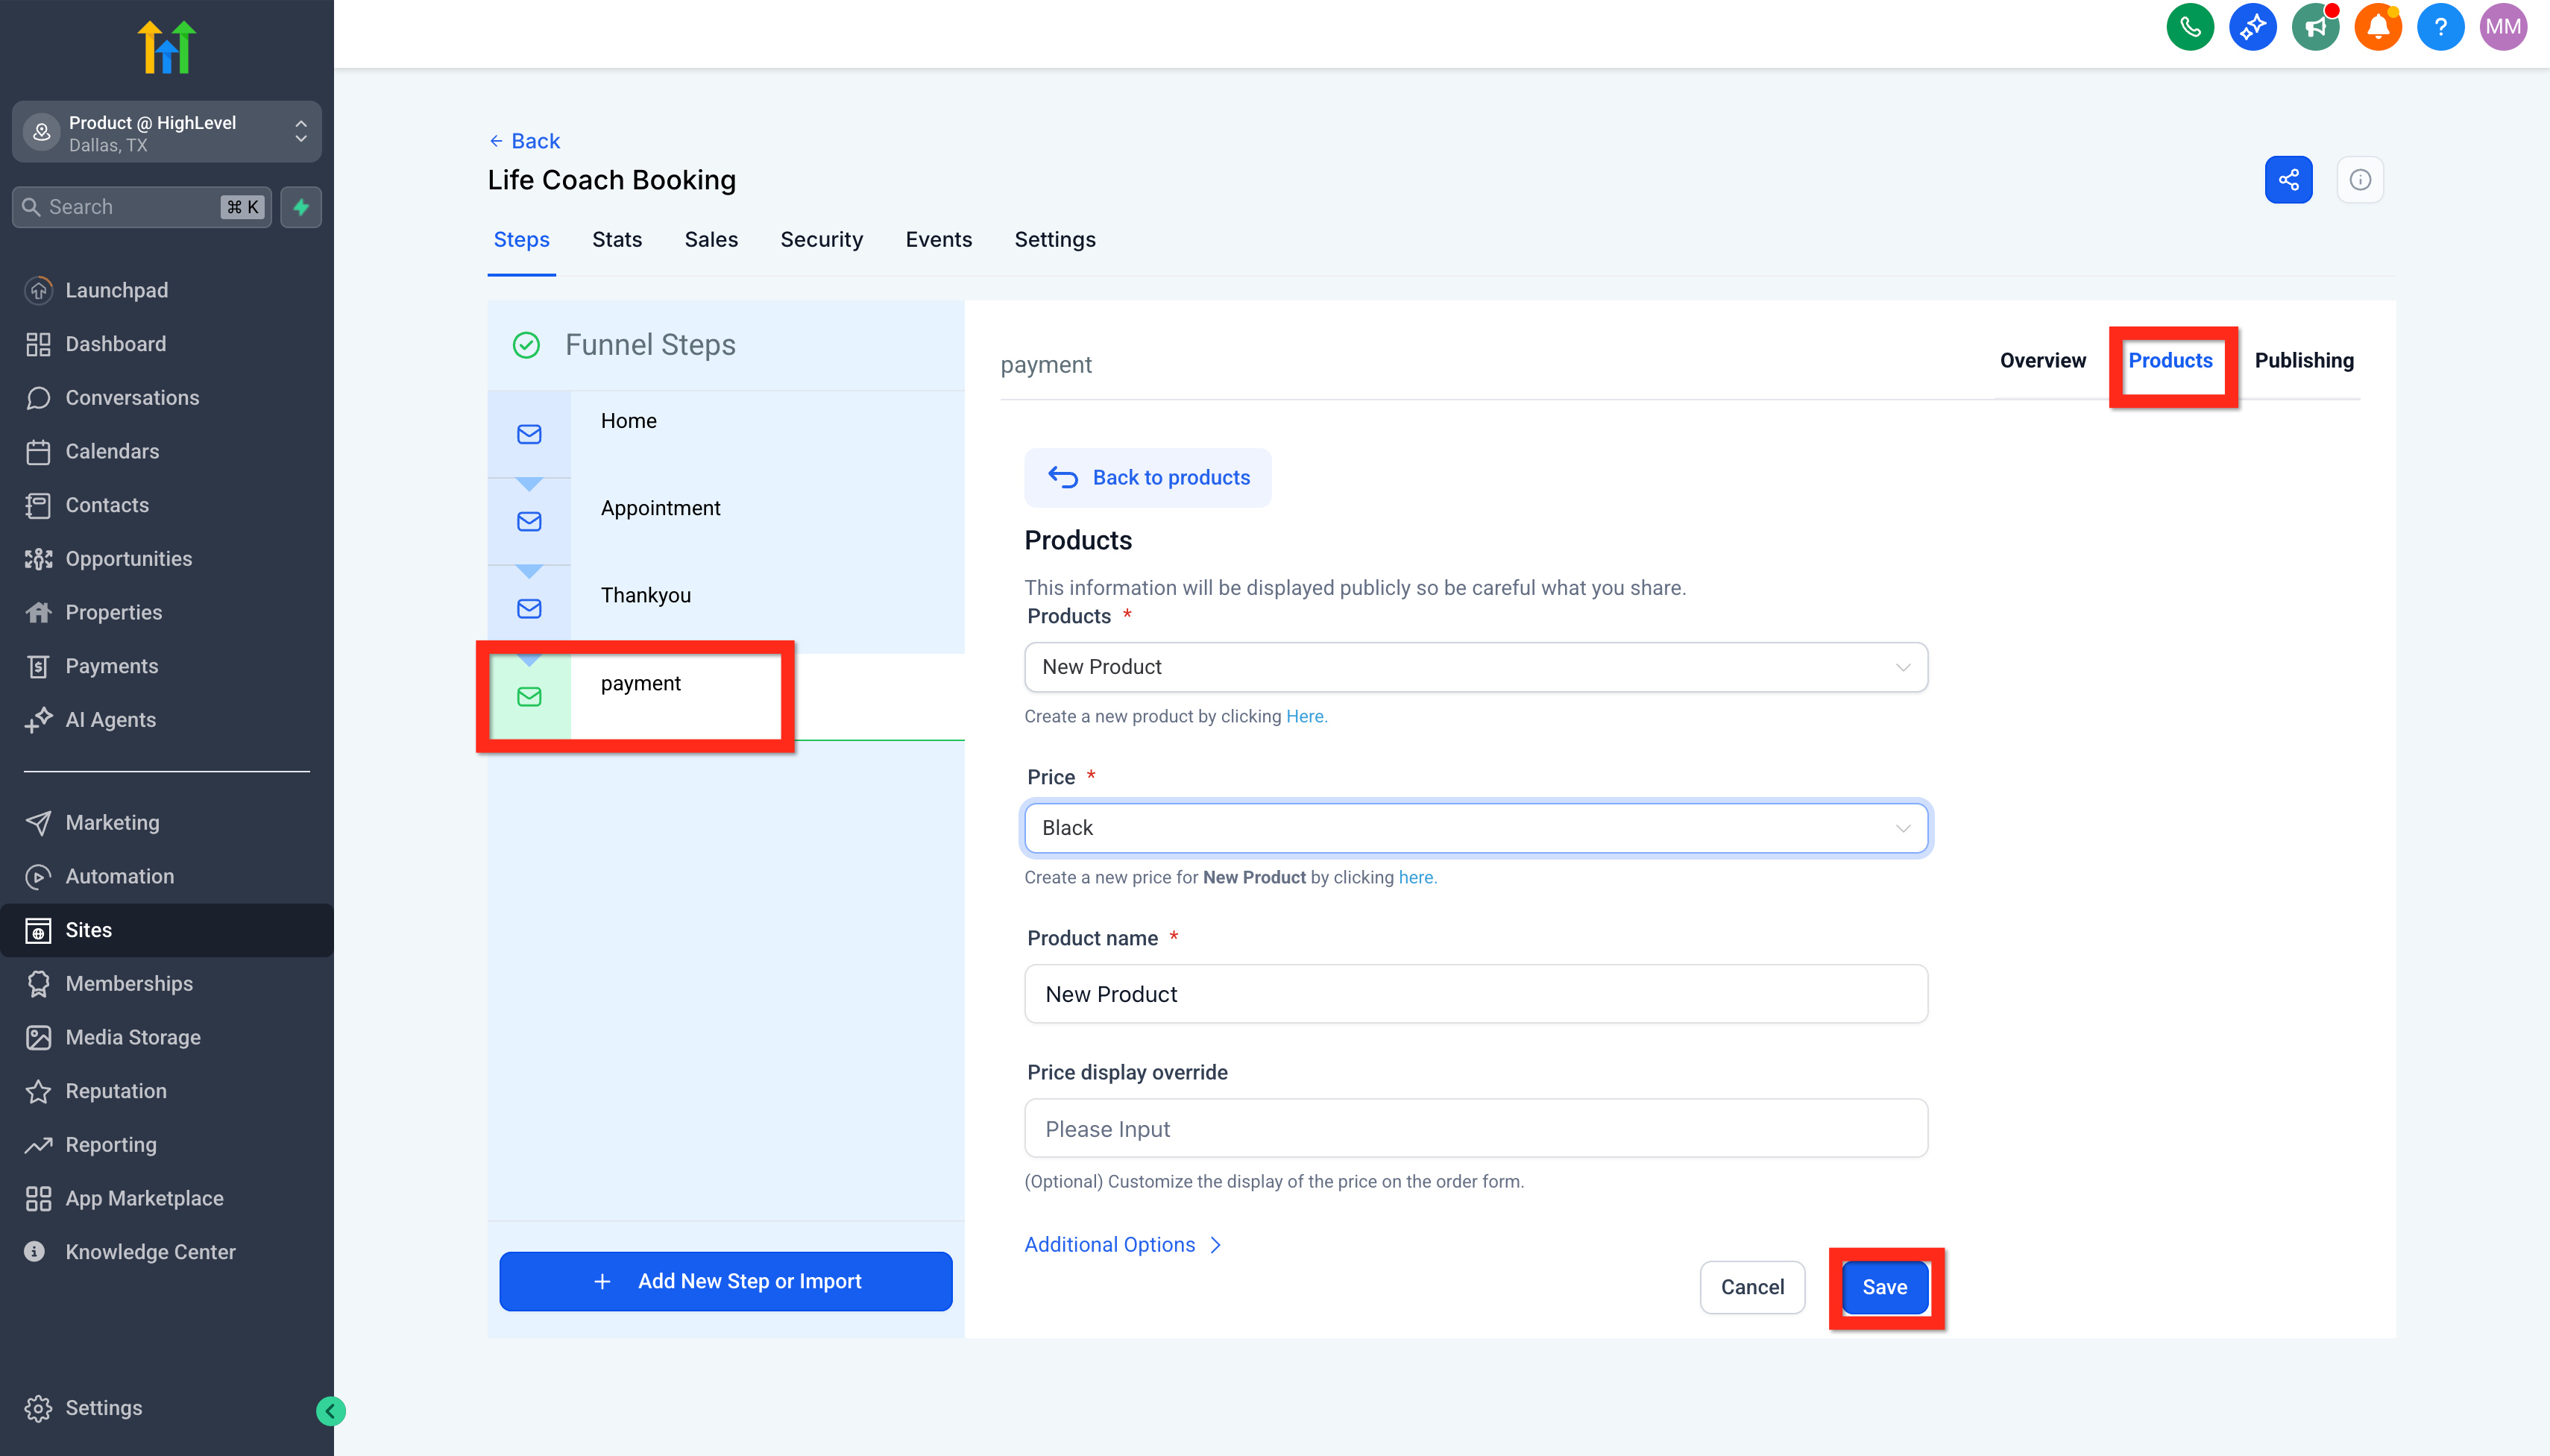
How to Add a Product to a Funnel
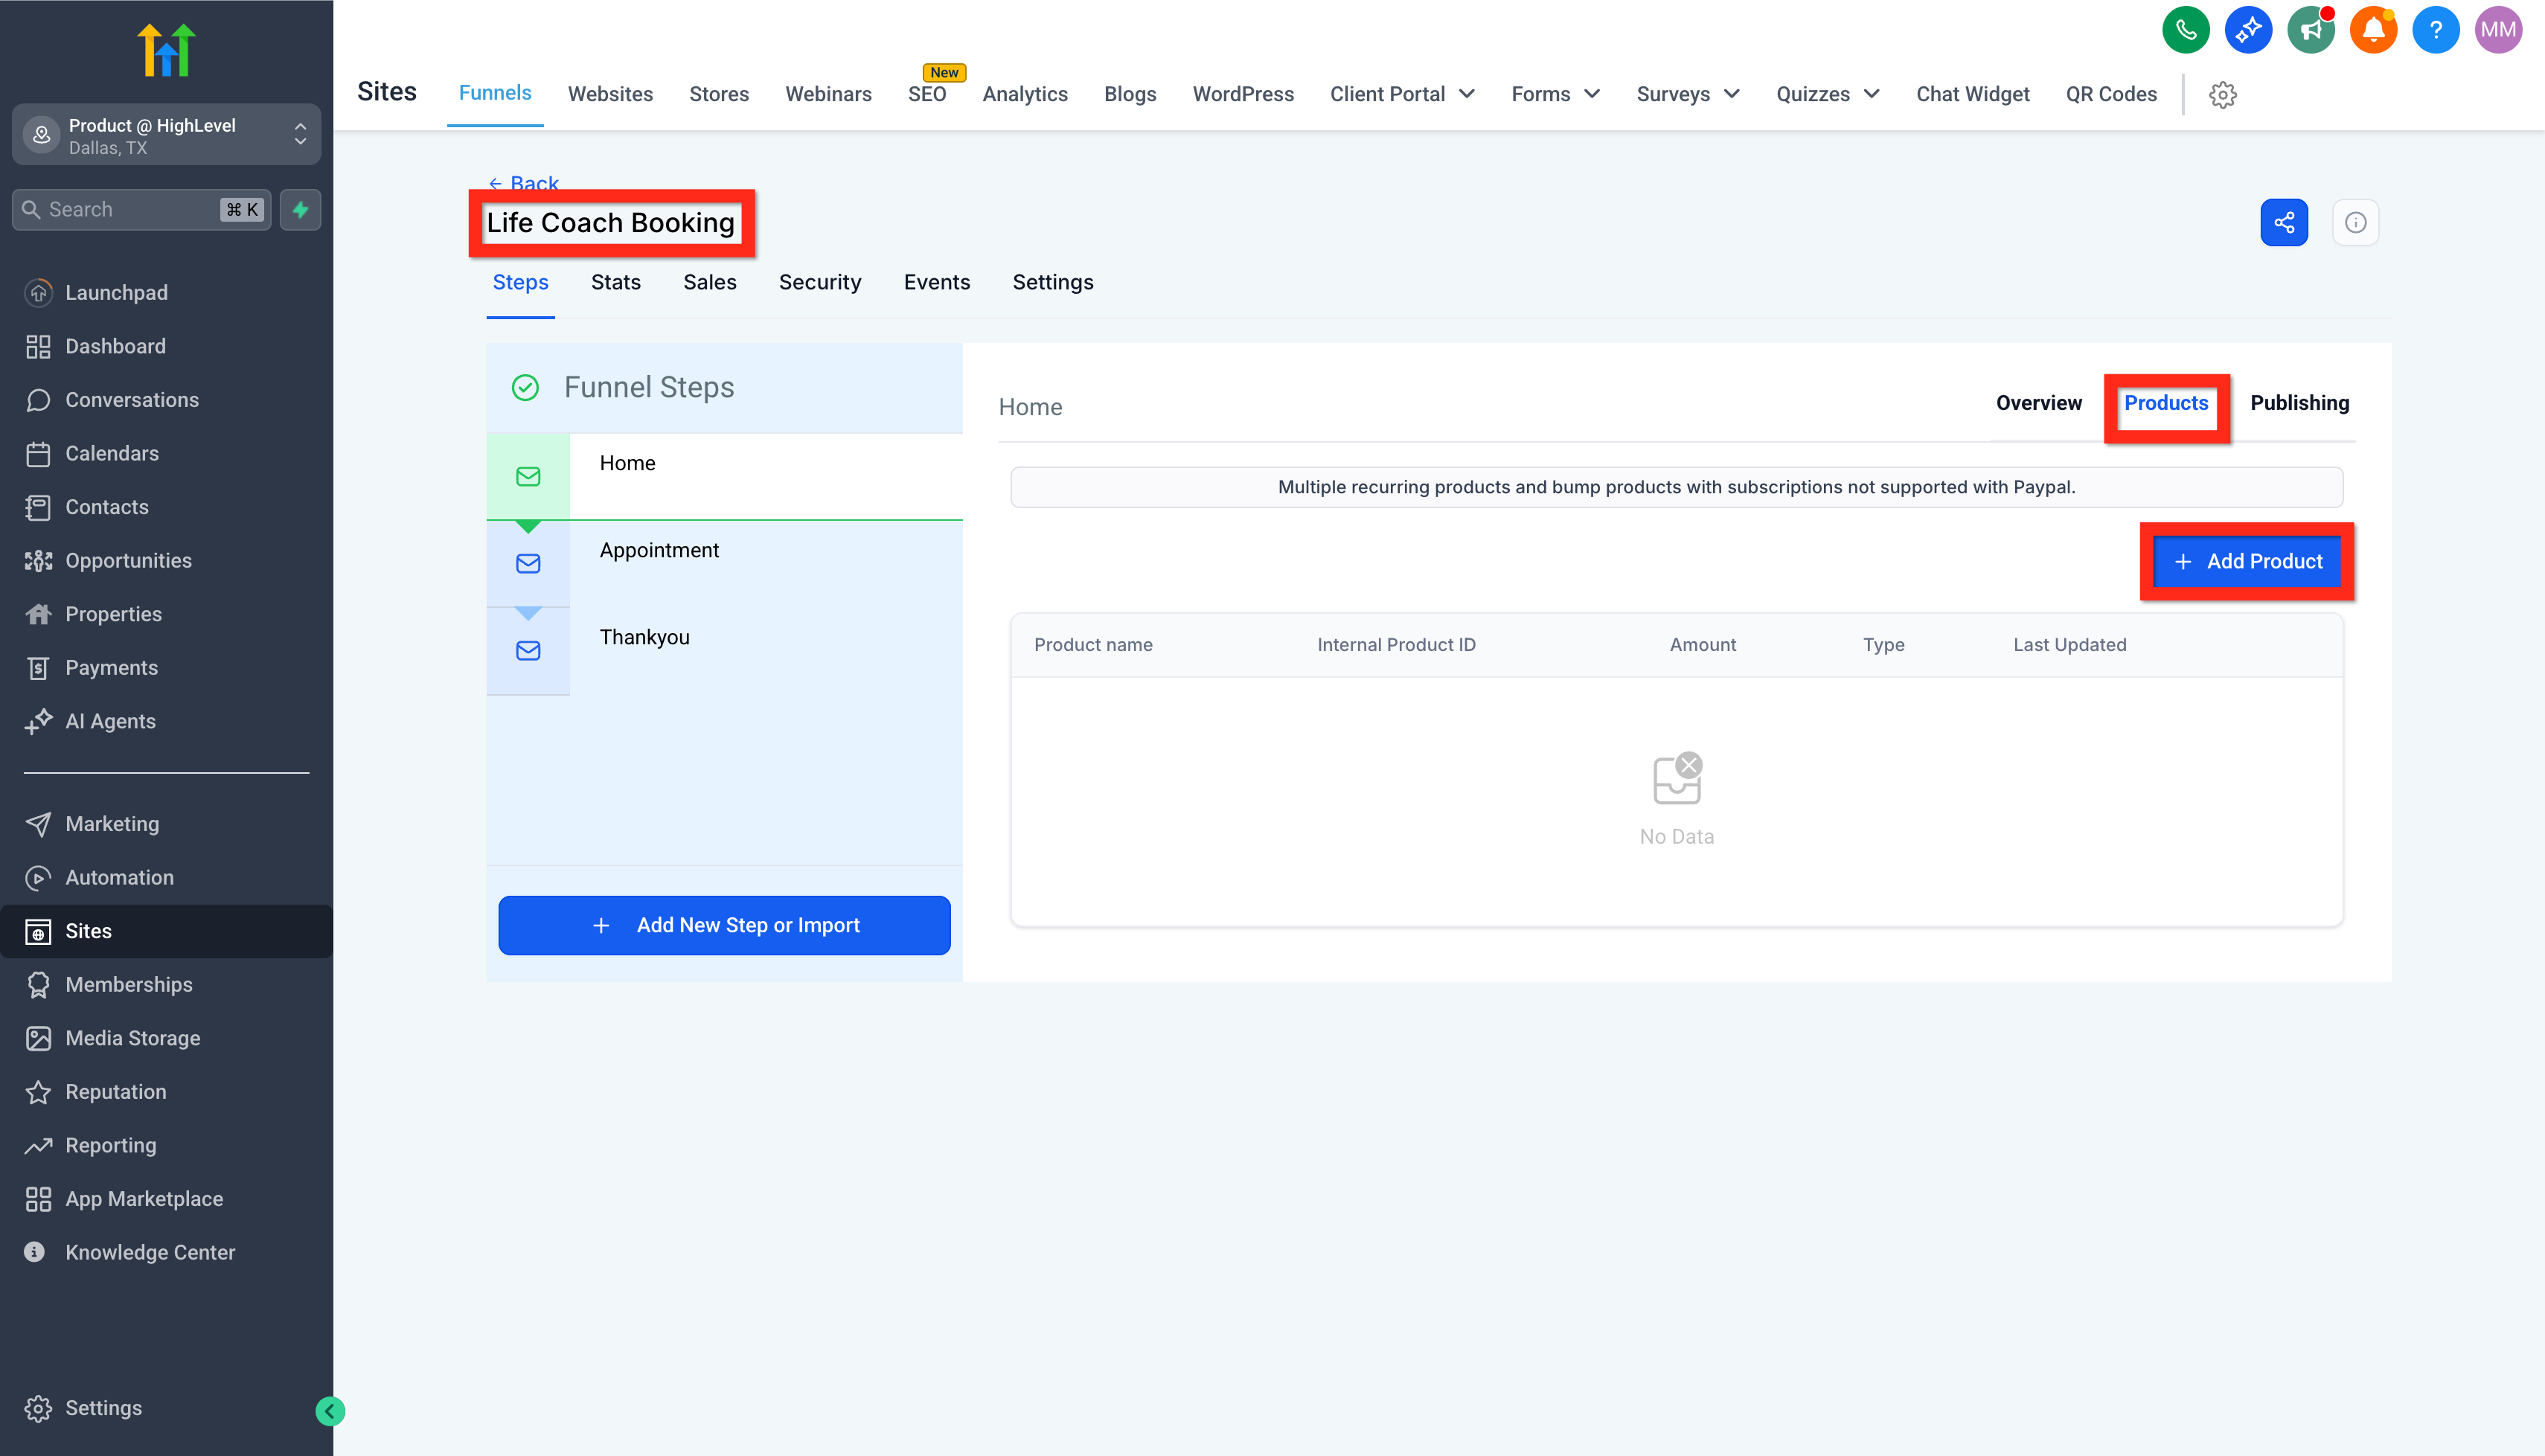
- Click Funnels and select your desired funnel
- Go to the Products tab
- Click Add Product
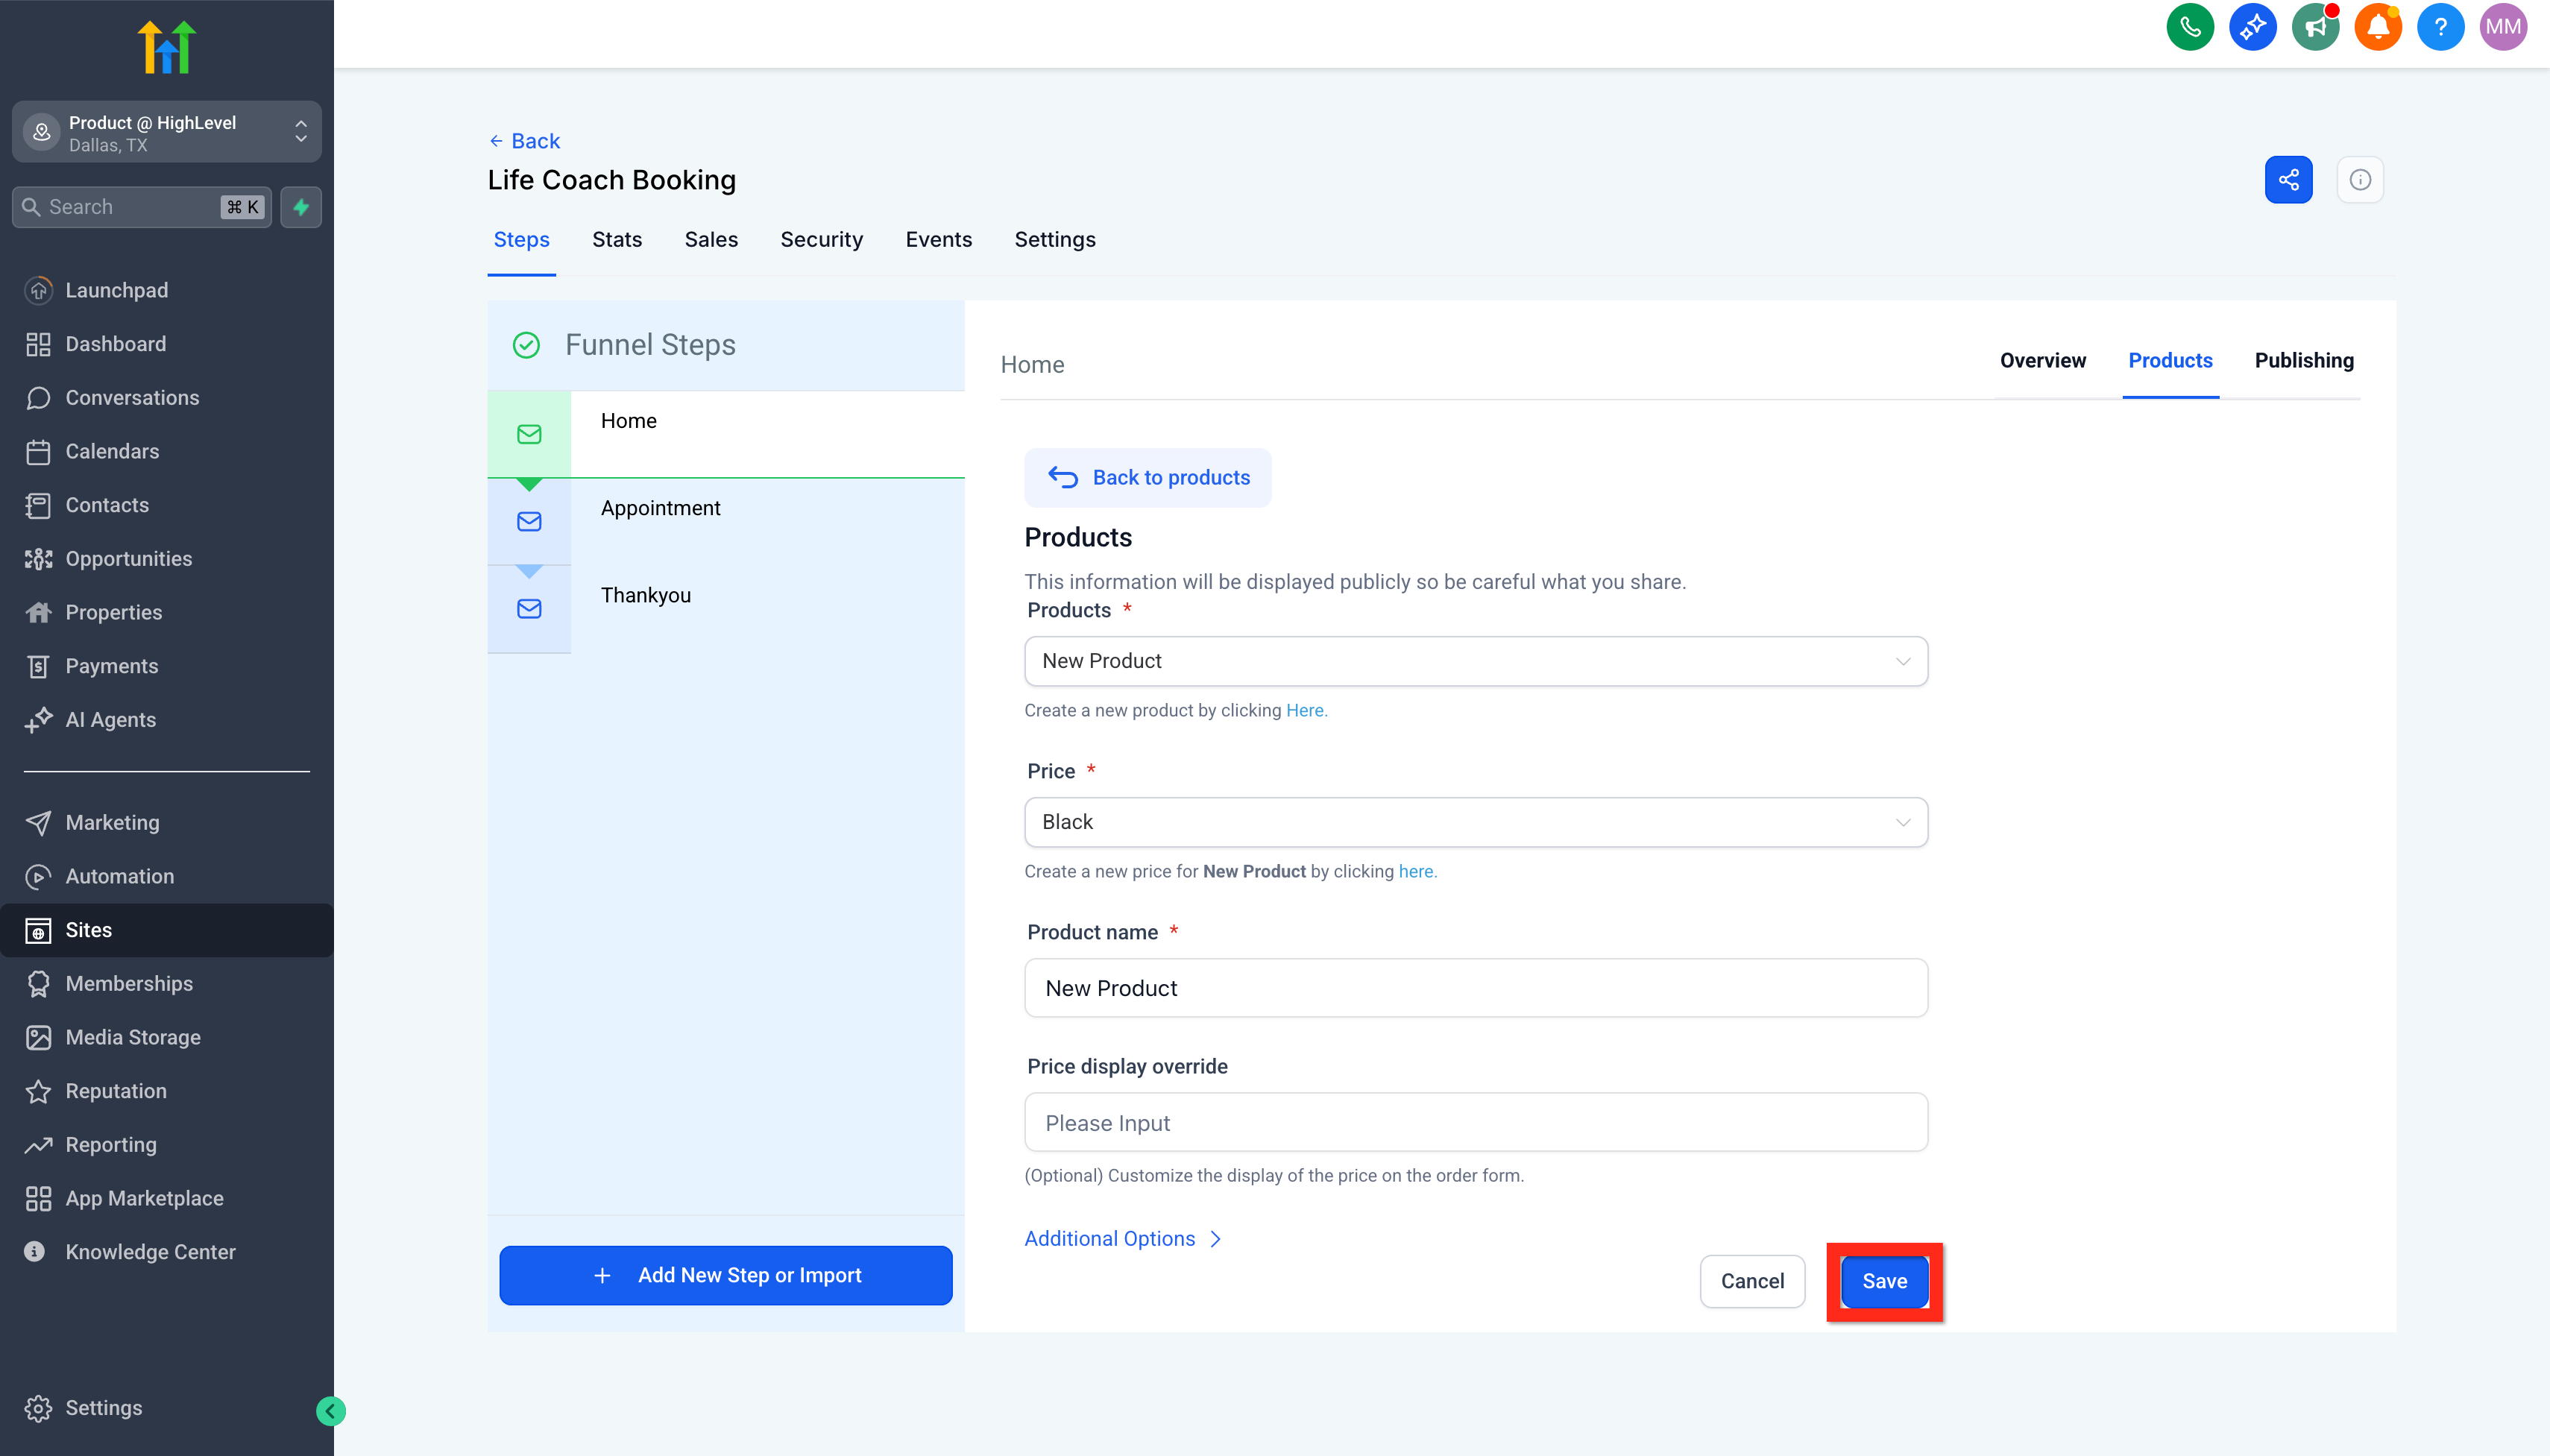
- Configure your product details
- Click Save
How to Add Order Form to a Funnel
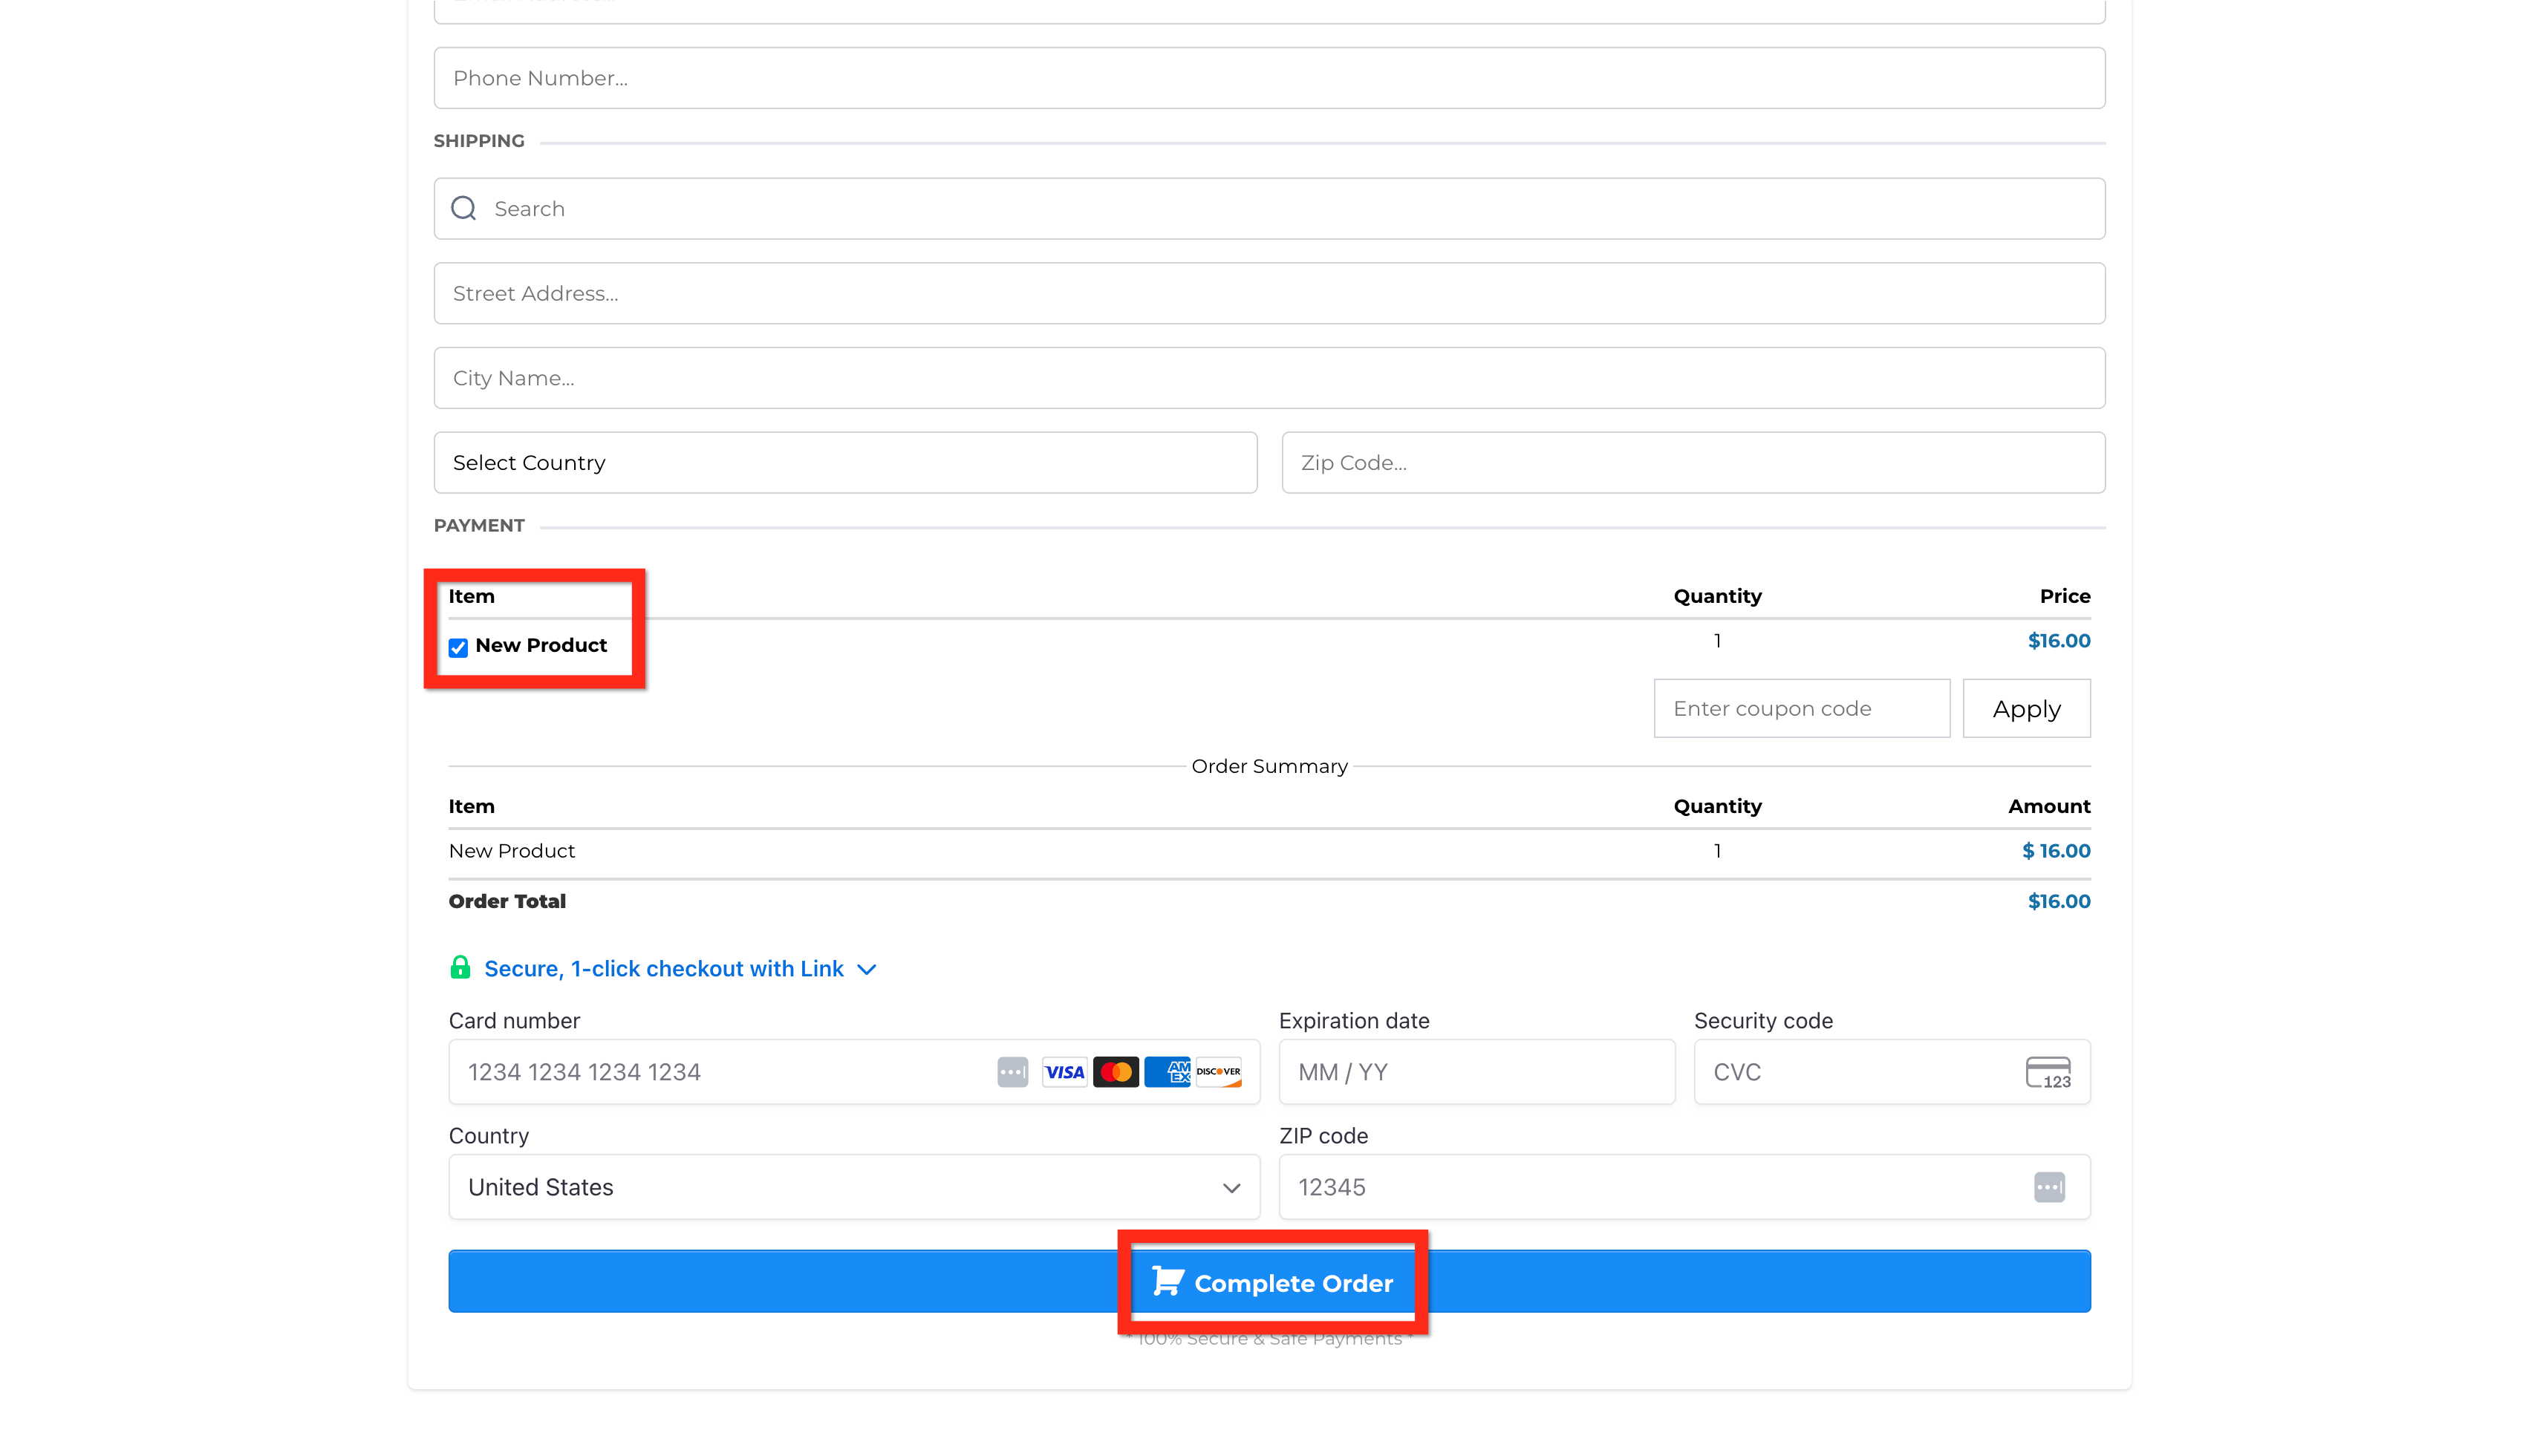
After adding a product to your funnel, add an order form to the checkout page so customers can enter their information and complete the purchase.
- Navigate to the Site Editor
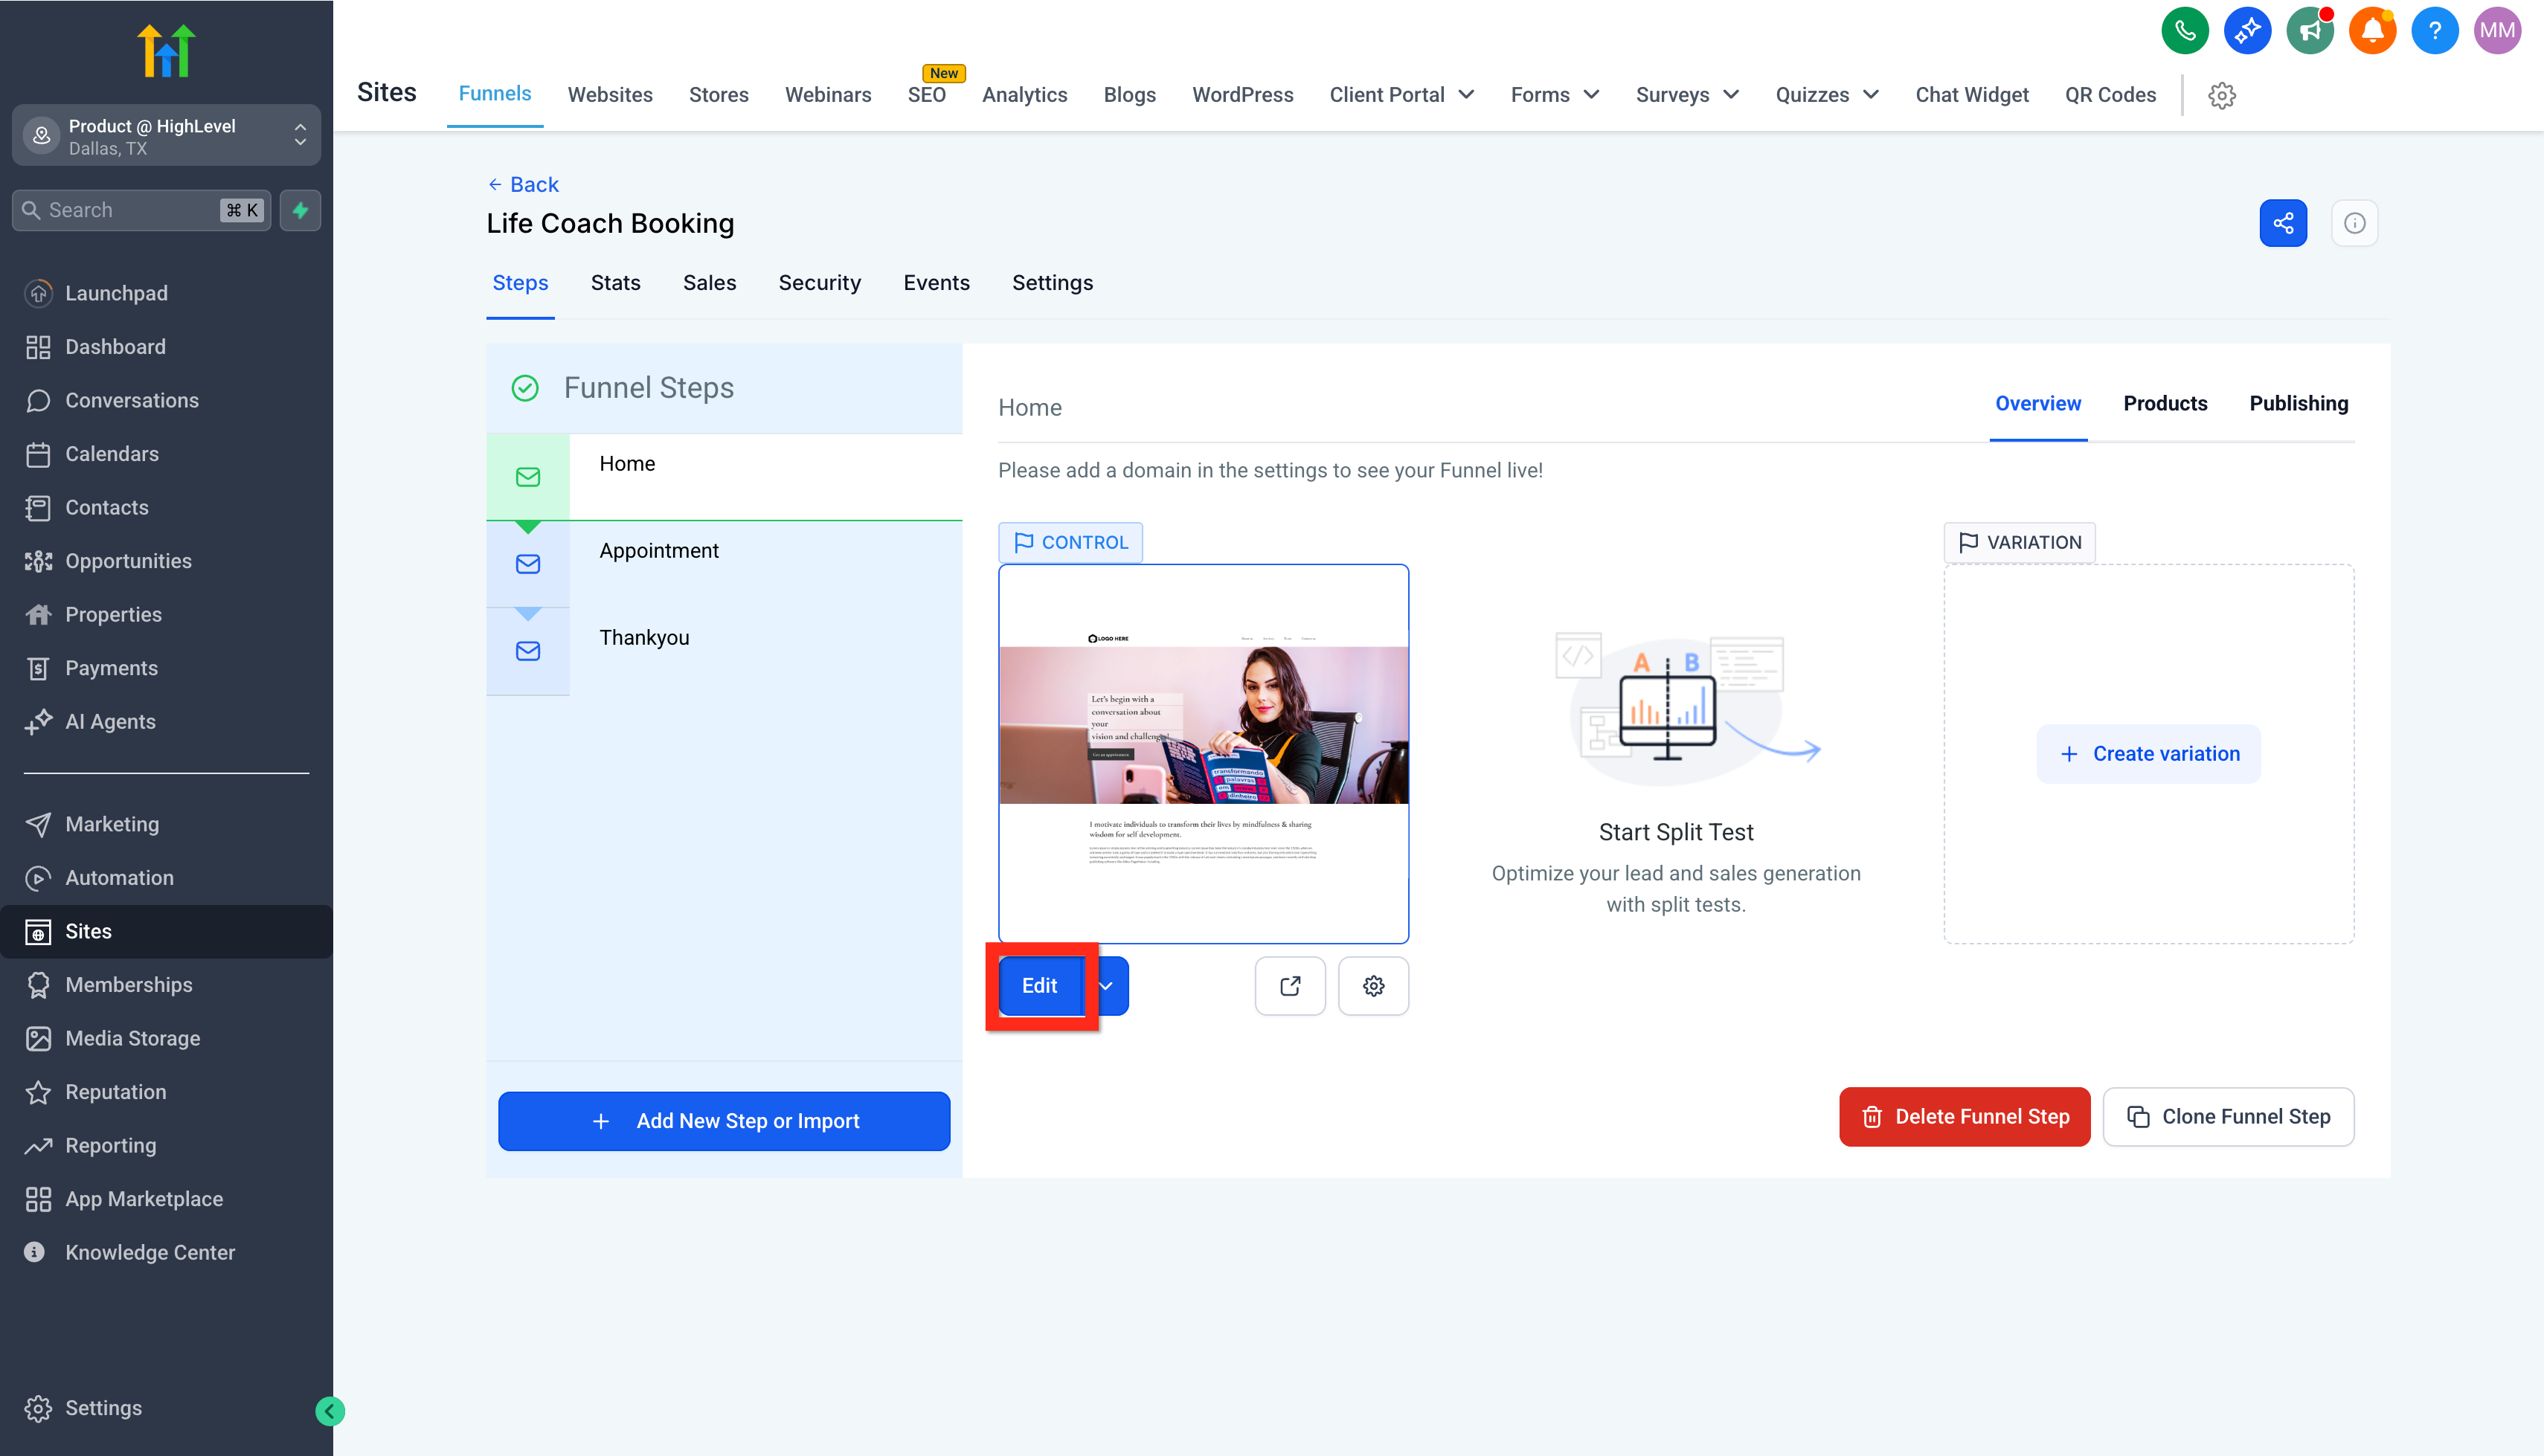
- Select the funnel page that will have the checkout form. If that page doesn't exist yet, create it:
- Click Add New Step.
- Fill out the details and click Create Funnel Step.
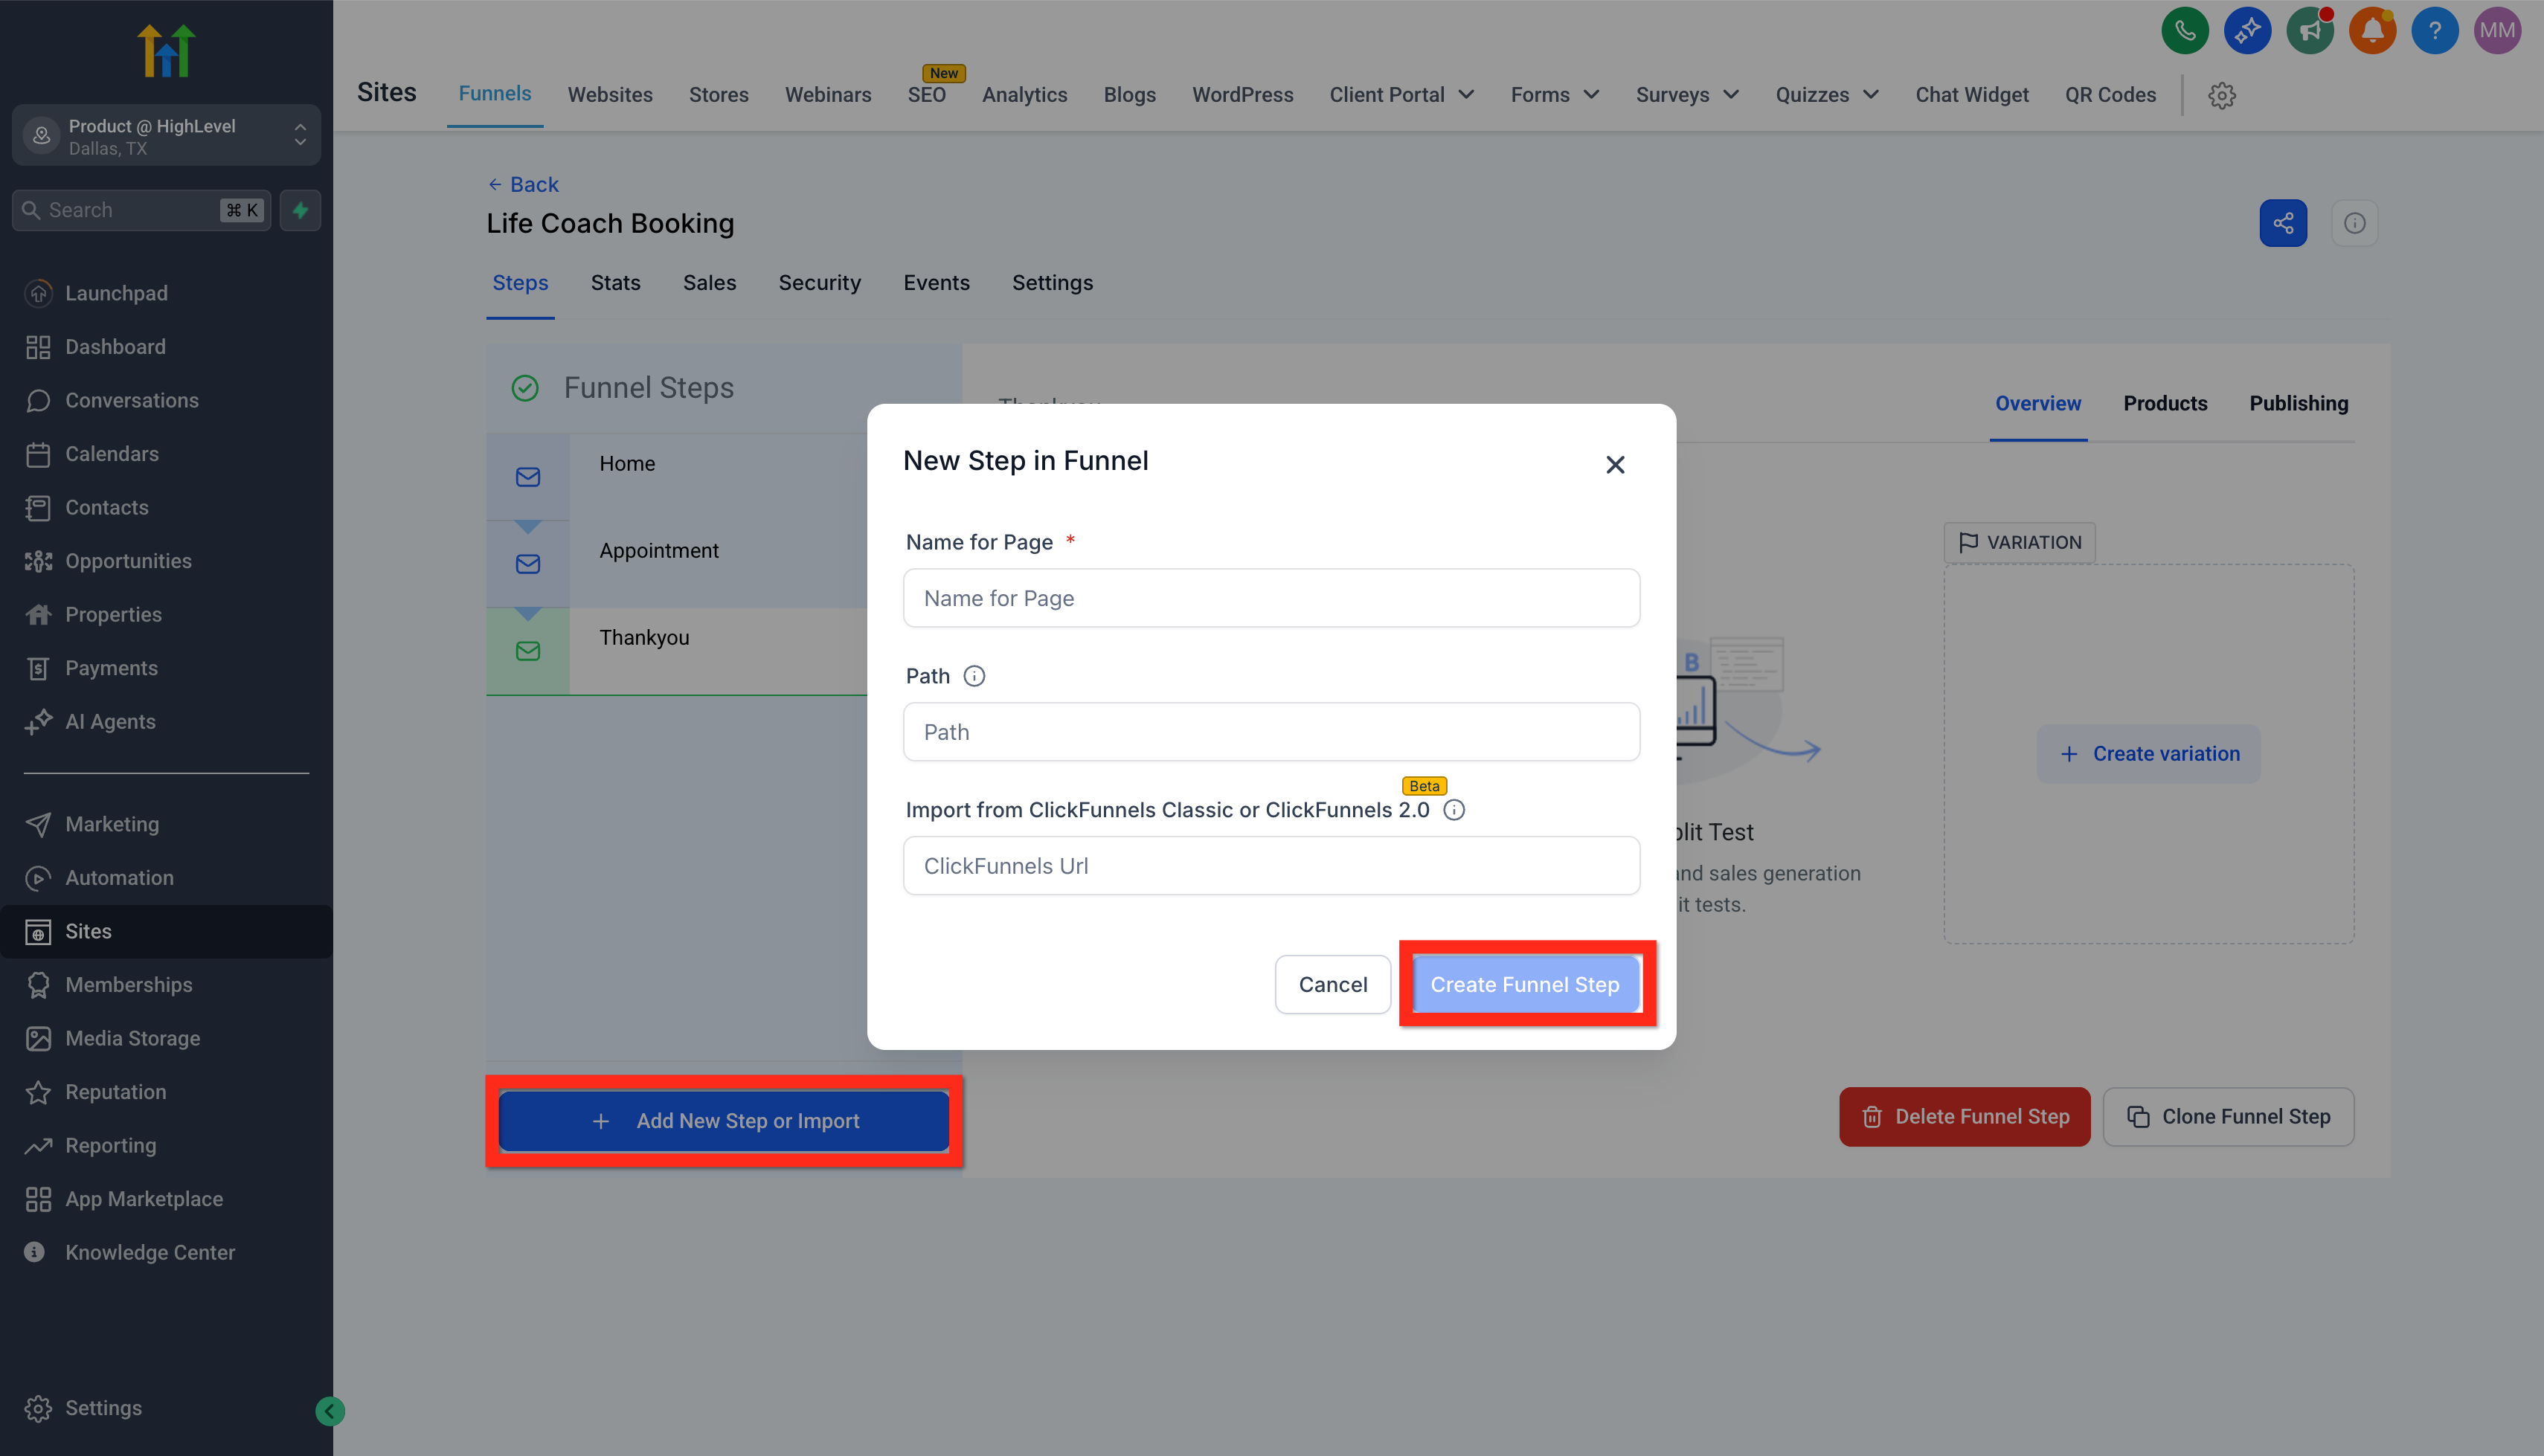
- Click Add New Step.
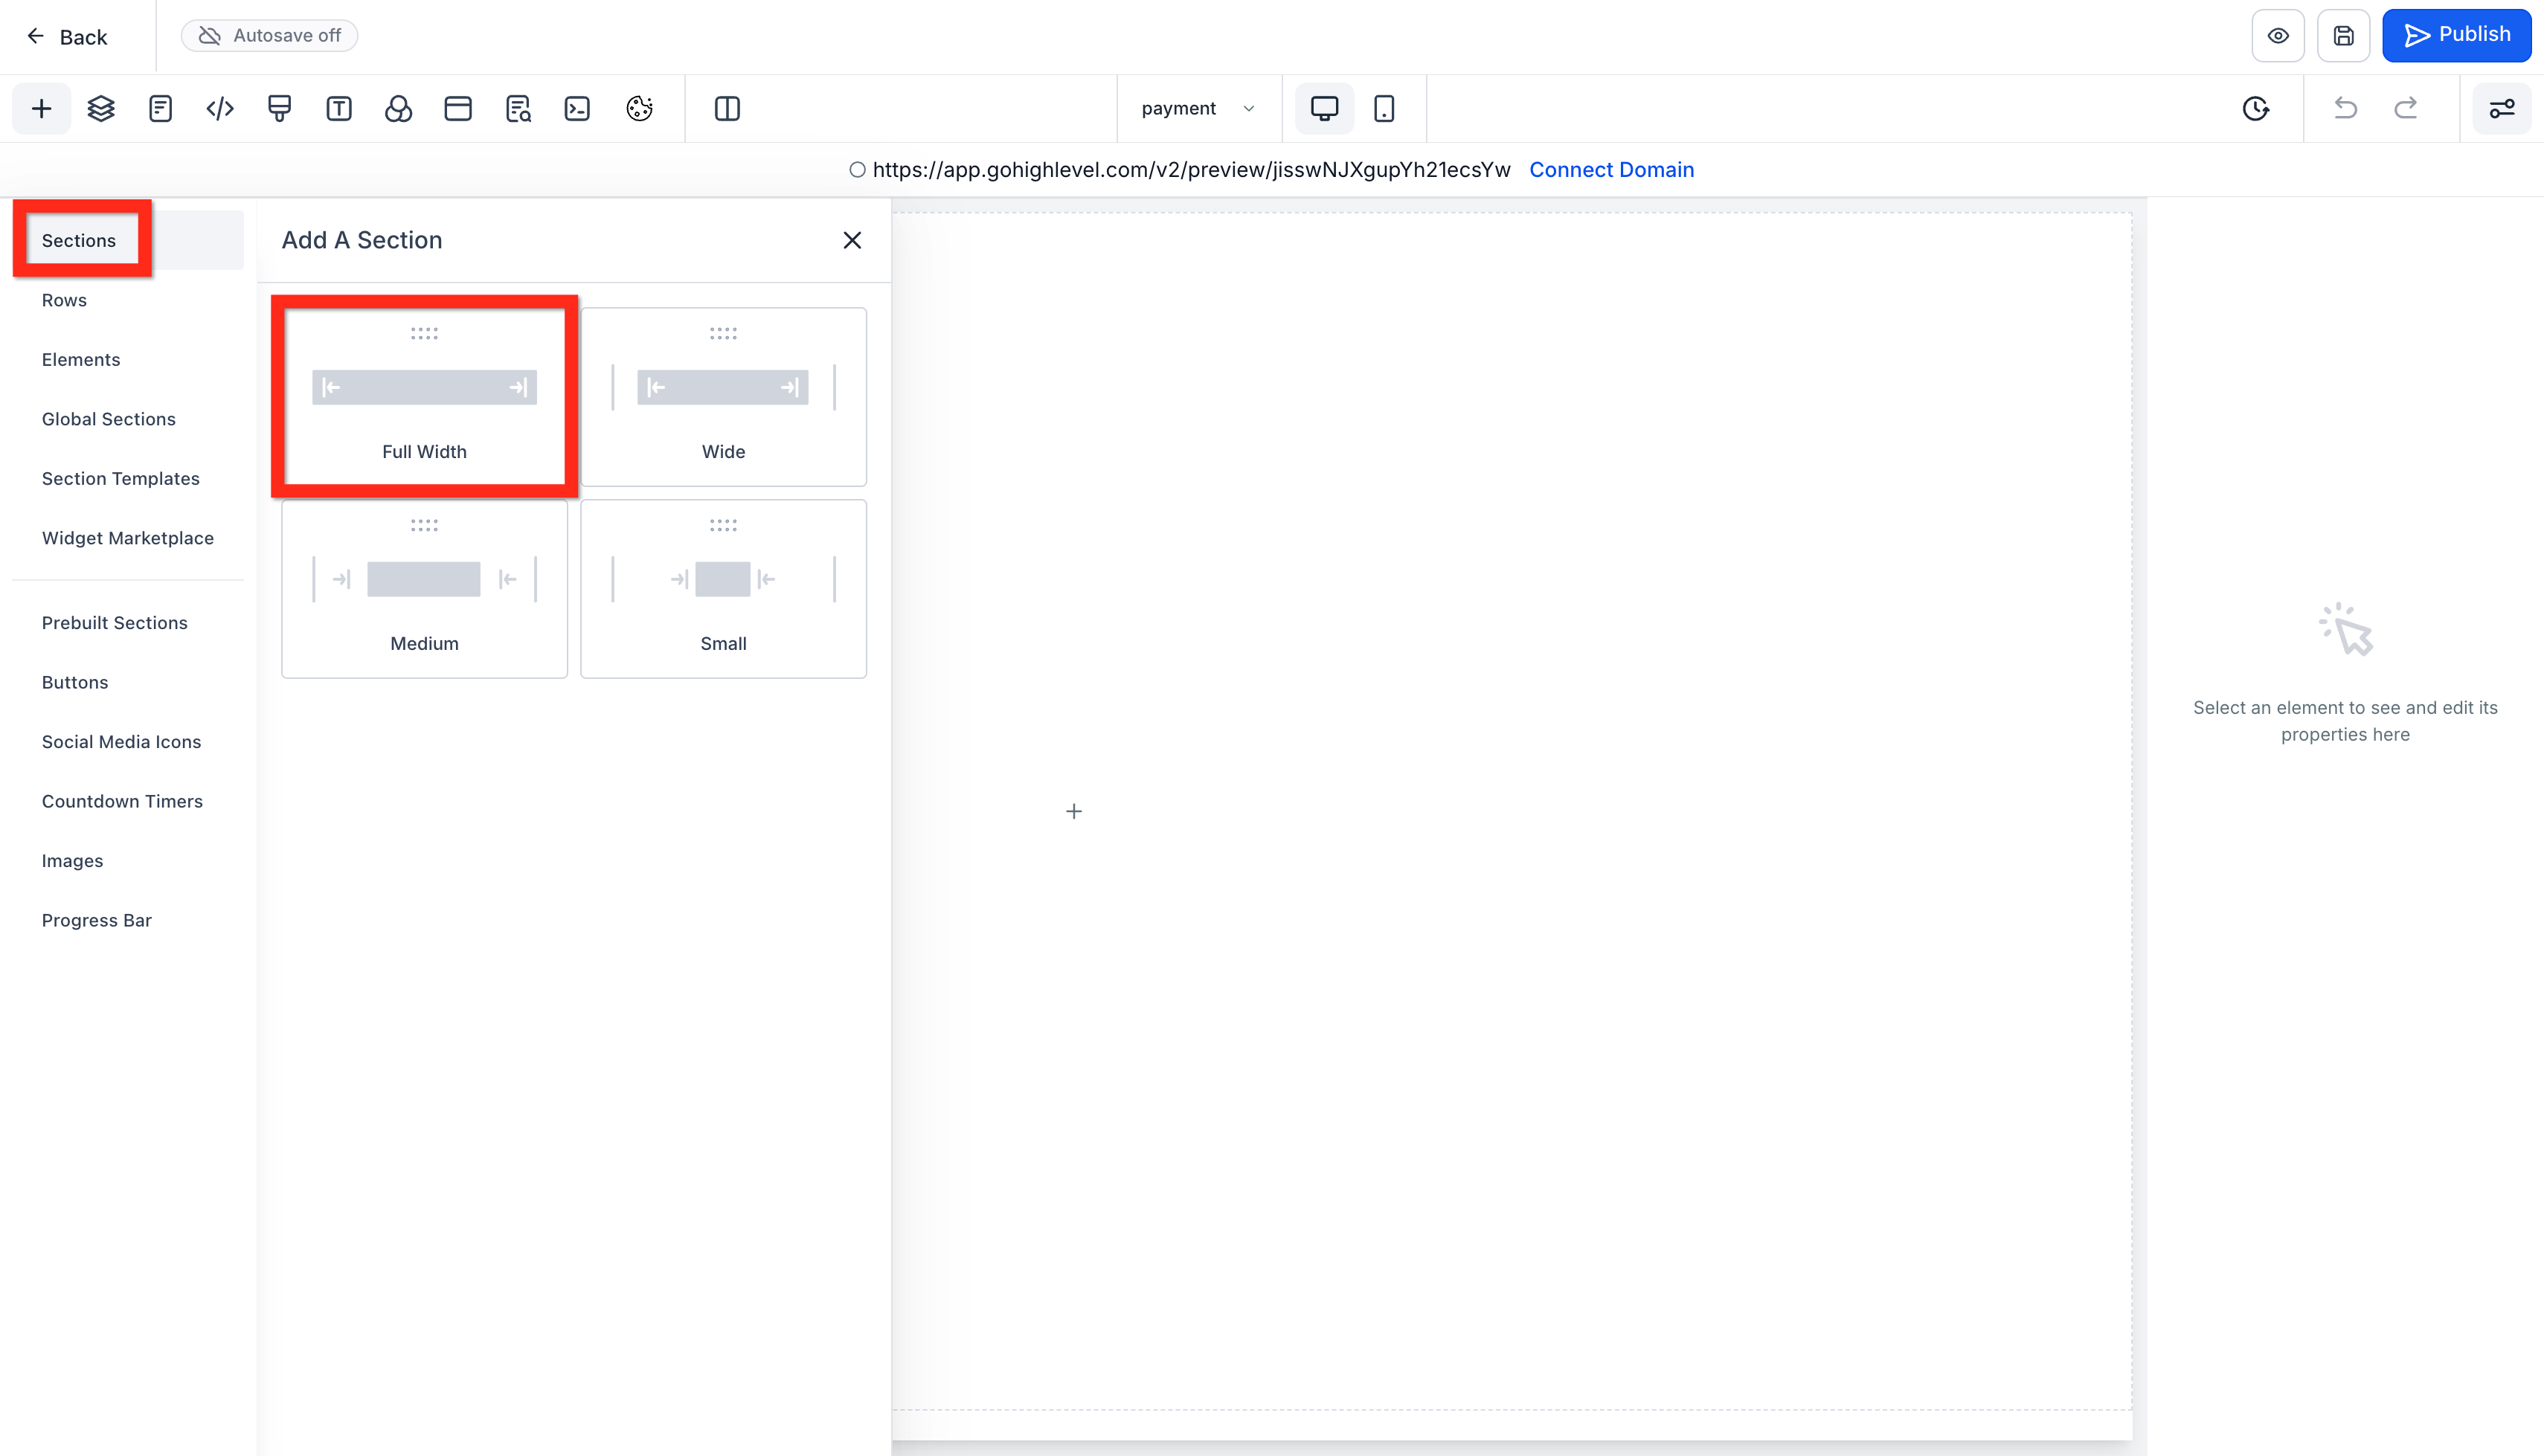
- On the page, add a full width section element.
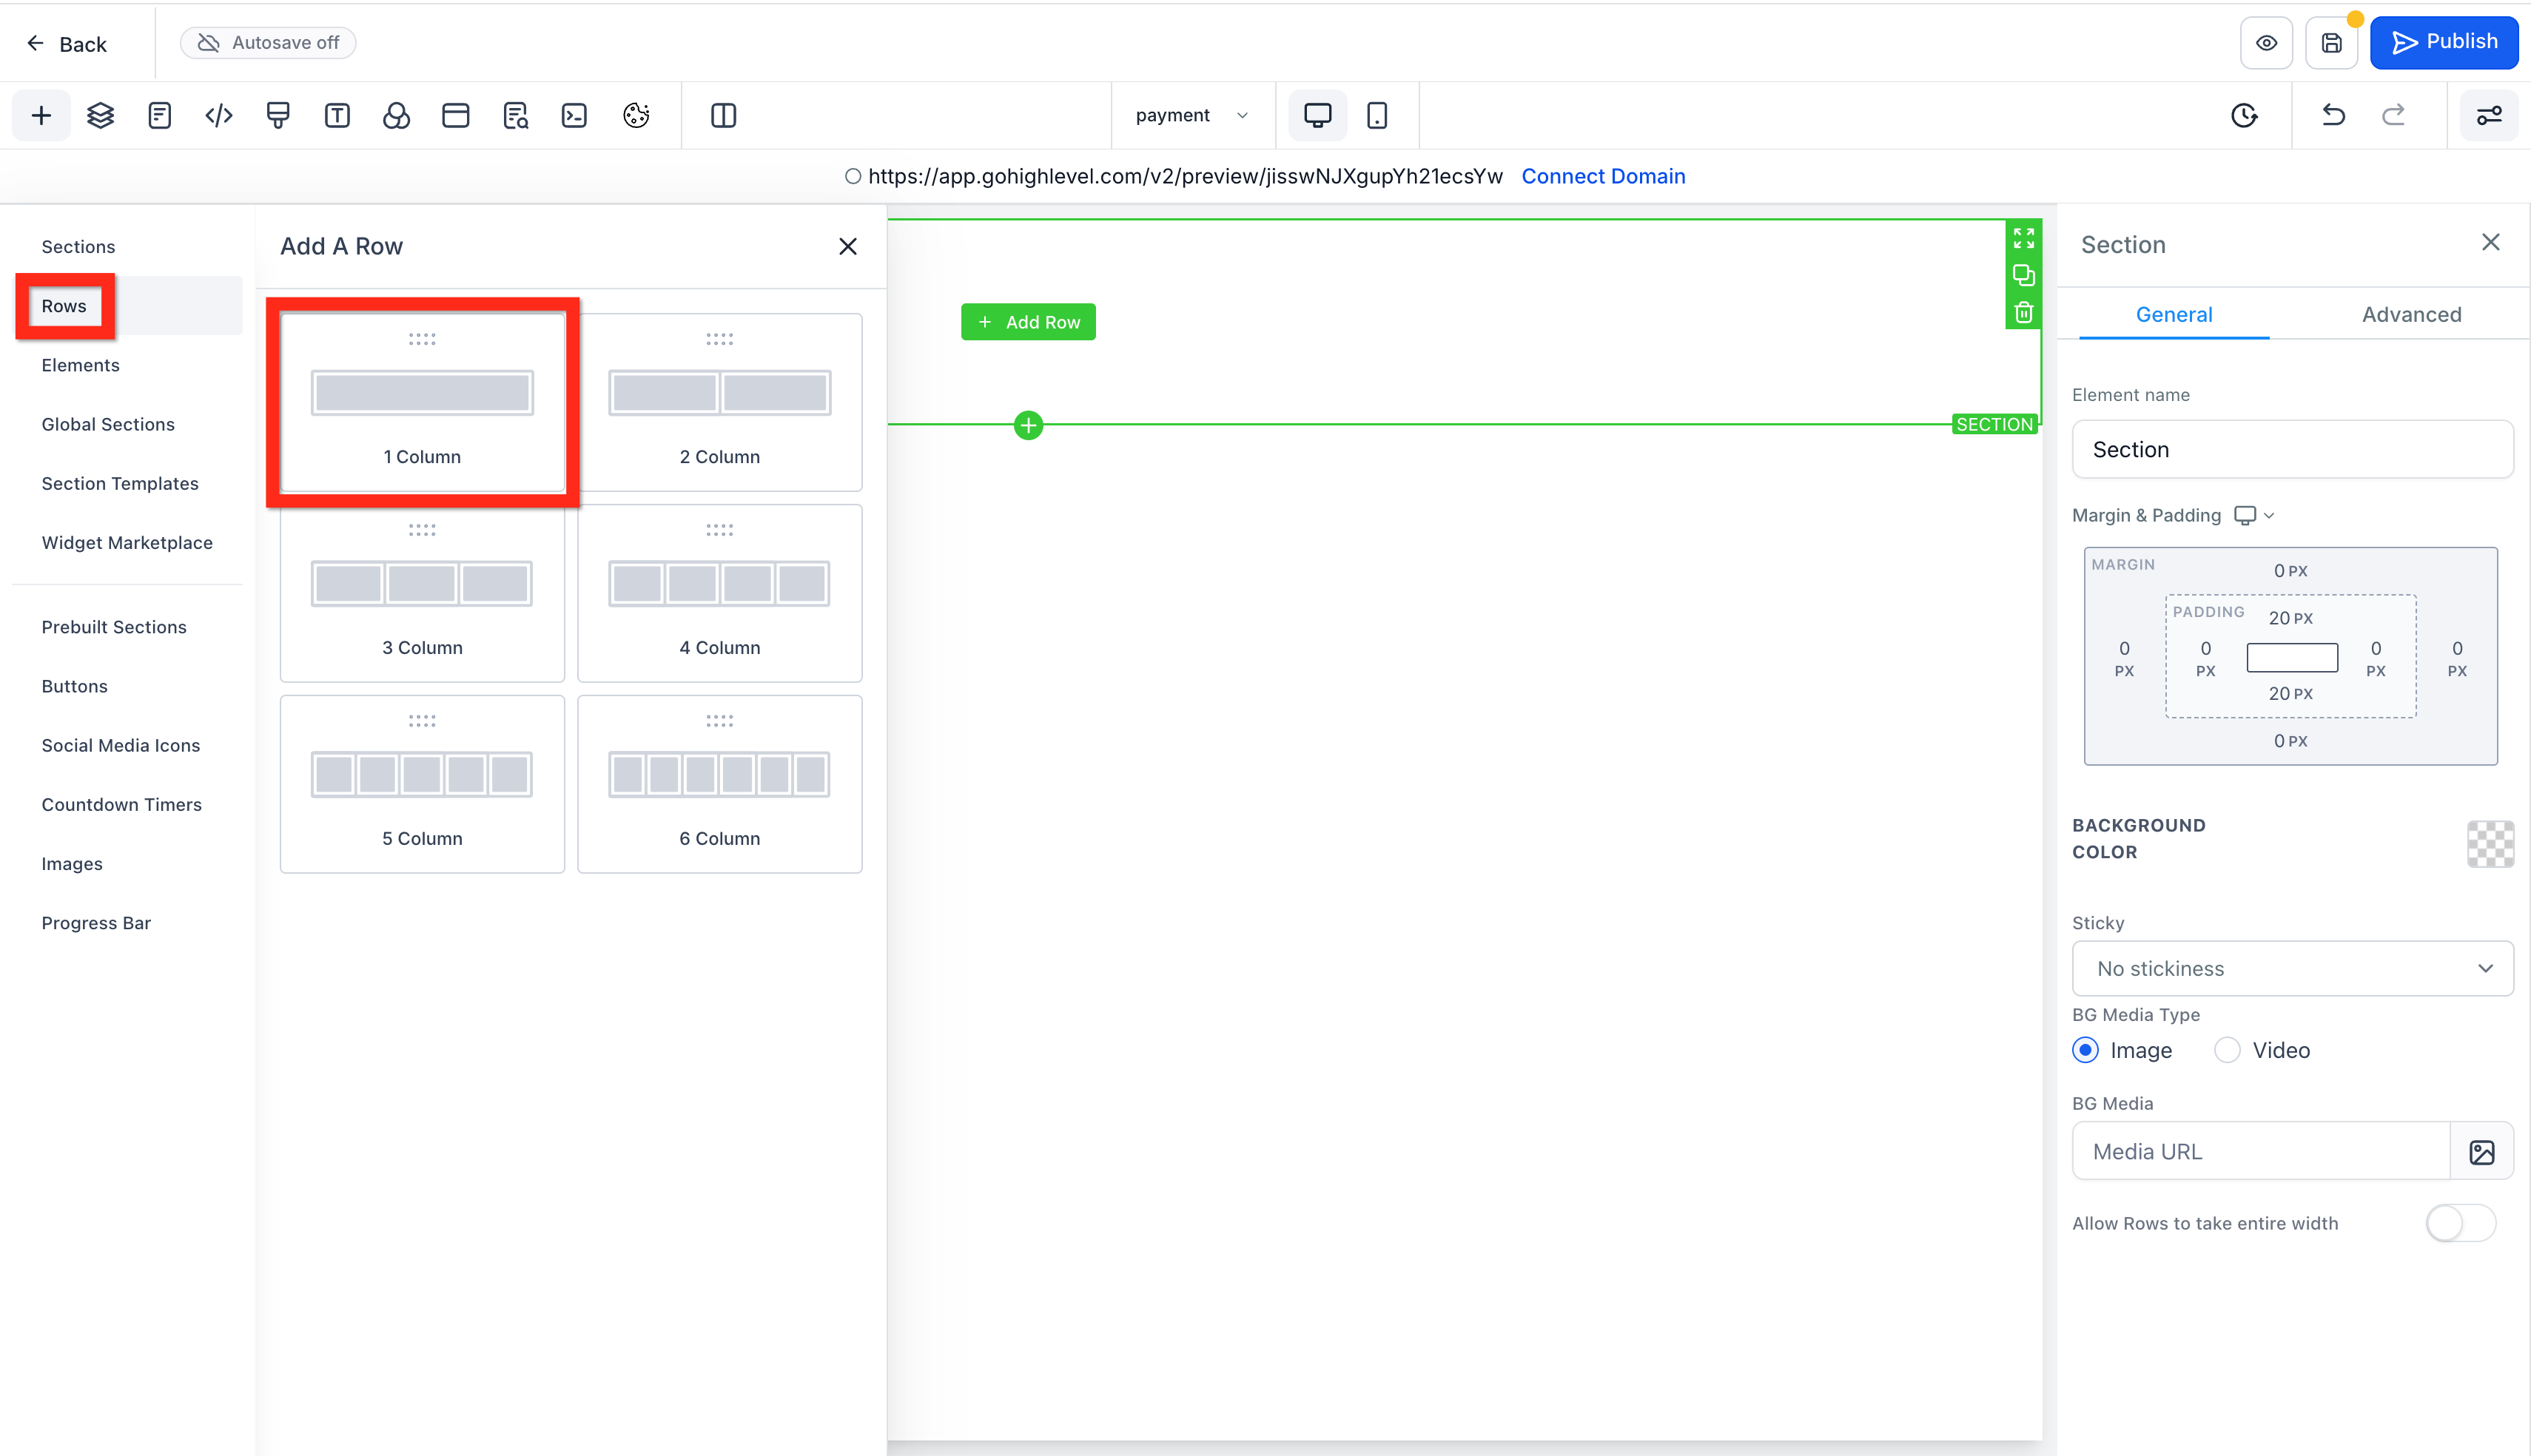
- Inside the section, add a one column row.
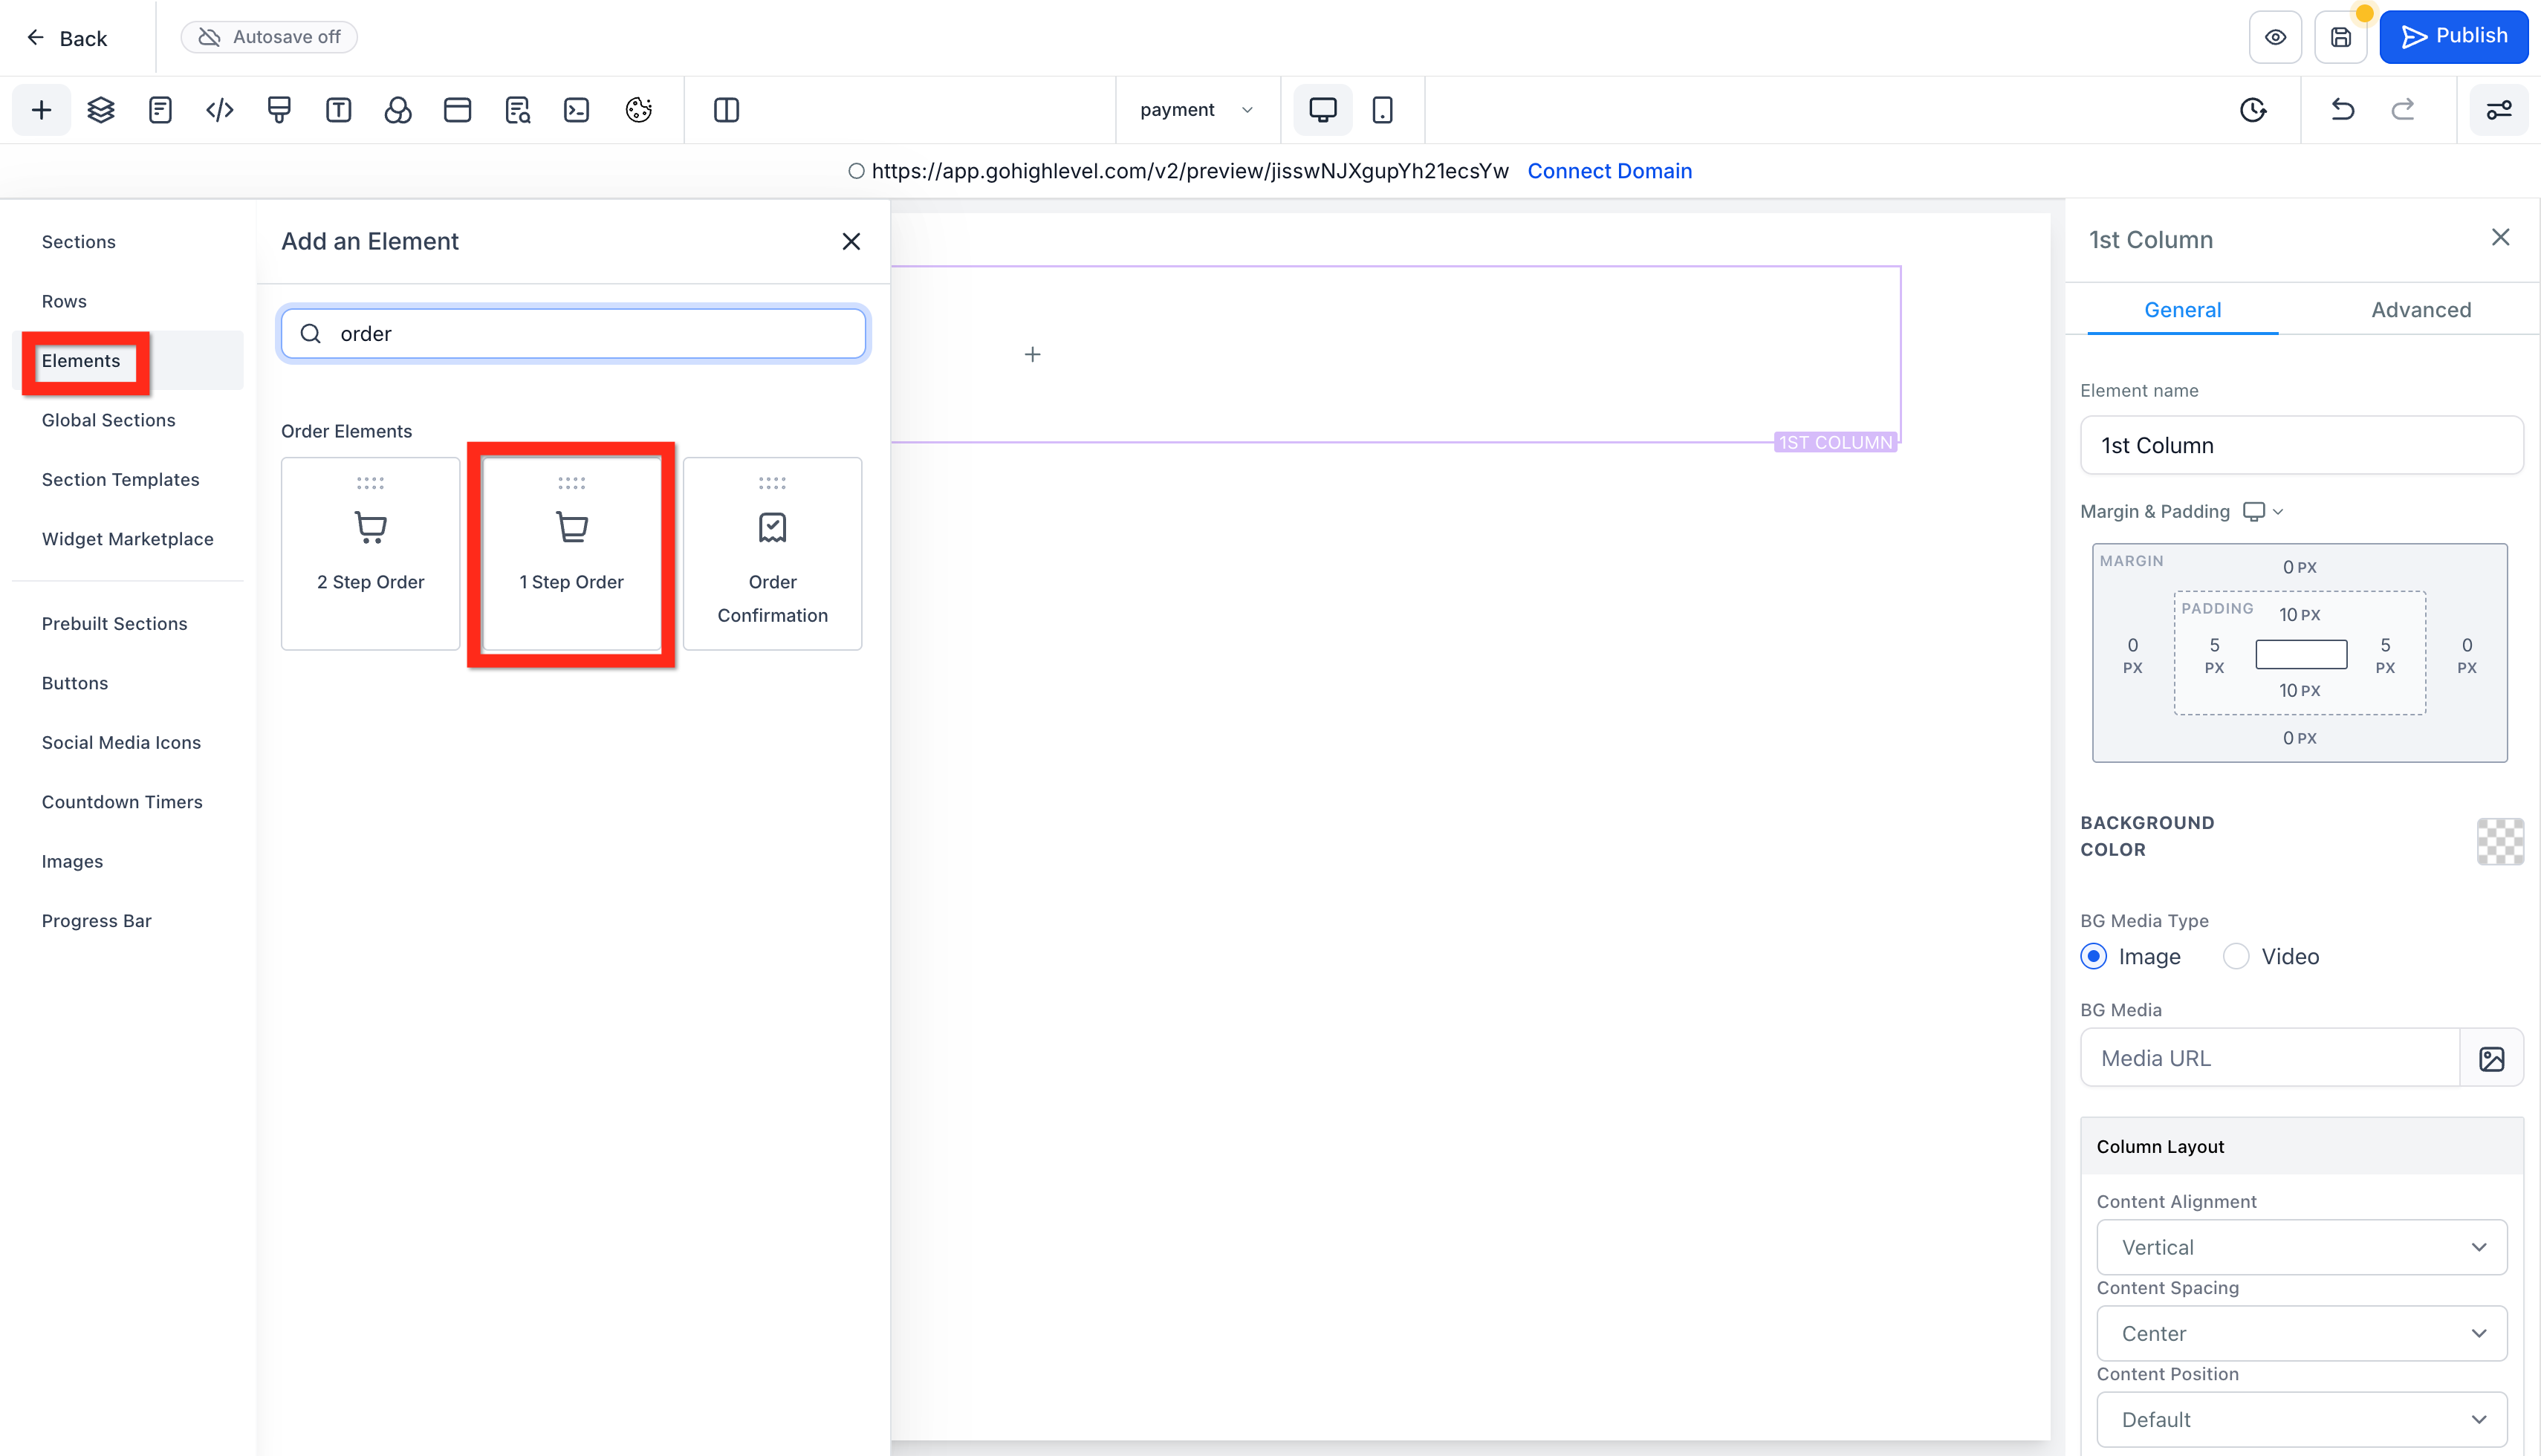
- Inside the row, add a one or two step order form.
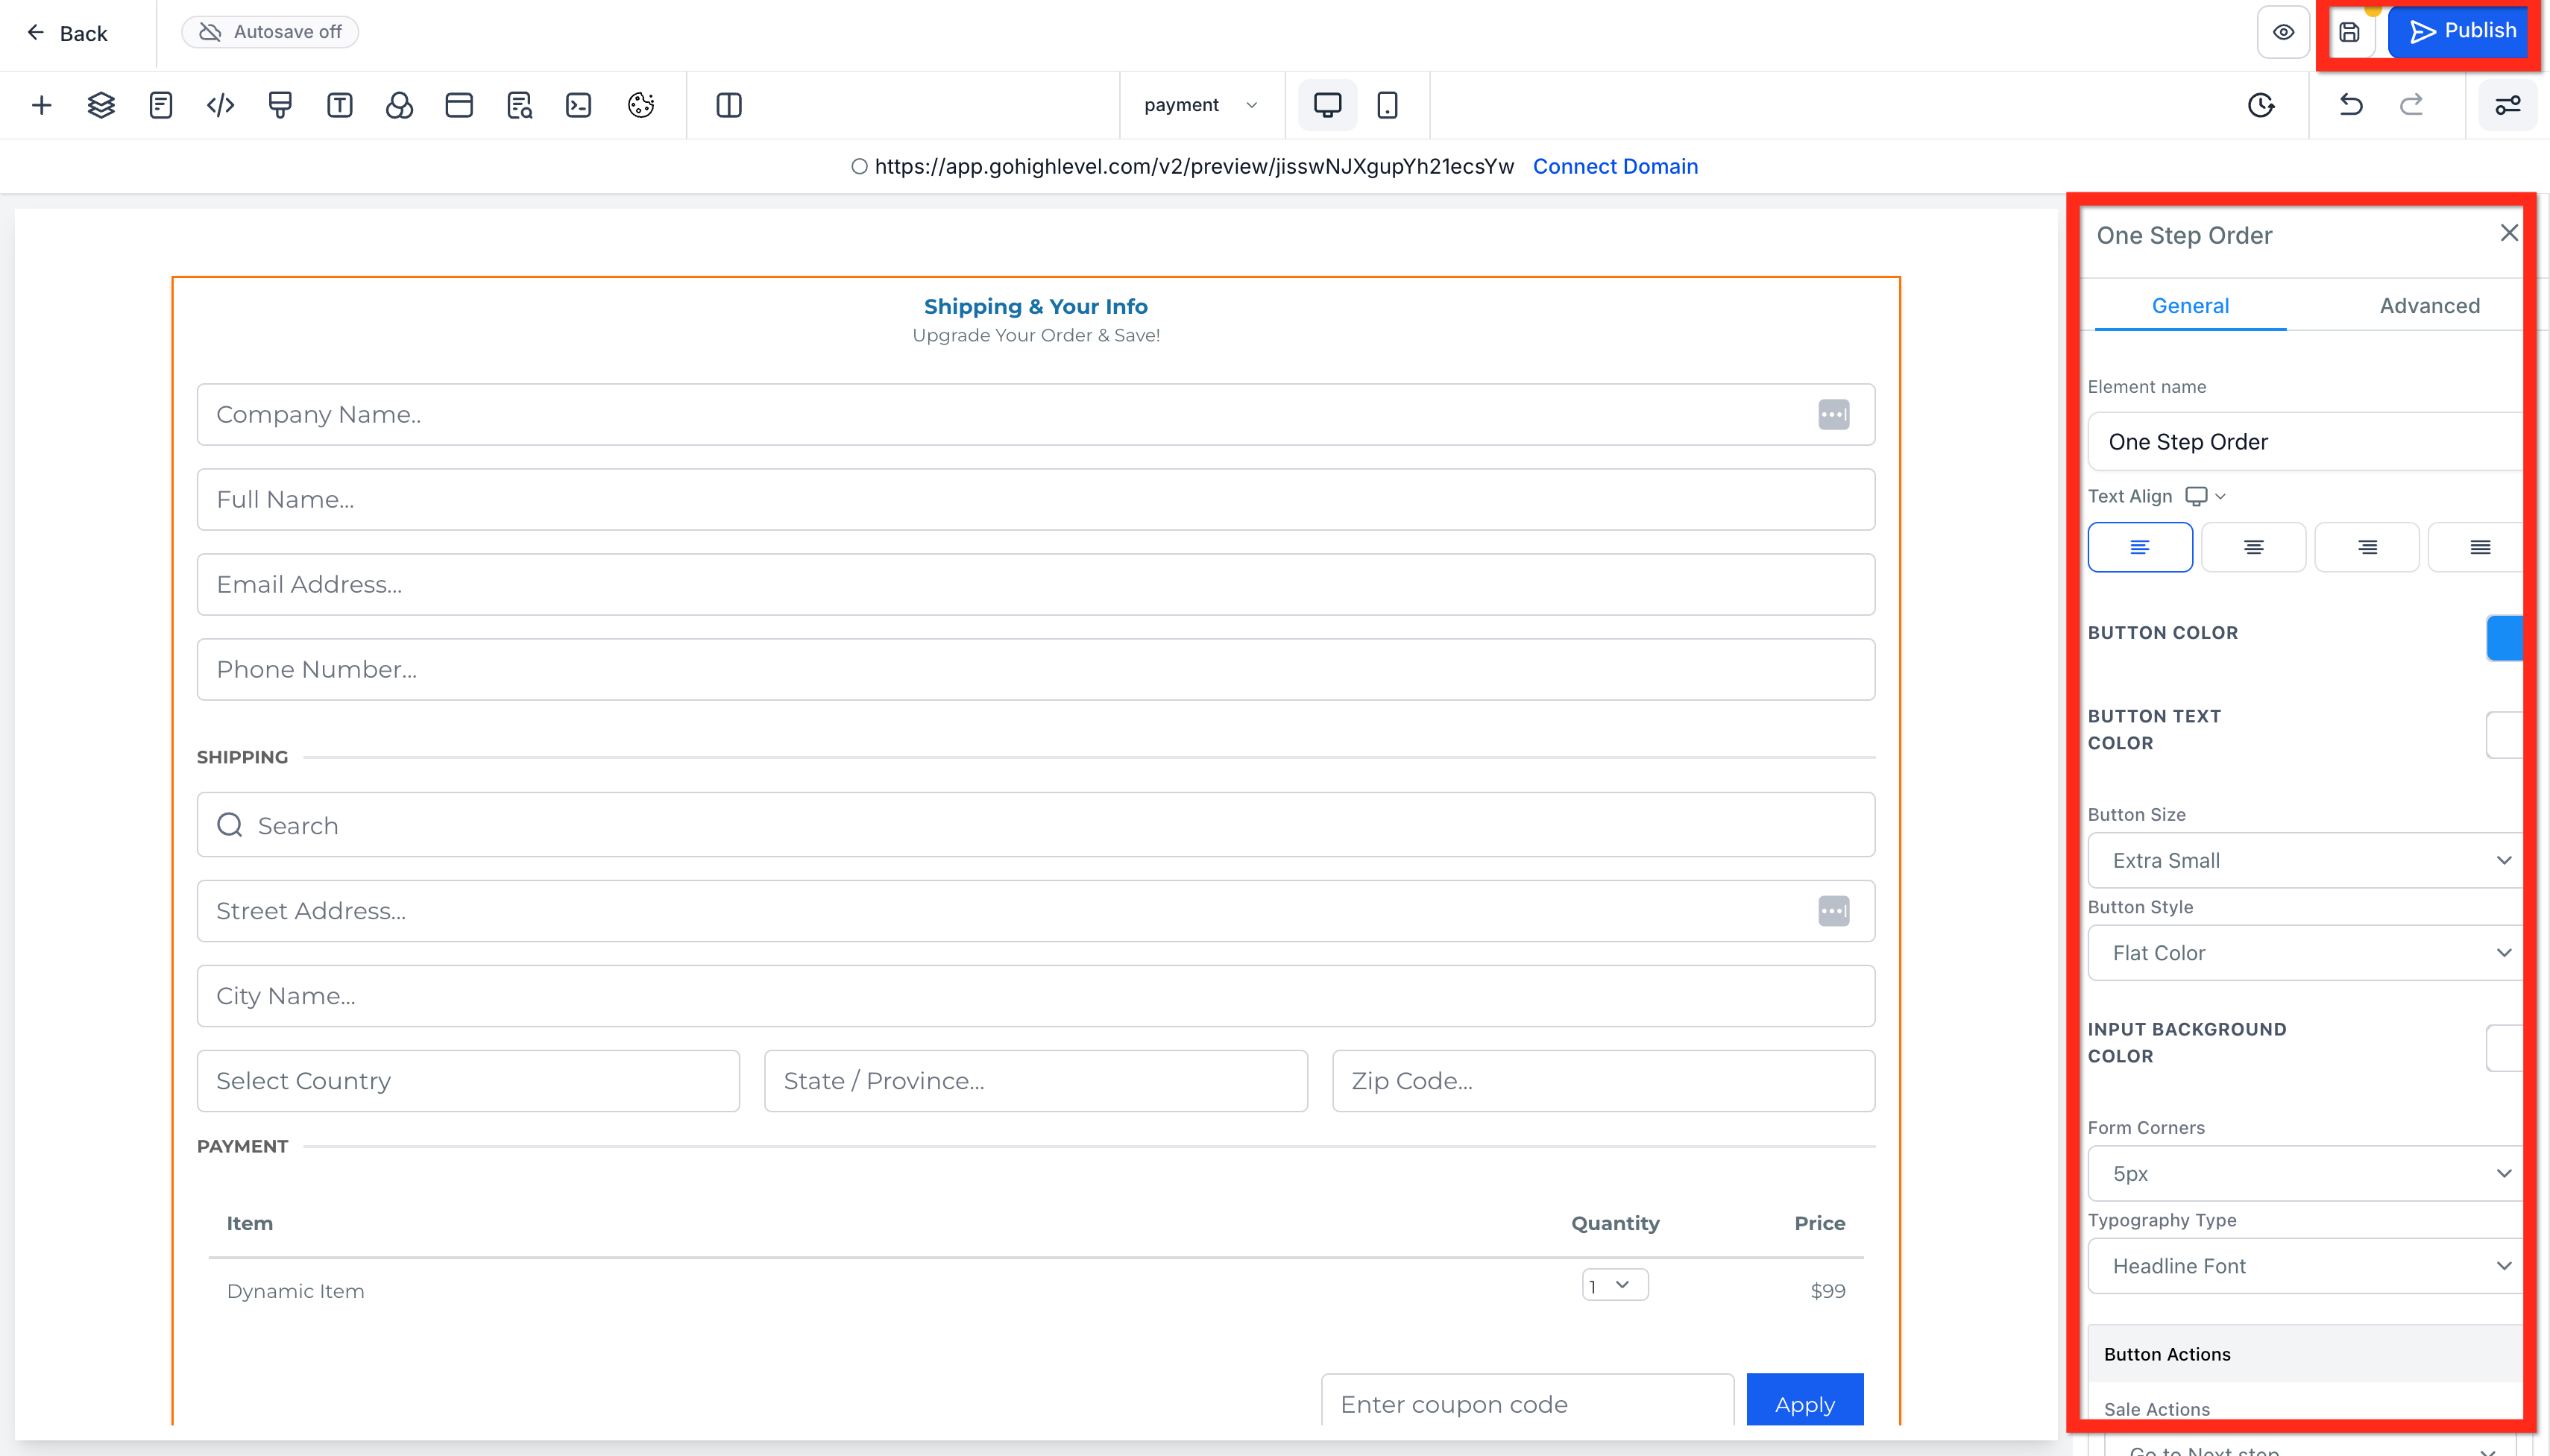
- Customize the order form, then click Save and Publish.
- Make sure the product is added to the same page as the order form.
Save and publish the page, then test the checkout experience to confirm that the correct product, price, and payment options appear before sharing the funnel with customers.
Your funnel order form should look something like this:
Frequently Asked Questions
Q: Why am I getting an error requiring a “Category ID” when creating a product in a sub-account?
This can occur when the product must first be created through the Agency’s SaaS Configurator. Create it there, then import it into the sub-account from Payments → Products.
Q: Can I change the currency of an existing product?
No. To use another currency, create a new product or add a new pricing option with the required currency.
Q: Where can I edit my product details?
Go to Payments → Products and select the product. You can update details such as its name, description, media, tax settings, SEO, product type, and statement descriptor.
Q: How do I change my product from “Physical” to “Digital”?
Go to Payments → Products, open the product and pricing option, then change Shipping and Delivery to Digital and save.
Q: What is the difference between a Physical and Digital product?
Physical products include shipping information during checkout, while digital products do not. Digital downloads are available only when a file is uploaded to the product or variant.
Q: Why can’t I find my product when creating an invoice?
Invoice products are filtered by pricing type. One-time invoices display one-time products, while recurring invoices display recurring products.
Q: What time unit does the “Trial Period” use?
Trial periods are always measured in days, regardless of the product’s billing frequency.
Q: Why are some products showing as unavailable during preview?
This usually happens when inventory tracking is enabled and stock reaches zero. Increase the available quantity or disable inventory tracking.
Q: Why are duplicated products grayed out when adding them to an invoice?
Check that the product is published and has active pricing with the correct billing type and currency before adding it to the invoice.
Q: Why aren’t my Stripe products importing into Chat To Clients CRM?
Only recurring/subscription products can be imported from Stripe. One-time products must be created directly in Payments → Products.
Q: Why did my first product disappear and why am I getting a “Category ID is required” error?
This can happen when an existing product is edited or required product settings are missing. Create products individually and confirm all required fields before saving.
Q: Why isn’t my Stripe product appearing when I try to import it?
The product may already exist in Chat To Clients CRM or still be syncing from Stripe. If needed, remove the Chat To Clients CRM copy and re-import it after synchronization completes.
Q: Why is the Download button not appearing after a digital purchase?
The Download button appears only when at least one digital file is assigned to the product or variant. Uploading a file later automatically makes the download option available.