
How to Create & Add Dashboard Widgets
Dashboard widgets help you track important business metrics in one place. Chat To Clients CRM's Widget Gallery makes it easier to find the right widgets by showing chart previews and descriptions before you add them. Search by purpose, browse recommended widgets, filter by reporting module, or switch between Gallery and List views to discover the metrics you need. This guide explains how to find, add, customize, and organize dashboard widgets using the Widget Gallery.
TABLE OF CONTENTS
- What Is the Widget Gallery?
- Key Benefits of the Widget Gallery
- Prerequisites and Limitations
- How to Add Dashboard Widgets
- Using the Widget Gallery in Custom Reports
- Frequently Asked Questions
- Related Articles
What Is the Widget Gallery?
The Widget Gallery is a visual library of built-in reporting widgets available when creating or editing Chat To Clients CRM dashboards and Custom Reports.
Each widget includes a preview of its chart style and a description of what it measures, allowing you to review the available options before adding a widget.
You can browse recommended widgets, search by reporting purpose, filter by module, and switch between Gallery and List views.
Key Benefits of the Widget Gallery
The Widget Gallery simplifies dashboard creation by helping you discover the right reporting widgets without relying on trial and error.
- Visual previews: See whether a widget uses a number, donut chart, bar chart, line chart, or another supported visualization.
- Widget descriptions: Use the information icon to understand what a widget measures.
- Intent-based search: Search using terms related to your reporting goal.
- Recommended widgets: Discover suggestions based on account activity, including starter widgets for newer accounts.
- Flexible browsing: Switch between Gallery and List views or browse reporting categories.
- Module filters: Narrow widget results across supported reporting modules.
- Quick adding: Select a widget from the gallery to add it to your dashboard.
- New widget indicators: Identify recently released widgets with the New tag.
Prerequisites and Limitations
Before adding widgets, make sure you can access and edit the dashboard you want to customize.
- You must be working in a Chat To Clients CRM Sub-Account.
- You need Edit or Full permission to modify a dashboard. View permission is read-only.
- You can add widgets to an existing dashboard or create a new dashboard.
- Available configuration options depend on the widget you select.
- The Widget Gallery is available in dashboards and Custom Reports.
How to Add Dashboard Widgets
Use the following steps to open the Widget Gallery, find the reporting widgets you need, and add them to your dashboard.
Step 1: Open Your Dashboard
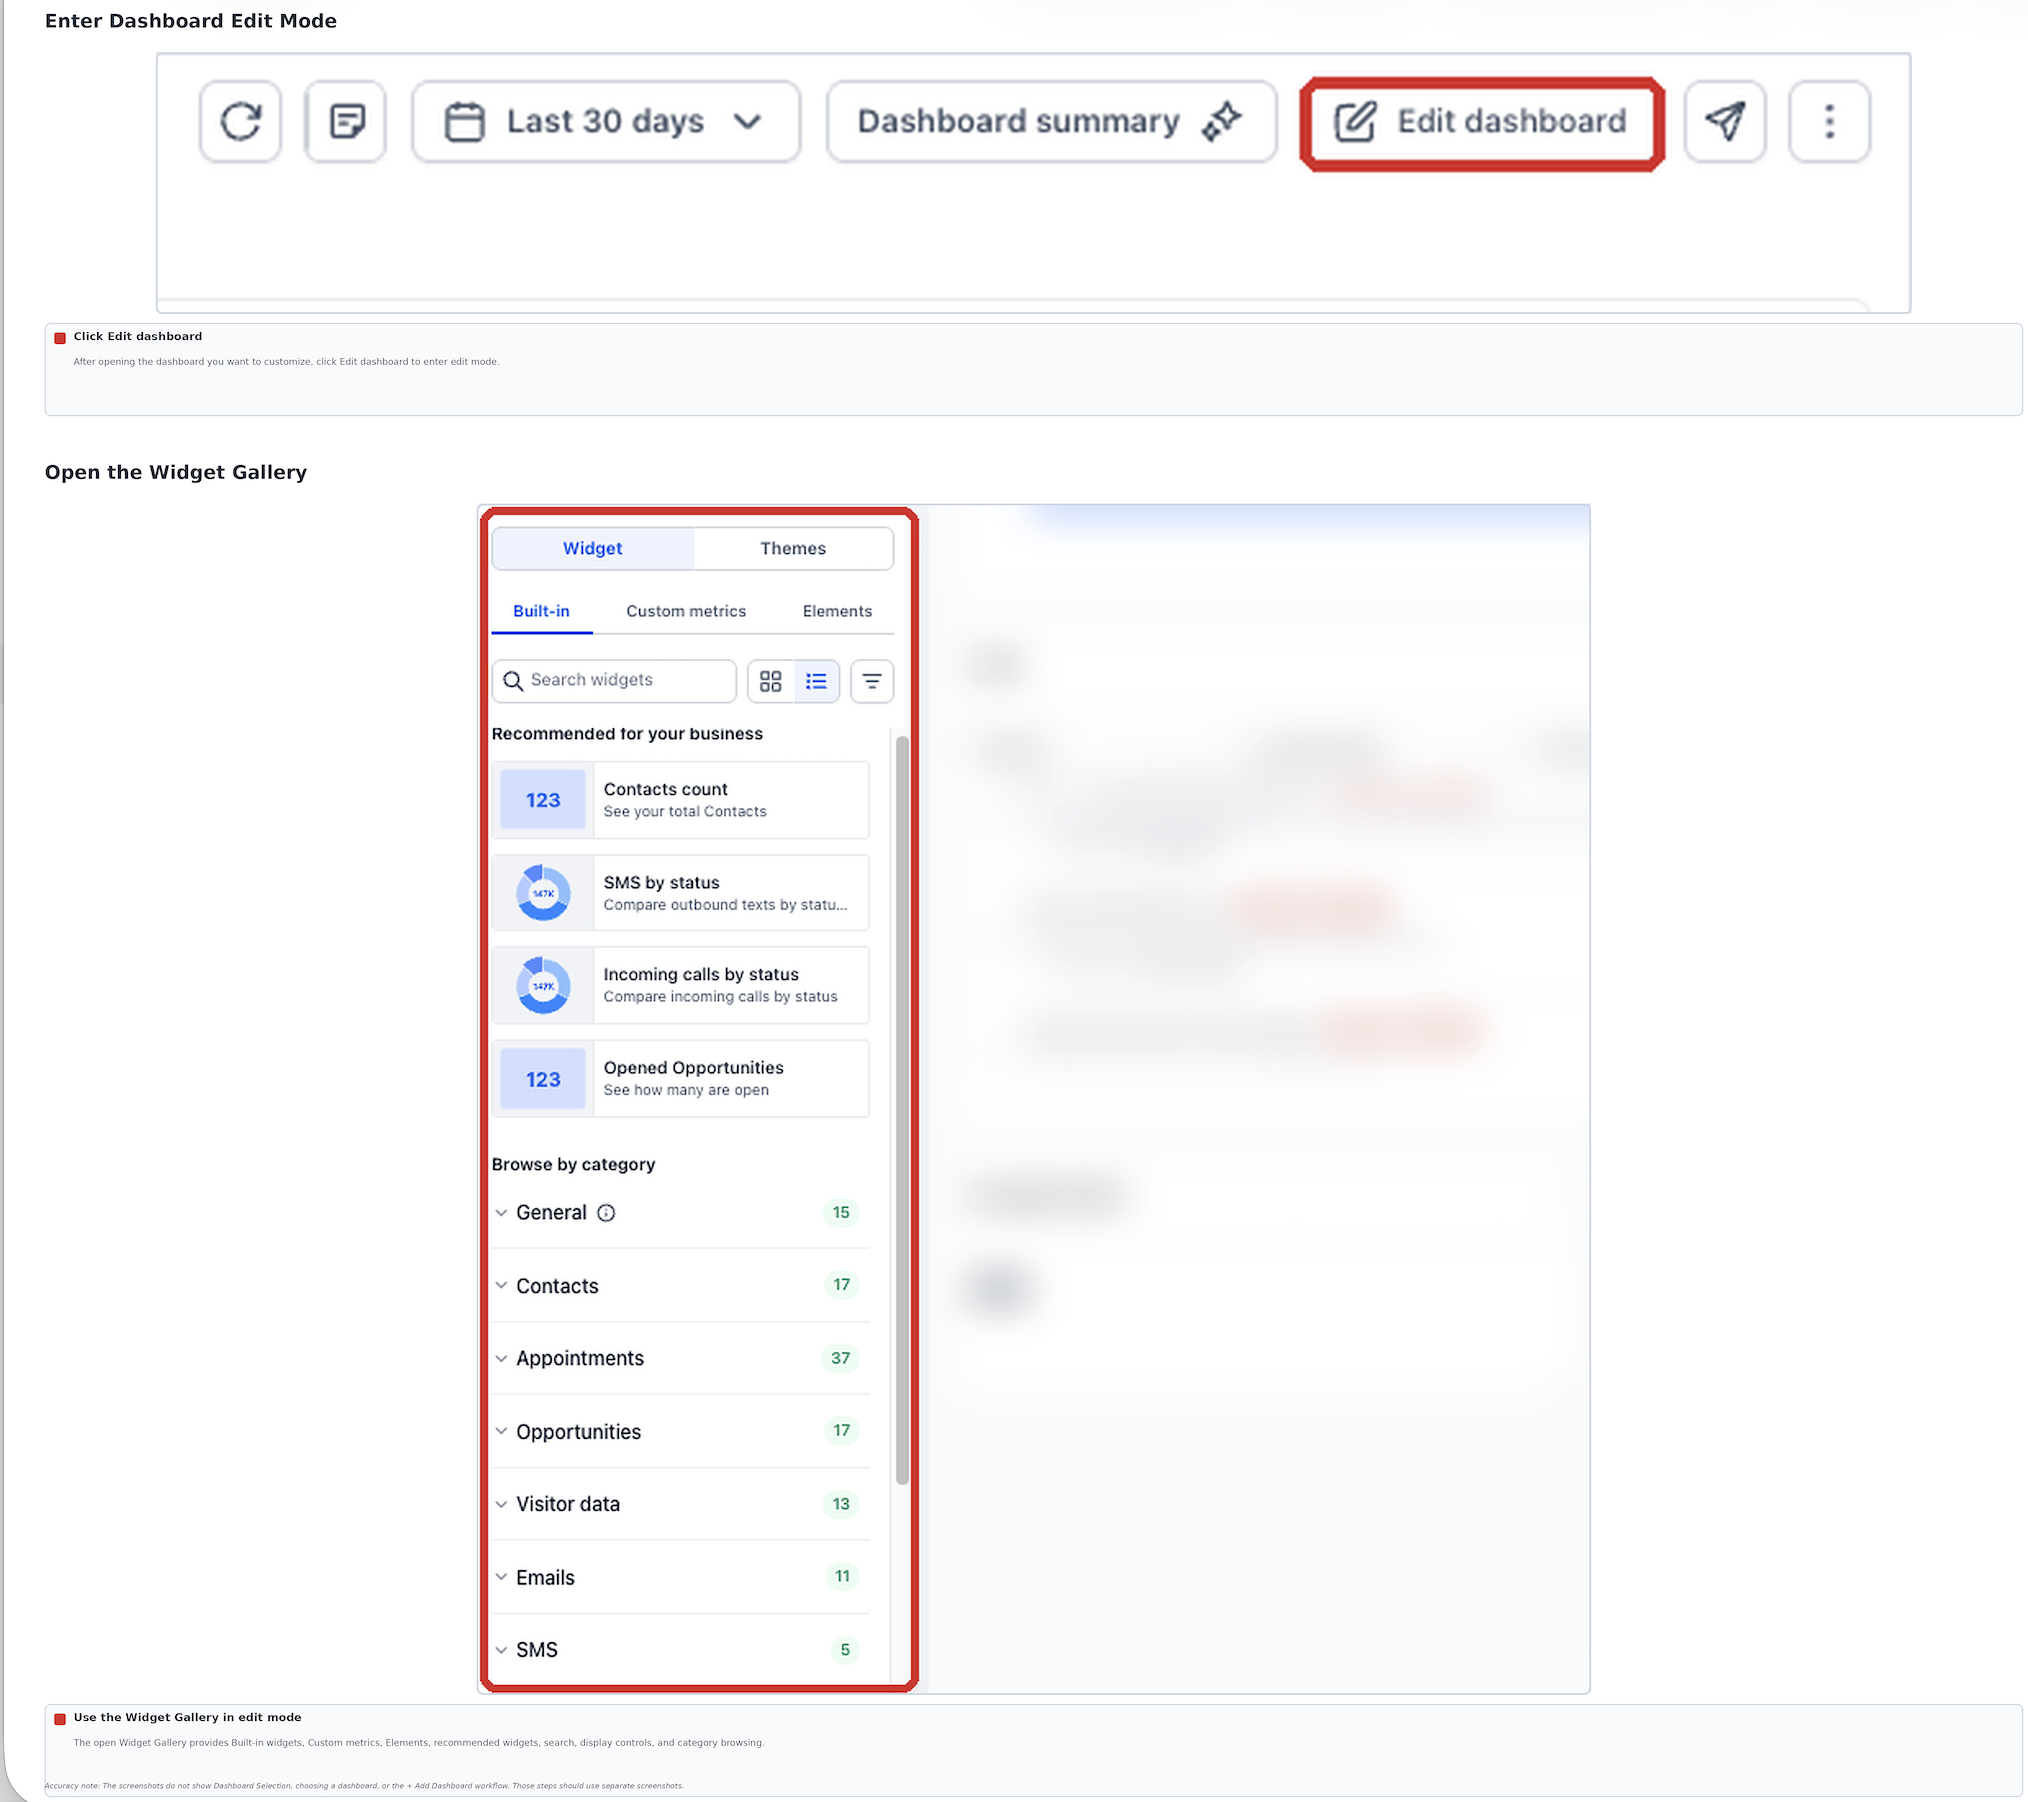
- From your Chat To Clients CRM Sub-Account, select Dashboard from the left navigation menu.
- Open the Dashboard Selection menu.
- Select the dashboard you want to customize.
- Click Edit Dashboard to enter Edit mode.
- Open the Widget Gallery from the dashboard editor.
To create a new dashboard instead, open Dashboard Selection, select + Add Dashboard, choose a blank dashboard, enter the dashboard information, configure its visibility, and confirm the new dashboard.
Step 2: Browse Recommended Widgets
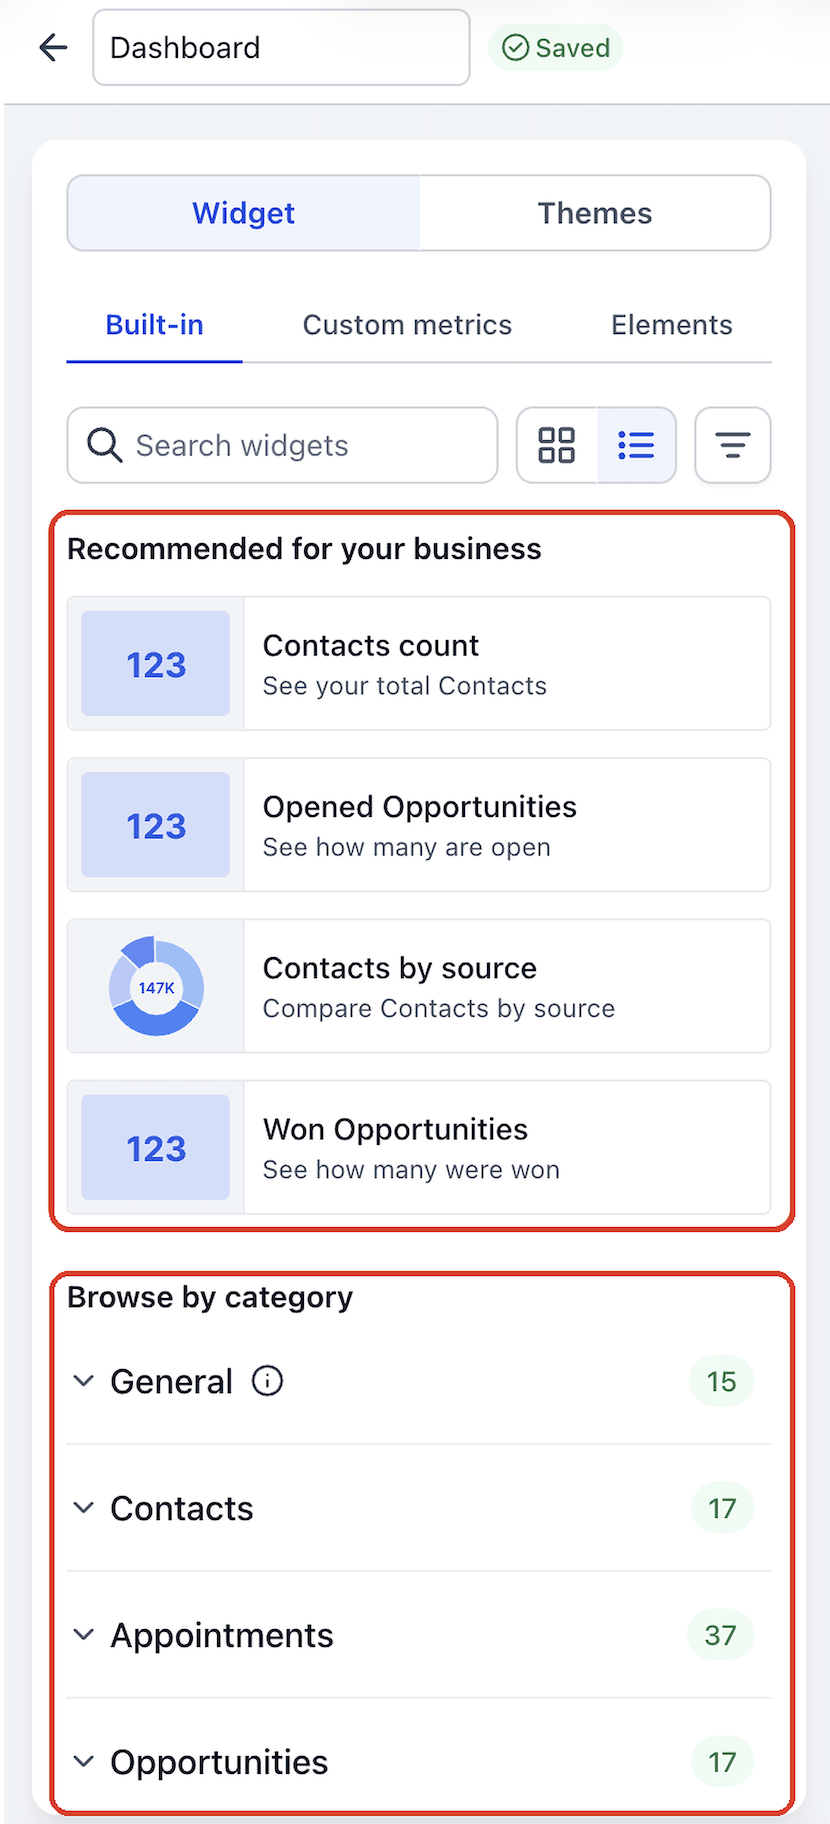
The Recommended for your business section highlights widgets based on account activity. New accounts can also see popular starter widgets.
Examples of recommended widgets can include:
- Contacts count: View the total number of contacts.
- Opened Opportunities: View the number of currently open opportunities.
- Contacts by source: Compare contacts based on their source.
- Won Opportunities: View the number of opportunities marked as won.
Below the recommendations, Browse by category organizes widgets into expandable reporting categories.
Step 3: Preview Widgets in Gallery View
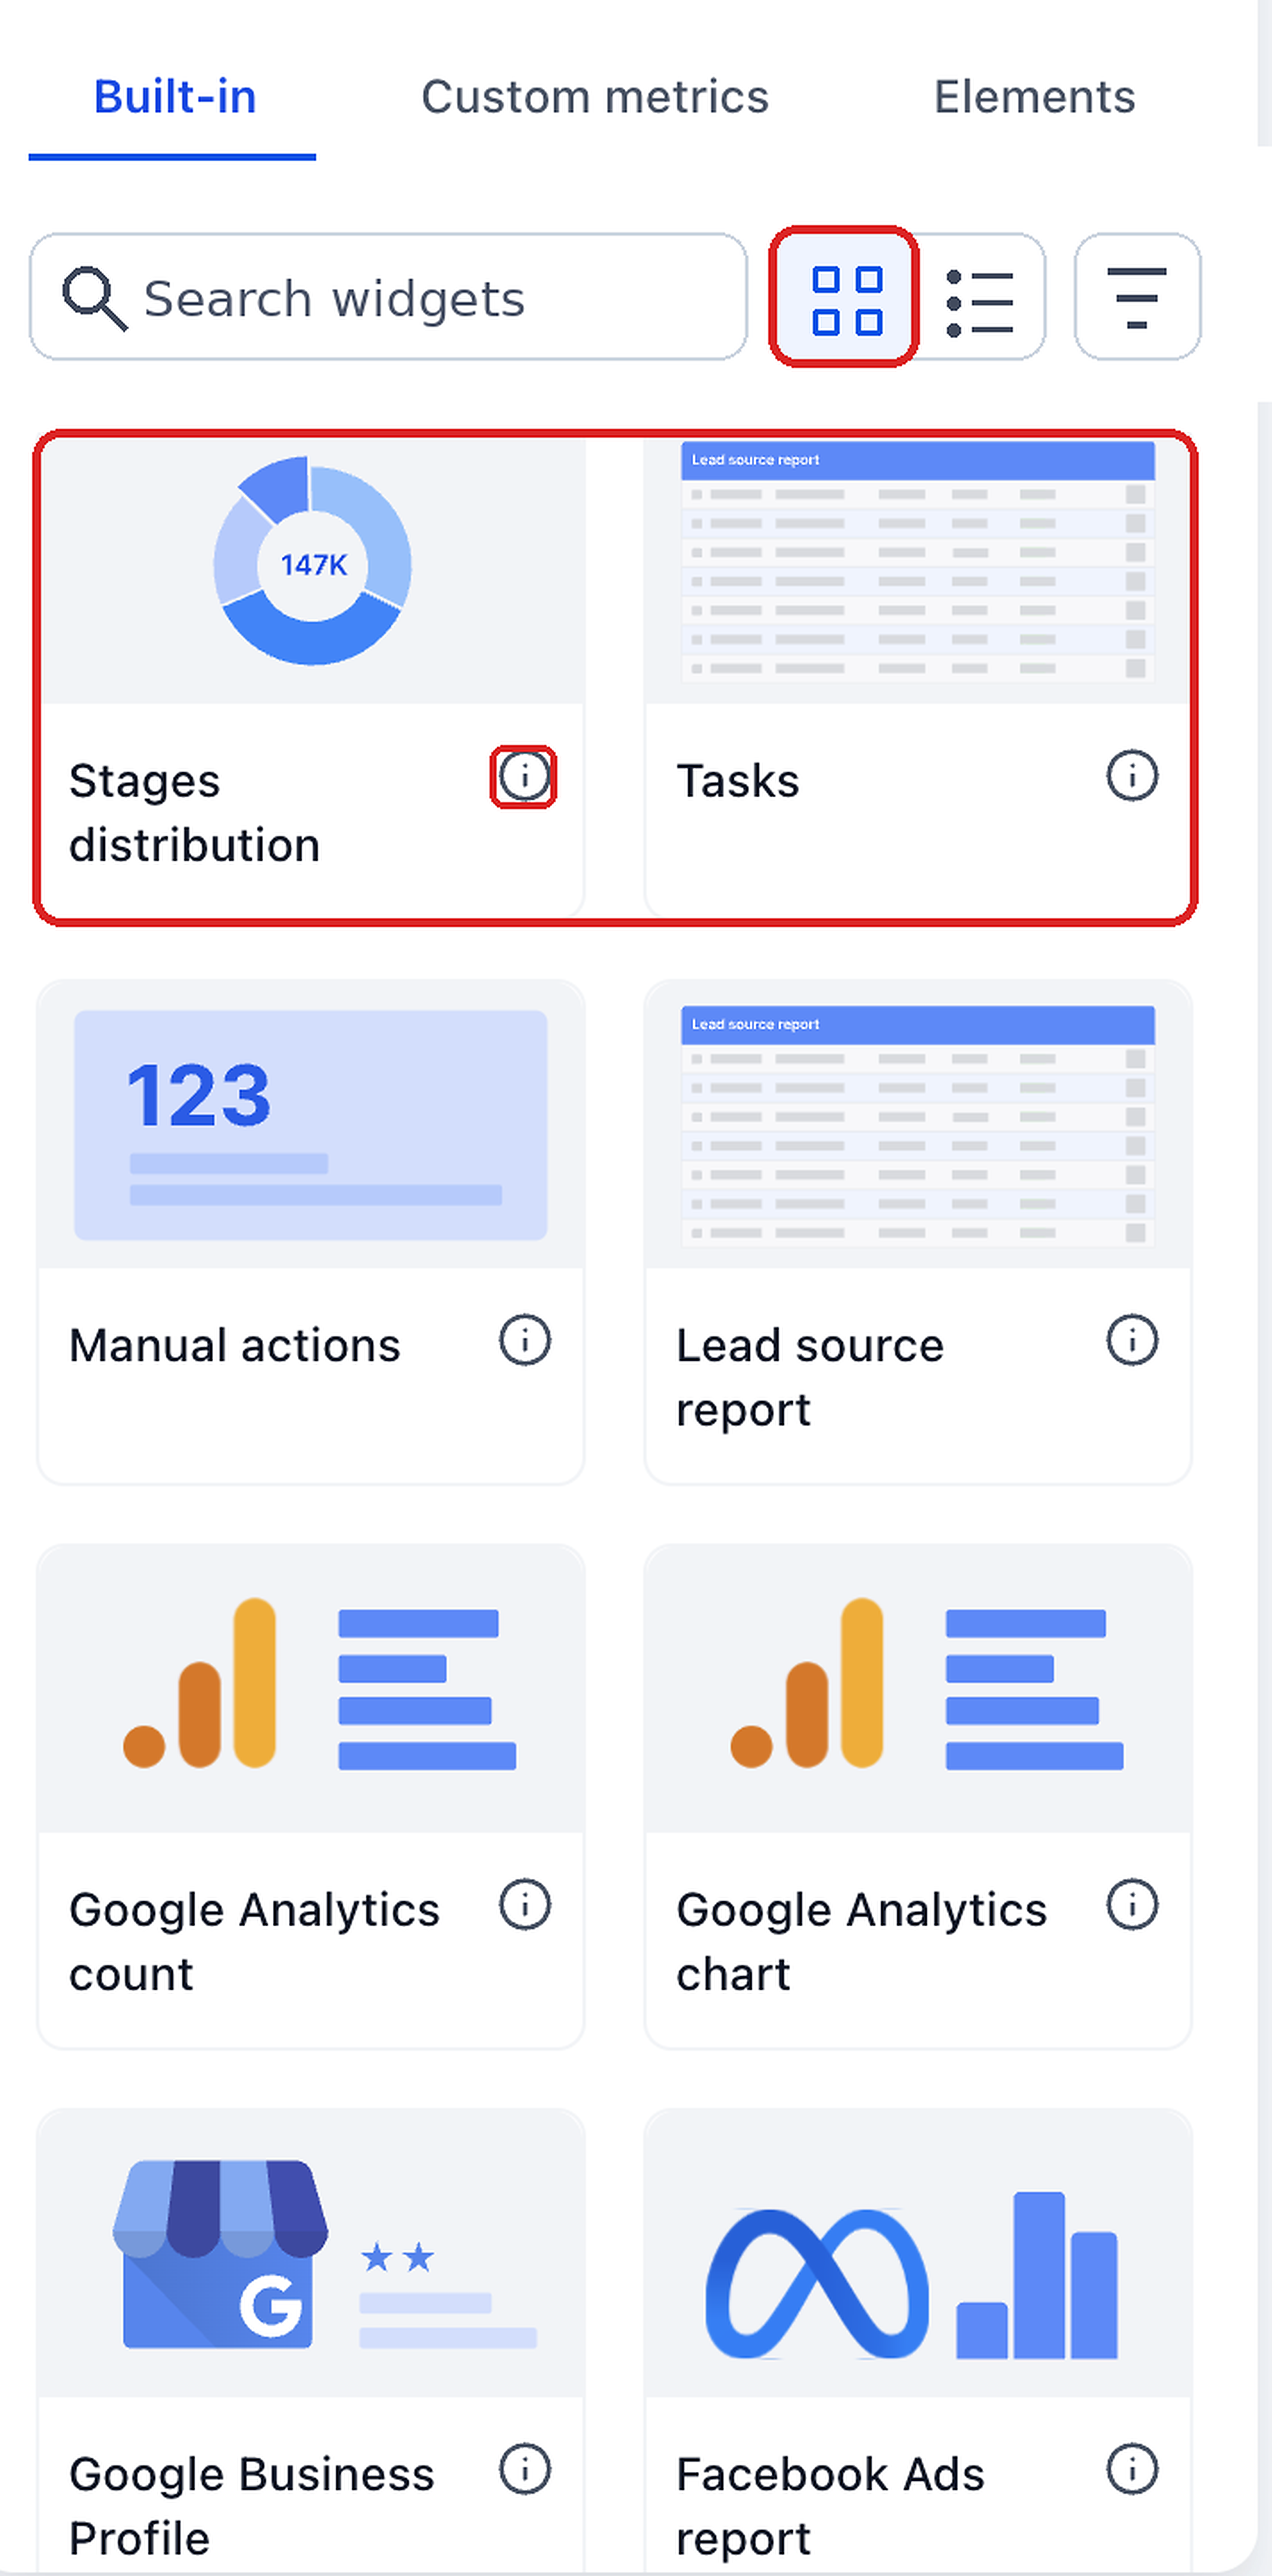
Gallery view displays widgets as visual cards so you can compare their appearance before adding them to your dashboard.
- In the Widget Gallery, select the Gallery view icon beside the search field.
- Browse the available widget cards.
- Review each widget's chart preview and name.
- Use the information icon to review what the widget displays.
- Look for the New tag to identify recently released widgets.
Step 4: Search and Filter Widgets
Use search and module filters to narrow the Widget Gallery to the reporting metrics you need.
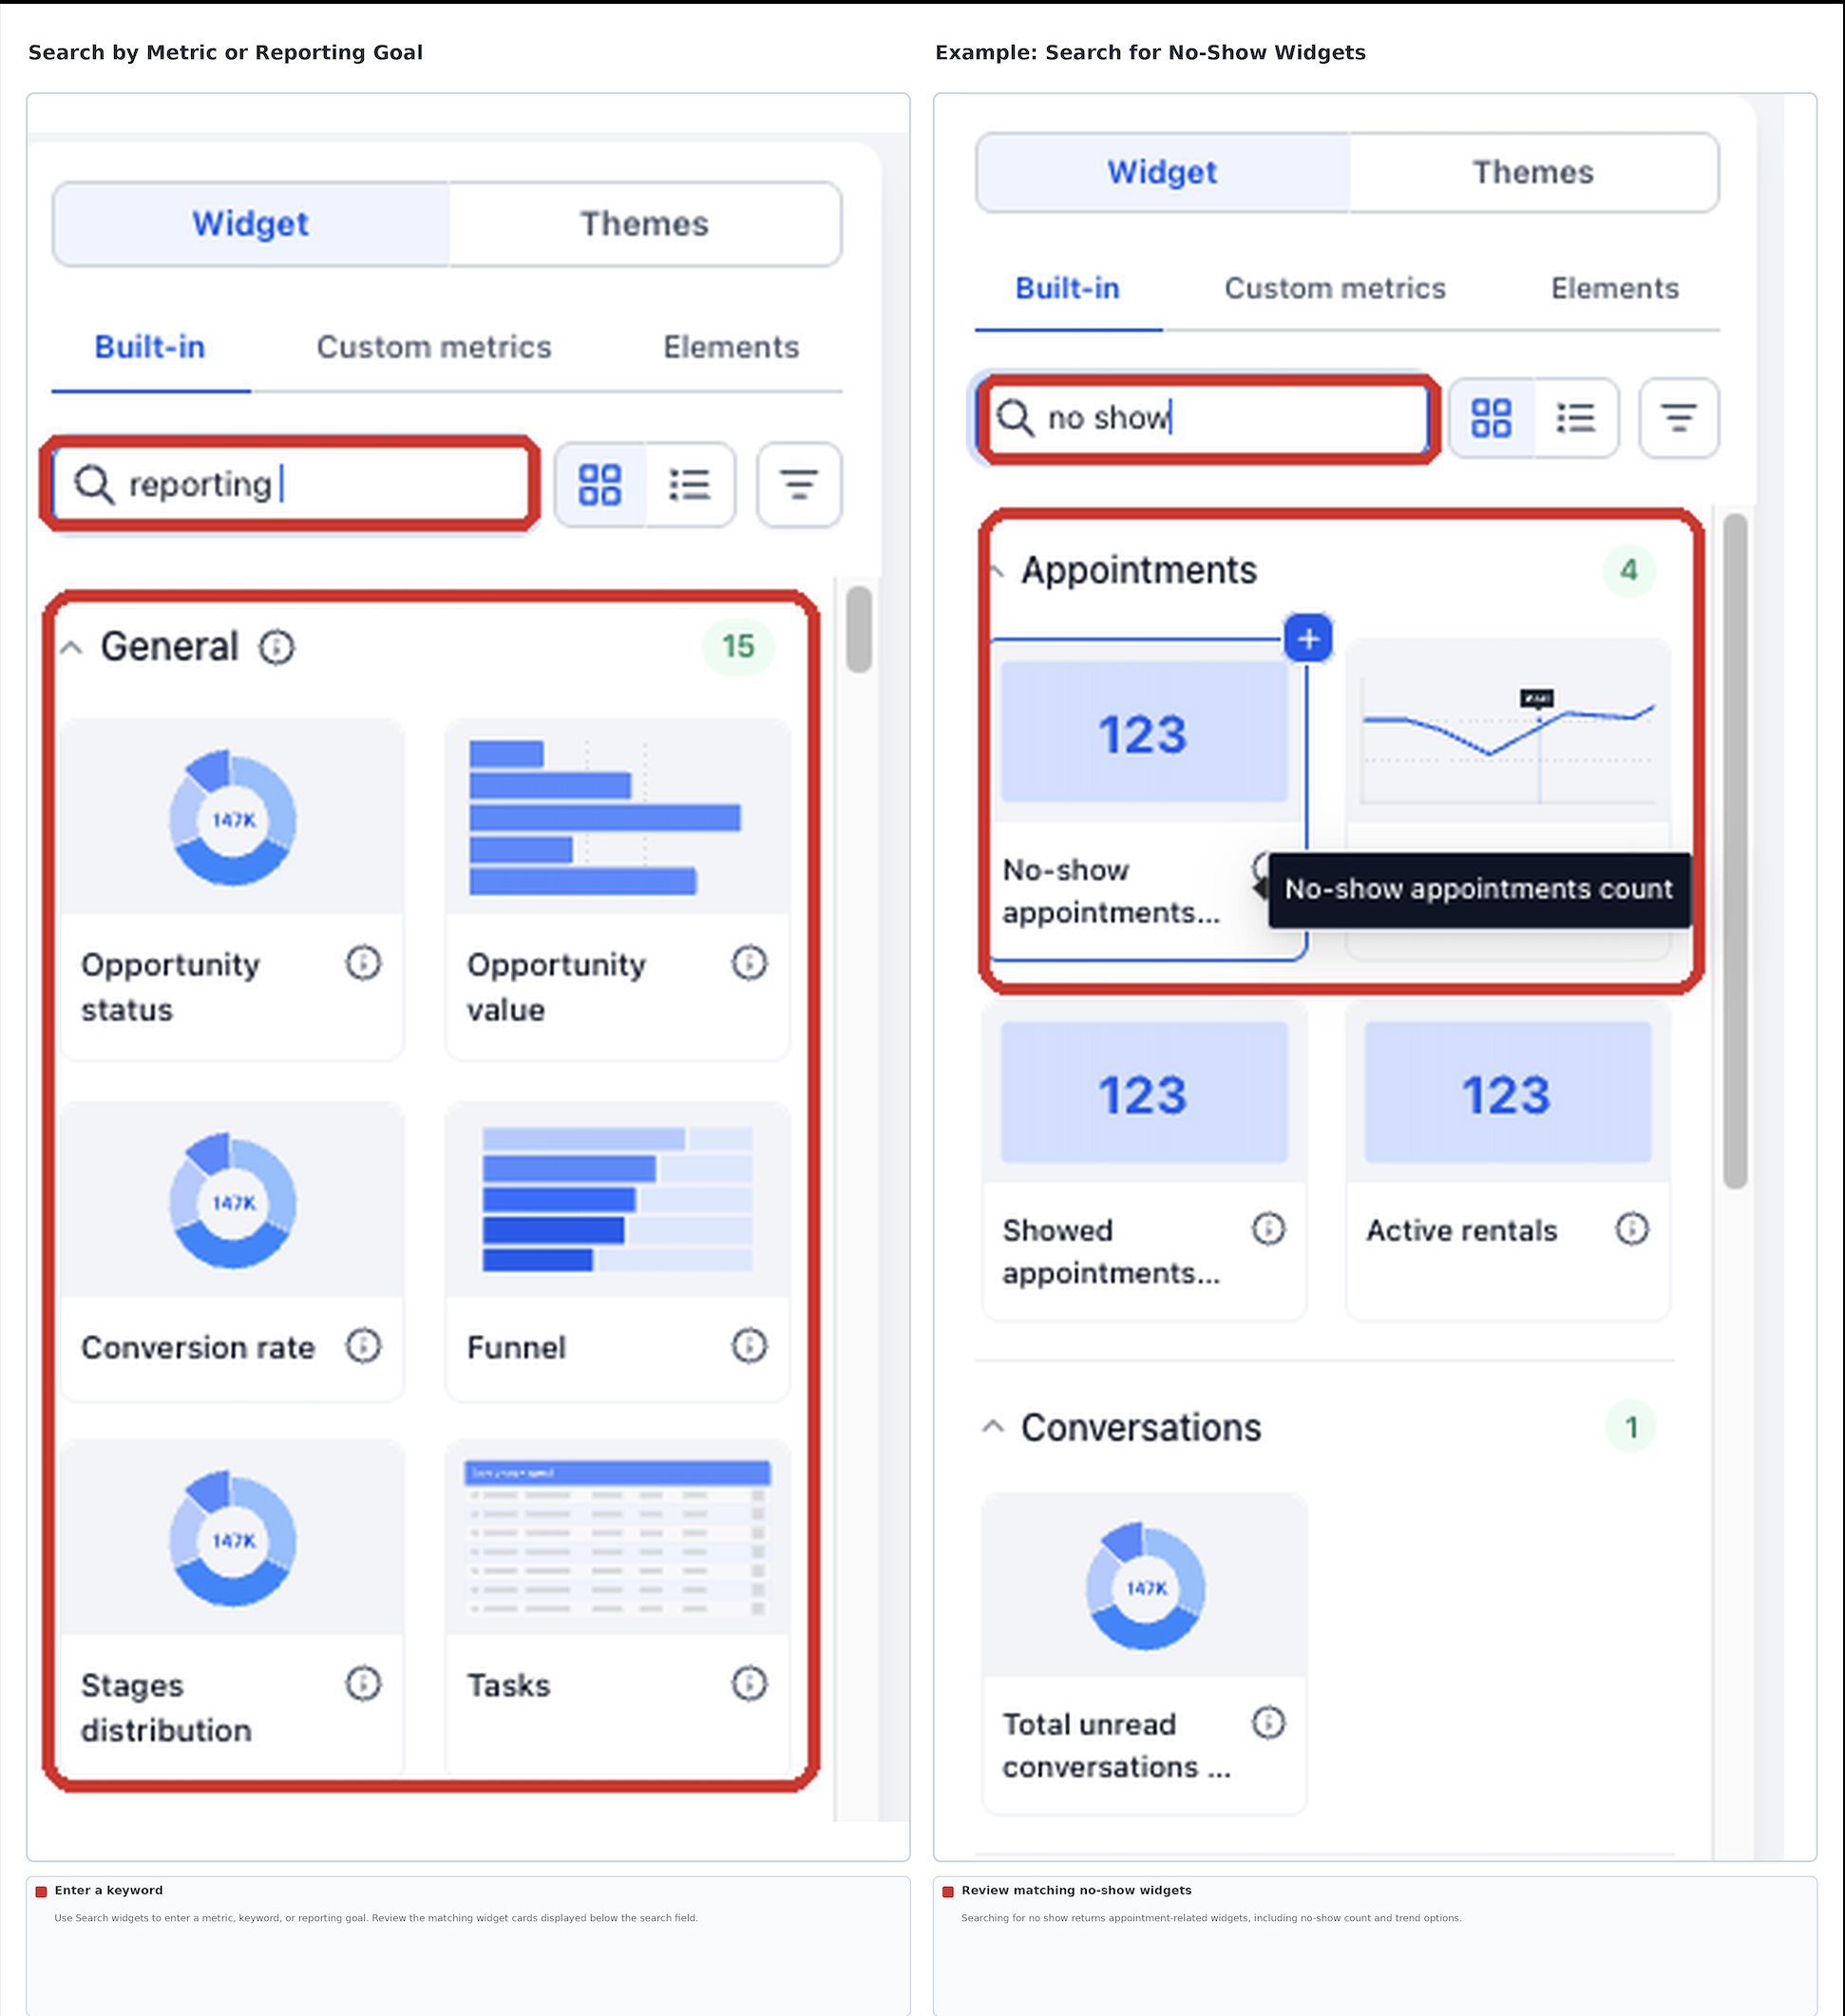
Search for a widget
- Select Search widgets.
- Enter a metric, keyword, or reporting goal.
- Review the matching widgets.
For example, searching for no show can help you find appointment-related widgets for no-show counts and trends over time.
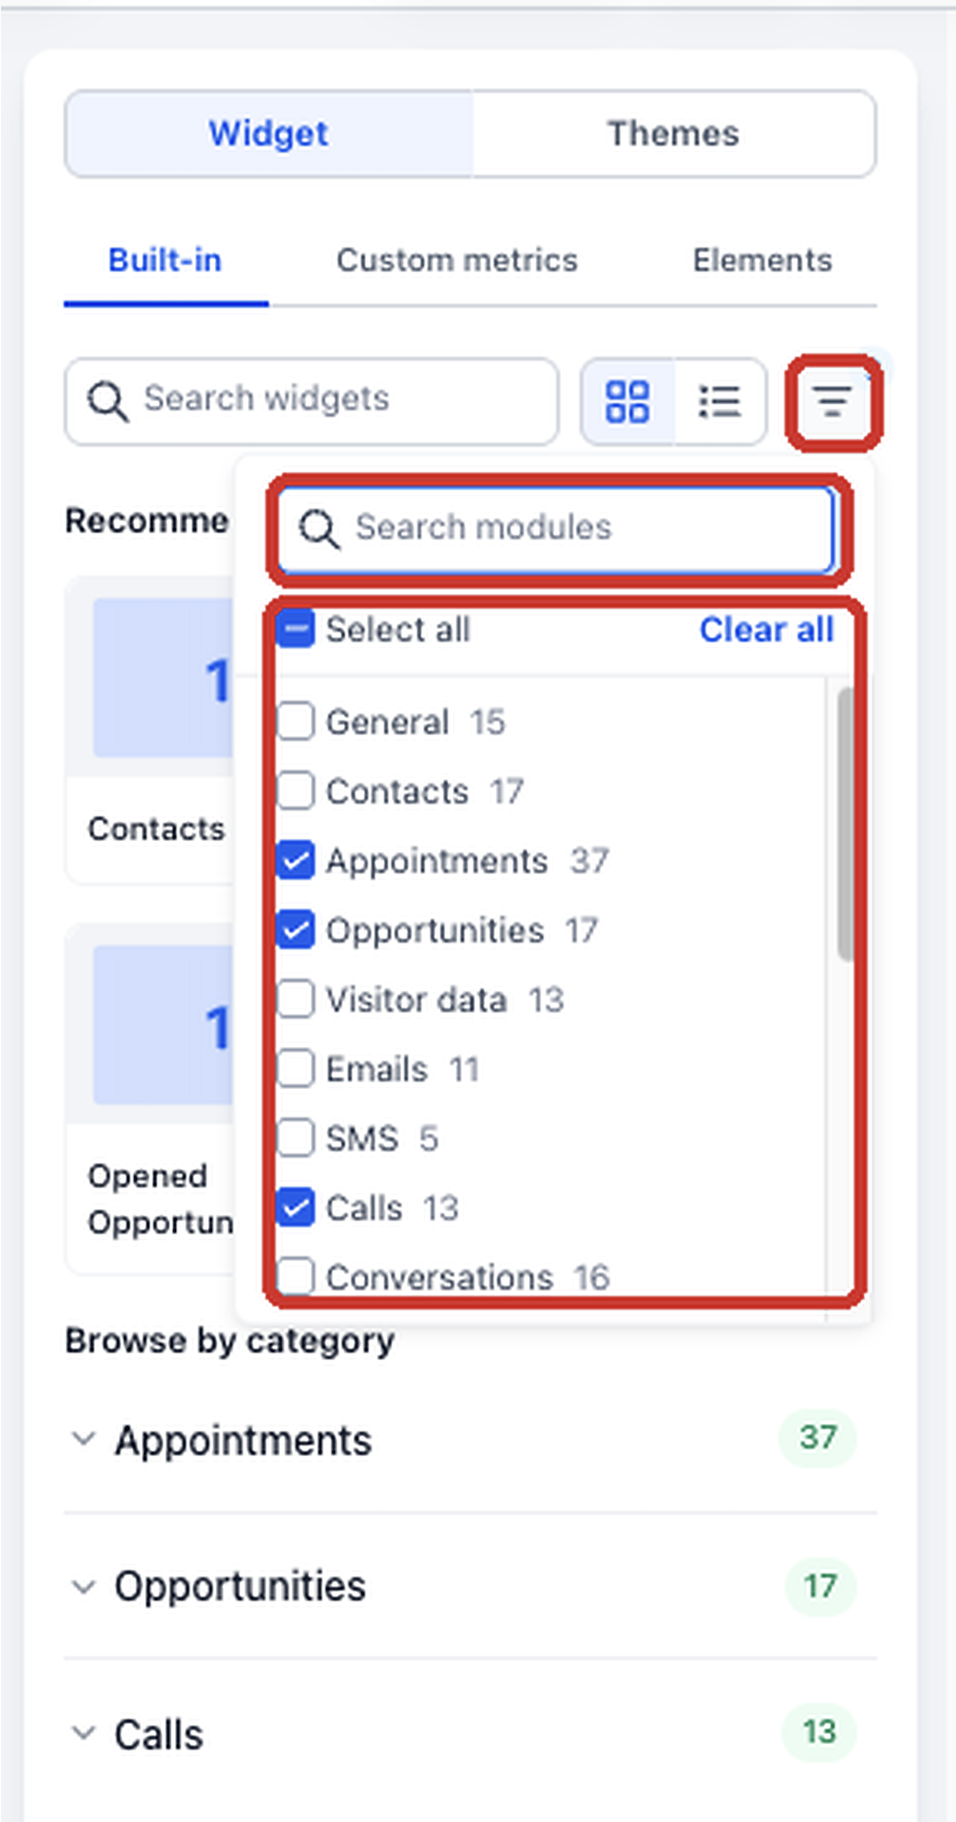
Filter by module
- Select the filter control beside the Gallery and List view options.
- Use Search modules to locate a reporting category when needed.
- Select the modules you want to include.
- Use Select all or Clear all to quickly adjust the selection.
The Widget Gallery includes the following reporting modules:
| Module | Module | Module |
|---|---|---|
| General | Contacts | Appointments |
| Opportunities | Visitor Data | Emails |
| SMS | Calls | Conversations |
| Payments | Meta Ads | Google Ads |
| Social Planner | Reputation | Google Analytics |
The module filter also displays the number of available widgets associated with each reporting area.
Step 5: Switch to List View
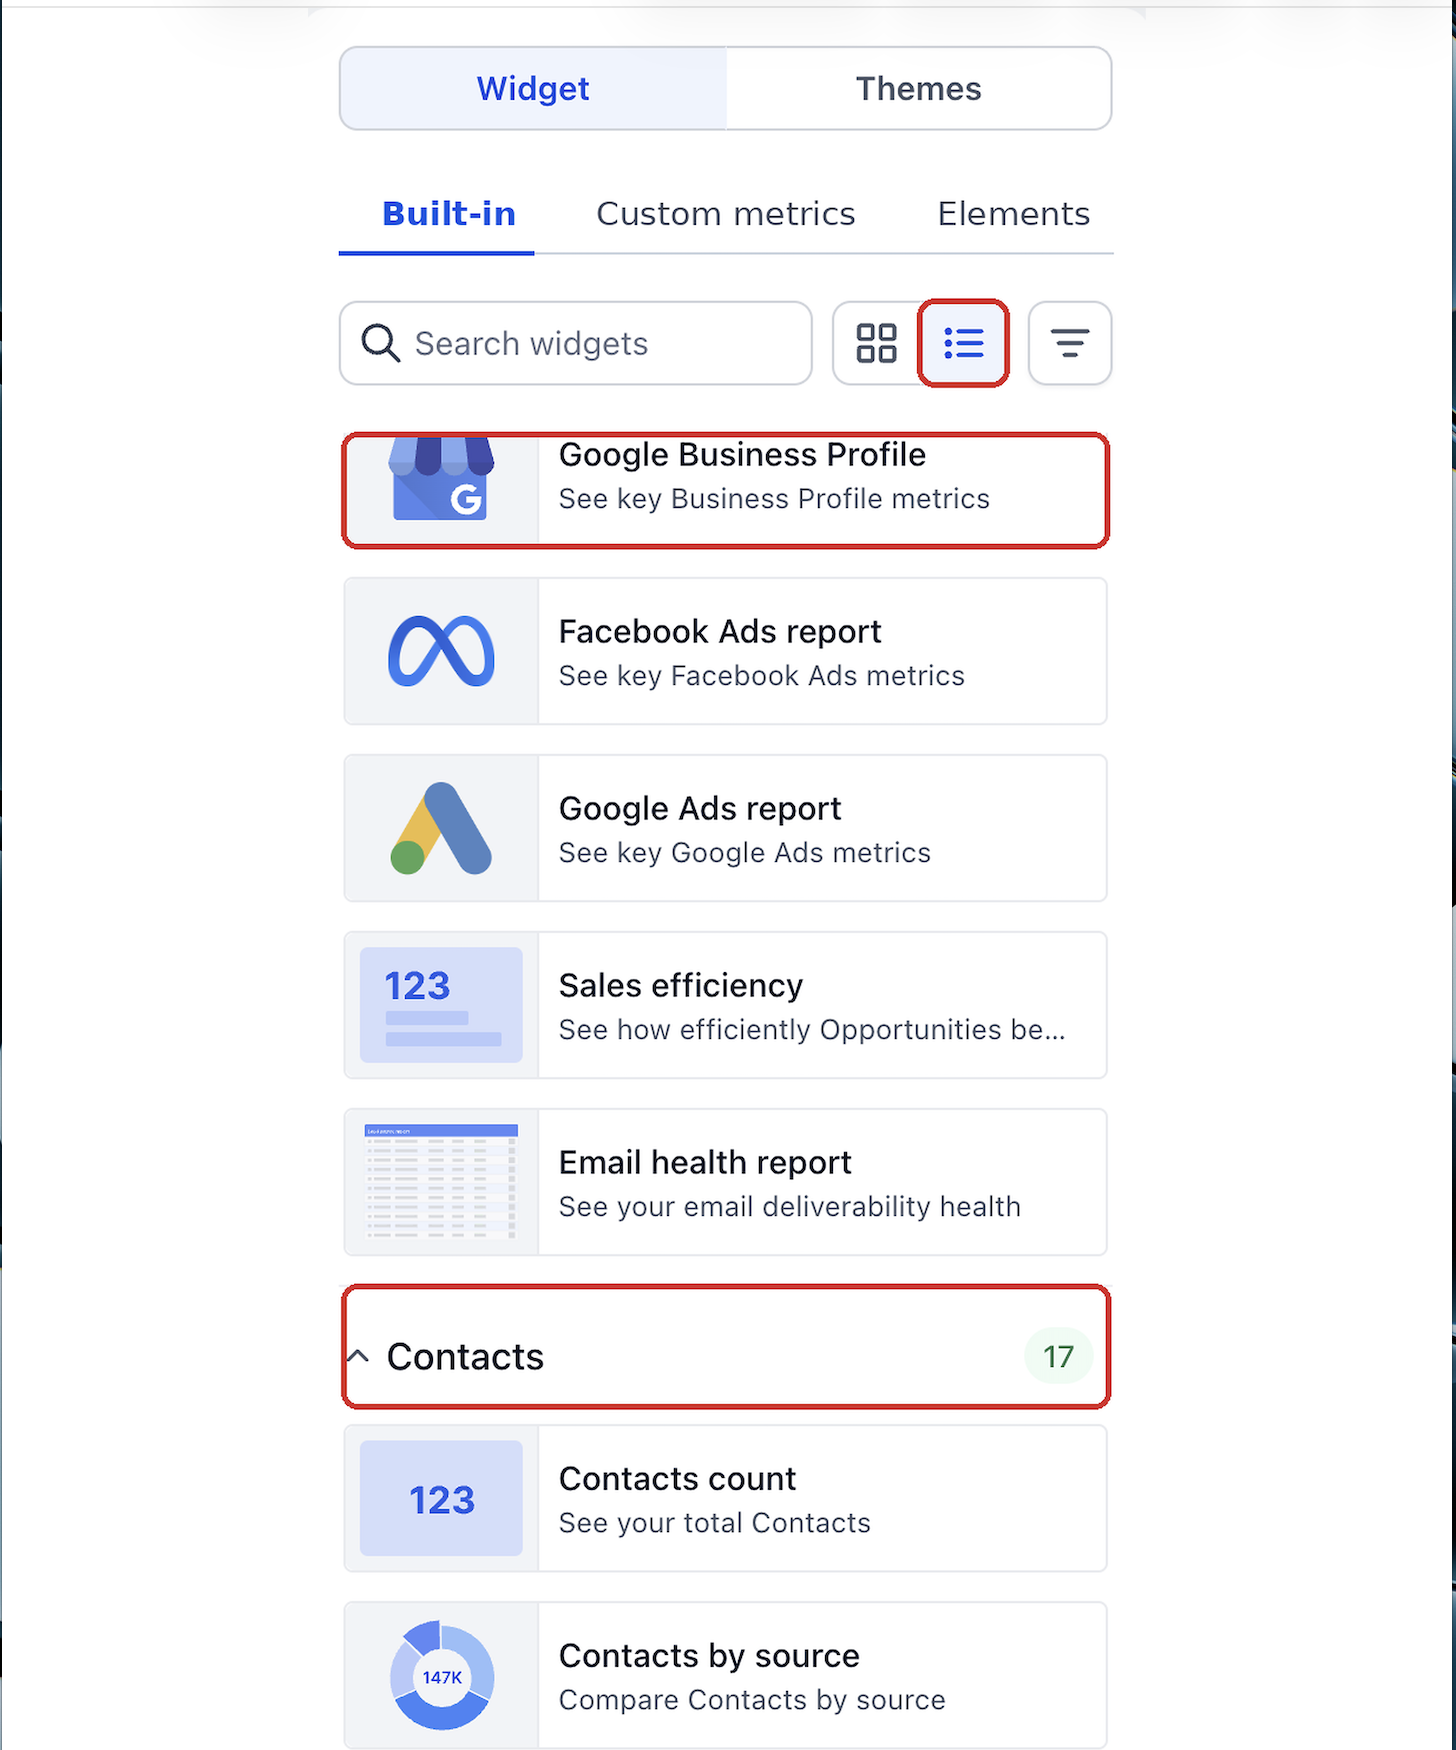
List view displays widgets in a more compact format with smaller previews and descriptions.
- Select the List view icon beside the Gallery view icon.
- Browse the widgets in the available reporting categories.
- Expand or collapse categories to narrow the list.
- Review the widget name and description before selecting it.
You can switch back to Gallery view whenever you prefer larger visual previews.
Step 6: Add a Widget to Your Dashboard
Once you find the right widget, add it directly from the Widget Gallery.
- Locate the widget in Gallery or List view.
- Review its preview and description.
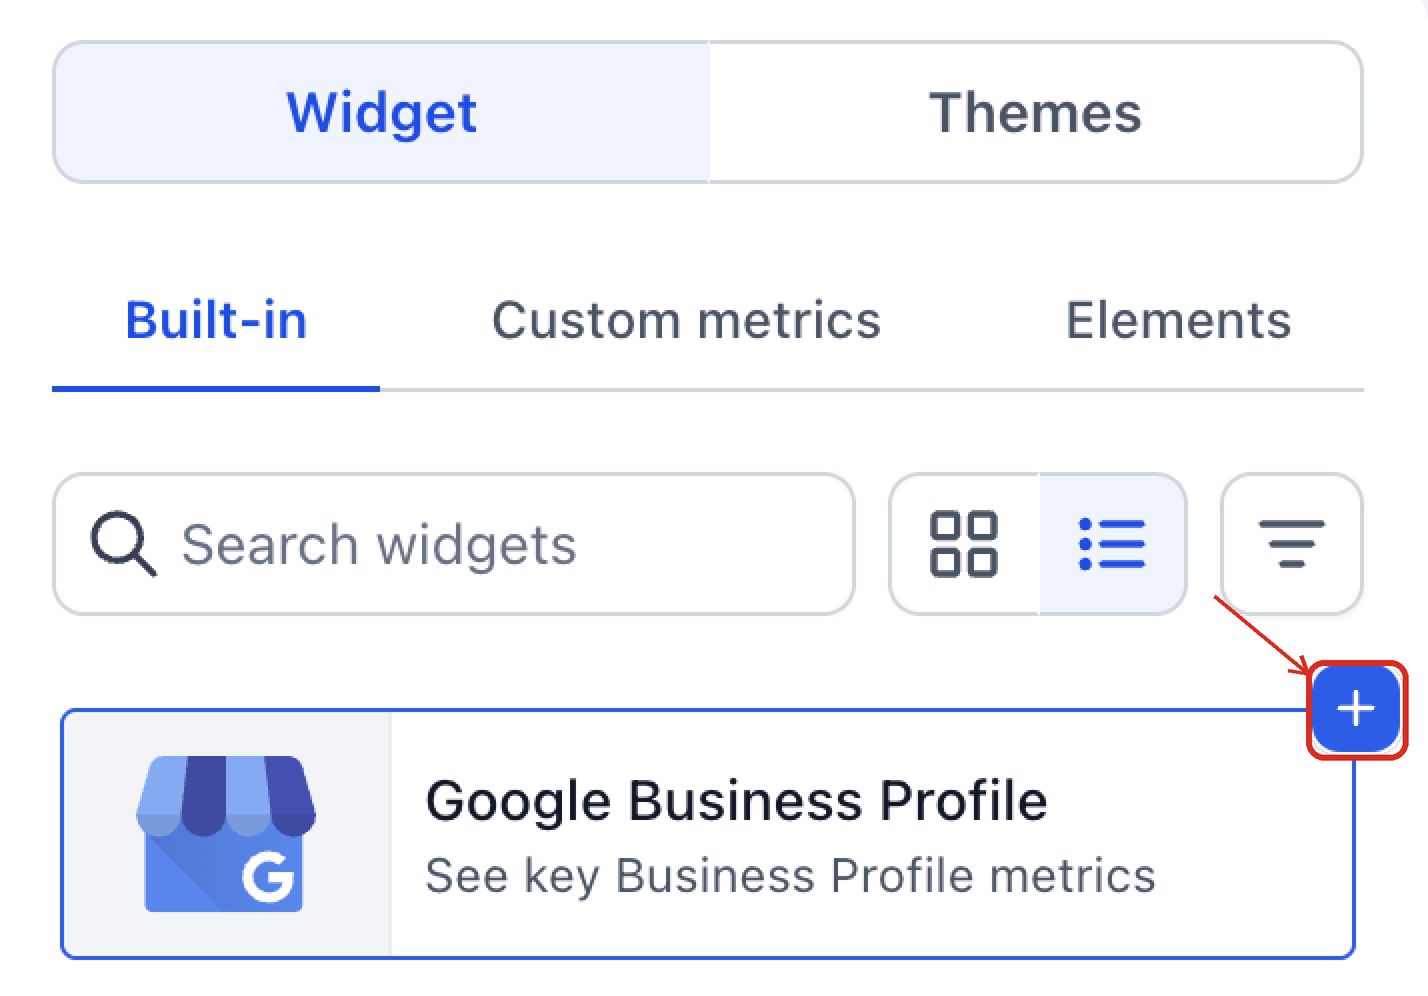
- Hover over the widget card to view its available add control.
- Select the widget to add it to the dashboard canvas.
- Repeat the process to add additional widgets.
The widget appears on your dashboard, where you can arrange or customize it as needed.
Step 7: Customize and Save Your Dashboard
After adding widgets, customize their settings and organize the dashboard to create a useful reporting layout.
Customize a widget
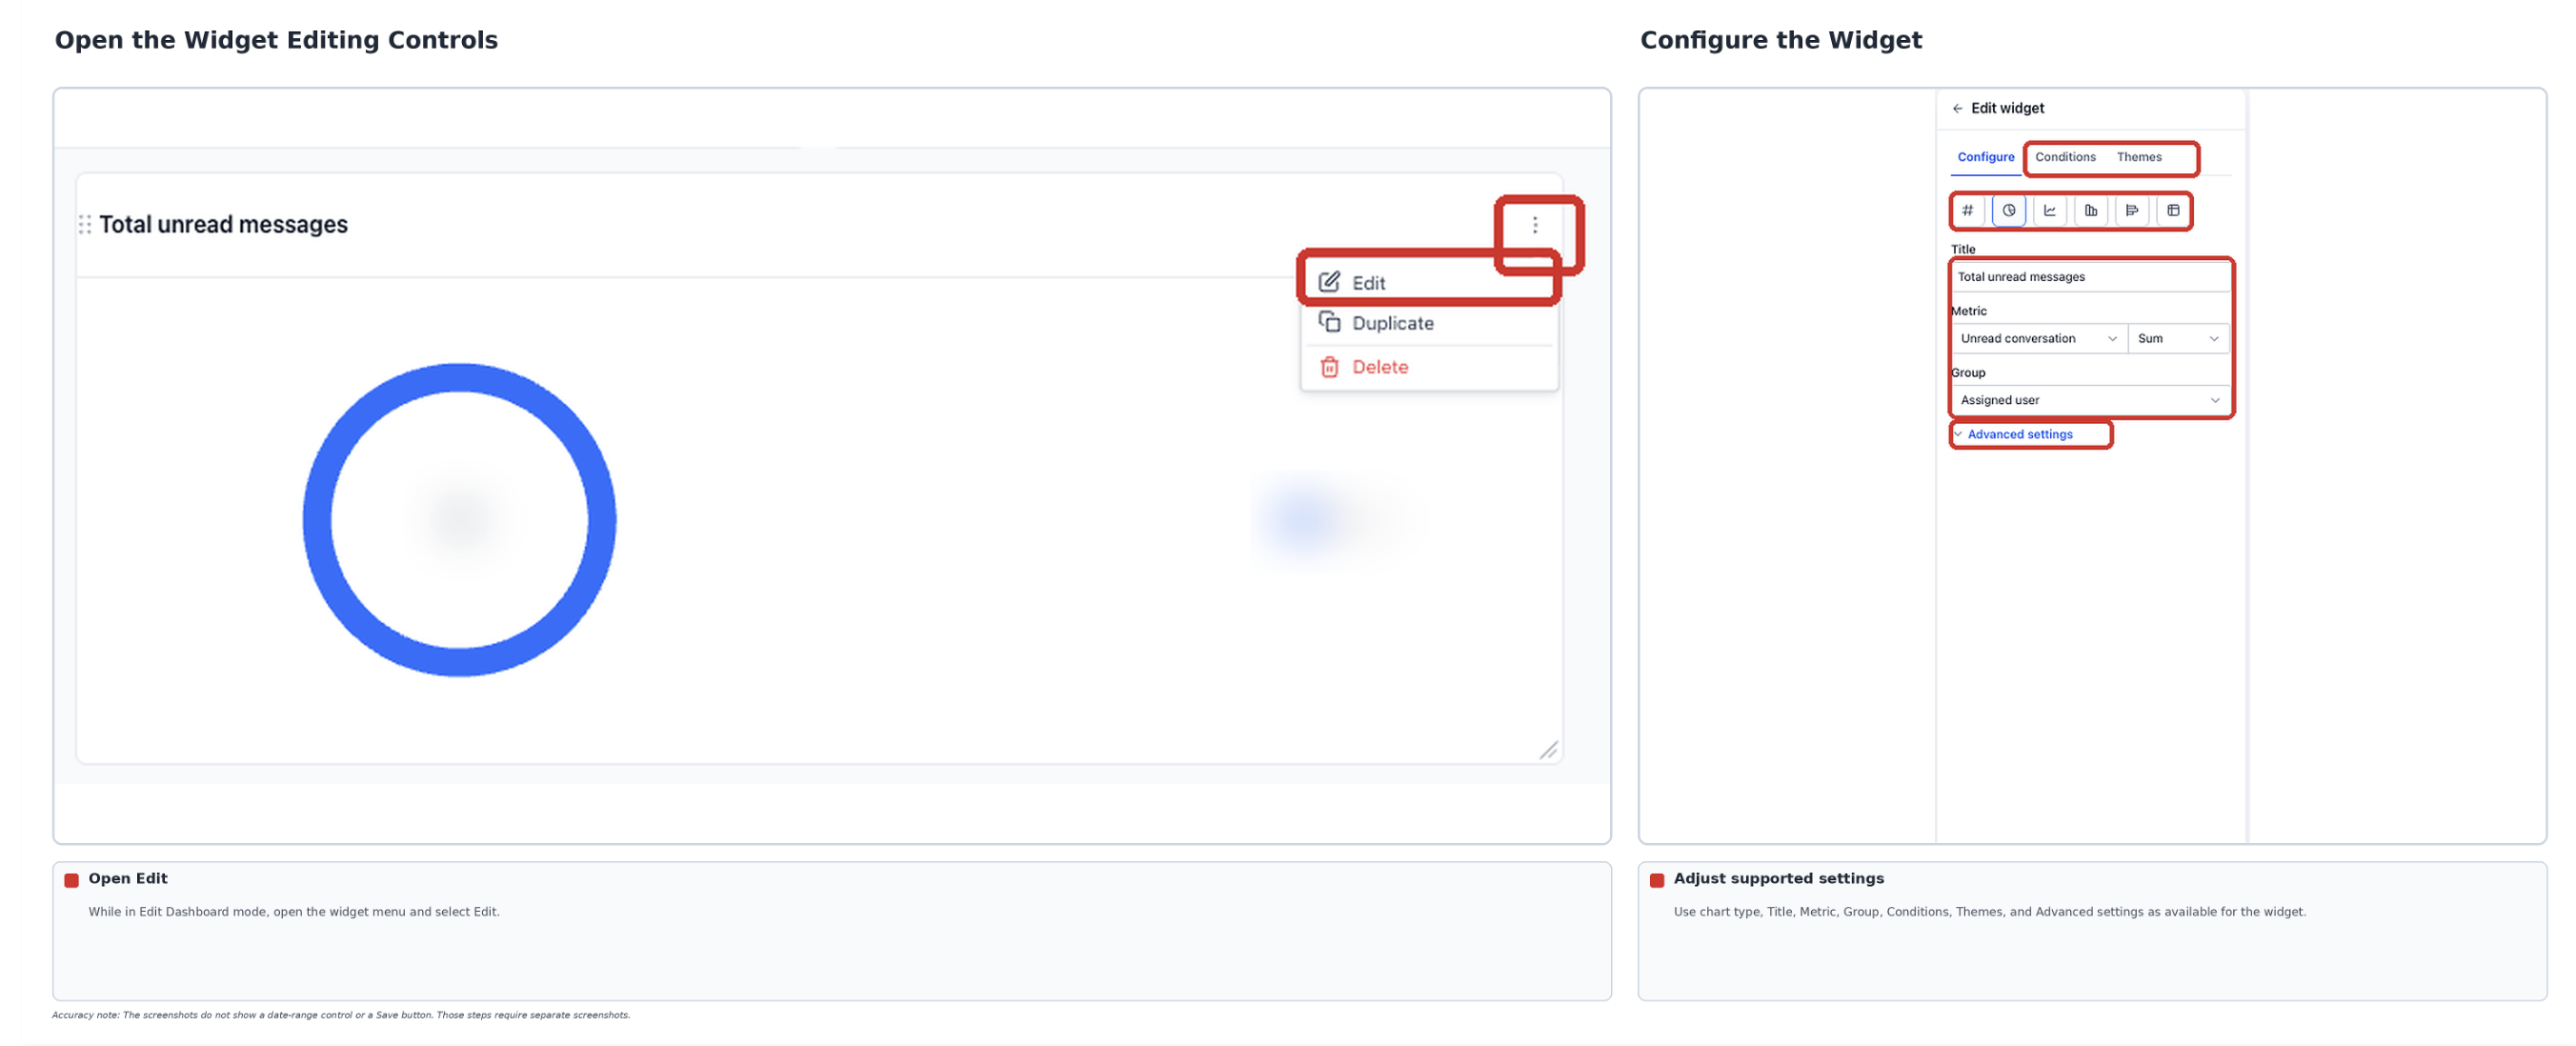
- While in Edit Dashboard mode, locate the widget you want to customize.
- Open the widget's available editing controls.
- Use the available configuration options to adjust the widget.
- Depending on the widget, settings can include:
- Title
- Metrics
- Chart settings
- Date range
- Conditions
- Title
- Save the widget configuration when finished.
Arrange your dashboard
- Drag widgets to reposition them.
- Resize widgets as needed.
- Save your dashboard changes when you finish arranging the layout.
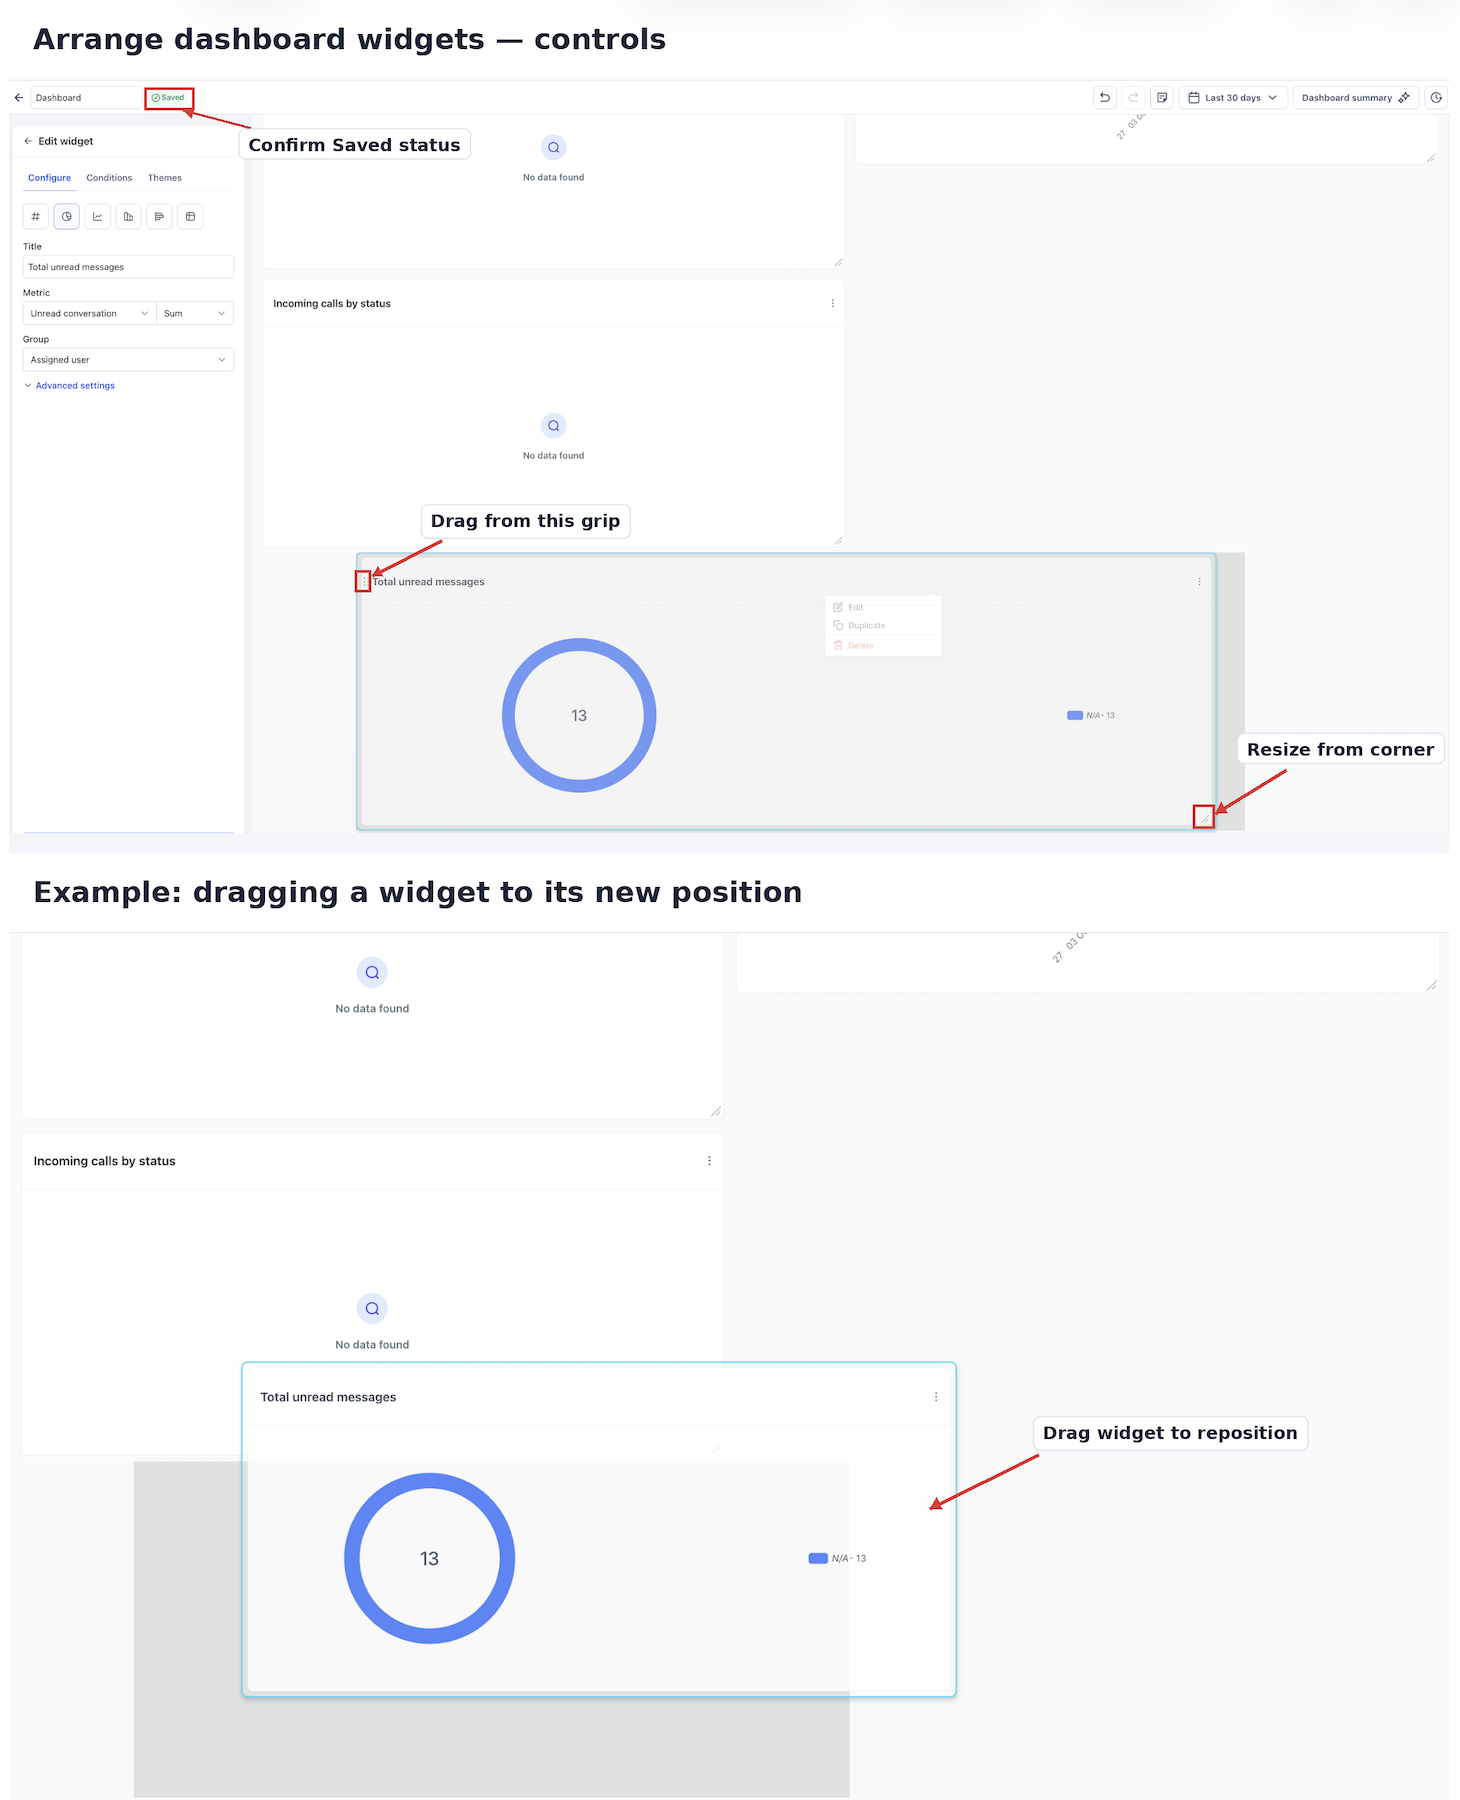
Note: Available widget configuration and saving controls can vary depending on the widget and dashboard editor.
Using the Widget Gallery in Custom Reports
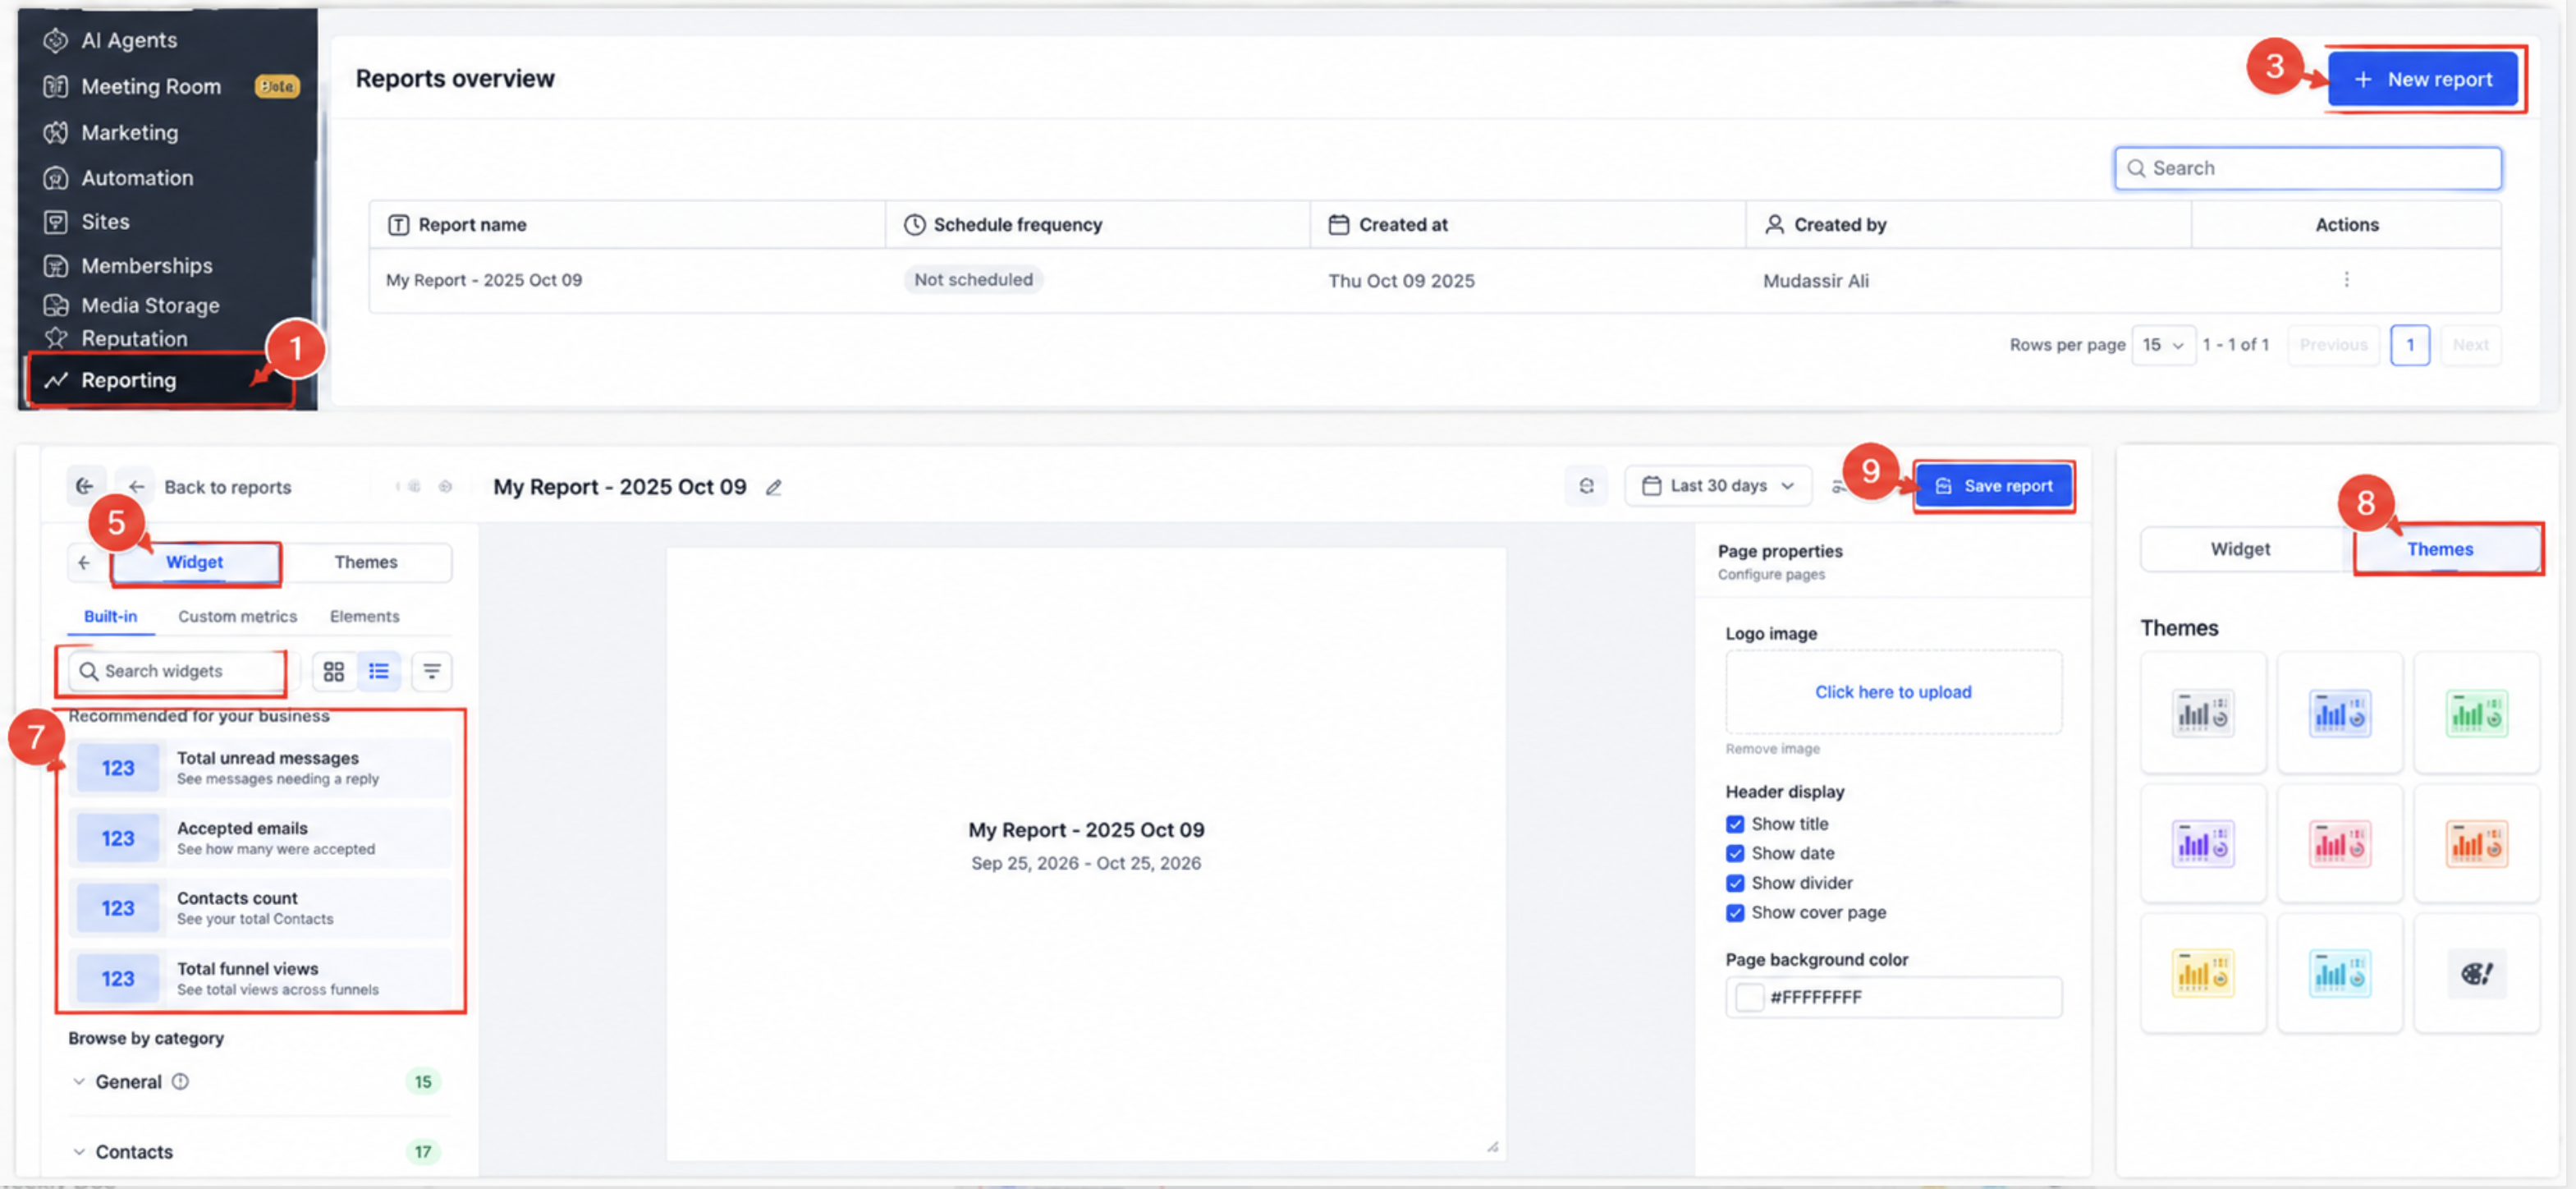
The Widget Gallery is also available when creating or editing Custom Reports. You can use the same search tools, widget previews, recommendations, and reporting categories to discover widgets.
- From your Chat To Clients CRM Sub-Account, select Reporting.
- Open Custom Reports.
- Create a new report or open an existing Custom Report.
- Enter the Report Builder.
- Open the Widgets area.
- Browse recommended widgets, search by purpose, or filter by module.
- Review the available widget previews and descriptions.
- Add the selected widget using the available Report Builder controls.
- Configure the widget if needed, then save the report.
The Themes, Custom metrics, and Elements tabs remain available alongside the widget library.
Frequently Asked Questions
Q: Can I preview a widget before adding it?
Yes. Gallery view displays a visual preview of each built-in widget. You can also use the information icon to learn what the widget displays.
Q: Can I search for widgets without knowing their exact names?
Yes. Search using a reporting goal or related keyword, such as no show, to find relevant widgets.
Q: What is the difference between Gallery view and List view?
Gallery view emphasizes larger visual widget previews. List view displays widgets in a more compact format with their names and descriptions.
Q: Are recommended widgets the same for every account?
No. Recommendations can be based on account activity. New accounts can also see popular starter widgets.
Q: Do module filters change the data displayed in existing dashboard widgets?
No. Module filters help you find widgets inside the Widget Gallery. To refine the data displayed by an existing widget, use the widget's supported configuration or Conditions settings.
Q: Can I use the Widget Gallery in Custom Reports?
Yes. The Widget Gallery is available when creating and editing Custom Reports.