
Set Up a Root Domain or Subdomain for Chat To Clients CRM Sites
Connecting a root domain or subdomain to Chat To Clients CRM lets you publish Funnels, Websites, Stores, Blogs, and Webinars using your own branded web address. You can connect supported domains automatically with Domain Connect or configure the required DNS records manually. After connecting the domain, you can assign the correct landing page and configure default and 404/error pages to provide visitors with a consistent experience. This guide covers domain connection, DNS setup, page configuration, removal, and common troubleshooting steps.
2. Key Benefits of Connecting a Root Domain or Subdomain
3. Prerequisites and Limitations
4. How To Set Up a Root Domain or Subdomain
5. How To Check Your DNS Records
6. How To Remove a Domain
7. Troubleshooting Domain Connection Issues
8. Frequently Asked Questions
9. Related Articles
What Is a Root Domain or Subdomain in Chat To Clients CRM?
A root domain is the primary web address for a site, such as example.com. A subdomain adds a prefix to the root domain, such as www.example.com or offers.example.com.
Chat To Clients CRM lets you connect root domains and subdomains to supported Sites products so visitors can access Funnels, Websites, Stores, Blogs, and Webinars through a branded URL. Depending on your DNS provider, you can use Domain Connect or configure the required DNS records manually.
Key Benefits of Connecting a Root Domain or Subdomain
Connecting the correct domain gives visitors a branded destination while allowing Chat To Clients CRM to route traffic to the appropriate site content.
- Branded Visitor Experience: Publish Chat To Clients CRM content using a domain or subdomain associated with your business.
- Flexible Connection Options: Use Domain Connect when supported or configure DNS manually when needed.
- Automatic SSL: Chat To Clients CRM provisions SSL after the domain connects successfully.
- Controlled Landing Experience: Choose which Funnel step or Website page loads when visitors open the domain without an additional path.
- Custom Error Handling: Configure a branded 404/error page for visitors who open an unavailable URL.
- Configuration Reminders: Eligible connected domains can display an Action Required reminder when default-page configuration is incomplete.
Prerequisites and Limitations
Preparing the domain and confirming where its DNS is managed helps prevent connection conflicts and reduces verification delays.
Before you begin:
- You must own or have access to the root domain or subdomain you want to connect.
- You need access to the active DNS provider when manual configuration is required.
- Decide whether visitors should use a root domain such as
example.comor a subdomain such aswww.example.comoroffers.example.com. - If the hostname currently supports another website or service that must remain active, use a different available subdomain instead of repointing it.
Current limitations and behaviors:
- A single hostname cannot point to multiple platforms or servers at the same time.
- Do not create both an A record and a CNAME record for the same hostname.
- If Cloudflare manages the DNS, set the Chat To Clients CRM A or CNAME record to DNS only, not Proxied.
- DNS changes may require time to propagate and can take up to 24 hours.
- The Action Required reminder applies when an eligible connected domain is missing its default page or default 404/error page.
- The Action Required reminder appears only in the sub-account where the domain was originally connected.
How To Set Up a Root Domain or Subdomain
Connecting the domain in the correct order allows Chat To Clients CRM to verify DNS, associate the address with your content, and provision SSL successfully.
Step 1: Decide Whether to Use a Root Domain or Subdomain
Choosing the correct hostname before changing DNS helps prevent an existing website or service from being unintentionally replaced.
A root domain uses the primary address:
example.comA subdomain adds a prefix:
www.example.comoffers.example.comgo.example.comImportant: If the root domain already hosts another website or service that must remain active, use an available subdomain instead of repointing the root domain.
Step 2: Start the Domain Connection in Chat To Clients CRM
Starting from the Domains area allows Chat To Clients CRM to identify the type of Sites connection and provide the appropriate automatic or manual DNS workflow.
- From the Sub-Account view, click Settings.
- Select Domains & URL Redirects.
- Click + Connect a domain.
- Locate Funnel/Website/Store/Blog/Webinar and click Connect.
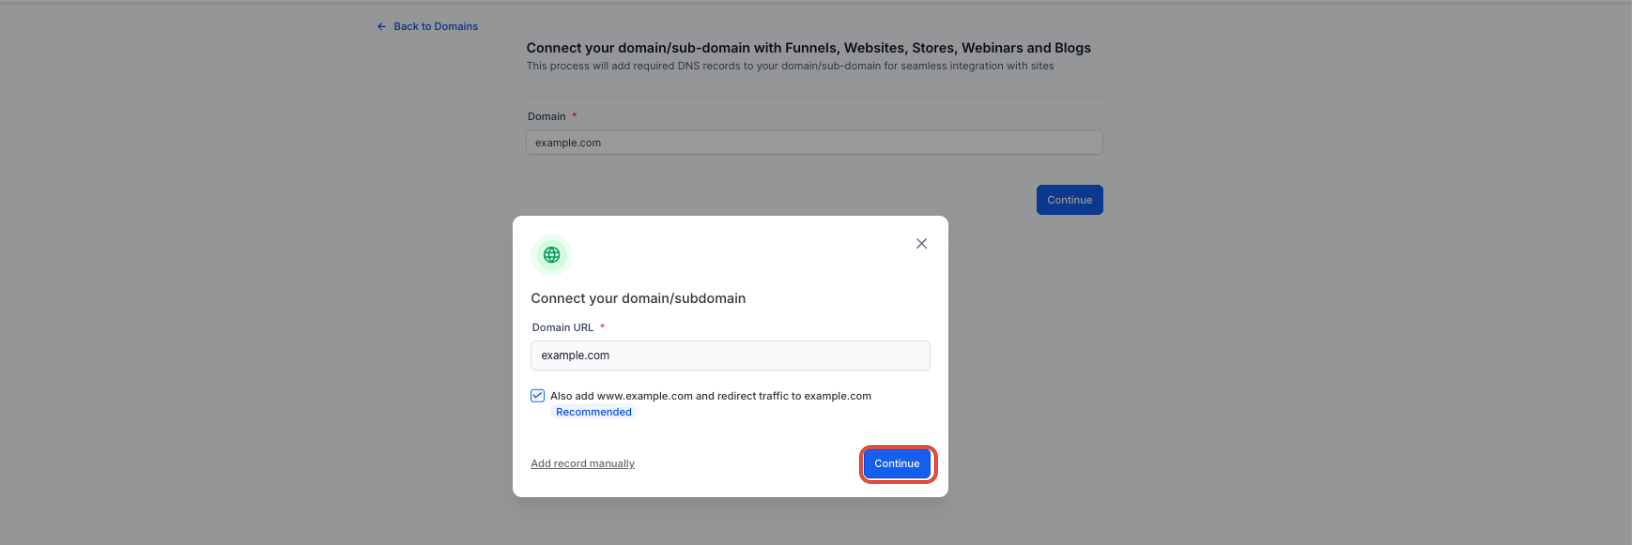
- Enter the root domain or subdomain in the Domain URL field.
- Choose the connection method:
- Continue: Attempt automatic setup with Domain Connect.
- Add record manually: Configure the required DNS record yourself.
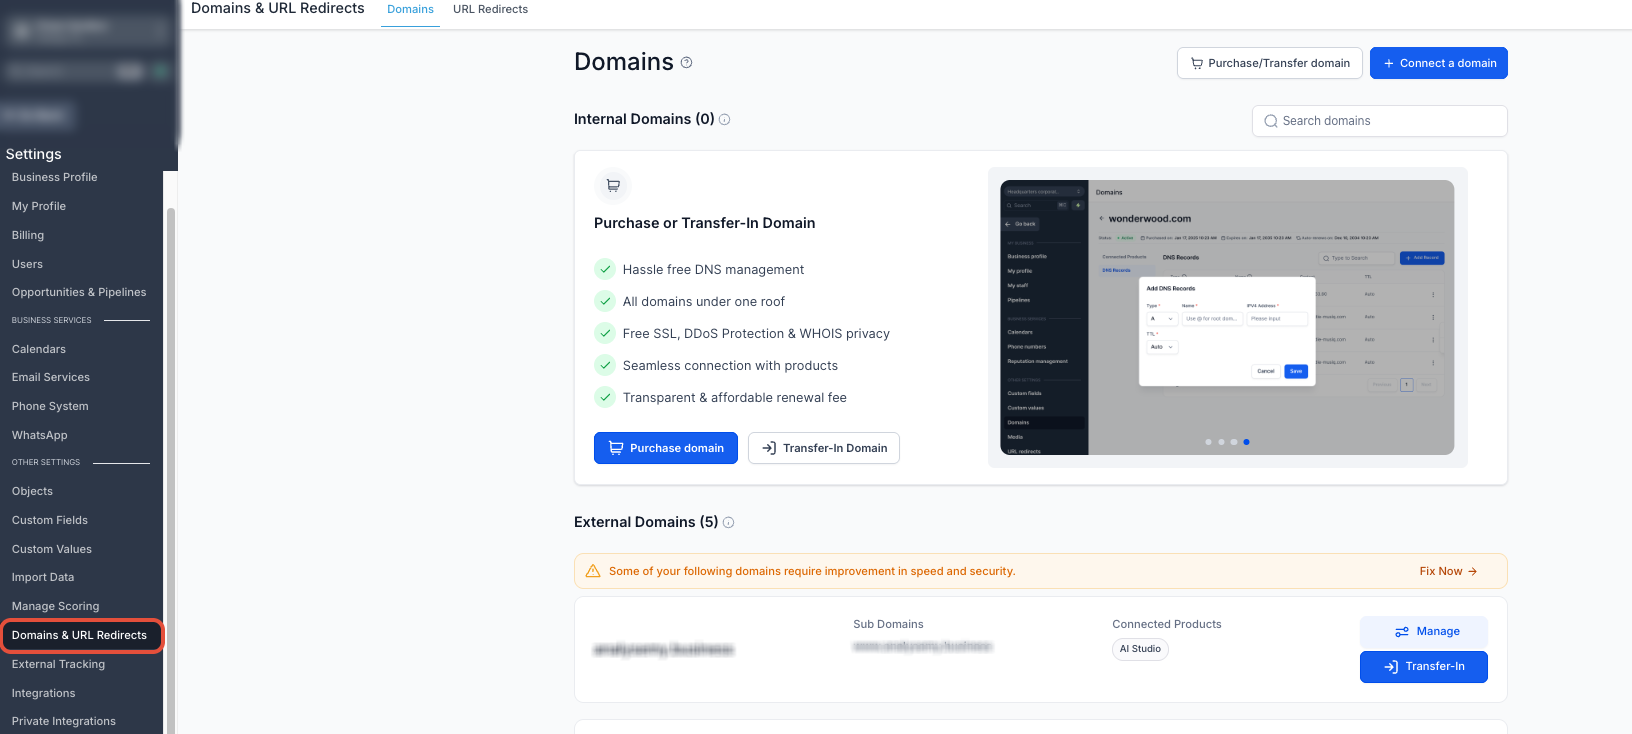
When connecting a root domain, Chat To Clients CRM can also add the www version and configure a 301 redirect so traffic from the www address is sent to the root domain.
Step 3: Configure the Domain Automatically or Manually
Use Domain Connect when automatic setup is supported by your DNS provider, or manually add the required DNS record when automatic configuration is unavailable or not preferred.
Automatic Setup with Domain Connect
Domain Connect can authorize a supported DNS provider and automatically create the records required for the connection.
- Enter the domain in the connection flow and click Continue.
- If Chat To Clients CRM recognizes a supported provider, click Authorize.
- Sign in to the domain provider when prompted.
- Approve the requested DNS connection.
- After authorization is complete, close the provider tab and return to Chat To Clients CRM.
- Allow Chat To Clients CRM to verify the DNS configuration.
Manual DNS Setup
Manual setup lets you add the required record directly at the provider that currently manages the domain's DNS.
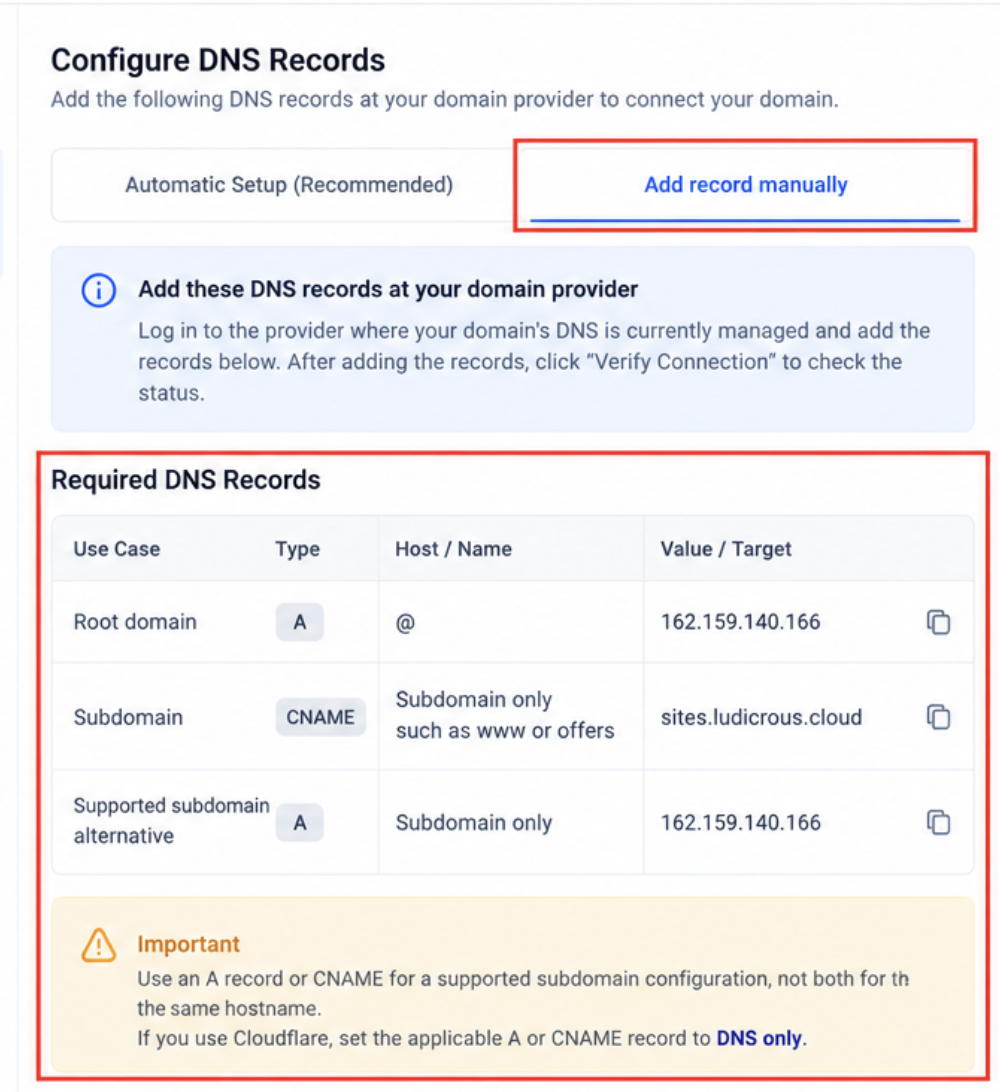
- Enter the domain in Chat To Clients CRM and click Add record manually.
- Sign in to the provider managing the domain's active DNS.
- Add one of the supported records shown below.
| Use Case | Type | Host / Name | Value / Target |
|---|---|---|---|
| Root domain | A | @ | 162.159.140.166 |
| Subdomain | CNAME | Subdomain only, such as www or offers | sites.ludicrous.cloud |
| Supported subdomain alternative | A | Subdomain only | 162.159.140.166 |
Important: Use an A record or CNAME for a supported subdomain configuration, not both for the same hostname. If you use Cloudflare, set the applicable A or CNAME record to DNS only.
Step 4: Associate the Domain With Your Site Content
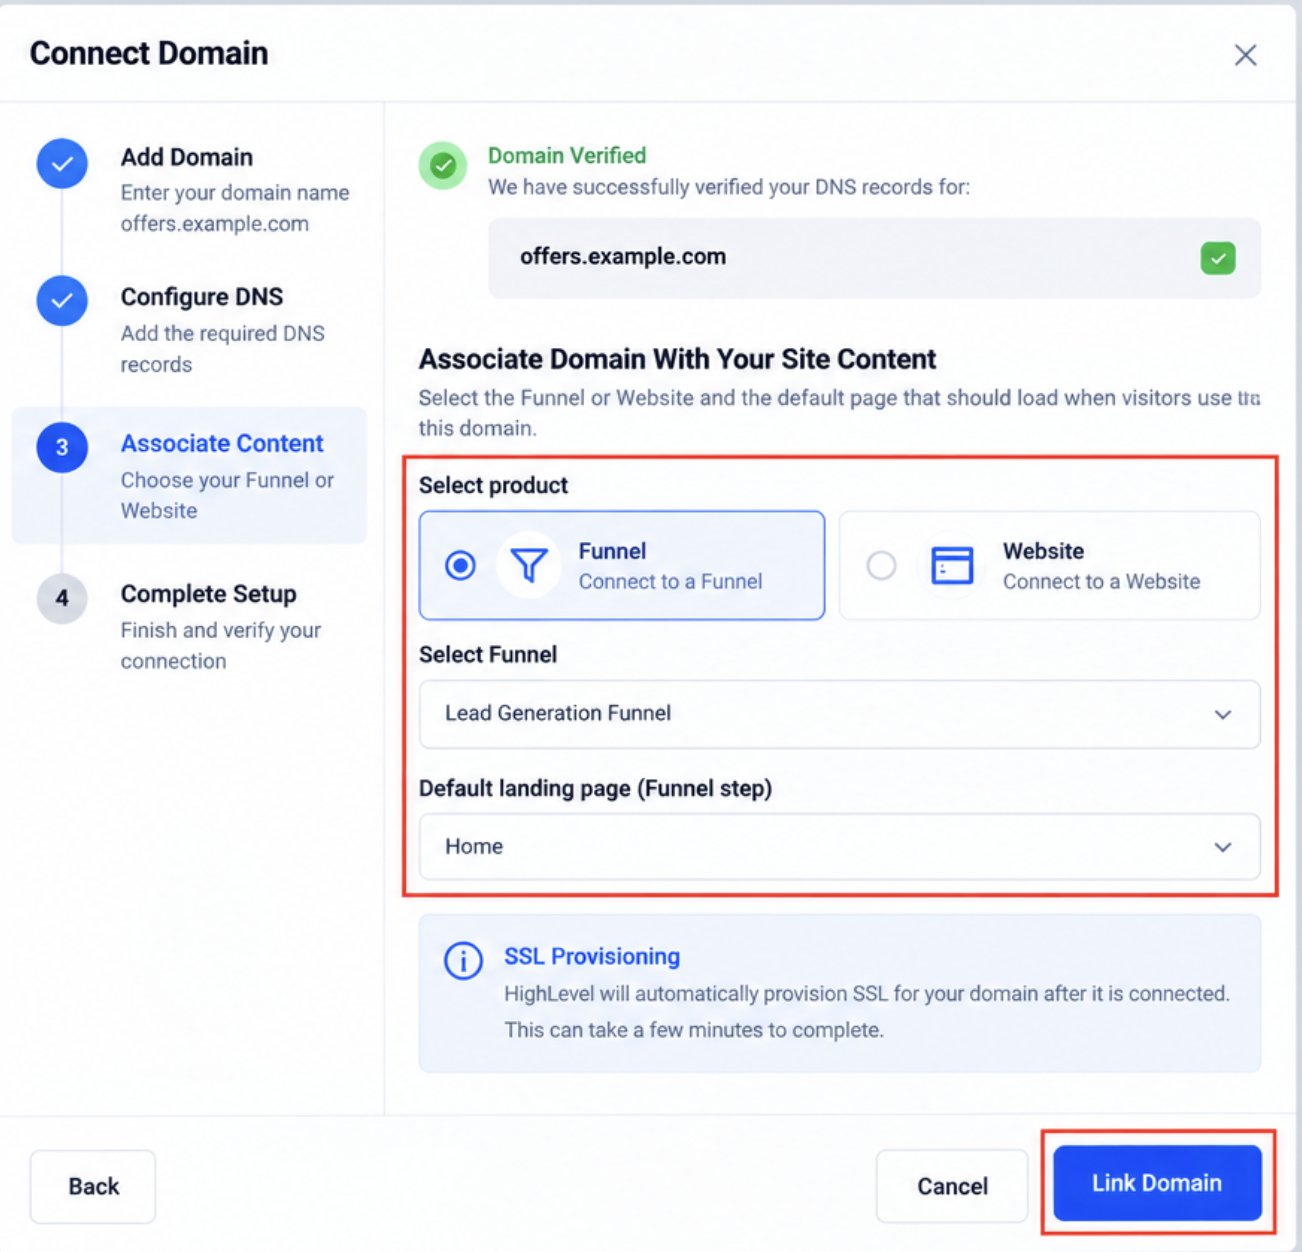
Associating the verified domain tells Chat To Clients CRM which Funnel or Website content should load when visitors use that address.
- Wait for Chat To Clients CRM to verify the required DNS record.
- On the domain association screen, select the applicable Funnel or Website.
- Select the Funnel step or Website page that should act as the default landing page.
- Click Link Domain.
Chat To Clients CRM begins provisioning SSL automatically after the domain is connected. SSL can take a few minutes to complete.
Step 5: Configure the Default Page and 404/Error Page
Default-page settings control what visitors see at the main domain and where they are sent when they request an invalid or unavailable URL.
- Go to Settings → Domains & URL Redirects.
- Locate the connected domain and click Manage.
- Review the domain's Connected Products.
- If an Action Required reminder appears, click it.
- Select an eligible page from the Default Page dropdown.
- Select an eligible page from the Default 404/Error Page dropdown.
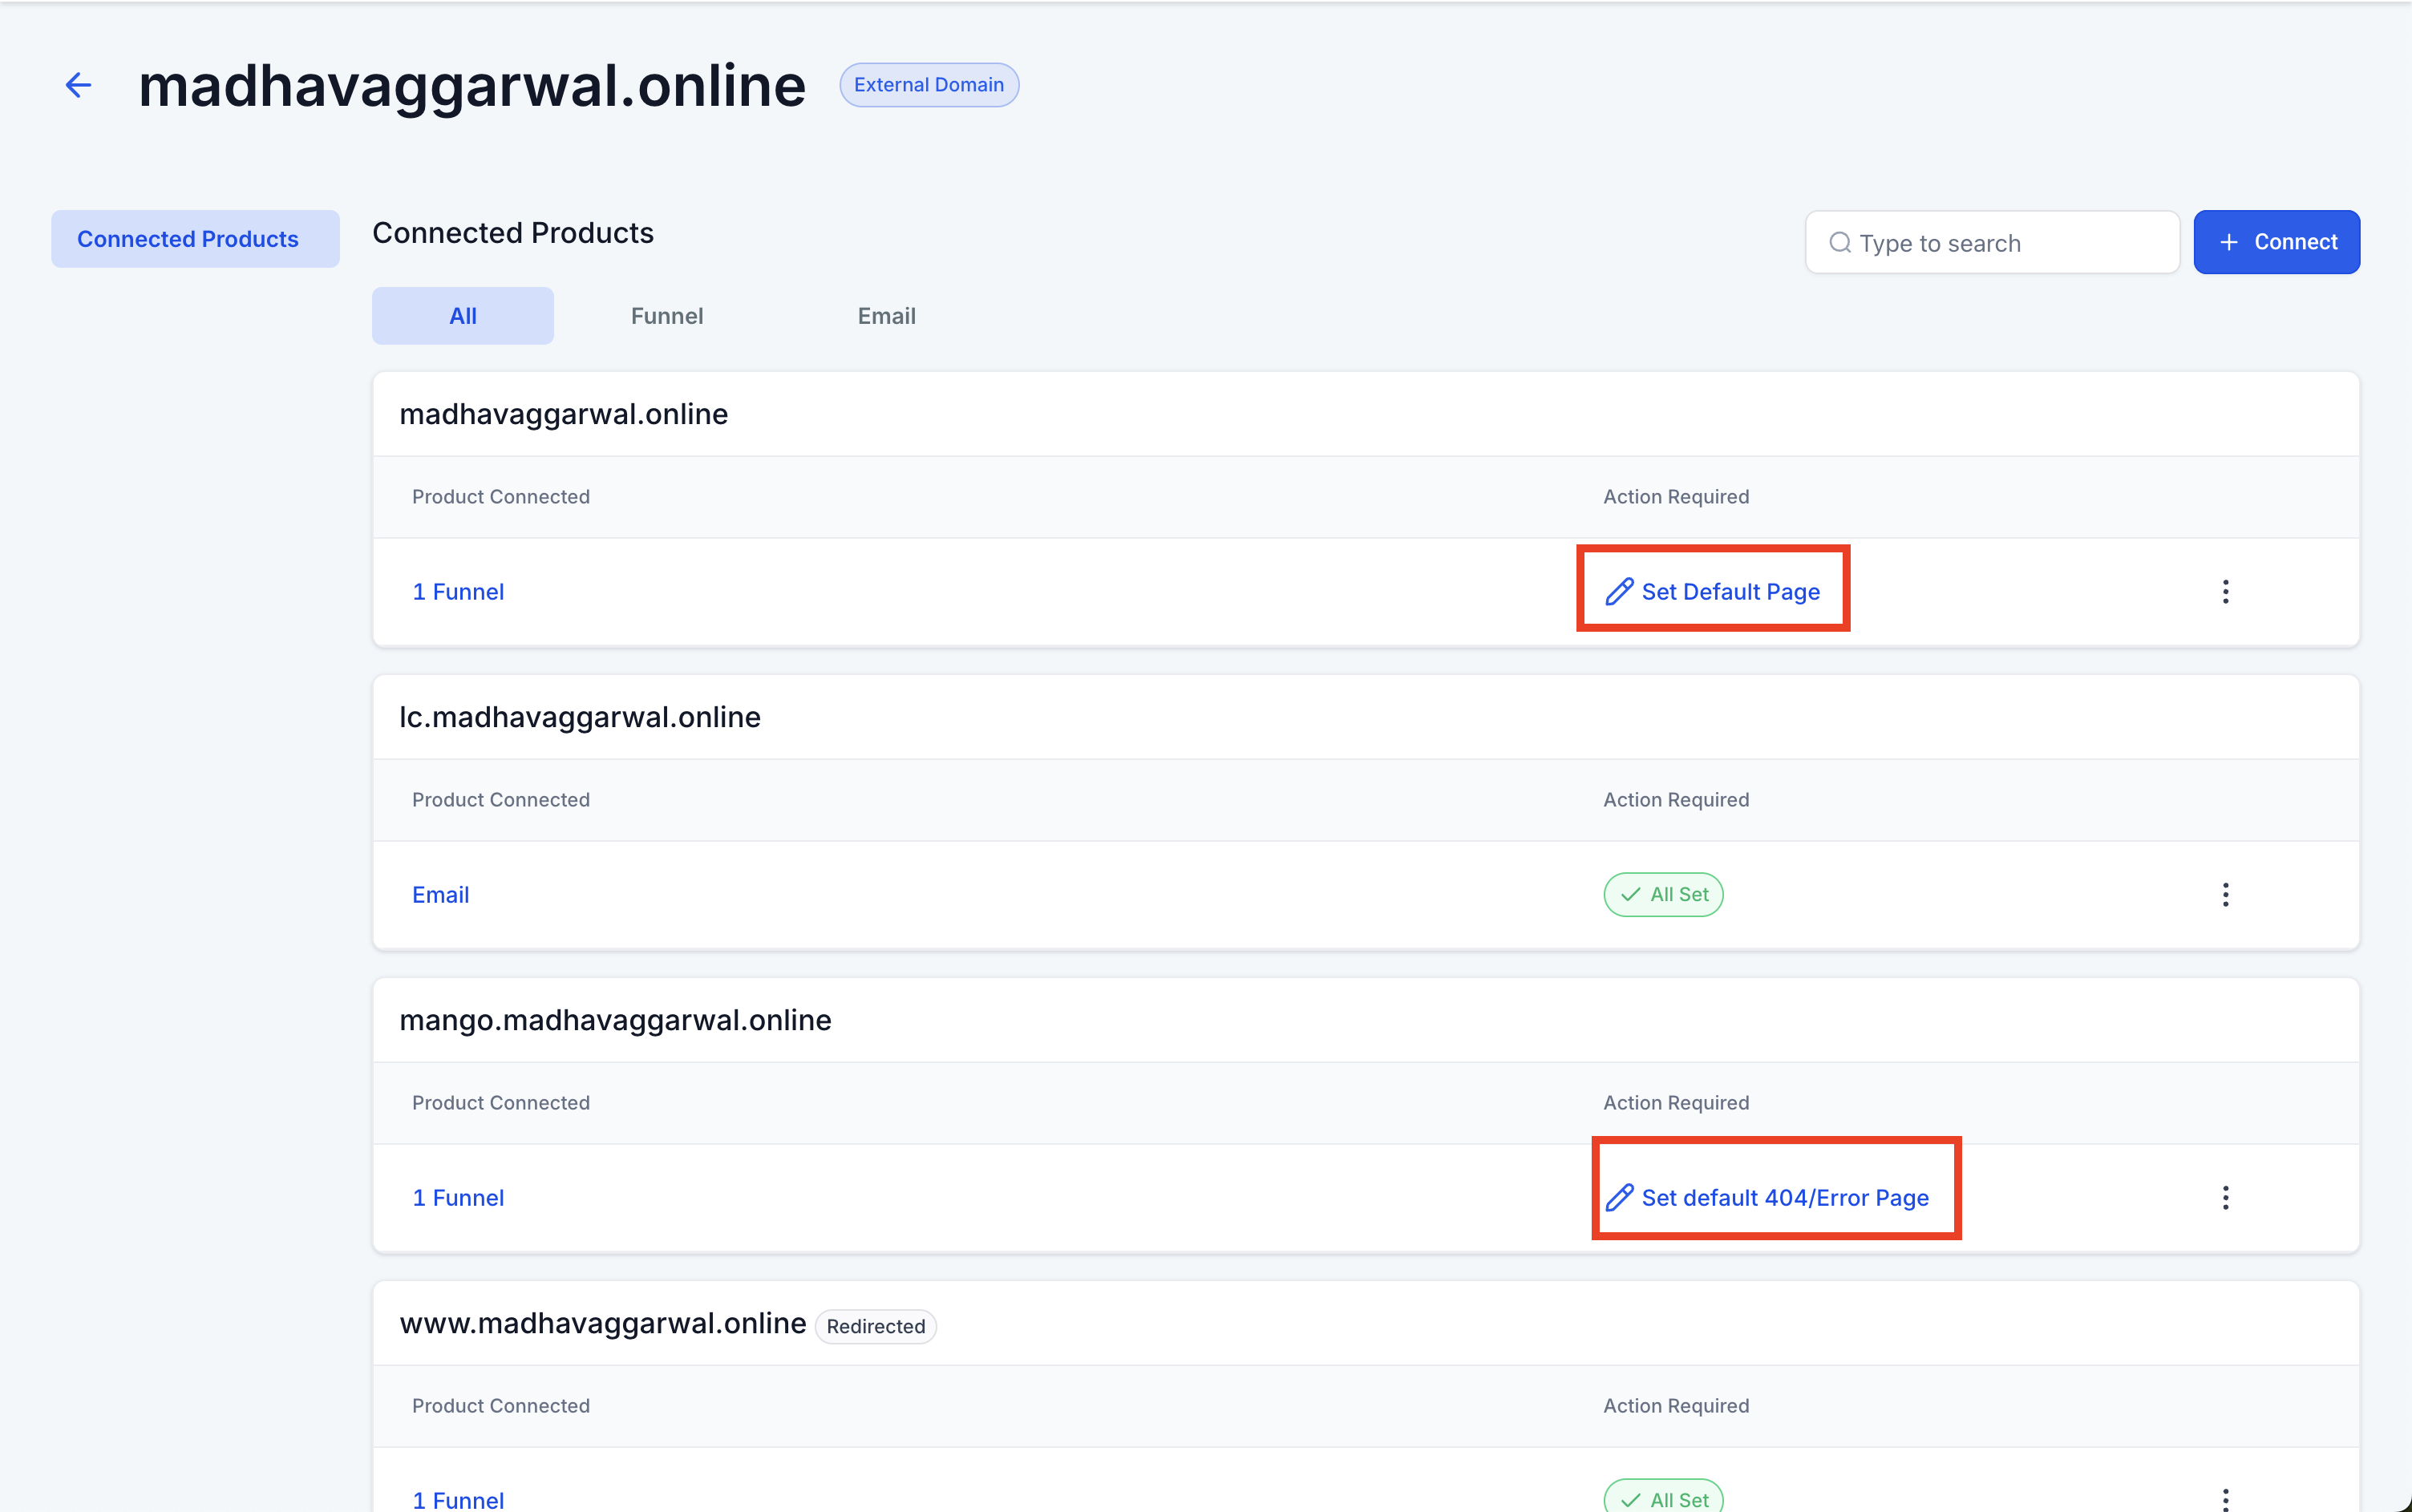
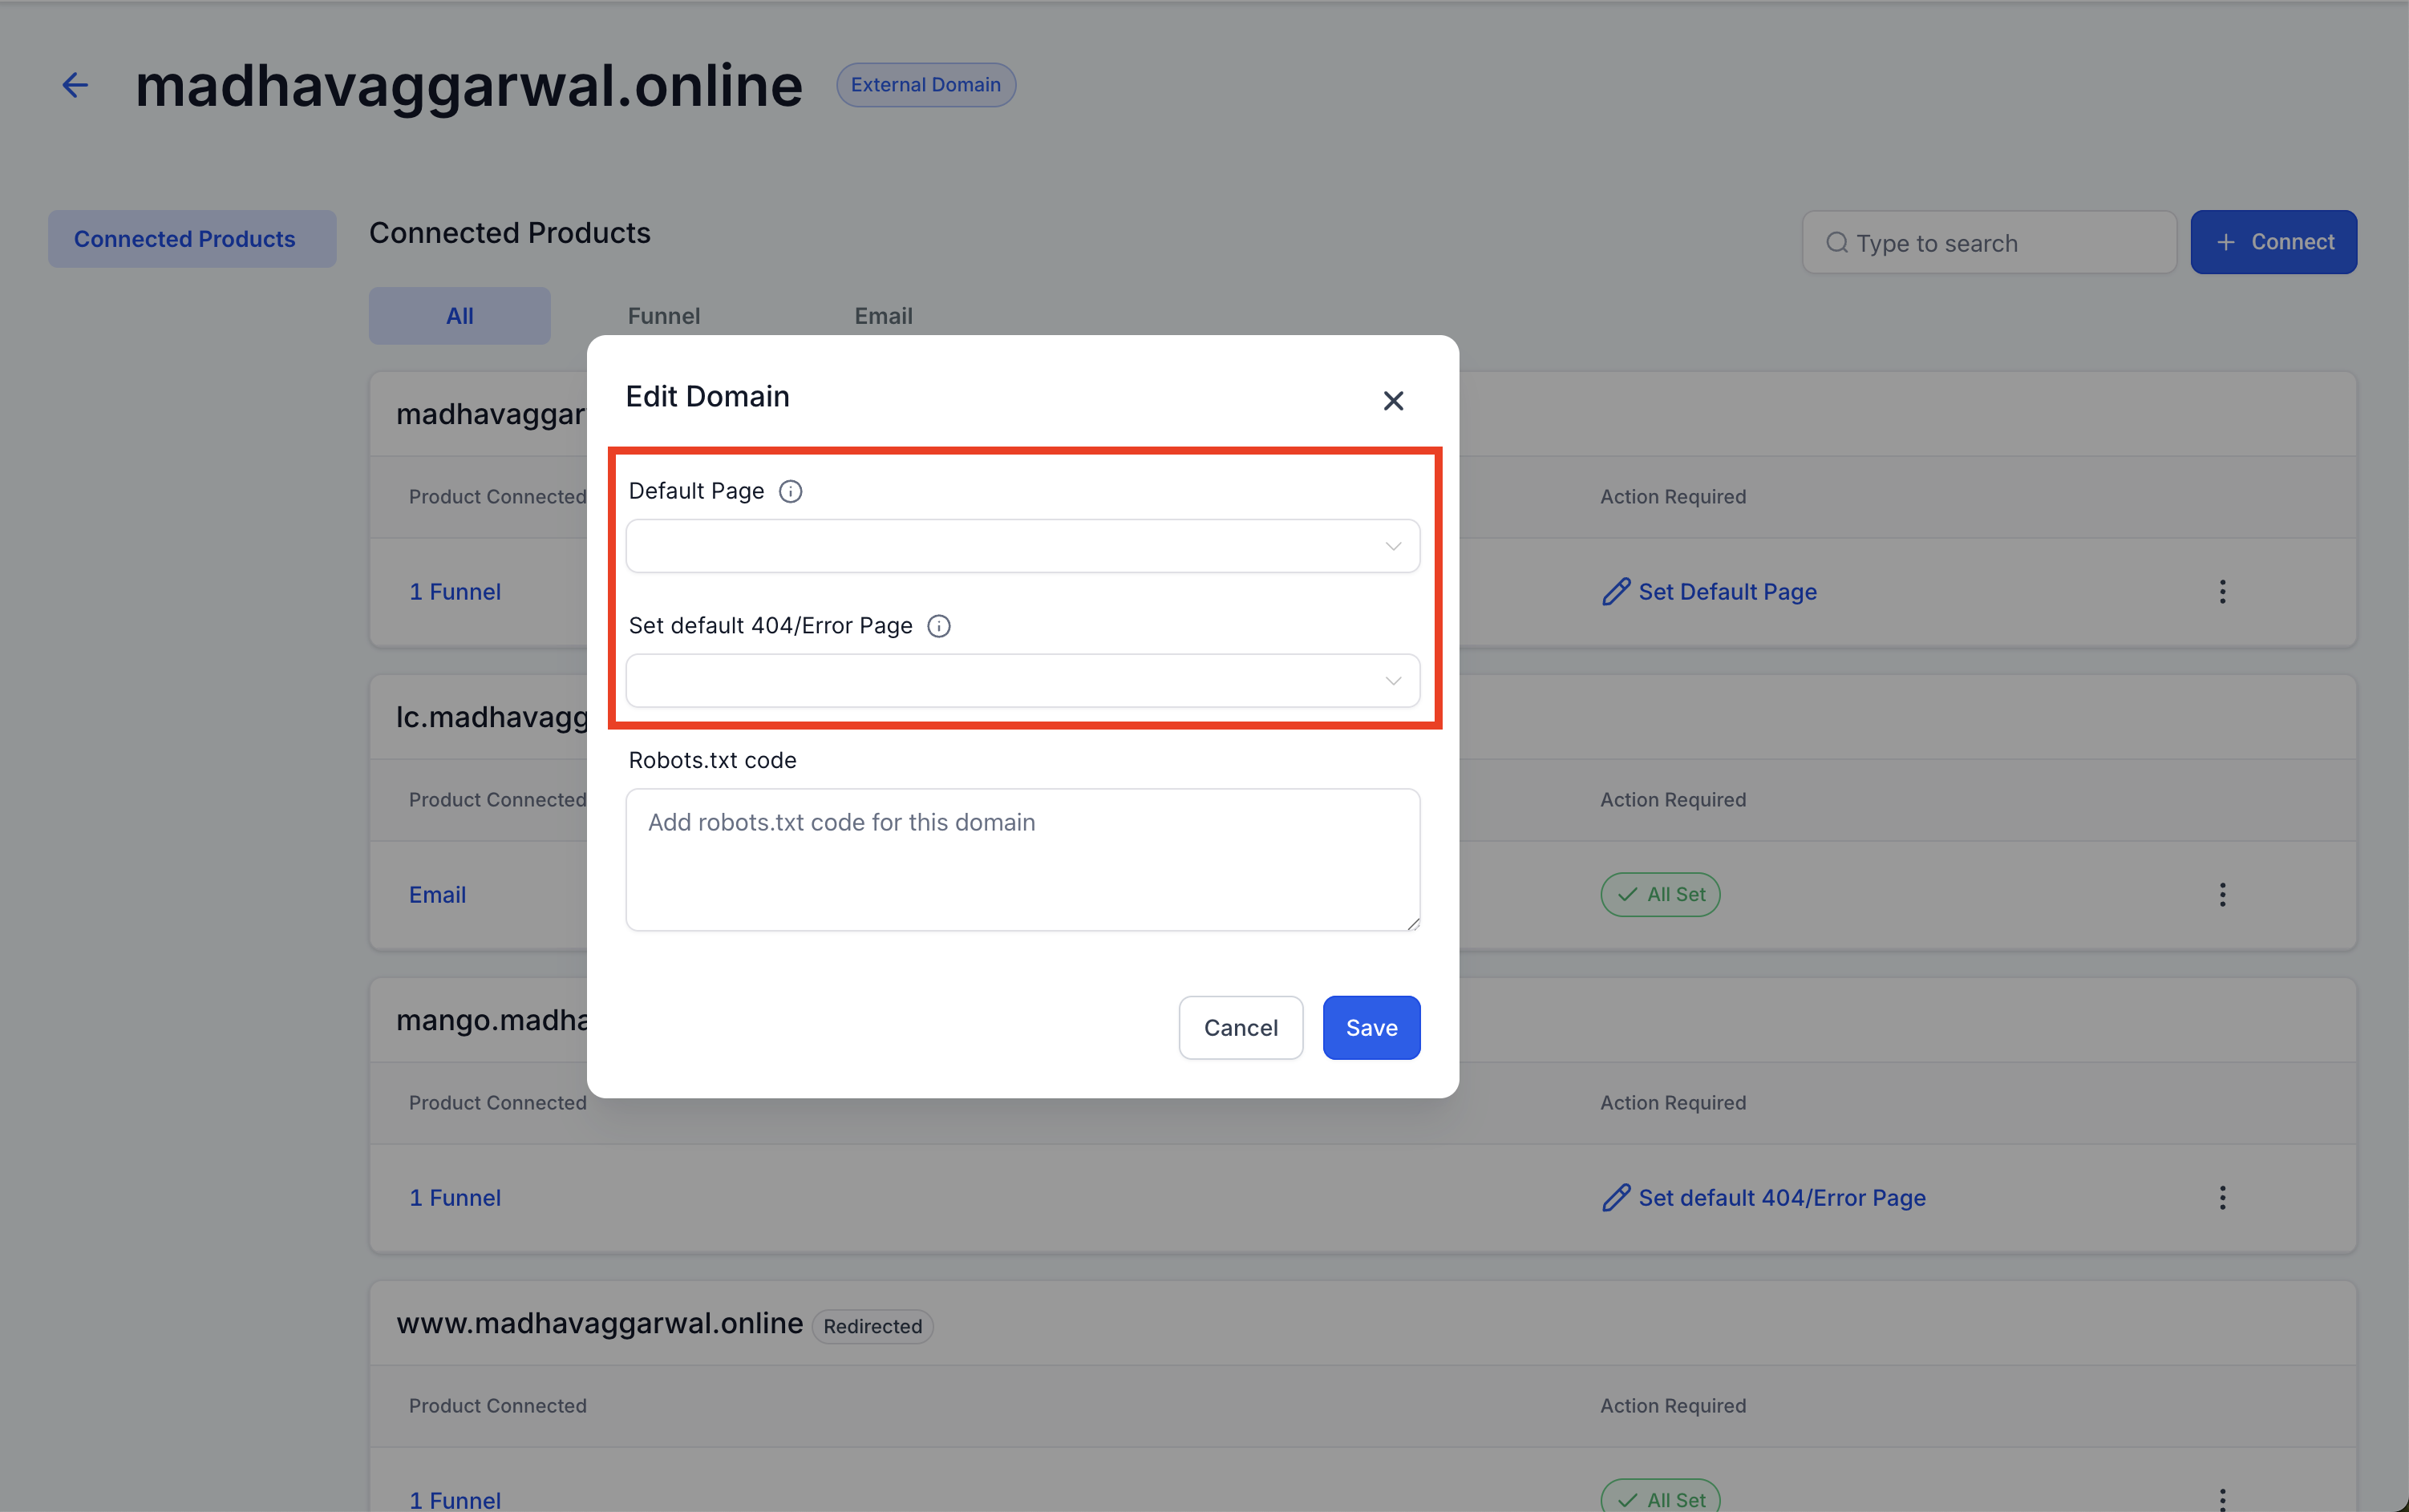
Note: The Action Required reminder appears only in the sub-account where the domain was originally connected.
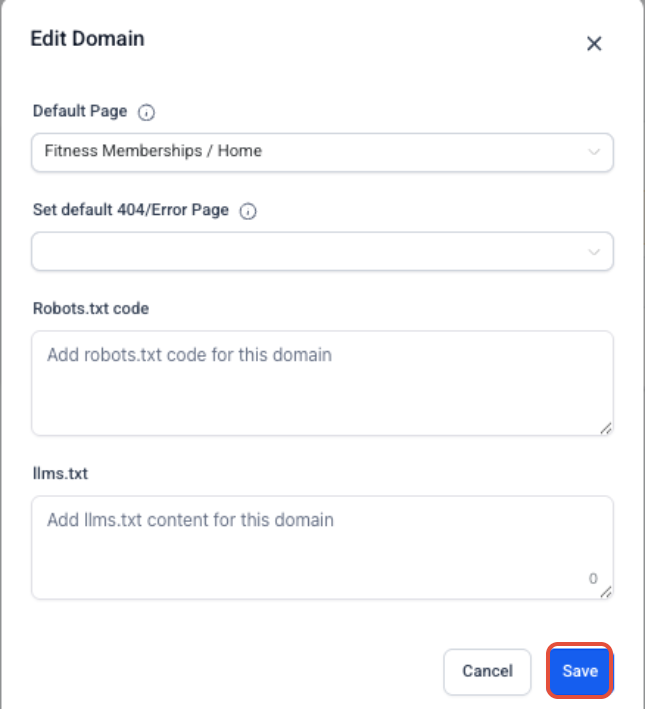
You can also manage the default and 404/error page settings through the existing Edit Domain flow:
- Go to Settings → Domains & URL Redirects.
- Click Manage for the domain.
- Open the three-dot menu for the applicable domain or connected product.
- Select Edit.
- Update the default page or Set default 404/Error Page setting.
- Click Save.
How To Check Your DNS Records
A public DNS lookup can help confirm whether the expected A or CNAME record has propagated before you continue troubleshooting the connection in Chat To Clients CRM.
- Open a public DNS lookup tool such as MXToolbox.
- Select the applicable lookup type, such as a DNS or CNAME lookup.
- Enter the root domain or subdomain you connected.
- Run the lookup.
- Confirm that the expected Chat To Clients CRM record is publicly visible.
sites.ludicrous.cloud162.159.140.166DNS propagation: Recently changed DNS records may not appear immediately. Allow up to 24 hours before assuming the configuration has failed.
How To Remove a Domain
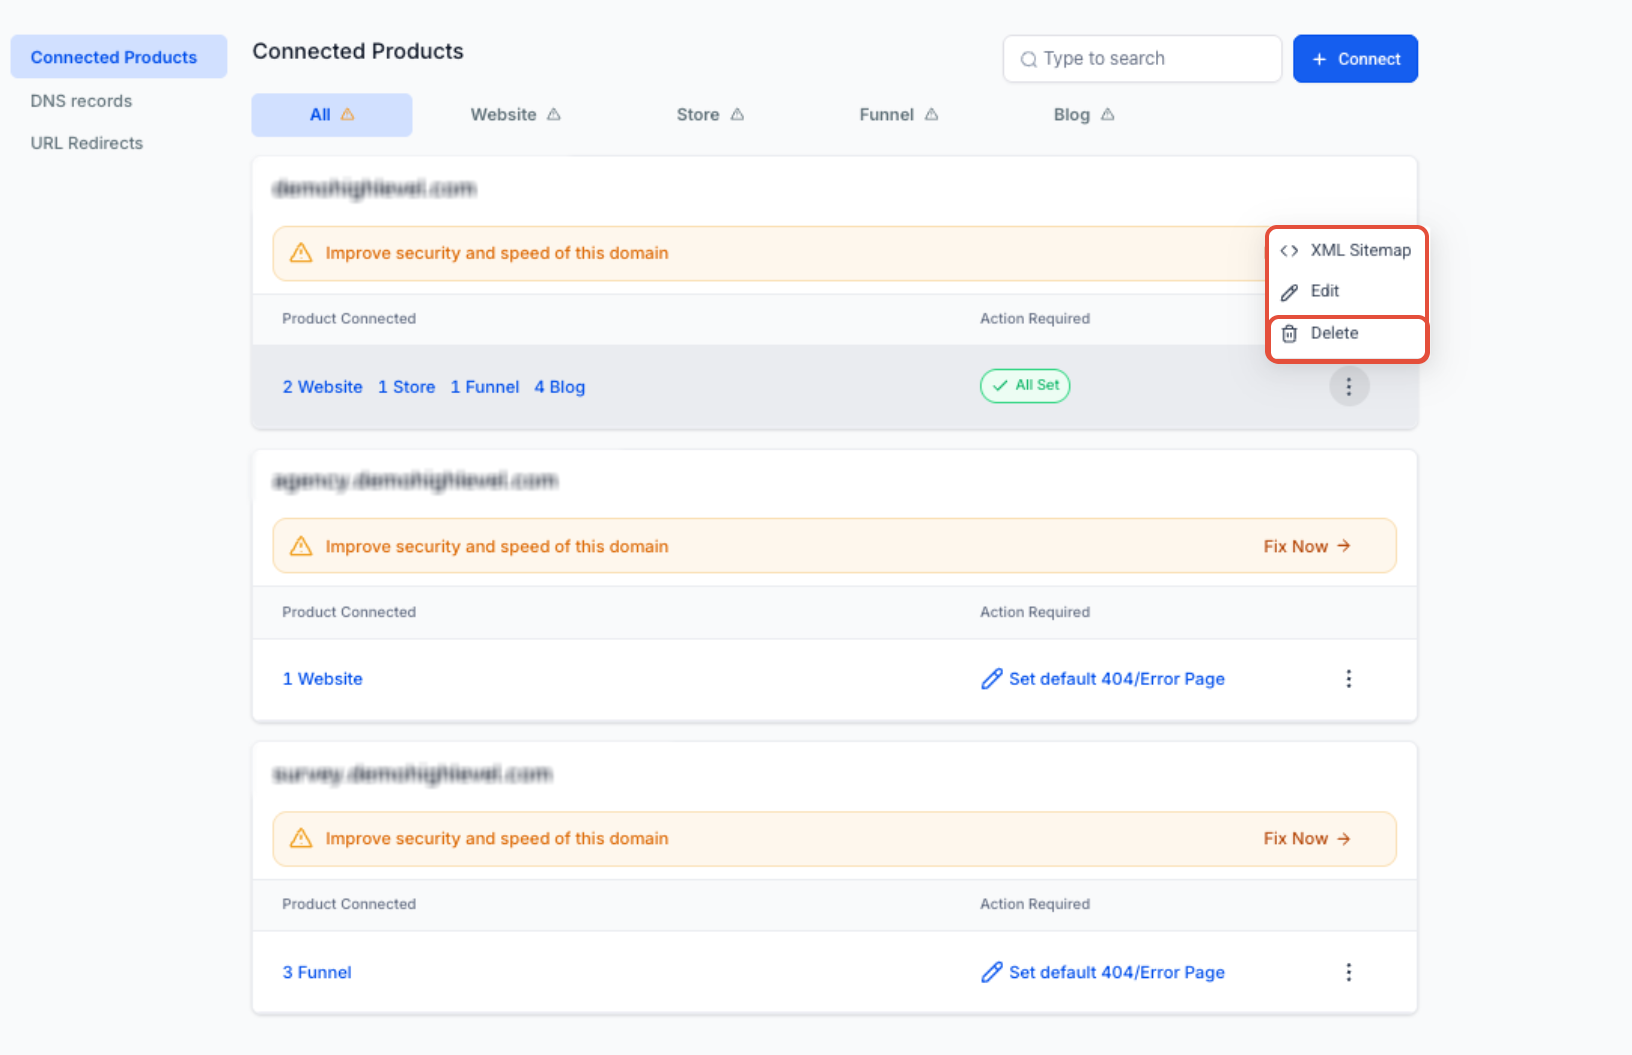
Removing a domain disconnects it from the sub-account, so confirm that the address is no longer required for active site content before deleting the connection.
- Go to Settings → Domains & URL Redirects.
- Locate the domain and click Manage.
- Open the three-dot menu.
- Select Delete.
- Confirm the deletion in the confirmation dialog.
Troubleshooting Domain Connection Issues
Most connection problems come from records being added at the wrong DNS provider, conflicting records, propagation delays, or Cloudflare proxy settings.
Chat To Clients CRM Cannot Find the CNAME or A Record
This error means Chat To Clients CRM cannot detect the expected DNS record for the hostname being connected.
- Confirm which provider hosts the domain's active DNS by checking the nameservers.
- Make sure the DNS record was added at that provider.
- Check whether the hostname already has an A or CNAME record pointing elsewhere.
- Use only one supported record for the hostname:
- CNAME →
sites.ludicrous.cloud - A record →
162.159.140.166
- CNAME →
- Enter only the hostname portion, such as
wwworoffers, in the Host/Name field when required by the provider. - Save the DNS changes and allow time for propagation.
- Return to Chat To Clients CRM and retry verification.
The Domain Shows an SSL or Privacy Error
SSL cannot complete reliably when Chat To Clients CRM cannot verify the hostname or when conflicting DNS records send traffic to different destinations.
- Remove conflicting A or CNAME records for the hostname.
- Confirm the required Chat To Clients CRM A or CNAME record exists.
- Review unexpected records that point the hostname to another platform.
- If you use Cloudflare, make sure the Chat To Clients CRM record is set to DNS only.
- After correcting DNS, allow time for propagation and SSL provisioning.
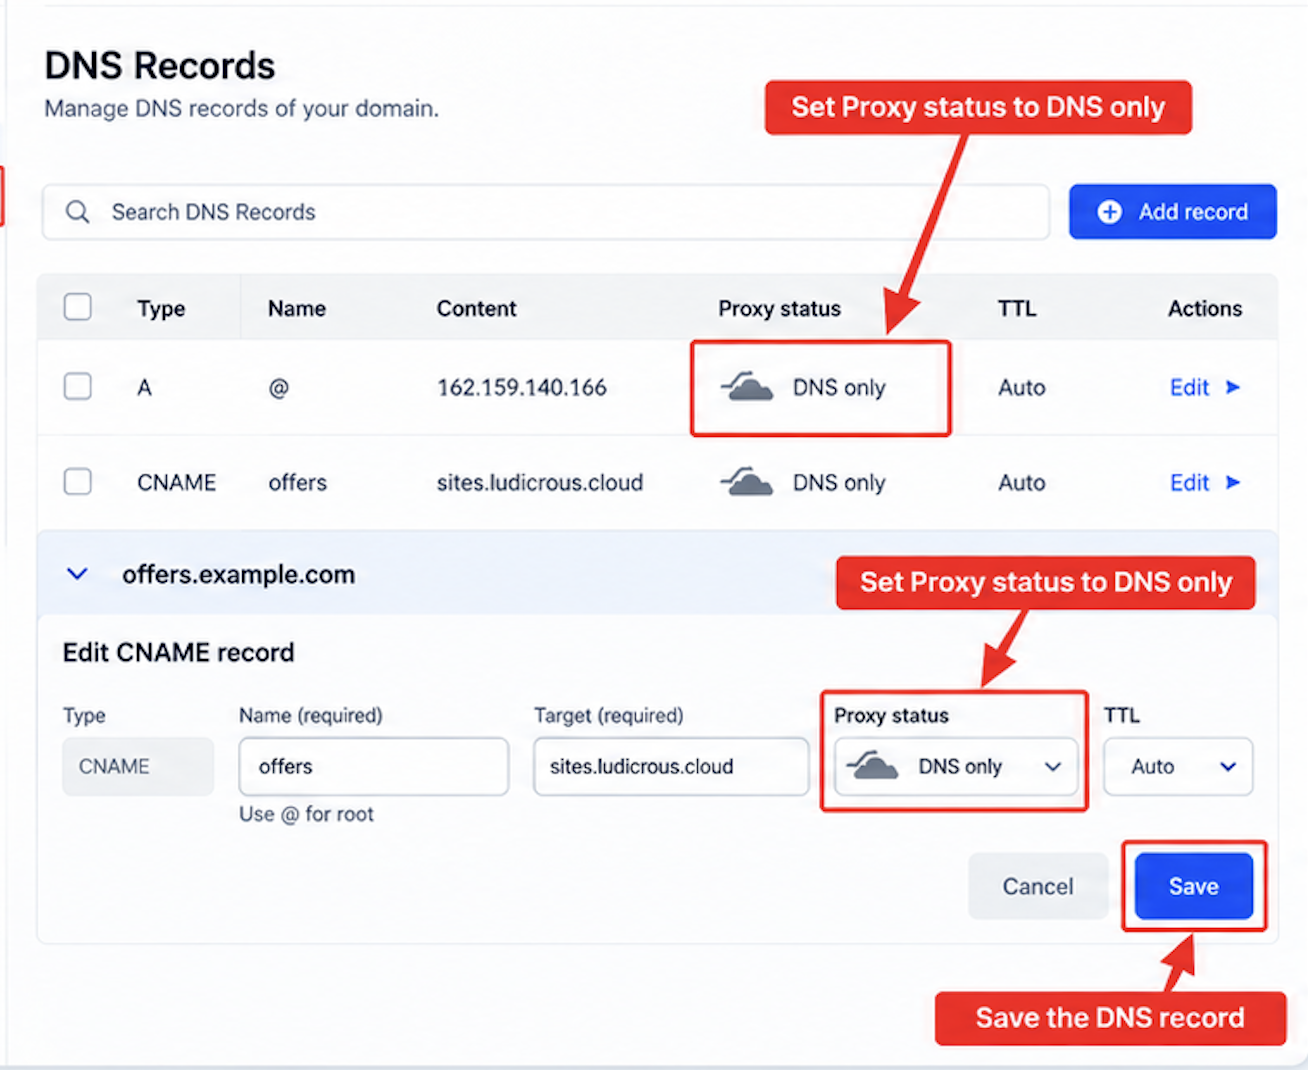
A Cloudflare Domain Does Not Connect Correctly
Cloudflare proxying can prevent Chat To Clients CRM from validating the A or CNAME record used for Funnels and Websites.
- Sign in to Cloudflare.
- Open the affected domain and go to DNS.
- Locate the A or CNAME record used for Chat To Clients CRM.
- Change Proxy status to DNS only.
- Save the change.
- Return to Chat To Clients CRM and retry the connection after DNS updates.
The Domain Sometimes Shows a 404 Page
Intermittent 404 behavior can occur when different domain versions route inconsistently or when the domain does not have the intended default-page configuration.
- Check whether visitors are using both the root and
wwwversions of the domain. - Configure the appropriate 301 redirect when one version should always send visitors to the other.
- Confirm that the intended Funnel step or Website page is configured as the default page.
- Configure a Default 404/Error Page so invalid paths lead to the intended branded error page.