
How to Create and Manage a Loyalty & Referral Program
TABLE OF CONTENTS
- What is Loyalty & Referral?
- Before You Start
- How to Create a Program
- Managing Your Program
- Frequently Asked Questions
- Related Articles
Loyalty & Referral lets you build a points-based rewards program directly inside your sub-account — no third-party app needed. You can set how customers earn points, what they can redeem points for, customize a branded signup page, issue an Apple/Google Wallet pass, and track customer activity from one dashboard. This article walks you through creating a program from scratch (or from a template), publishing it, and managing it after launch.
What is Loyalty & Referral?
Loyalty & Referral gives businesses a native way to reward repeat customers and turn them into referral sources — without leaving Chat To Clients CRM. Instead of using a separate tool like Smile.io or Yotpo, you can create a program, configure how customers earn and redeem points, customize a public signup page, issue a wallet pass, and track everything from the same sub-account where your contacts and payments already live.
Programs work for both online businesses (customers earn/redeem at checkout on your funnel or website) and physical, in-store businesses (customers earn/redeem via staff scanning a QR code) — or both at once.
Before You Start
Choosing your program type up front determines which product source (online catalog vs. in-store products) is available throughout setup, so pick the option that matches how your business sells before you start adding earning rules.
Option | Description | Best Used For |
Online | Customers earn and redeem points at checkout on your funnel or website. Product rules pull from your existing product catalog. | E-commerce stores, online-only businesses |
Physical (In-store) | Customers earn and redeem points via a staff member scanning their QR code at checkout. Products are added by free-text name since there's no online catalog. | Retail stores, restaurants, service businesses with a physical location |
Both | Combines both — the online catalog picker and free-text offline product entry are both available everywhere a product rule is configured. | Businesses that sell both online and in-store |
Important: Program type cannot be changed after a program is created. If you select the wrong option, you'll need to create a new program.
How to Create a Program
Step 1: Start a new program
From Marketing → Loyalty, click Get started (or + Create new program if you already have one). In the New loyalty program modal, enter a Program name, choose a Program type (Online, Physical (In-store), or both), and select where customers should be able to earn points (a funnel or website). Click Save & continue.
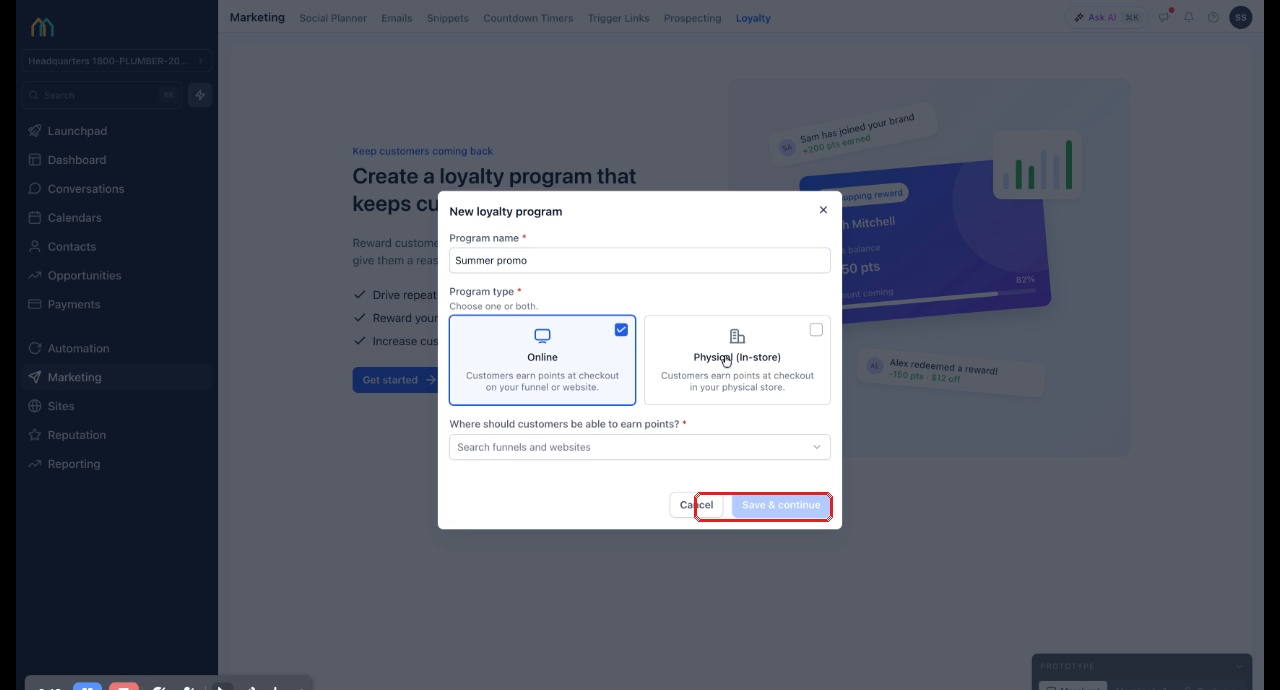
The New loyalty program modal — program name, program type, and earn-points location.
Step 2: Start from a template or build from scratch
Next, choose a starting point. Three ready-made templates are pre-filled with common earning and redemption rules you can still edit afterward, or you can build a program manually.
Grow my customer list — 100 pts for creating an account, 100 pts for referring a friend → $1 off per 100 pts
Bring customers back — 200 pts on purchasing a product, 100 pts for referring a friend → $1 off per 100 pts
Delight my regulars — 100 pts on their birthday → free products (you choose the products)
Build it from scratch — configure every rule manually
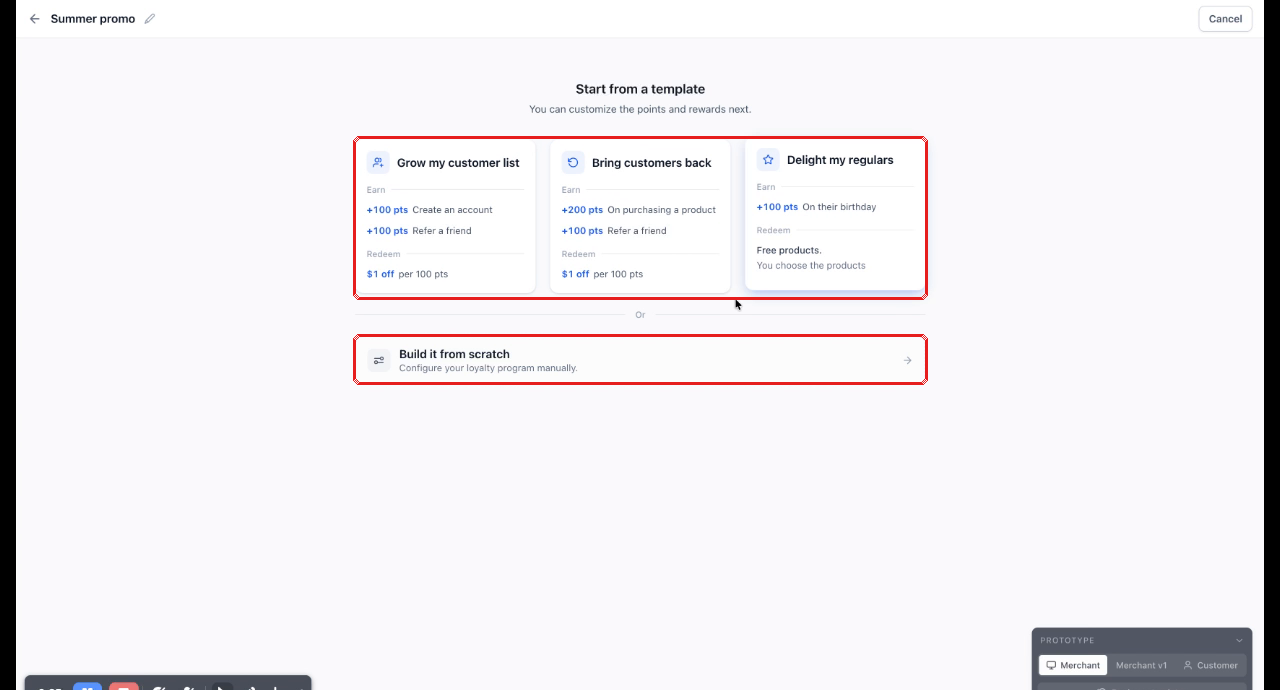
Template picker — pick a starting point or build the program manually.
Note: Selecting a template pre-fills the next step; you can still edit every rule afterward.
Step 3: Set up earning rules
Under Customers earn points for, toggle on the ways customers can earn points: Creating an account, Referring a friend, Purchasing a product, and Celebrating a birthday. For Purchasing a product, click Add product(s) to select which products earn points.
Online programs: pick from your existing product catalog.
Physical/in-store programs: click + Add an offline product and type the product name.
Select multiple products at once and use "Set points for N selected" to bulk-assign the same point value, or the "1 point per $1" quick-set.
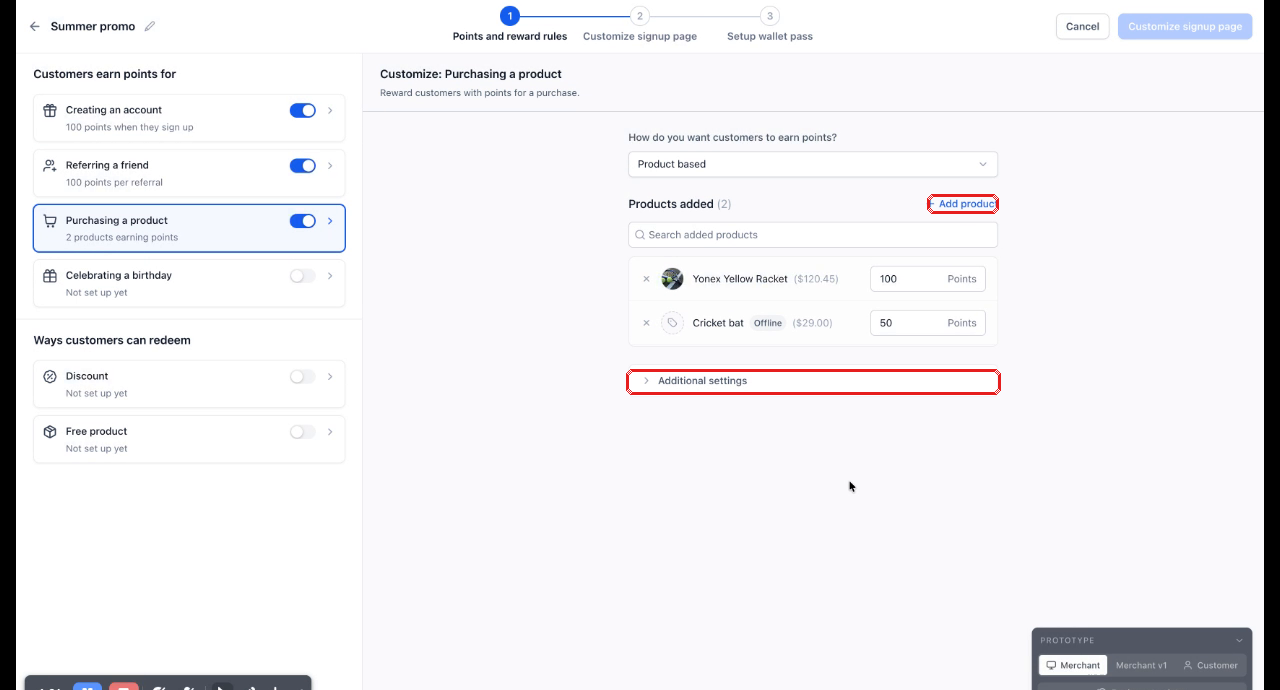
Products added to the "Purchasing a product" rule, each with its own points value. Offline products are marked with an Offline tag.
Click Additional settings on any rule to configure extras like subscription purchase handling, points expiry, whether points are calculated before or after tax, and daily order/point caps.
Step 4: Set up redemption rewards
Under Ways customers can redeem, toggle on Discount and/or Free product.
Discount: set how many points equal $1 in rewards (e.g. 100 points = $1 off). You can also cap the maximum discount allowed per order and generate one-time discount codes.
Free product: click Add free product, type a product name (search your catalog or enter free text for an in-store item), and set the points required to redeem it.
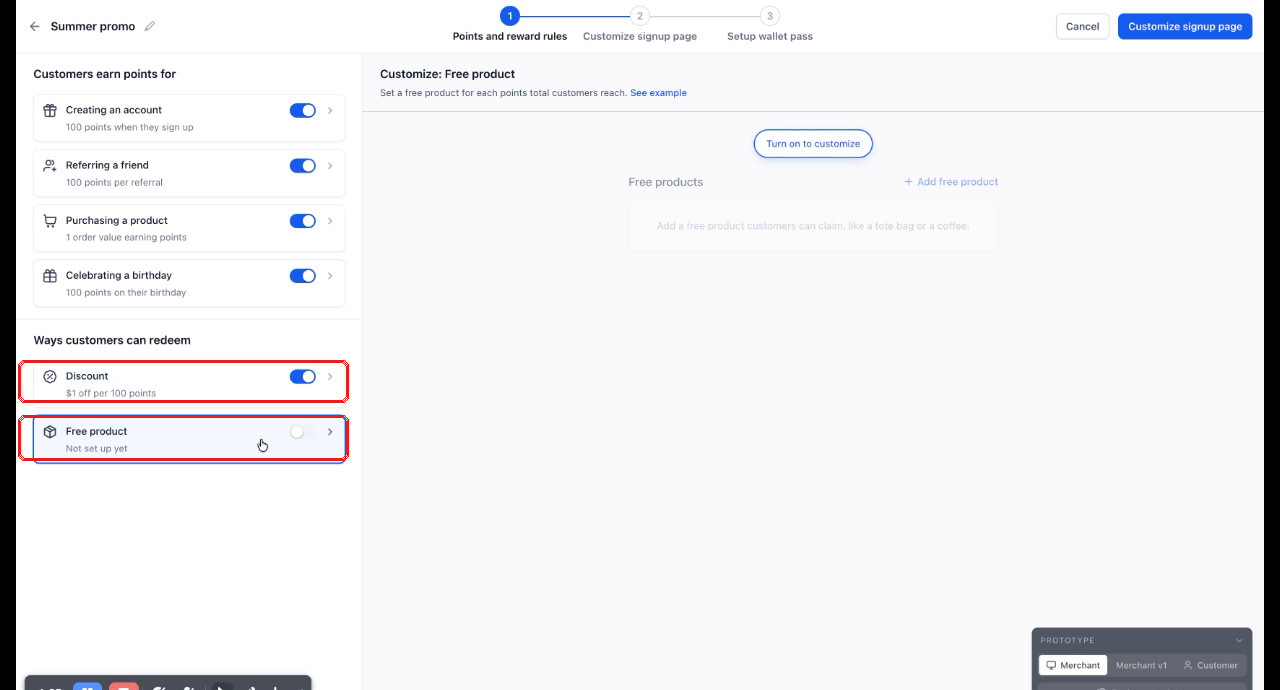
Redemption rules — Discount configured at $1 off per 100 points; Free product ready to configure.
Step 5: Customize your signup page
Click Customize signup page to move to step 2 of the wizard. Under the Content tab, edit the Heading, Body text, the three content cards, which Loyalty form fields (Name, Email, Phone number, Birthday) are shown and required, and the button text. Switch to the Design tab to choose a Brand kit, brand color, background, logo, typeface, and corner radius. A live preview updates as you edit.
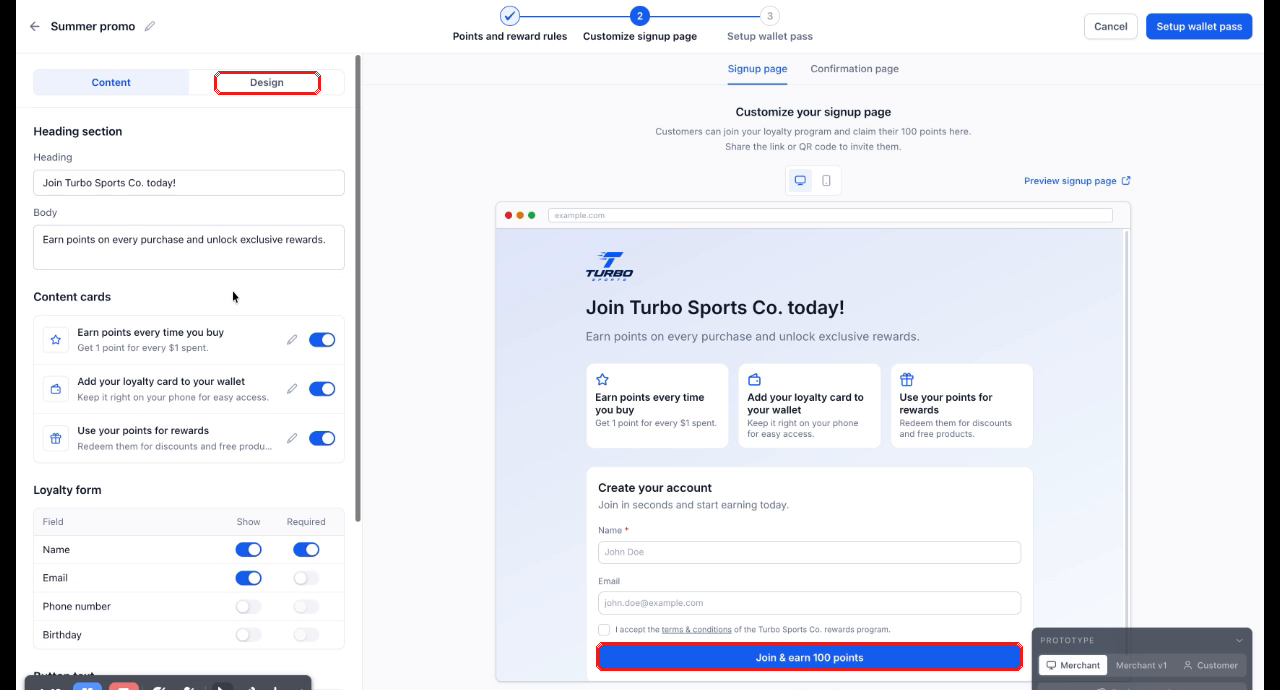
Signup page editor — Content tab shown, with a live preview on the right.
Step 6: Set up your wallet pass
Click Setup wallet pass to move to step 3. Enter a Wallet display name, choose whether to enable Apple Wallet and/or Google Wallet (both on by default), upload a logo, and optionally add a custom banner image. A live preview shows both wallet passes side by side.
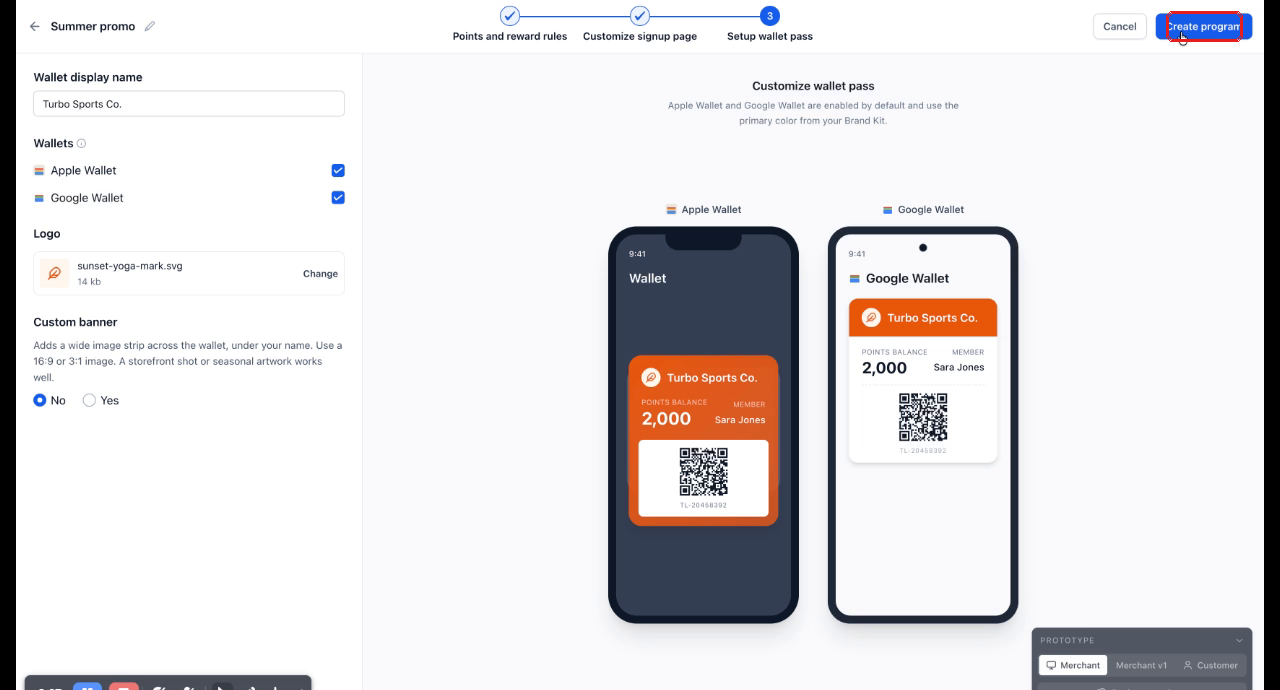
Wallet pass setup with live Apple Wallet / Google Wallet previews.
Click Create program to finish.
Step 7: Share your program
Once created, your program goes live and you'll see a confirmation screen with your Program QR code. From here you can Copy program URL, Download the QR code, or click Share with customers to send it out. Click Go to all programs to return to your program list, or Preview signup page to see it as a customer would.
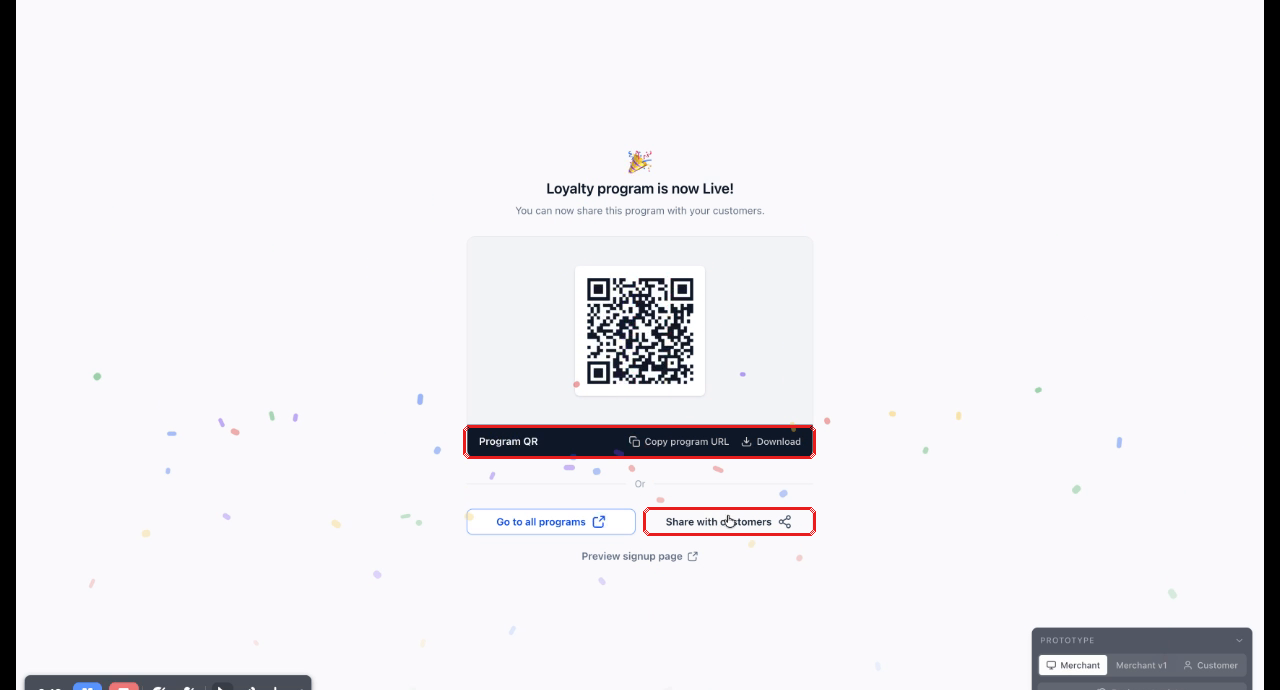
Confirmation screen after publishing, with the Program QR code and sharing options.
Managing Your Program
Once a program is live, click into it from your Loyalty programs list to manage it. Each program has the following tabs:
Tab | What it's for |
Statistics | Enrolled customers, points awarded/redeemed, amount redeemed, engagement by channel, and top-performing earning rules. |
Customer | Search and manage every enrolled customer, view/adjust their point balance, and see individual activity. |
Points | Edit earning rules (same as Step 3 above). |
Rewards | Edit redemption rules (same as Step 4 above). |
Signup page | Edit the signup page and confirmation page. |
Wallet | Edit wallet pass settings. |
Activity log | Full ledger of every point-earning and redemption event across all customers. |
Share | Share links and QR codes for the program. |
Notification | Configure email notifications (points earned, expiry warnings, reward redeemed, birthday reward, referral invite). |
Push notification | Send manual or scheduled push notifications to enrolled customers. |
Use the Scan customer QR button (top right of the program header) to record an in-store visit — add points, redeem points or a free product, and leave a remark, all from one modal.
Frequently Asked Questions
Q: Can I change a program's type (Online / Physical / Both) after creating it?
No. Program type cannot be changed after creation. Create a new program if you need a different type.
Q: Can customers redeem a percentage discount instead of a fixed dollar amount?
Not currently. Discount redemption is dollar/fixed-amount only in this version.
Q: Do point-expiry changes affect points a customer has already earned?
No. Changing a rule's expiry setting (e.g. switching to "Don't expire") only applies to new points earned going forward — it never retroactively changes the expiry of points already issued.
Q: Can I bulk-assign points to multiple products at once?
Yes. In the product picker, select multiple products and use "Set points for N selected" with the "Same for all" or "1 point per $1" quick-set option.