
Workflow Action – AI Analyze Image
This article explains how to use the AI Analyze Image action in workflows to analyze images with AI vision. You’ll find step-by-step configuration instructions, image URL requirements, how to use the output, practical use cases, and answers to common questions.
Note: This is a premium action. Using this action will incur additional charges per execution.TABLE OF CONTENTS
- What is AI Analyze Image Action in Workflows?
- Key Benefits of AI Analyze Image Action
- Action Details
- How to Use the AI Analyze Image Action
- Image URL Requirements
- Using the Output in Downstream Actions
- Use Cases
- Tips for Better Results
- Pricing
- Frequently Asked Questions
- Related Articles
What is AI Analyze Image Action in Workflows?
The AI Analyze Image action, available under AI Actions in Workflows, uses AI vision models to analyze an image and return a text response. You provide the image URL and a prompt describing what you want the AI to look for, and the action returns its analysis as text you can use in downstream actions.
This is useful for extracting text from images (OCR), generating image descriptions, identifying objects or attributes, and verifying image content – giving your workflows the ability to interpret visual input rather than just pass it along.
Key Benefits of AI Analyze Image Action
- Text Extraction (OCR): Pull text out of screenshots, receipts, documents, and other image-based content so it can be used as workflow data.
- Image Descriptions: Generate detailed descriptions of what an image contains, useful for cataloguing, alt text, or content summaries.
- Flexible Prompting: Ask the AI anything about the image – the prompt controls exactly what it looks for and how it responds.
- Adjustable Detail Level: Choose how thoroughly the image is analyzed, balancing depth against speed.
- Pairs with Image Generation: Combine with the AI Image Generation action to describe or verify an image your workflow just created.
Action Details
| Field | Description |
| Action Name | A custom name for the action, used to identify it on the workflow canvas and in execution logs. |
| Model | The AI vision model used for analysis. Two models are available: GPT-5.6 Luna and GPT-5.6 Tera. |
| Image URL | The URL of the image to analyze. Supply it from a previous step or from a custom value. The URL must be publicly accessible – see Image URL Requirements below. |
| Analysis Prompt | Instructions telling the AI what to look for in the image and how to respond. Supports custom values for dynamic prompts. |
| Detail Level | How thoroughly the image is analyzed. Defaults to Auto; can be set to High or Low. |
How to Use the AI Analyze Image Action
Step 1: Add the Action
- Go to Automation > Workflows.
- Create a new workflow or edit an existing one.
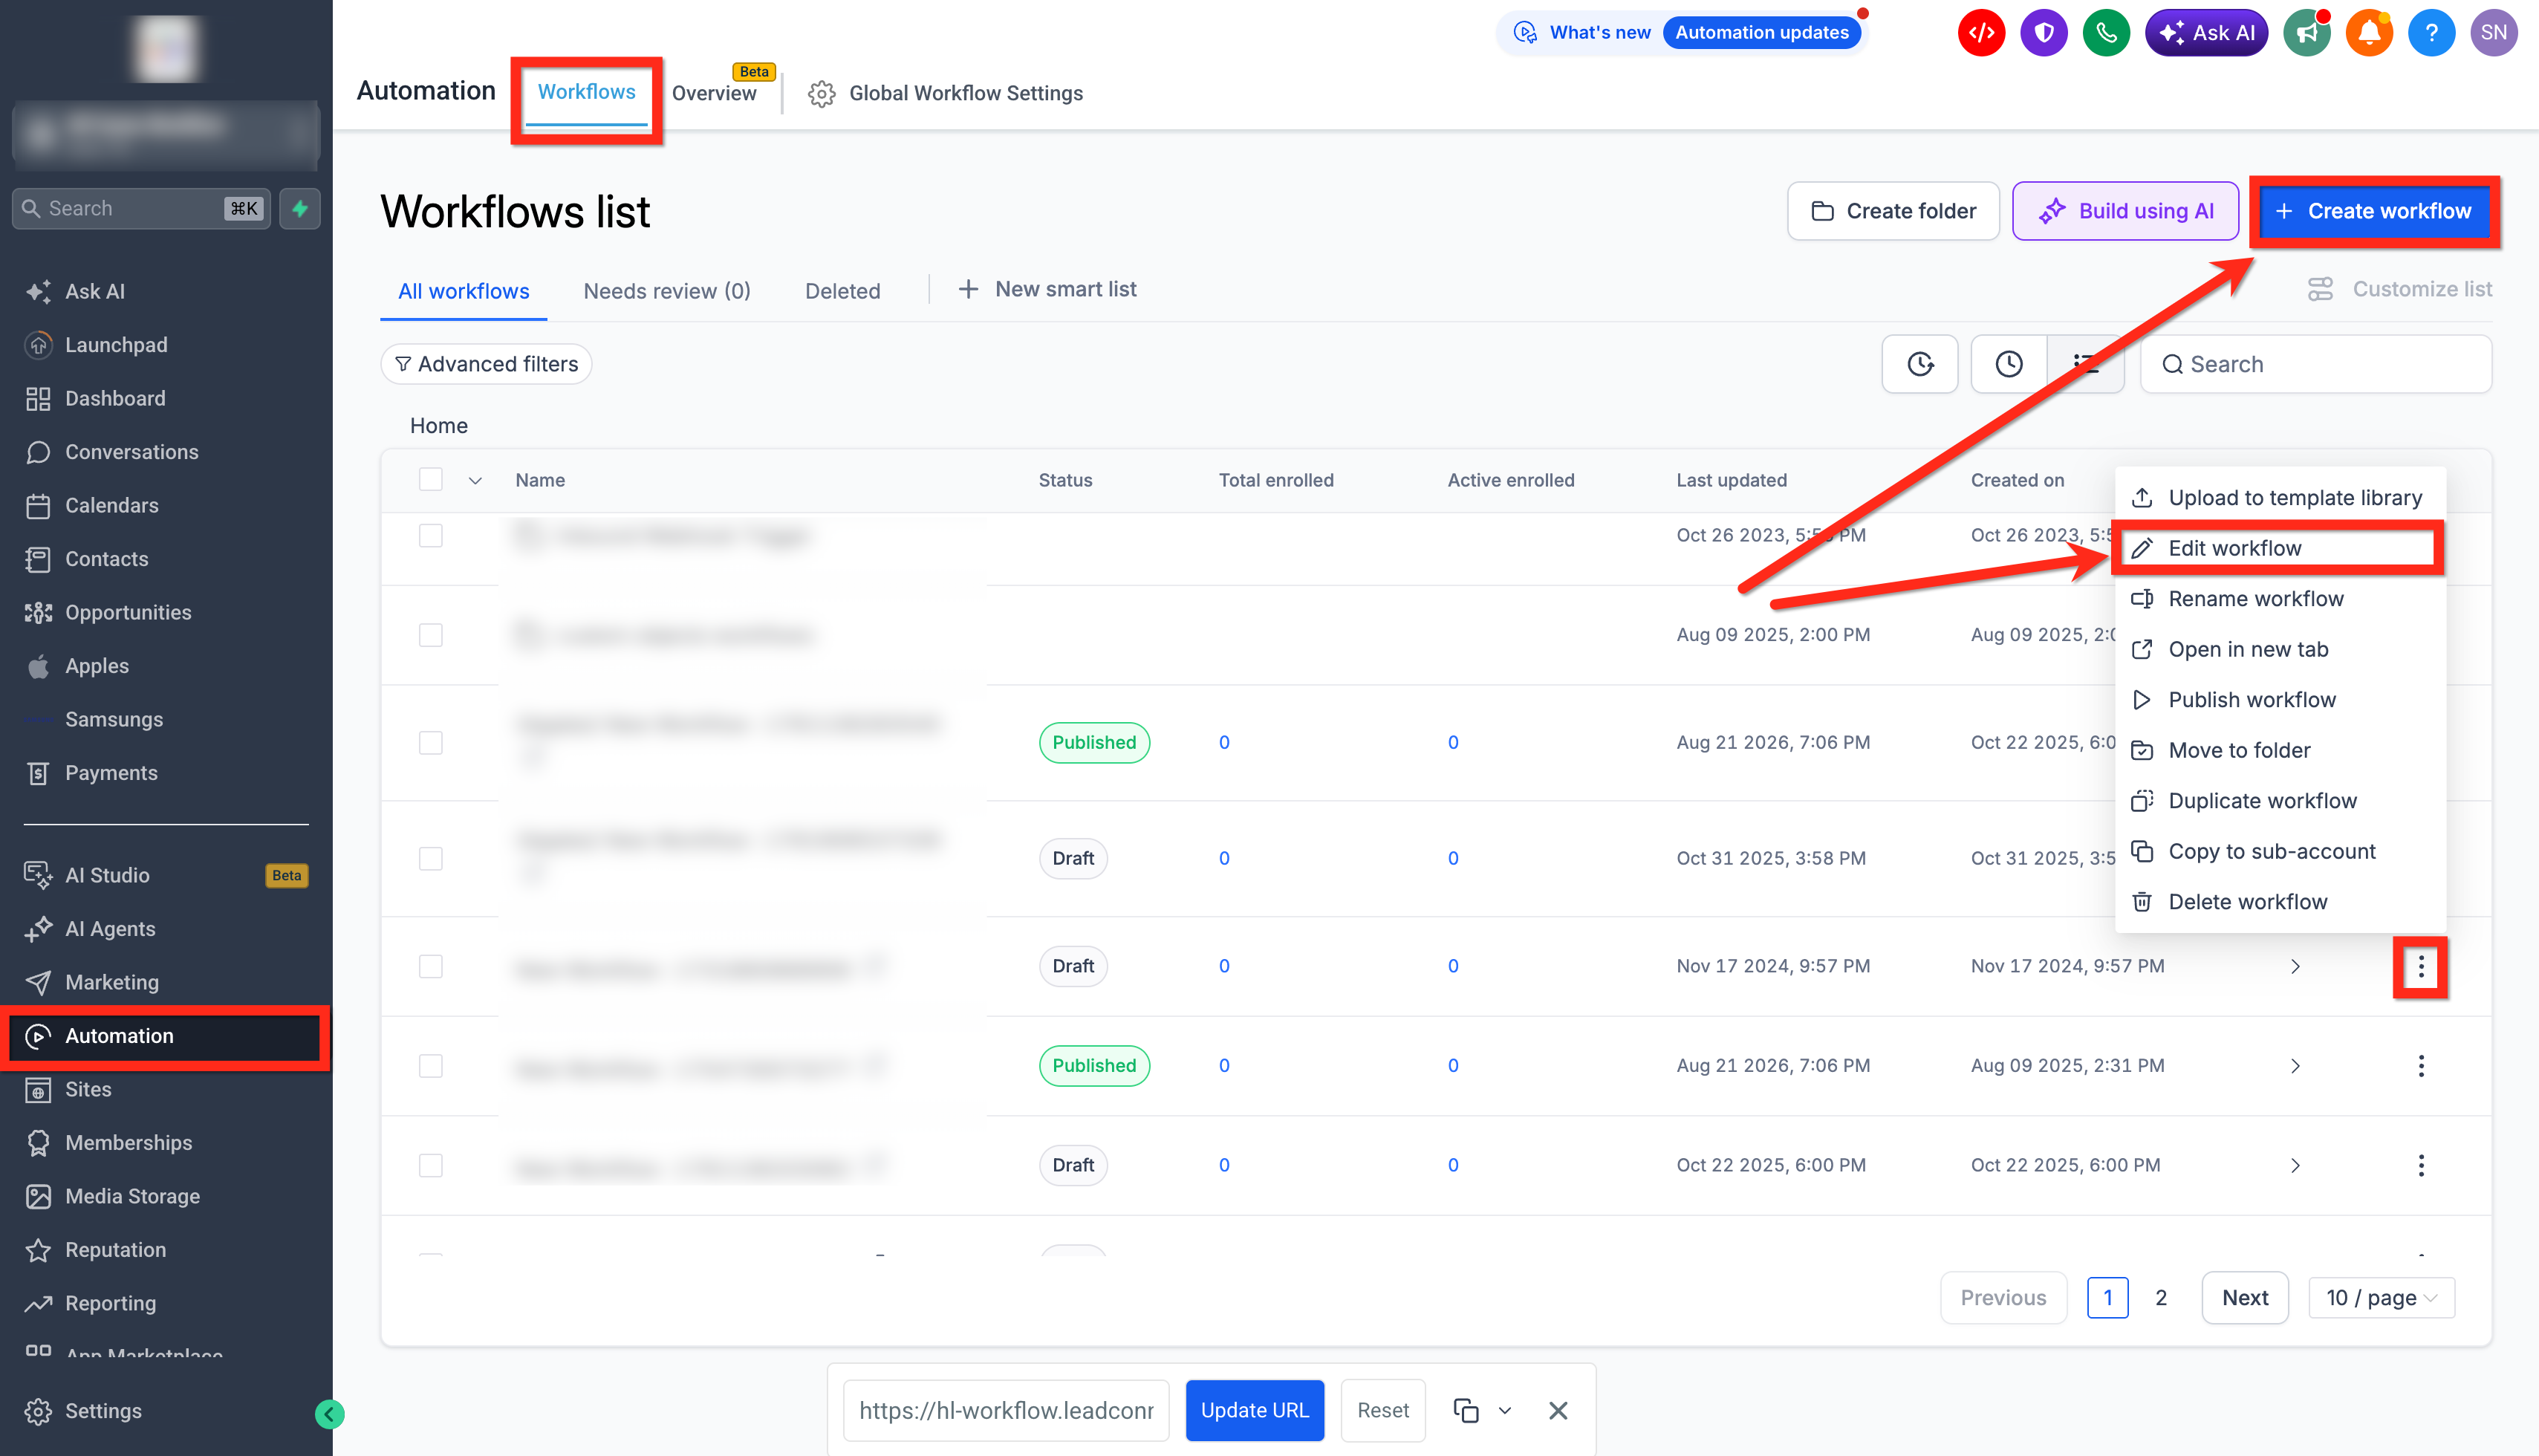
- In your workflow, click the + icon to add a new action, then find AI Analyze Image under AI Actions and select it. Give the action a clear, descriptive name so it’s easy to identify on the canvas.
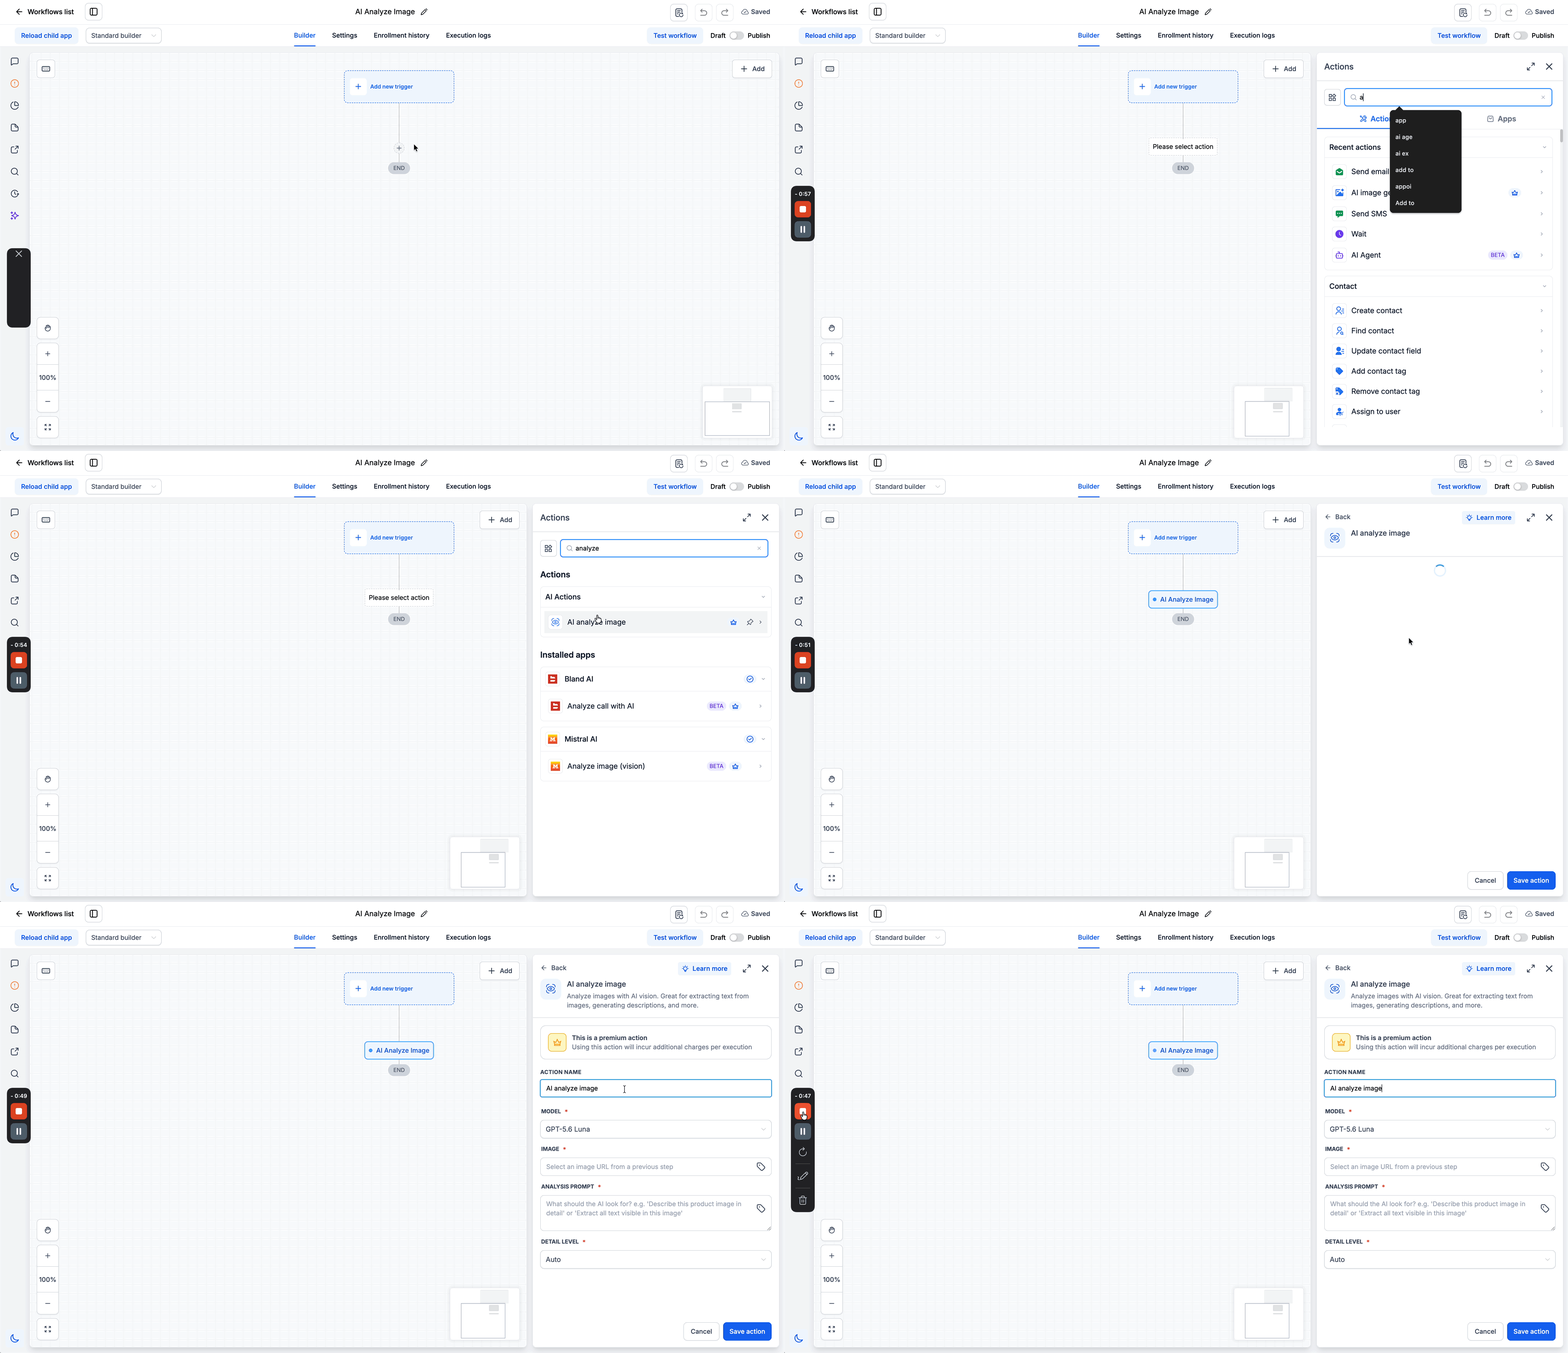
Step 2: Select the Model
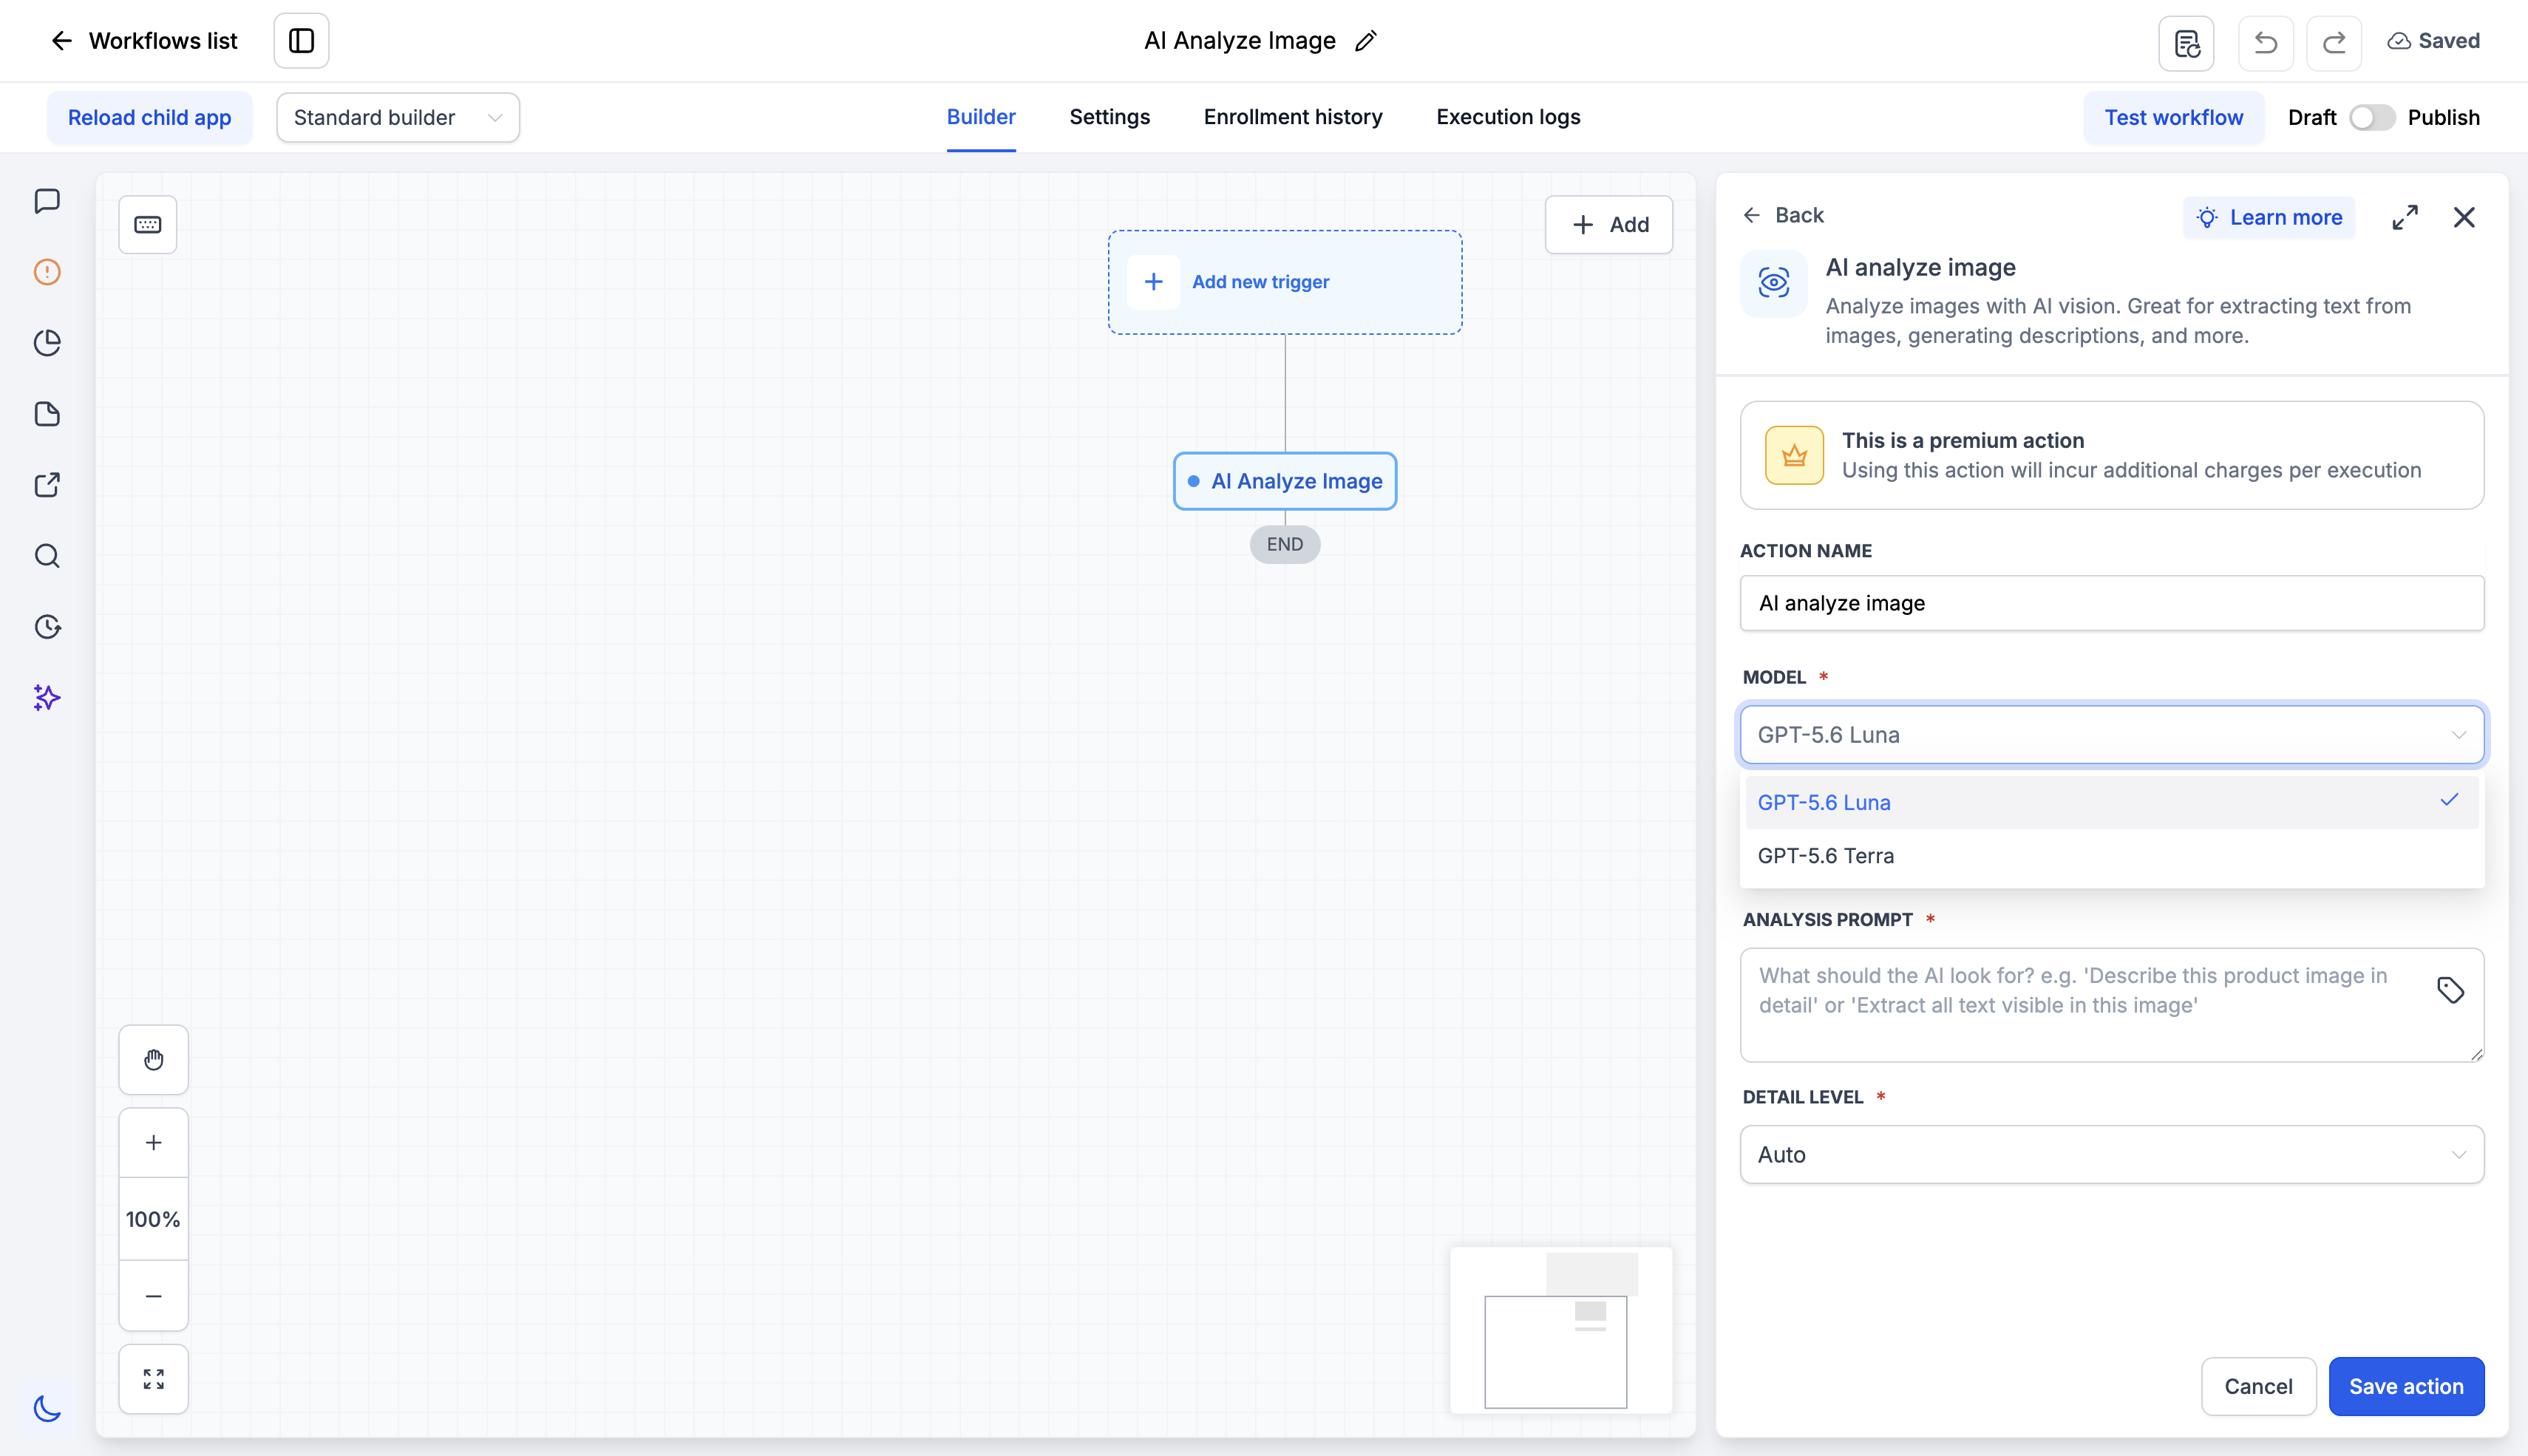
Choose the AI vision model to use for analysis. Two models are available:
- GPT-5.6 Luna
- GPT-5.6 Tera
If you’re unsure which to use, run the same image and prompt through both and compare the responses before publishing the workflow.
Step 3: Provide the Image URL
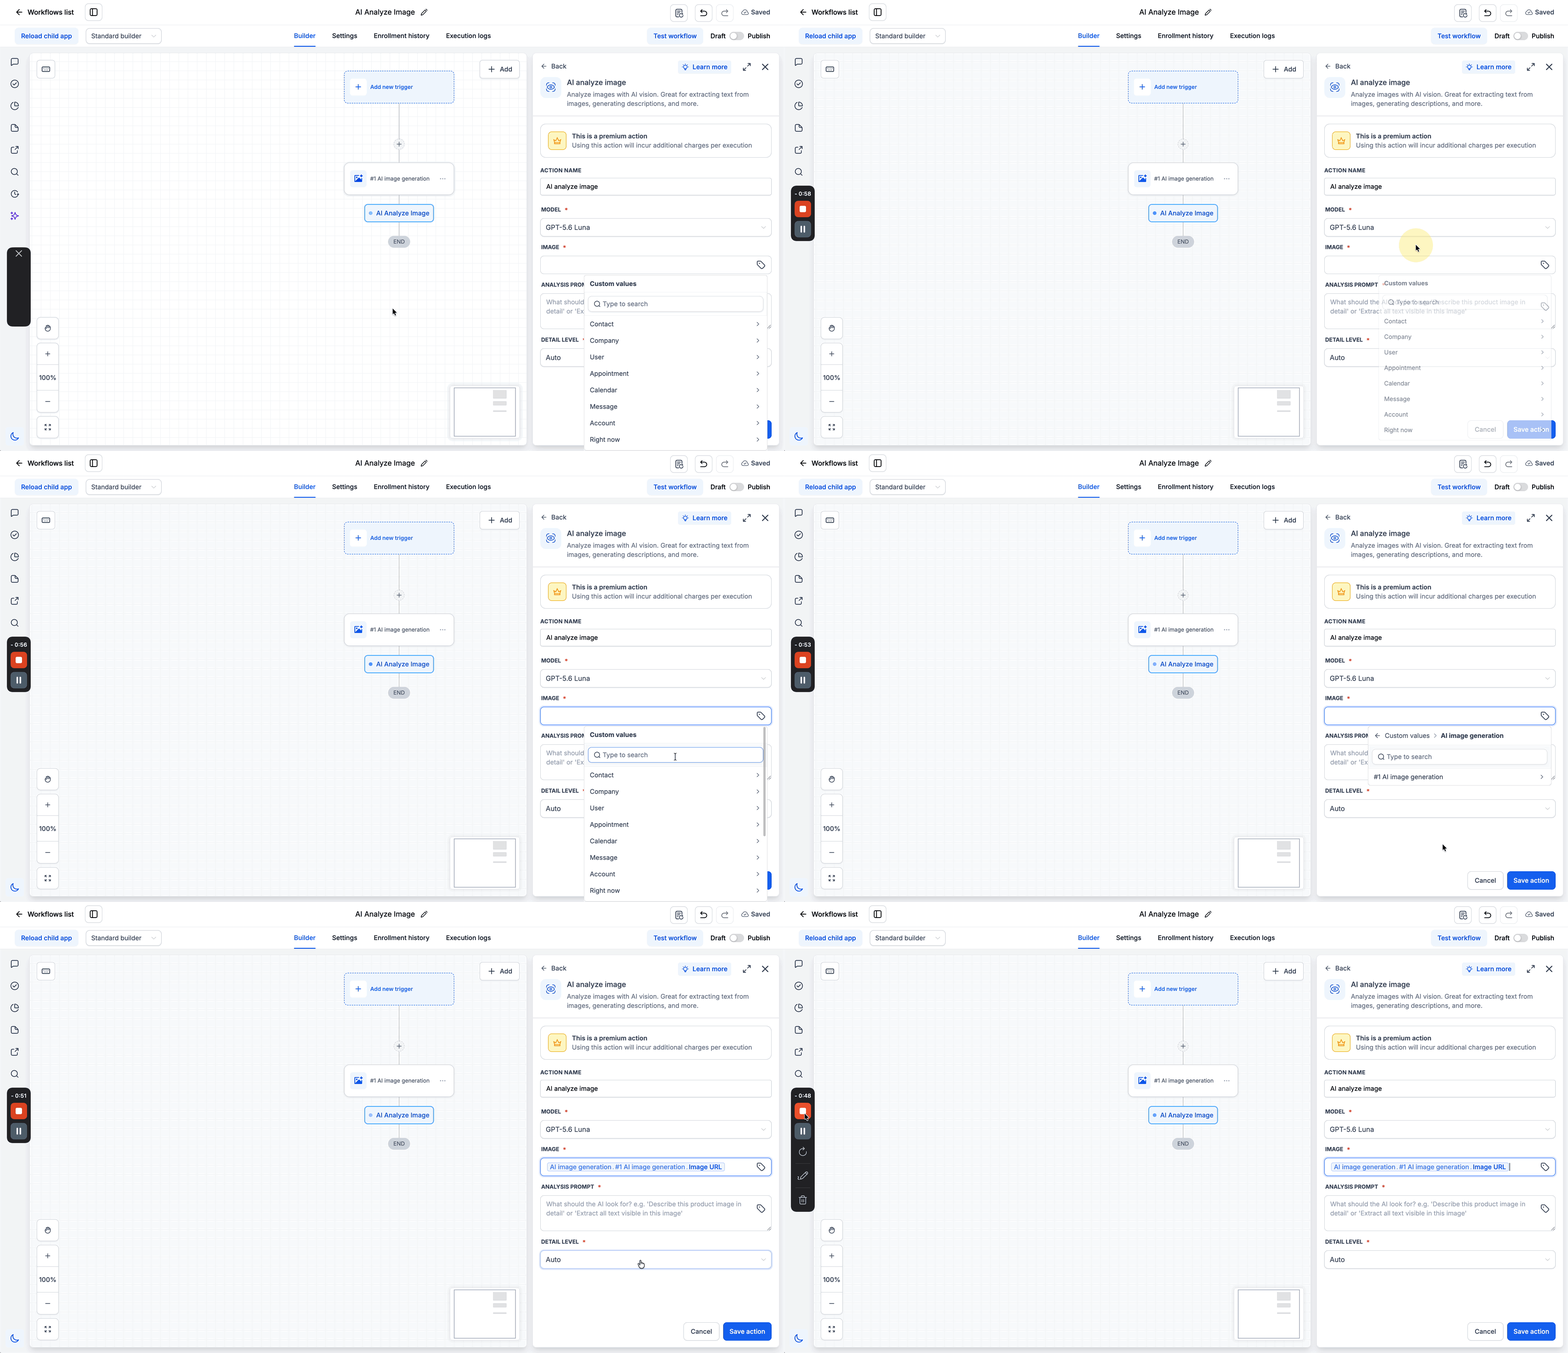
Enter the URL of the image you want to analyze.
You can pull this from a previous step in the workflow – for example, the Image URL output of an AI Image Generation action – or from any custom value that holds an image URL. The URL must be publicly accessible.
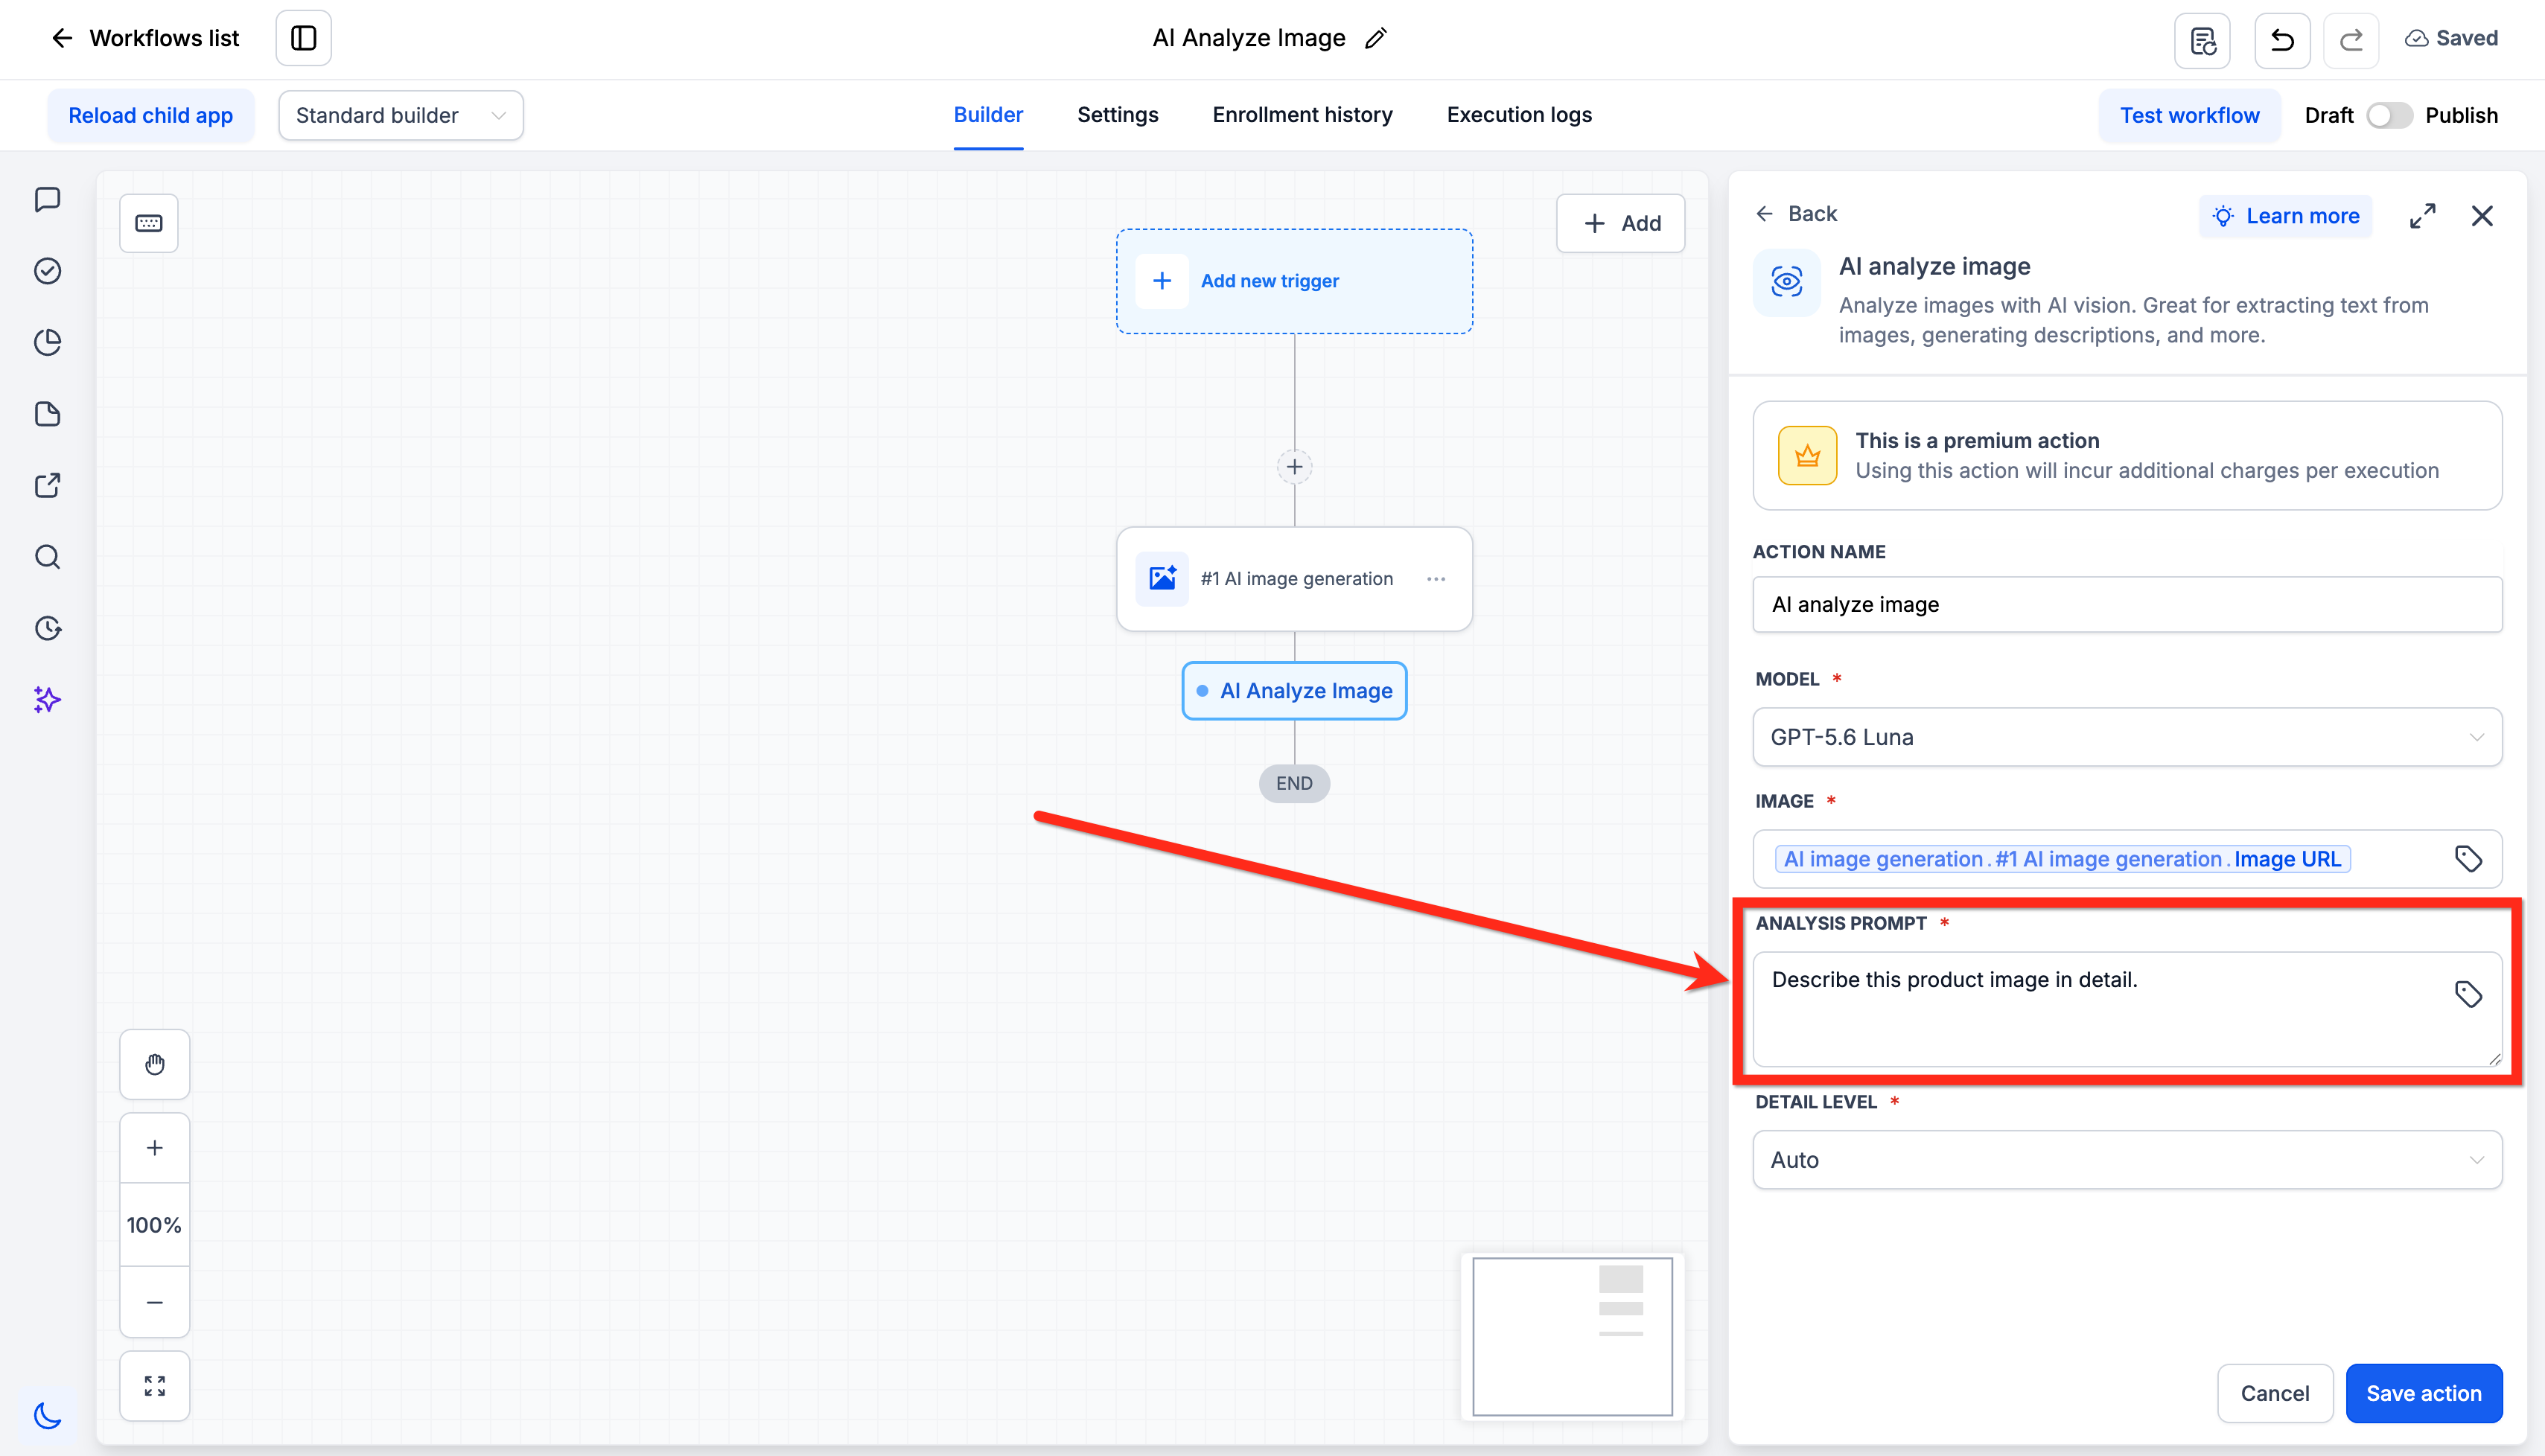
Step 4: Enter the Analysis Prompt
Write a prompt telling the AI what to look for in the image and how to respond. The more specific your prompt, the more useful the output.
Examples:
- Describe this product image in detail.
- Extract all text visible in this image.
- List the items visible in this photo.
- Read the total amount from this receipt and return only the number.
The prompt field supports custom values, so you can build the prompt dynamically from contact fields, web-hook data, or earlier action output.
Step 5: Set the Detail Level
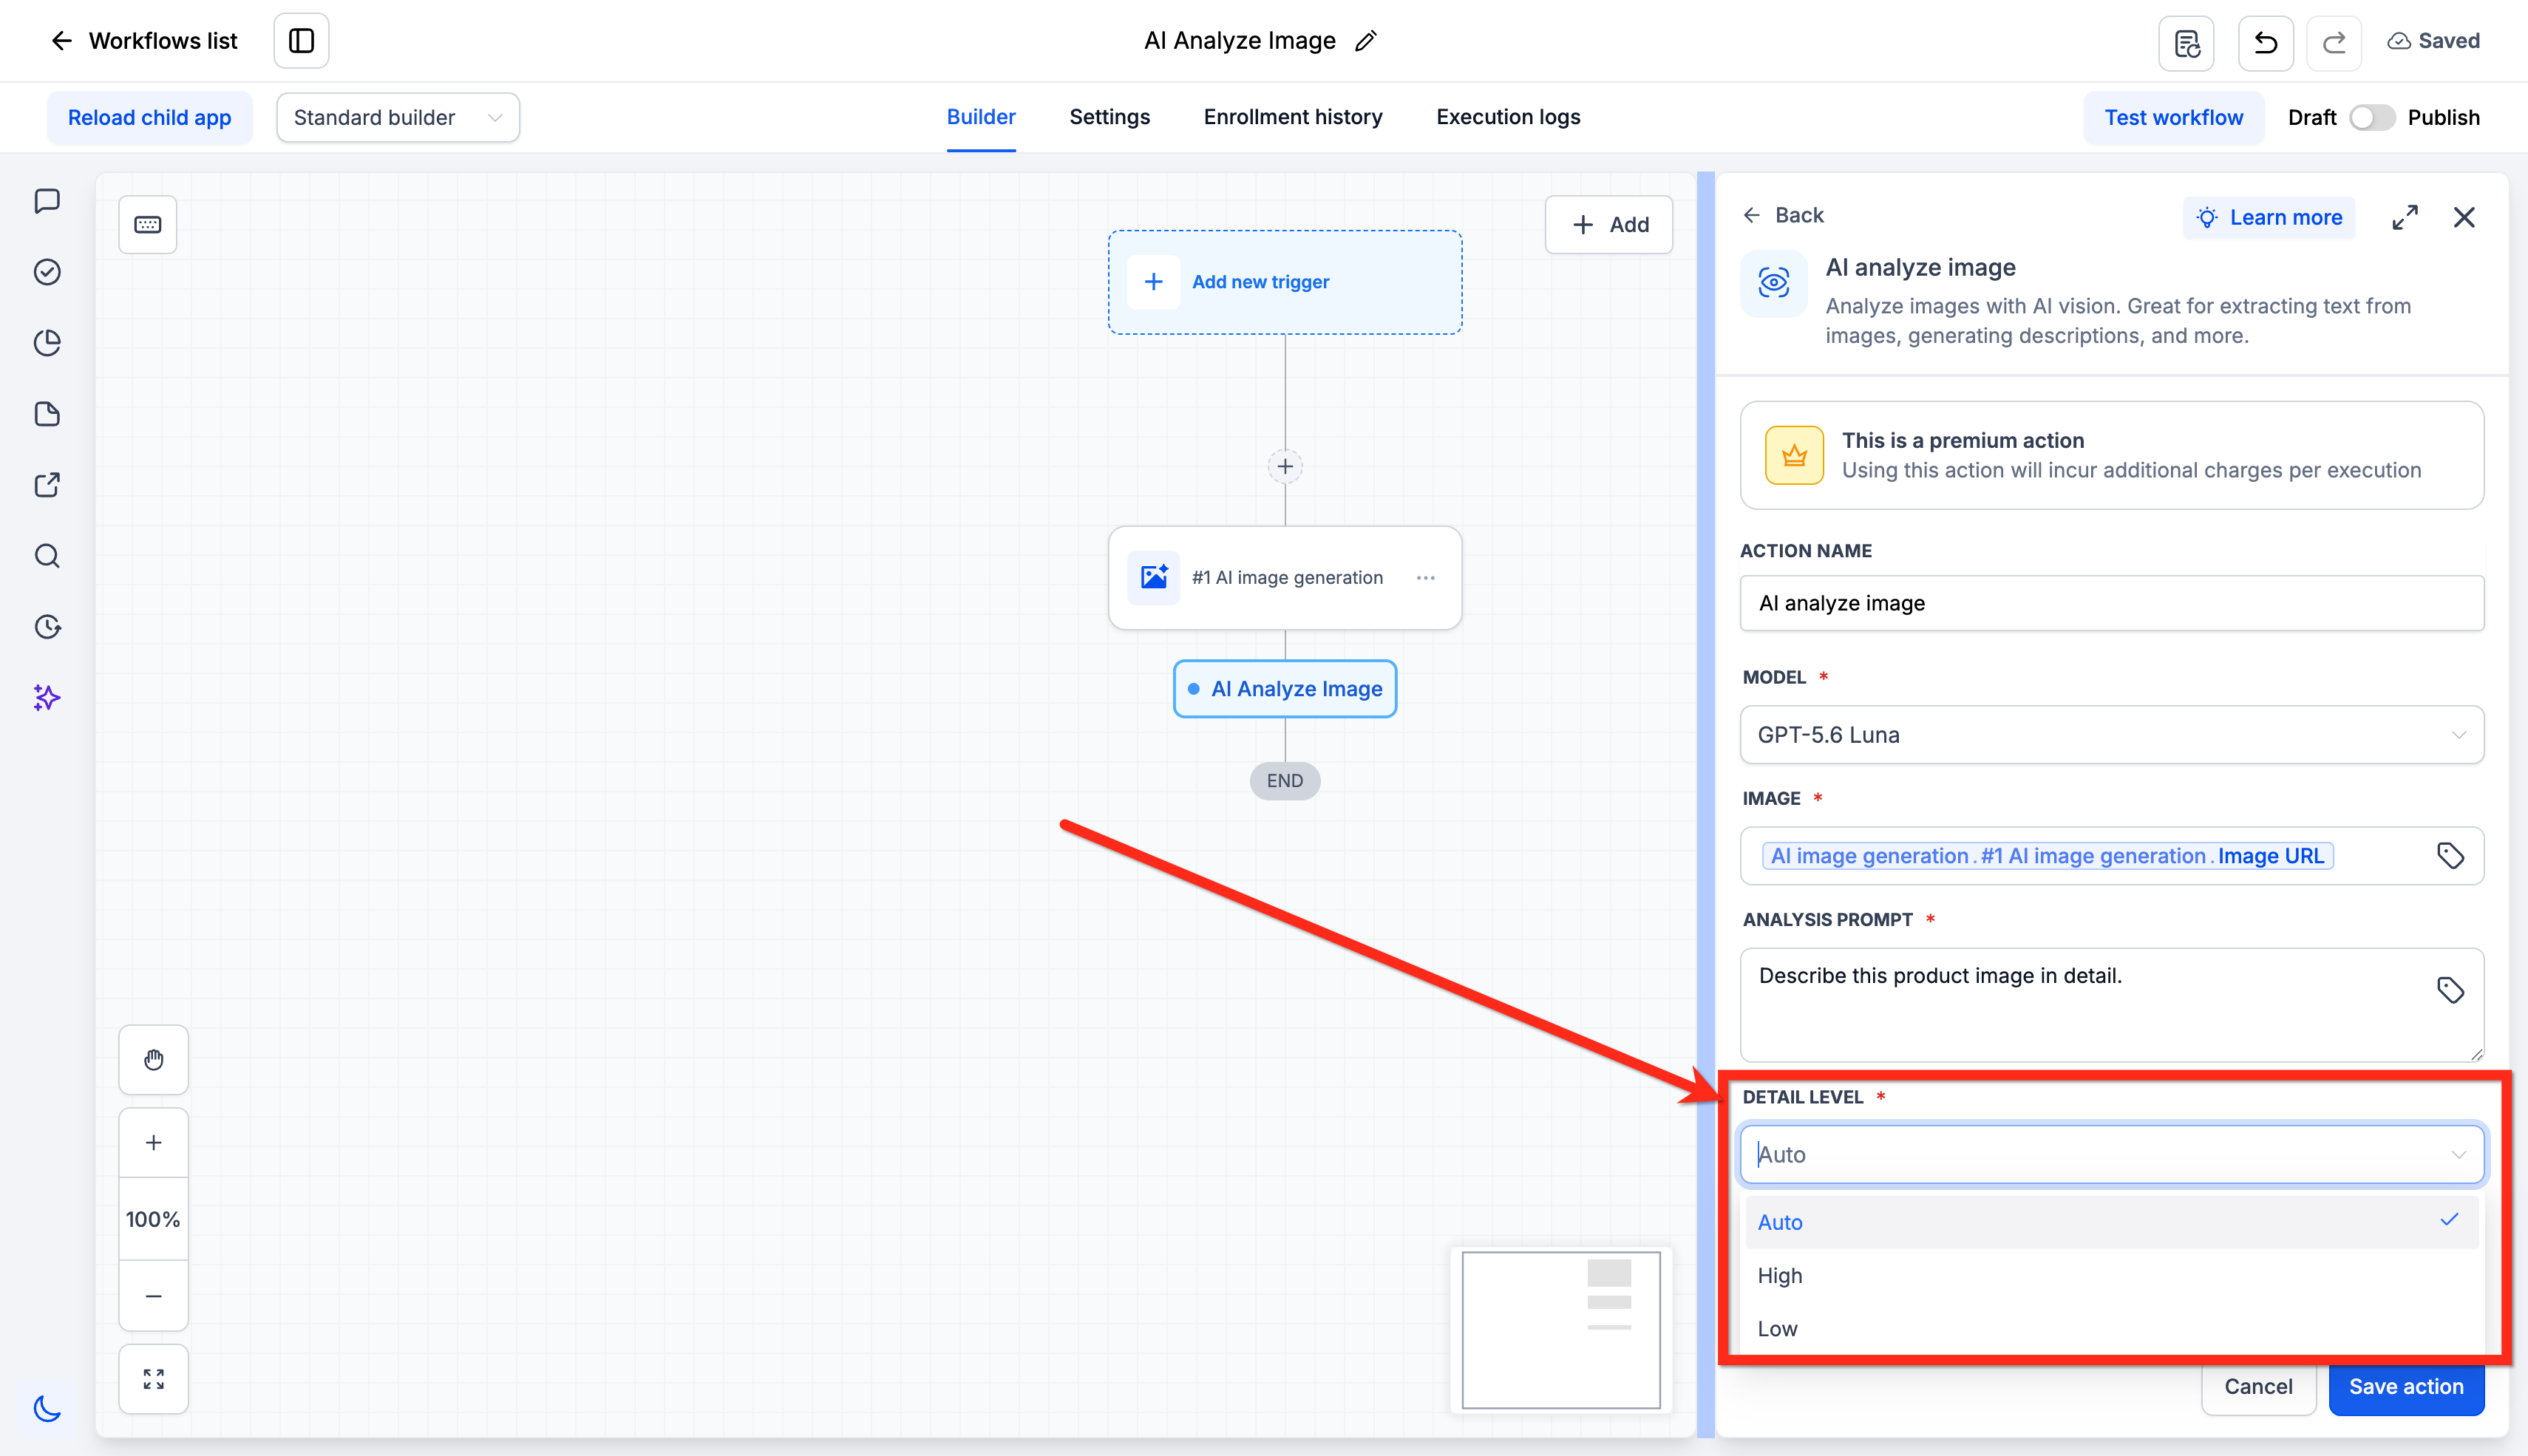
Choose how thoroughly the image should be analyzed.
The default is Auto, which lets the system pick an appropriate level. You can also select High for more careful analysis of fine detail, or Low for a faster, lighter pass when you only need a broad read of the image.
Step 6: Save the Action
Save the action. The analysis output will be available as a variable in all downstream actions once the workflow executes.
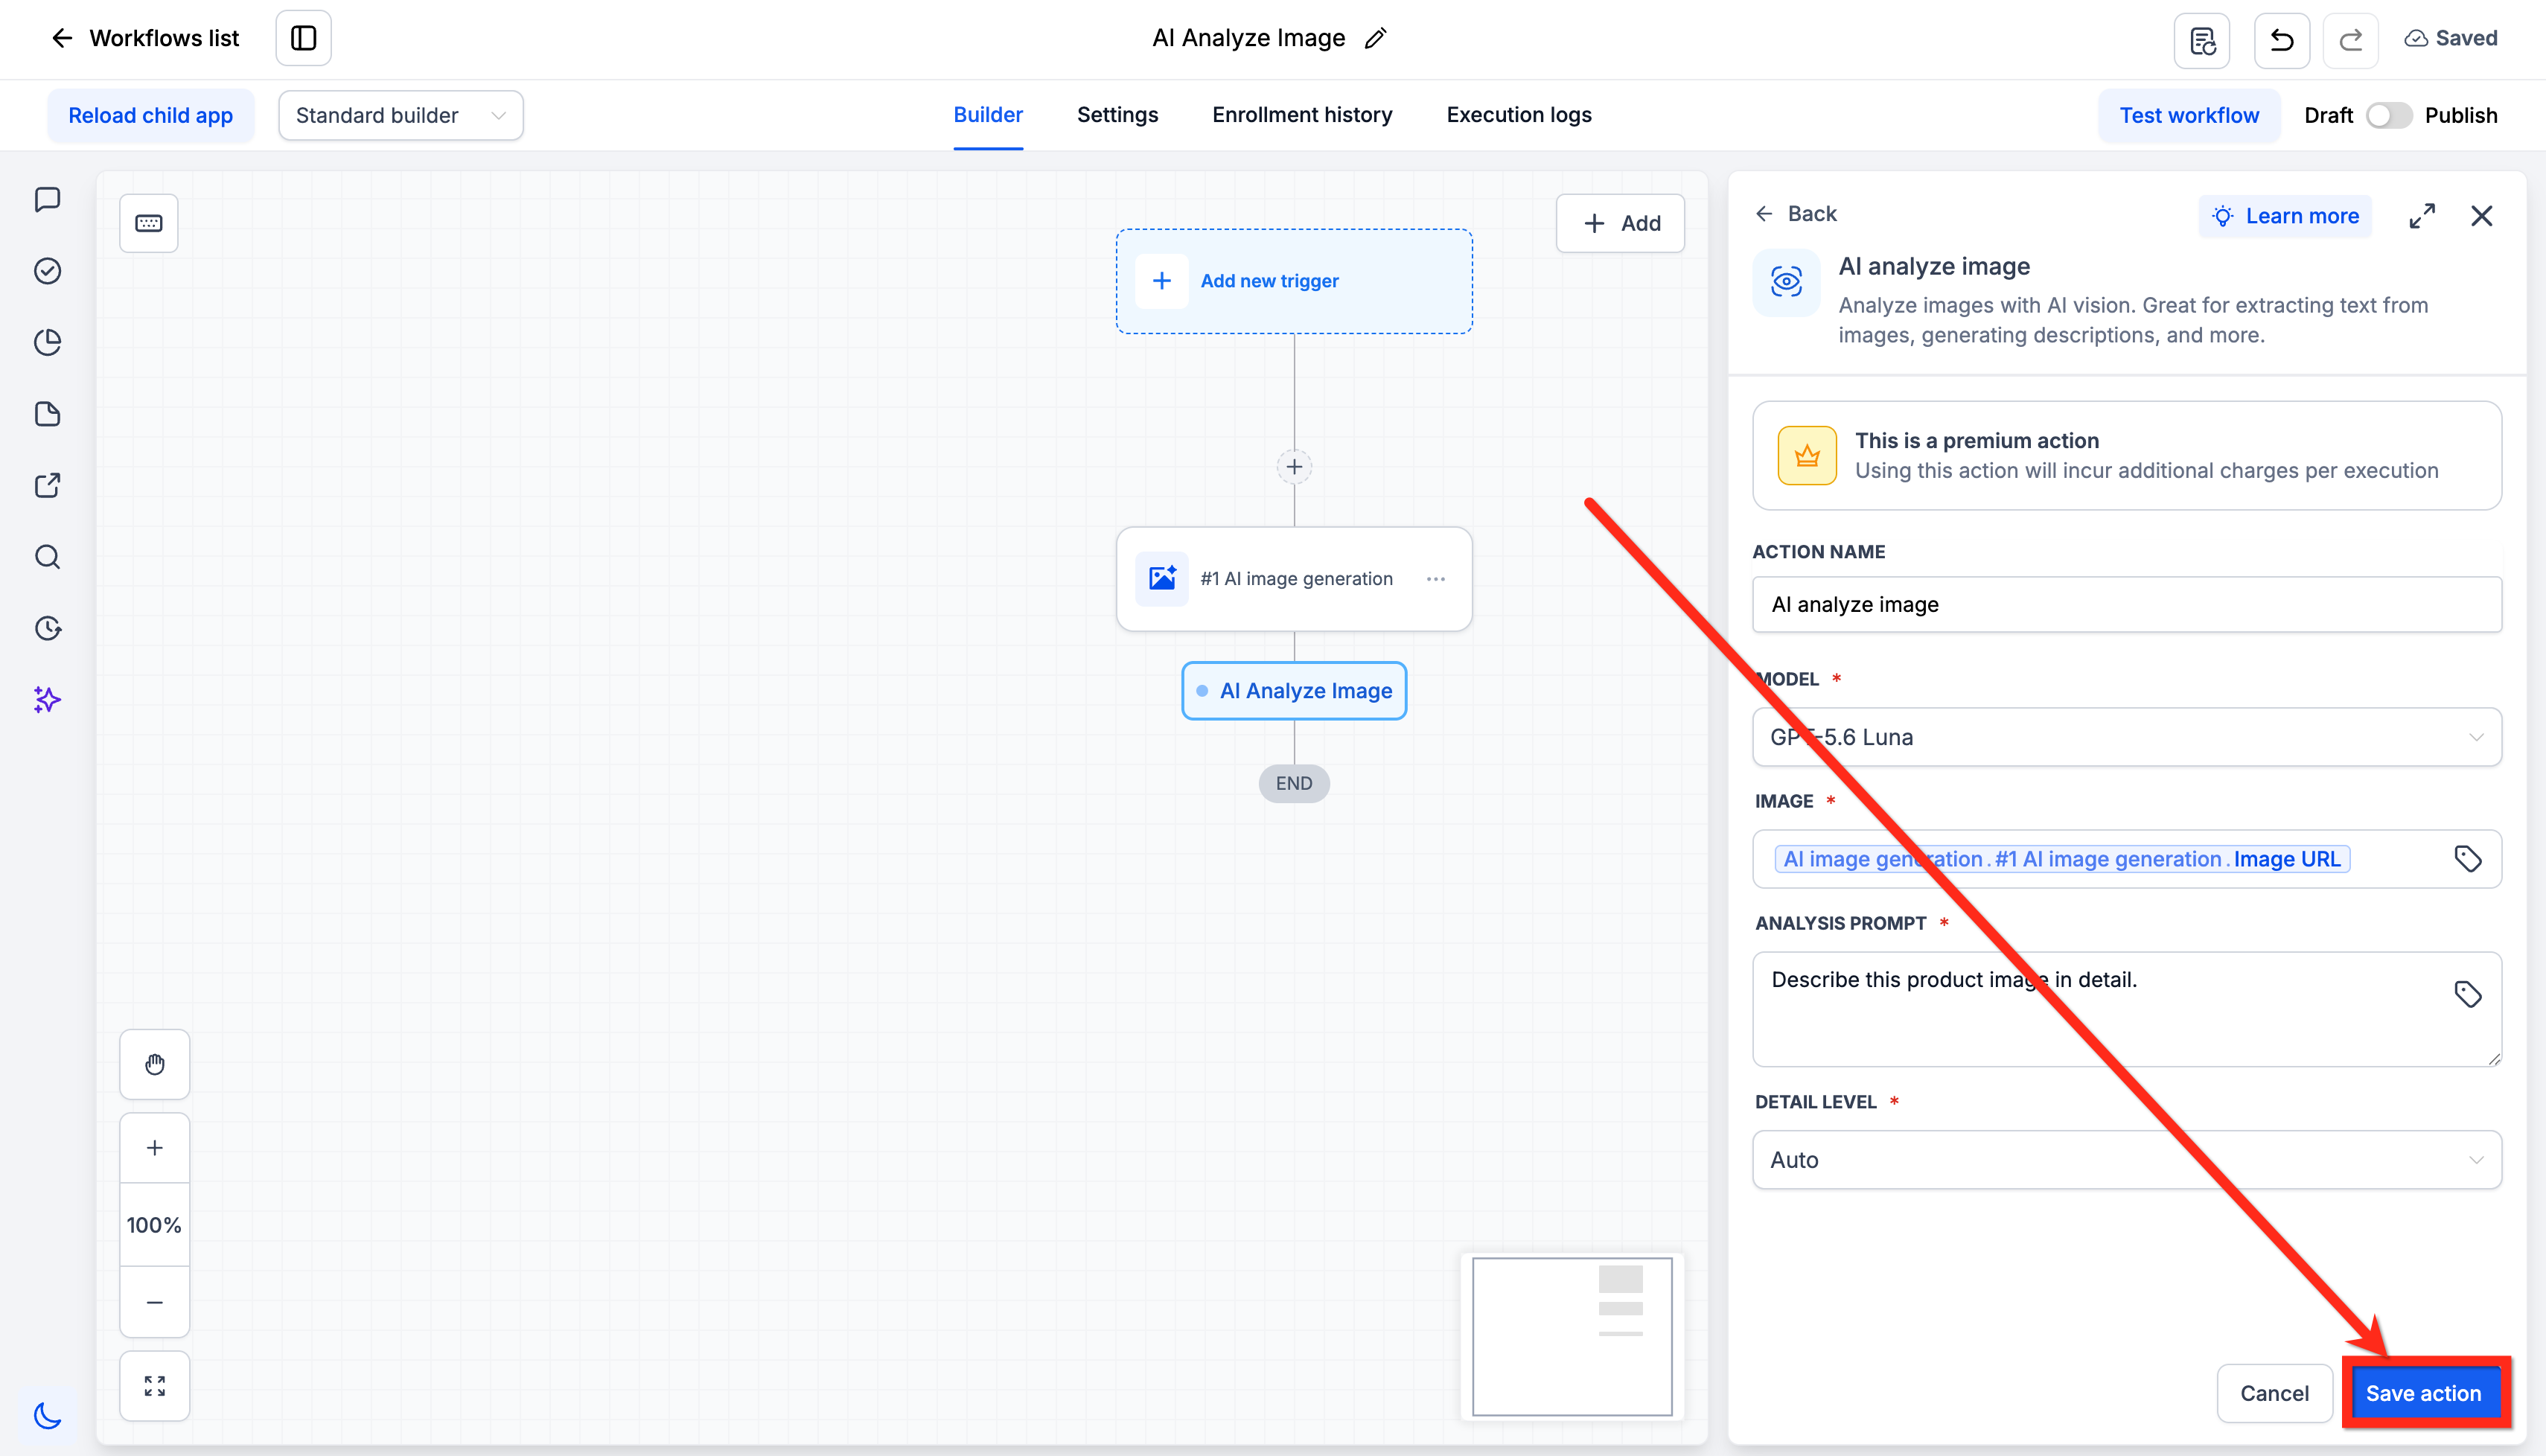
Image URL Requirements
The image URL you provide must be publicly accessible. The AI model fetches the image directly from the URL, so anything that blocks anonymous access will cause the action to fail.
Tip: A quick way to check is to open the URL in a private or incognito browser window. If the image loads without signing in, the action can reach it. Images stored in Media Storage – including those created by the AI Image Generation action – are already hosted at publicly accessible URLs and work without any extra setup.This means the URL must not:
- Require a login, password, or authentication token to view.
- Sit behind a private share link, permission-restricted drive, or internal network.
- Point to a page containing the image rather than the image file itself.
Using the Output in Downstream Actions
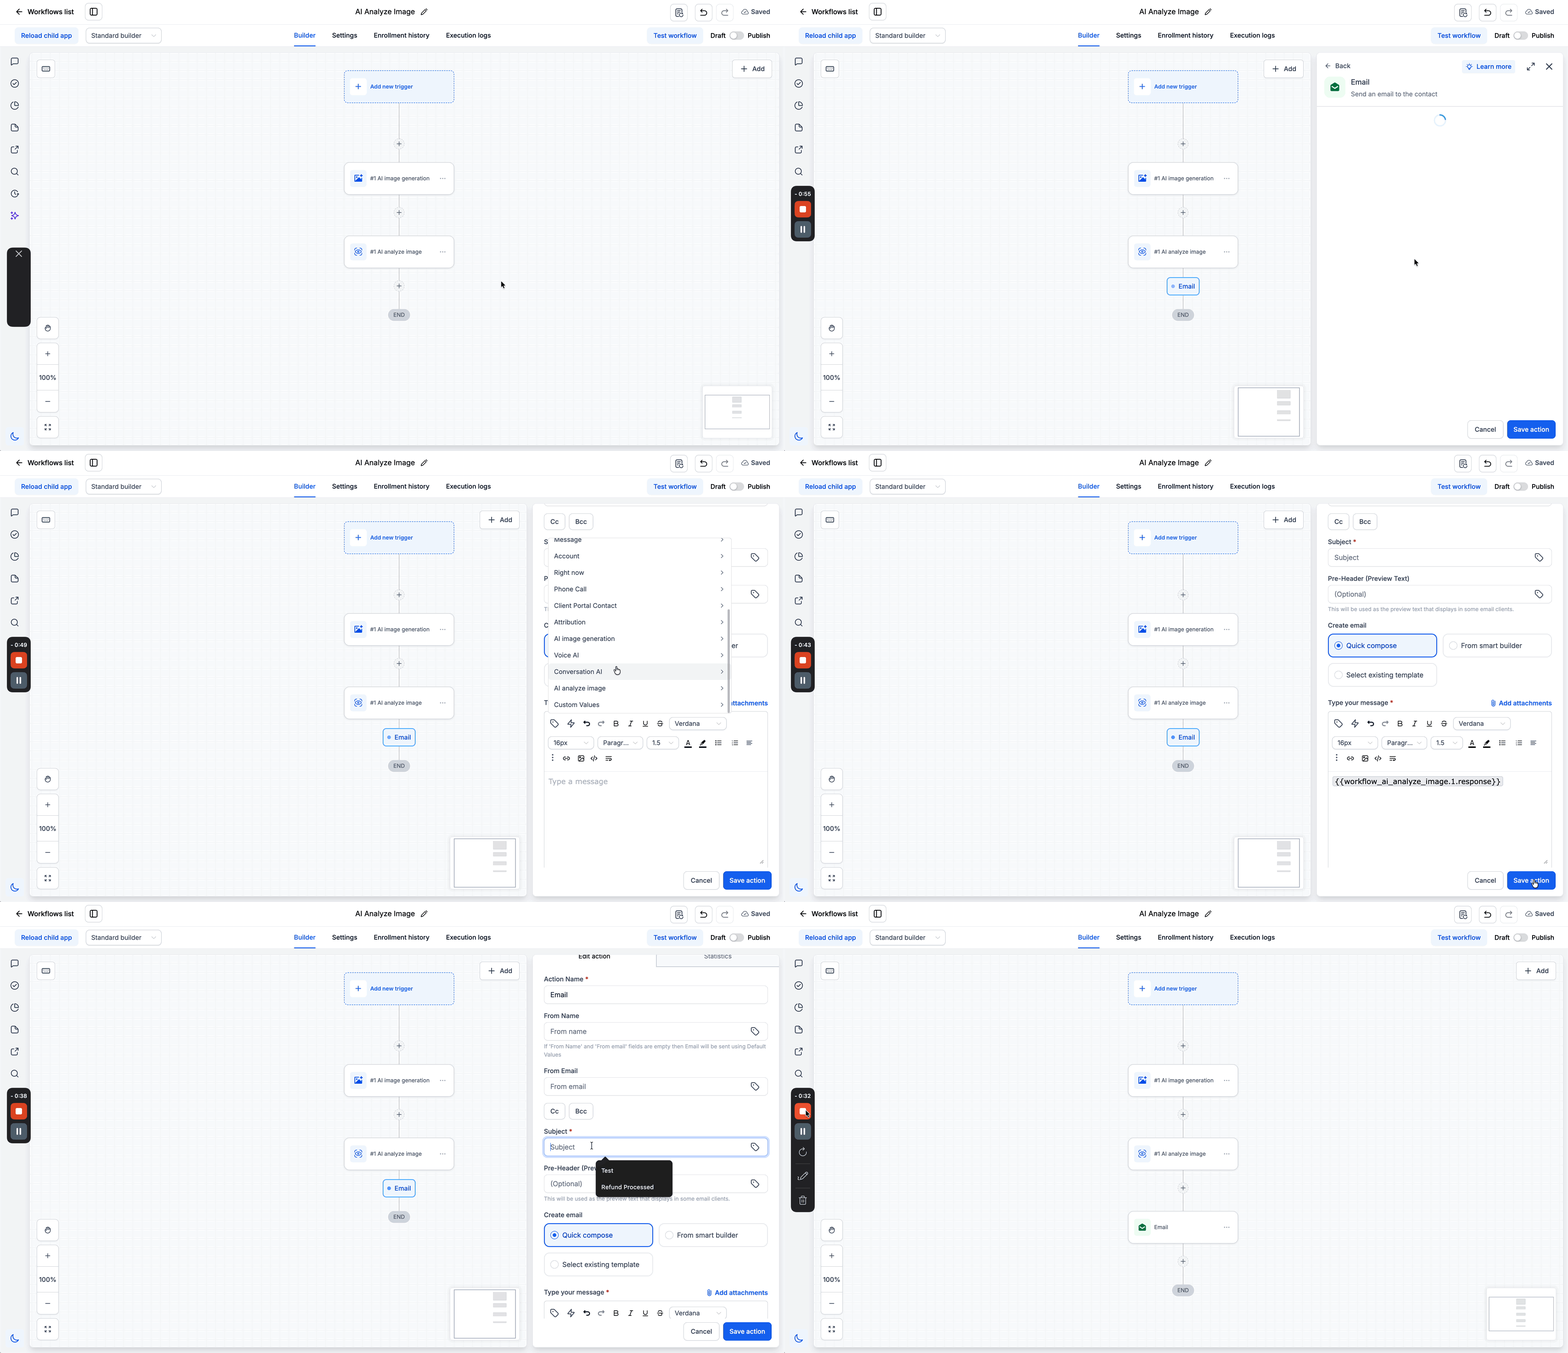
Once the action executes, its response is available in any subsequent action through the custom value picker under AI Analyze Image. The output is a text value containing the AI’s answer to your prompt – a description, extracted text, a list, or whatever else your prompt asked for.
Because the output is plain text, you can use it anywhere a text value is accepted: save it to a contact custom field, include it in an email or SMS, pass it to an outbound webhook, or feed it into another AI action for further processing.
Use Cases
1. Extracting Text from Customer-Submitted Images
Scenario: Customers send photos of receipts, invoices, or documents over MMS. You want to read the text out of those images and store it against the contact record instead of reviewing each one manually.
Setup:
- Trigger: Customer Replied (with image attachment)
- Action 1: AI Analyze Image – Image URL from the attachment. Prompt: “Extract all text visible in this image.” Detail Level: High.
- Action 2: Update Contact – Save the extracted text to a custom field for review or follow-up.
2. Verifying a Generated Image
Scenario: Your workflow generates an image with the AI Image Generation action, and you want a second check on what was actually produced before it goes out to a customer.
Setup:
- Action 1: AI Image Generation – Generate the image from your prompt.
- Action 2: AI Analyze Image – Use the Image URL output from the previous action. Prompt: “Describe this image in detail.”
- Action 3: If/Else or Internal Notification – Route the workflow based on the description, or send it to your team for a quick sanity check before delivery.
3. Describing Product Images from a Web-hook
Scenario: Product images arrive from an external system with no accompanying copy. You want a written description generated automatically for each one.
Setup:
- Trigger: Inbound Web-hook (carrying the image URL)
- Action 1: AI Analyze Image – Prompt: “Describe this product image in detail, including colour, material, and style.”
- Action 2: Outbound Web-hook – Send the description back to your catalogue or content system.
More Ideas
- Screenshot triage: Read error messages out of support screenshots so tickets can be routed by content rather than by hand.
- Alt text generation: Produce accessibility descriptions for images used across your sites and campaigns.
- Image tagging: Ask the model to return a short list of categories or keywords, then use that output to tag contacts or route the workflow.
- Submission checks: Confirm an uploaded image contains what was asked for before it moves further through the process.
Tips for Better Results
- Be specific about the output you want. “Return only the invoice number” gives you a usable value; “Tell me about this image” gives you a paragraph you’ll have to parse.
- Use High detail for small text, fine print, and dense documents. Auto is fine for general descriptions.
- Verify the image URL is publicly reachable before publishing – this is the most common cause of the action failing.
- If you plan to store the output in a custom field, ask the prompt to return the value in a consistent format so downstream steps can rely on it.
- Test with a few real images before running the workflow at volume – image quality varies more than text input does.
Pricing
Image analysis is billed per execution. The figures below give you an idea of what analyzing an image normally costs. Most analyses fall within this range.
Note: Treat these figures as a planning estimate rather than a fixed rate.| Metric | Cost per analysis | In cents |
|---|---|---|
| Median | $0.0004 | 0.04¢ |
| Average | $0.0013 | 0.13¢ |
Your actual cost per analysis will vary depending on how you configure the action. The main factors are:
- Model – the vision model you select.
- Detail Level – the level you set (Auto, High, or Low). High analyzes the image more thoroughly and costs more than Low.
Frequently Asked Questions
Q: How much does it cost to analyze an image?
Analyzing an image normally costs between $0.0004 (0.04¢) and $0.0013 (0.13¢). Your actual cost depends on the model and the Detail Level you select. See the Pricing section above for more detail.
Q: What happens if the image URL is behind authentication?
The action will not work. The AI model fetches the image directly from the URL, so it must be publicly accessible without a login, token, or permission check. Open the URL in a private browser window to confirm it loads for anyone.
Q: Where do I get the image URL from?
From any previous step in the workflow that produces one – such as the Image URL output of an AI Image Generation action, an inbound webhook payload, or a message attachment – or from a custom value where you’ve stored an image URL.
Q: Which model should I choose?
Two vision models are available: GPT-5.6 Luna and GPT-5.6 Tera. If you’re unsure, run the same image and prompt through both and compare the responses before publishing the workflow.
Q: What does the Detail Level setting affect?
It controls how thoroughly the image is analyzed. Auto (the default) lets the system decide. High examines the image more carefully, which helps with small text and fine detail. Low is a faster, lighter pass suited to broad descriptions.
Q: Can I use this to extract text from images (OCR)?
Yes. Set your prompt to something like “Extract all text visible in this image” and the action returns the text as its output. For receipts, invoices, and other small or dense text, set the Detail Level to High.
Q: What format is the output in?
The output is a text value containing the AI’s response to your prompt. It’s available in downstream actions through the custom value picker under AI Analyze Image, and can be used anywhere a text value is accepted.
Q: Can I use this together with the AI Image Generation action?
Yes. Add AI Analyze Image after an AI Image Generation step and pass in the generated Image URL. This lets you describe or verify what was produced before the image is sent onward. Images created by AI Image Generation are stored at publicly accessible URLs, so no extra setup is needed.
Q: Can I analyze more than one image in a single action?
Each AI Analyze Image action processes one image URL. To analyze several images in a workflow, add a separate action for each, and reference each action’s output individually in your downstream steps.