
Import data from HubSpot
HubSpot Importer helps you move important HubSpot CRM data into Chat To Clients CRM faster. This article walks you through importing your HubSpot data (contacts, deals, custom fields, and pipelines) and reviewing the import results so you can spot and fix any errors.
TABLE OF CONTENTS
What is the HubSpot Importer?
HubSpot Importer makes it easier to switch from HubSpot to Chat To Clients CRM. Instead of rebuilding your CRM setup by hand, you can connect HubSpot, choose what to bring over, and start the import from inside Chat To Clients CRM.
This helps speed up onboarding by bringing over important data and structure, including Contacts, Opportunities, Custom Fields, Pipelines, Stages, and Custom Folders. After the import finishes, Chat To Clients CRM shows a report so you can see what imported successfully, what failed, and what may need review.
Key Benefits of HubSpot Importer
Faster Migration: Import supported HubSpot CRM data directly into Chat To Clients CRM without relying only on manual CSV exports.
Preserved Structure: Bring HubSpot Deals into Chat To Clients CRM as Opportunities while keeping supported Pipelines and Stages organized.
Custom Data Continuity: Import supported HubSpot Contact and Deal Properties as Chat To Clients CRM Custom Fields.
Transparent Reporting: Review import totals, successful records, errors, warnings, object-level results, and record-level messages after the import finishes.
Before You Start
Use a clean account when possible. Importing into an account that does not already have manually created data makes errors and duplicates easier to review.
- Turn on Allow duplicates for both Contacts and Opportunities before you start. You can re-enable de-duplication after the import is complete. Leaving duplicate-blocking on causes a lot of avoidable errors during a HubSpot import.
The import runs in the background. You can close the window and return later to review progress.
- It is recommended to use English as the account language.
- It is recommend to test imports in a new or non-production location before importing into an actively used location.
What Data You Can Import from HubSpot
The HubSport Importer currently supports Contacts, Opportunities (Deals), Companies, Custom Fields (Properties), Custom Folders, Pipelines, Stages, Emails, Notes and Tasks.
When Deals are imported as Opportunities, their pipeline and stage structure is preserved when supported by the importer. This helps keep your sales process familiar after moving from HubSpot to Chat To Clients CRM.
| Migration Type | What It Does |
|---|---|
| Contacts migration | Brings HubSpot contact records into Chat To Clients CRM. |
| Opportunities migration | Imports HubSpot Deals as Chat To Clients CRM Opportunities. |
| Companies migration | Imports HubSpot companies as new records into Chat To Clients CRM. |
| Custom Fields migration | Maps HubSpot Contact and Deal Properties to Chat To Clients CRM Custom Fields. |
| Pipelines & Stages migration | Preserves the full pipeline structure, including stages. |
| Custom Folders migration | Carries over folder organization for supported imported data. |
| Email migration | Brings over all of your emails from HubSpot into Chat To Clients CRM |
| Tasks migration | Brings your reminders and to-dos into Chat To Clients CRM. |
For unsupported objects, use your broader migration plan or the manual migration steps in the HubSpot to Chat To Clients CRM migration guide.
Limitations and Considerations
- Pipelines & Opportunities: Pipelines and pipeline stages are imported. An opportunity can be associated with up to 10 additional contacts. Also an opportunity with no contacts associated to it cannot be imported.
- Custom Fields: Custom field mapping is based on field keys. If a conflicting field key already exists in Chat To Clients CRM, the import may fail. HubSpot calculated fields are imported as Single Line Text fields.
- Files & Attachments: File attachments are supported for Contacts and Opportunities.
- Contacts: If an imported contact is deleted in Chat To Clients CRM and the importer is run again, the contact will be imported again. If the deleted contact is later restored, duplicate contacts may be created.
- Notes: A note can be associated with only one record of each object type. For example, a note can be linked with one contact, one opportunity. Currently - notes cannot be associated to companies.
- Tasks: Recurring tasks are not supported. A task can be associated with up to 10 records of each object type. For example, a task can be linked with 10 contacts, 10 opportunities or 10 companies.
- Associations: Some associations may not be imported due to platform limits. Customers should validate critical associations after migration.
- Emails: Imported emails from HubSpot will be read only.
How To Use the HubSpot Importer
Step 1: Open Import Data
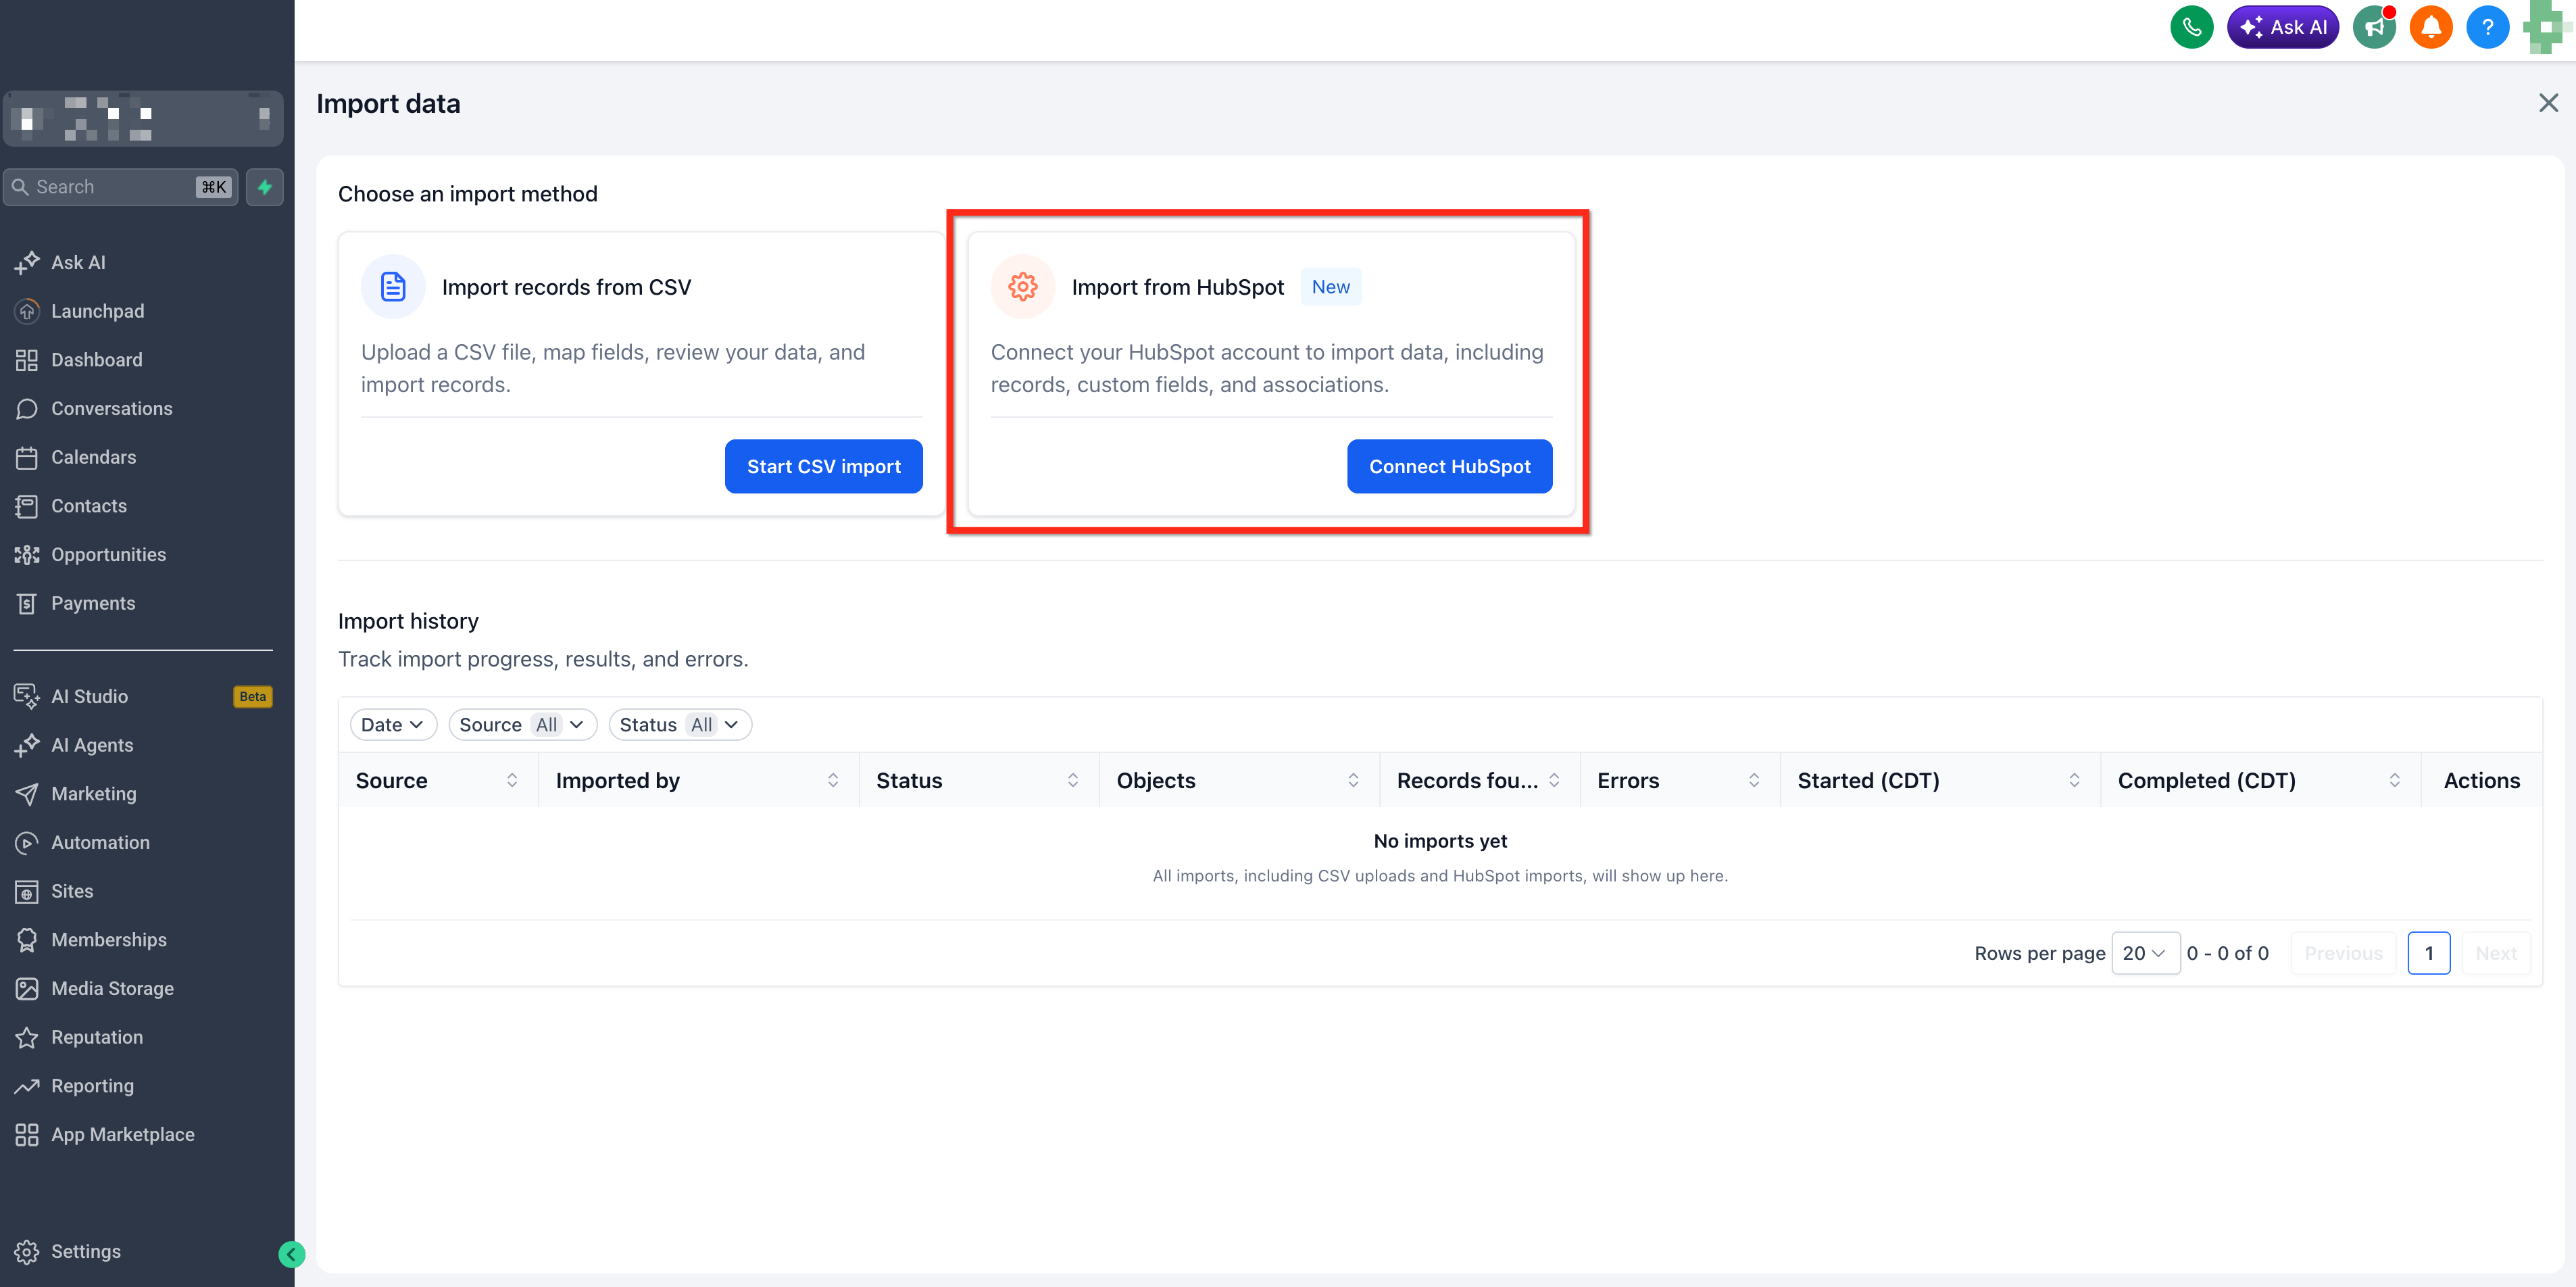
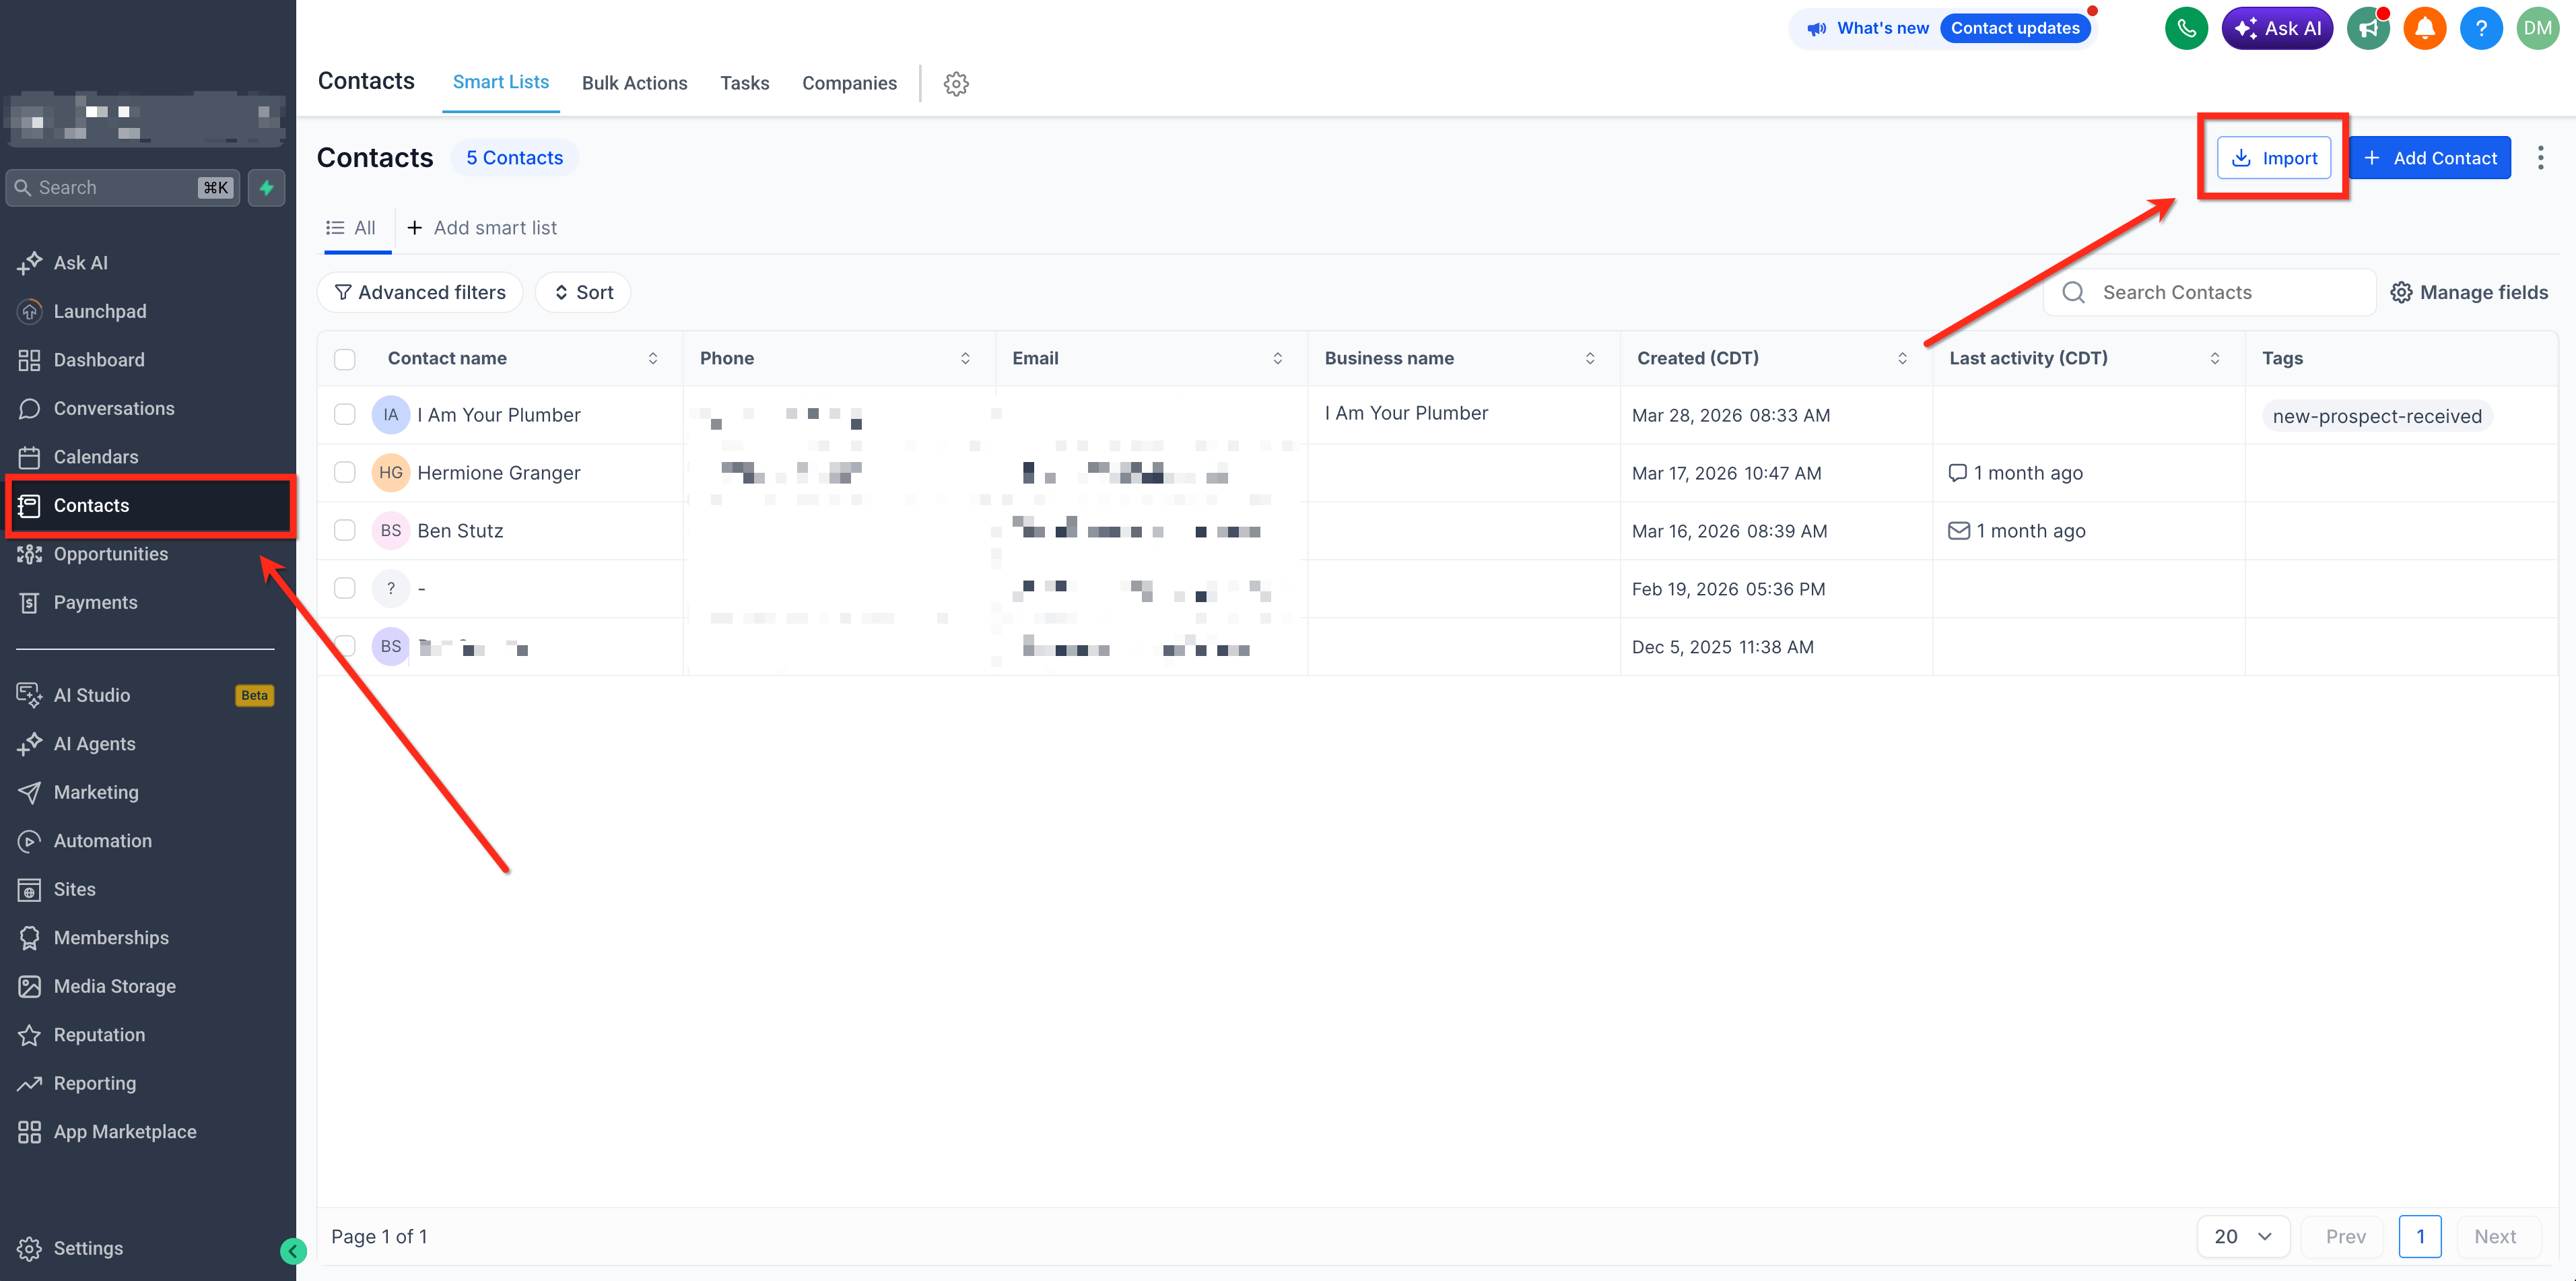
From Contacts (or Companies or Opportunities), open the Import menu in the top-right and select Import data.
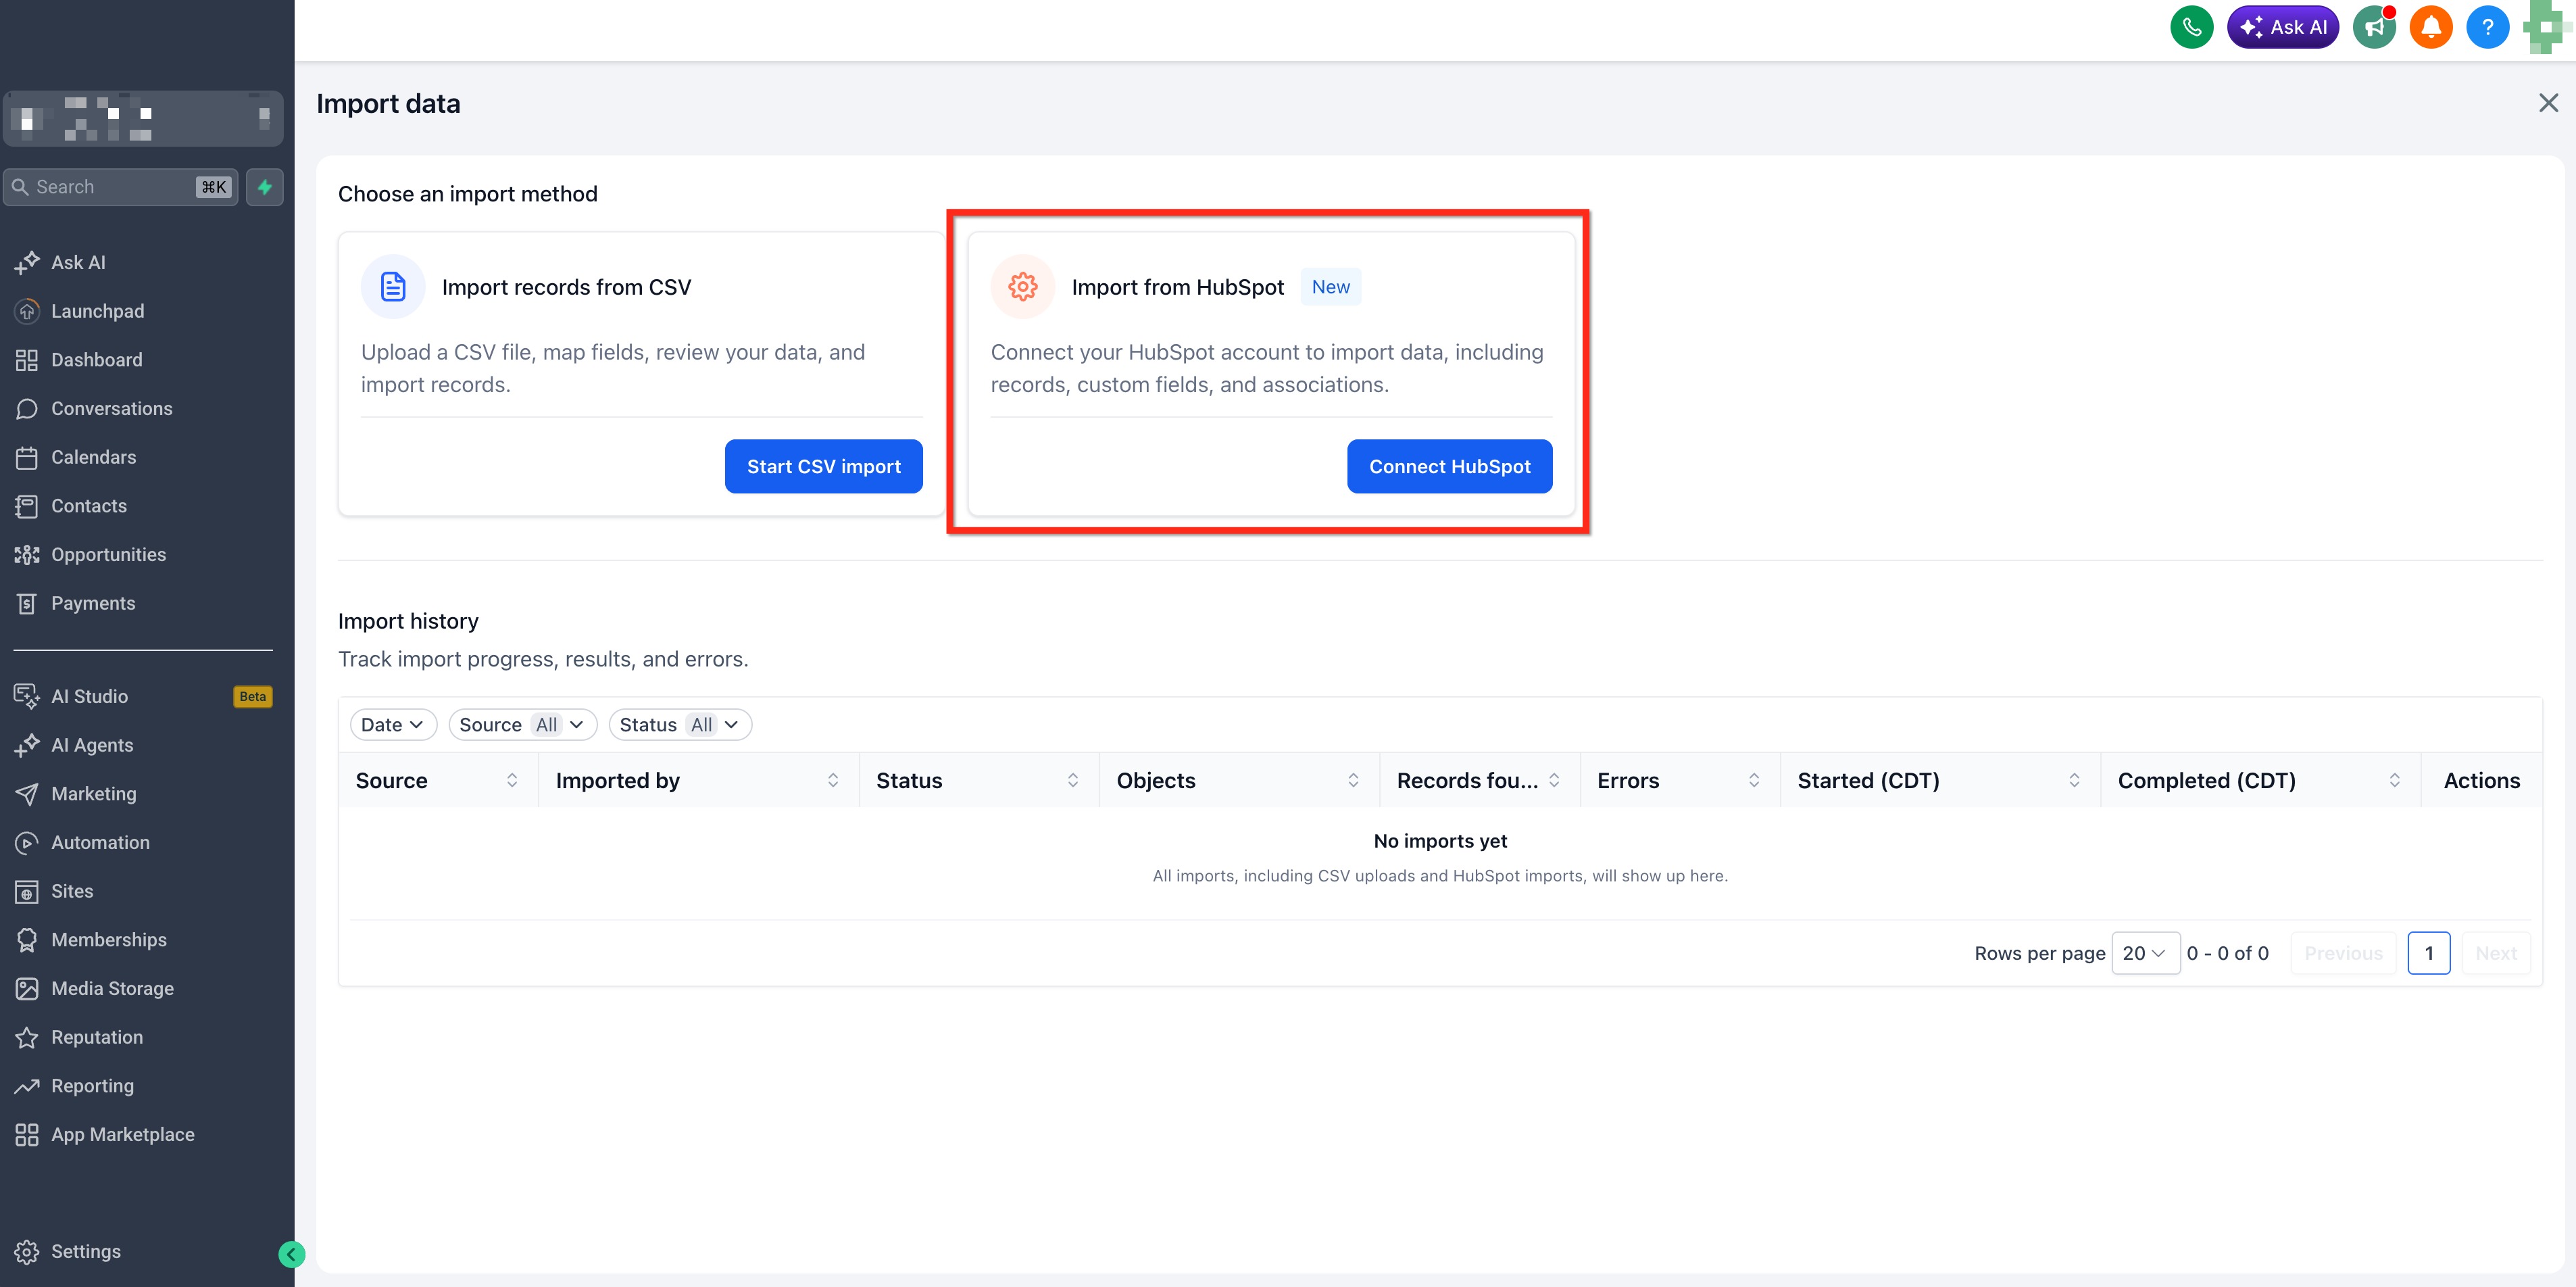
Step 2: Select HubSpot Import
Click Connect HubSpot in the right card to start a HubSpot import.
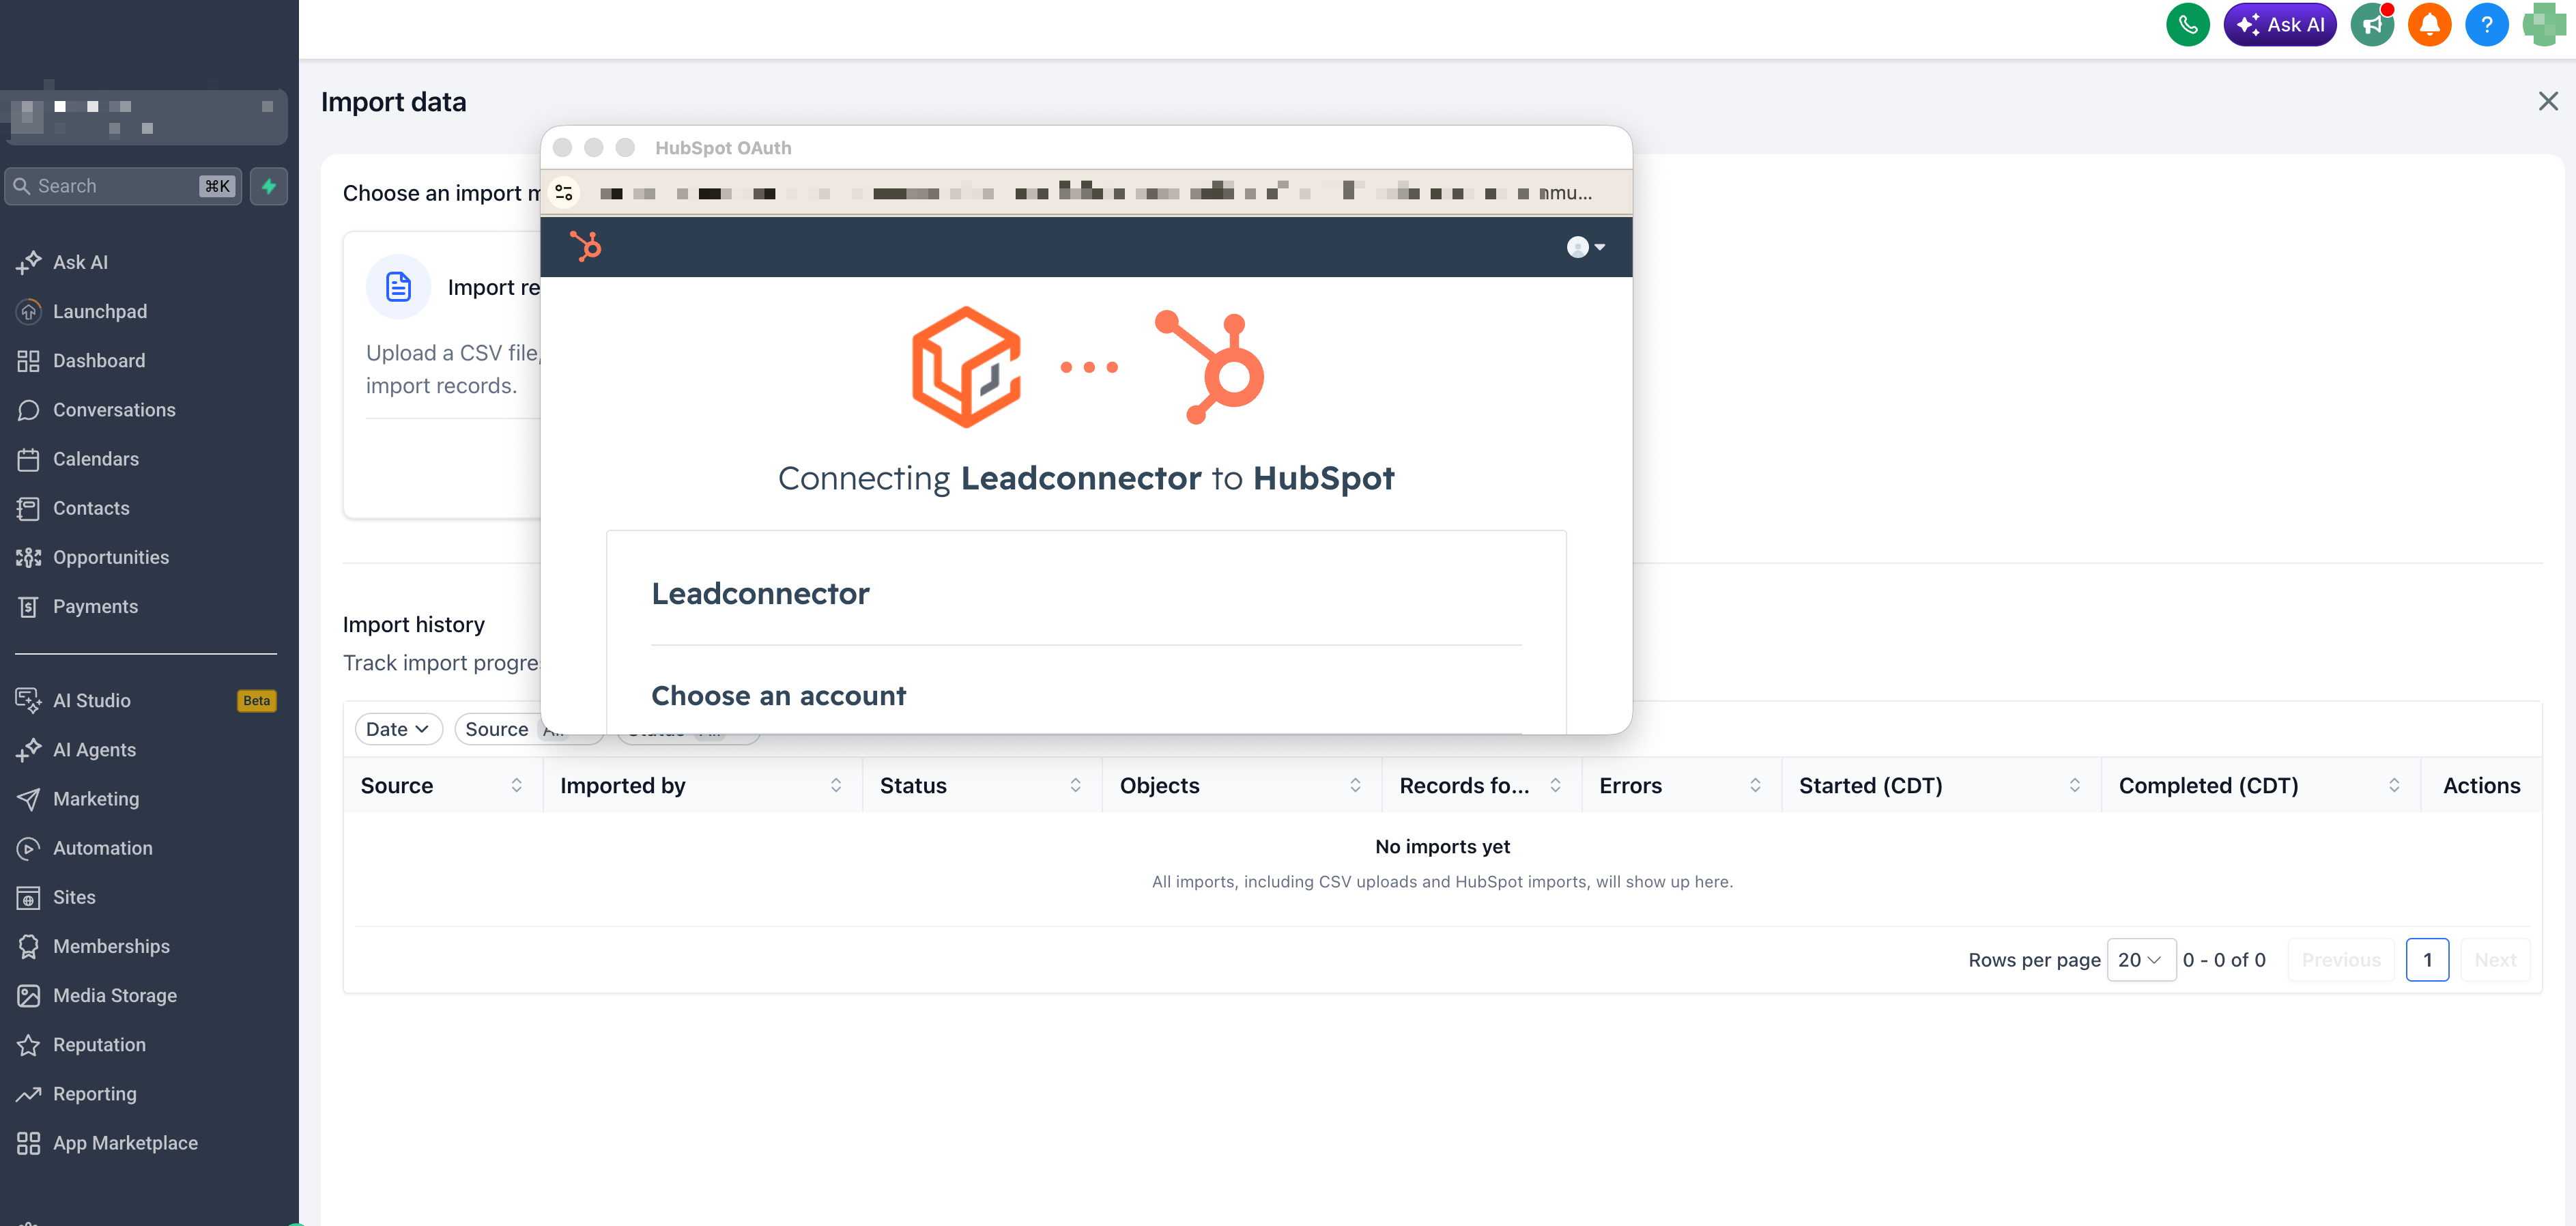
Step 3: Authenticate your HubSpot account
Login to your HubSpot account and authenticate.
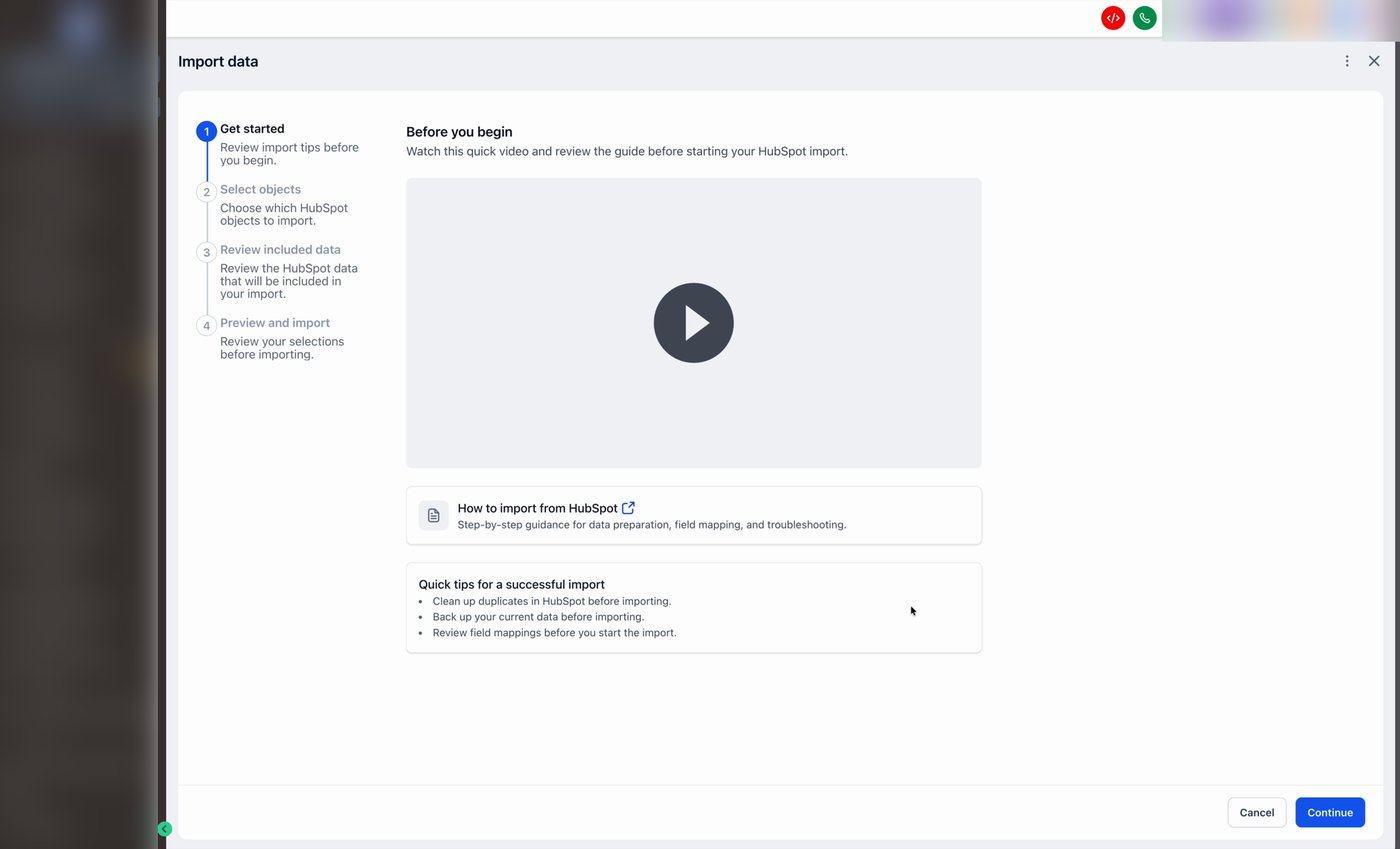
Step 4: Review the Quick Tips
Once your key is verified, the import wizard opens at Get started. This step shows a quick walkthrough video and a few tips:
Clean up duplicates in HubSpot before importing.
Back up your current data before importing.
Review field mappings before you start the import.
When you're ready, click Continue.
Step 5: Select What to Import
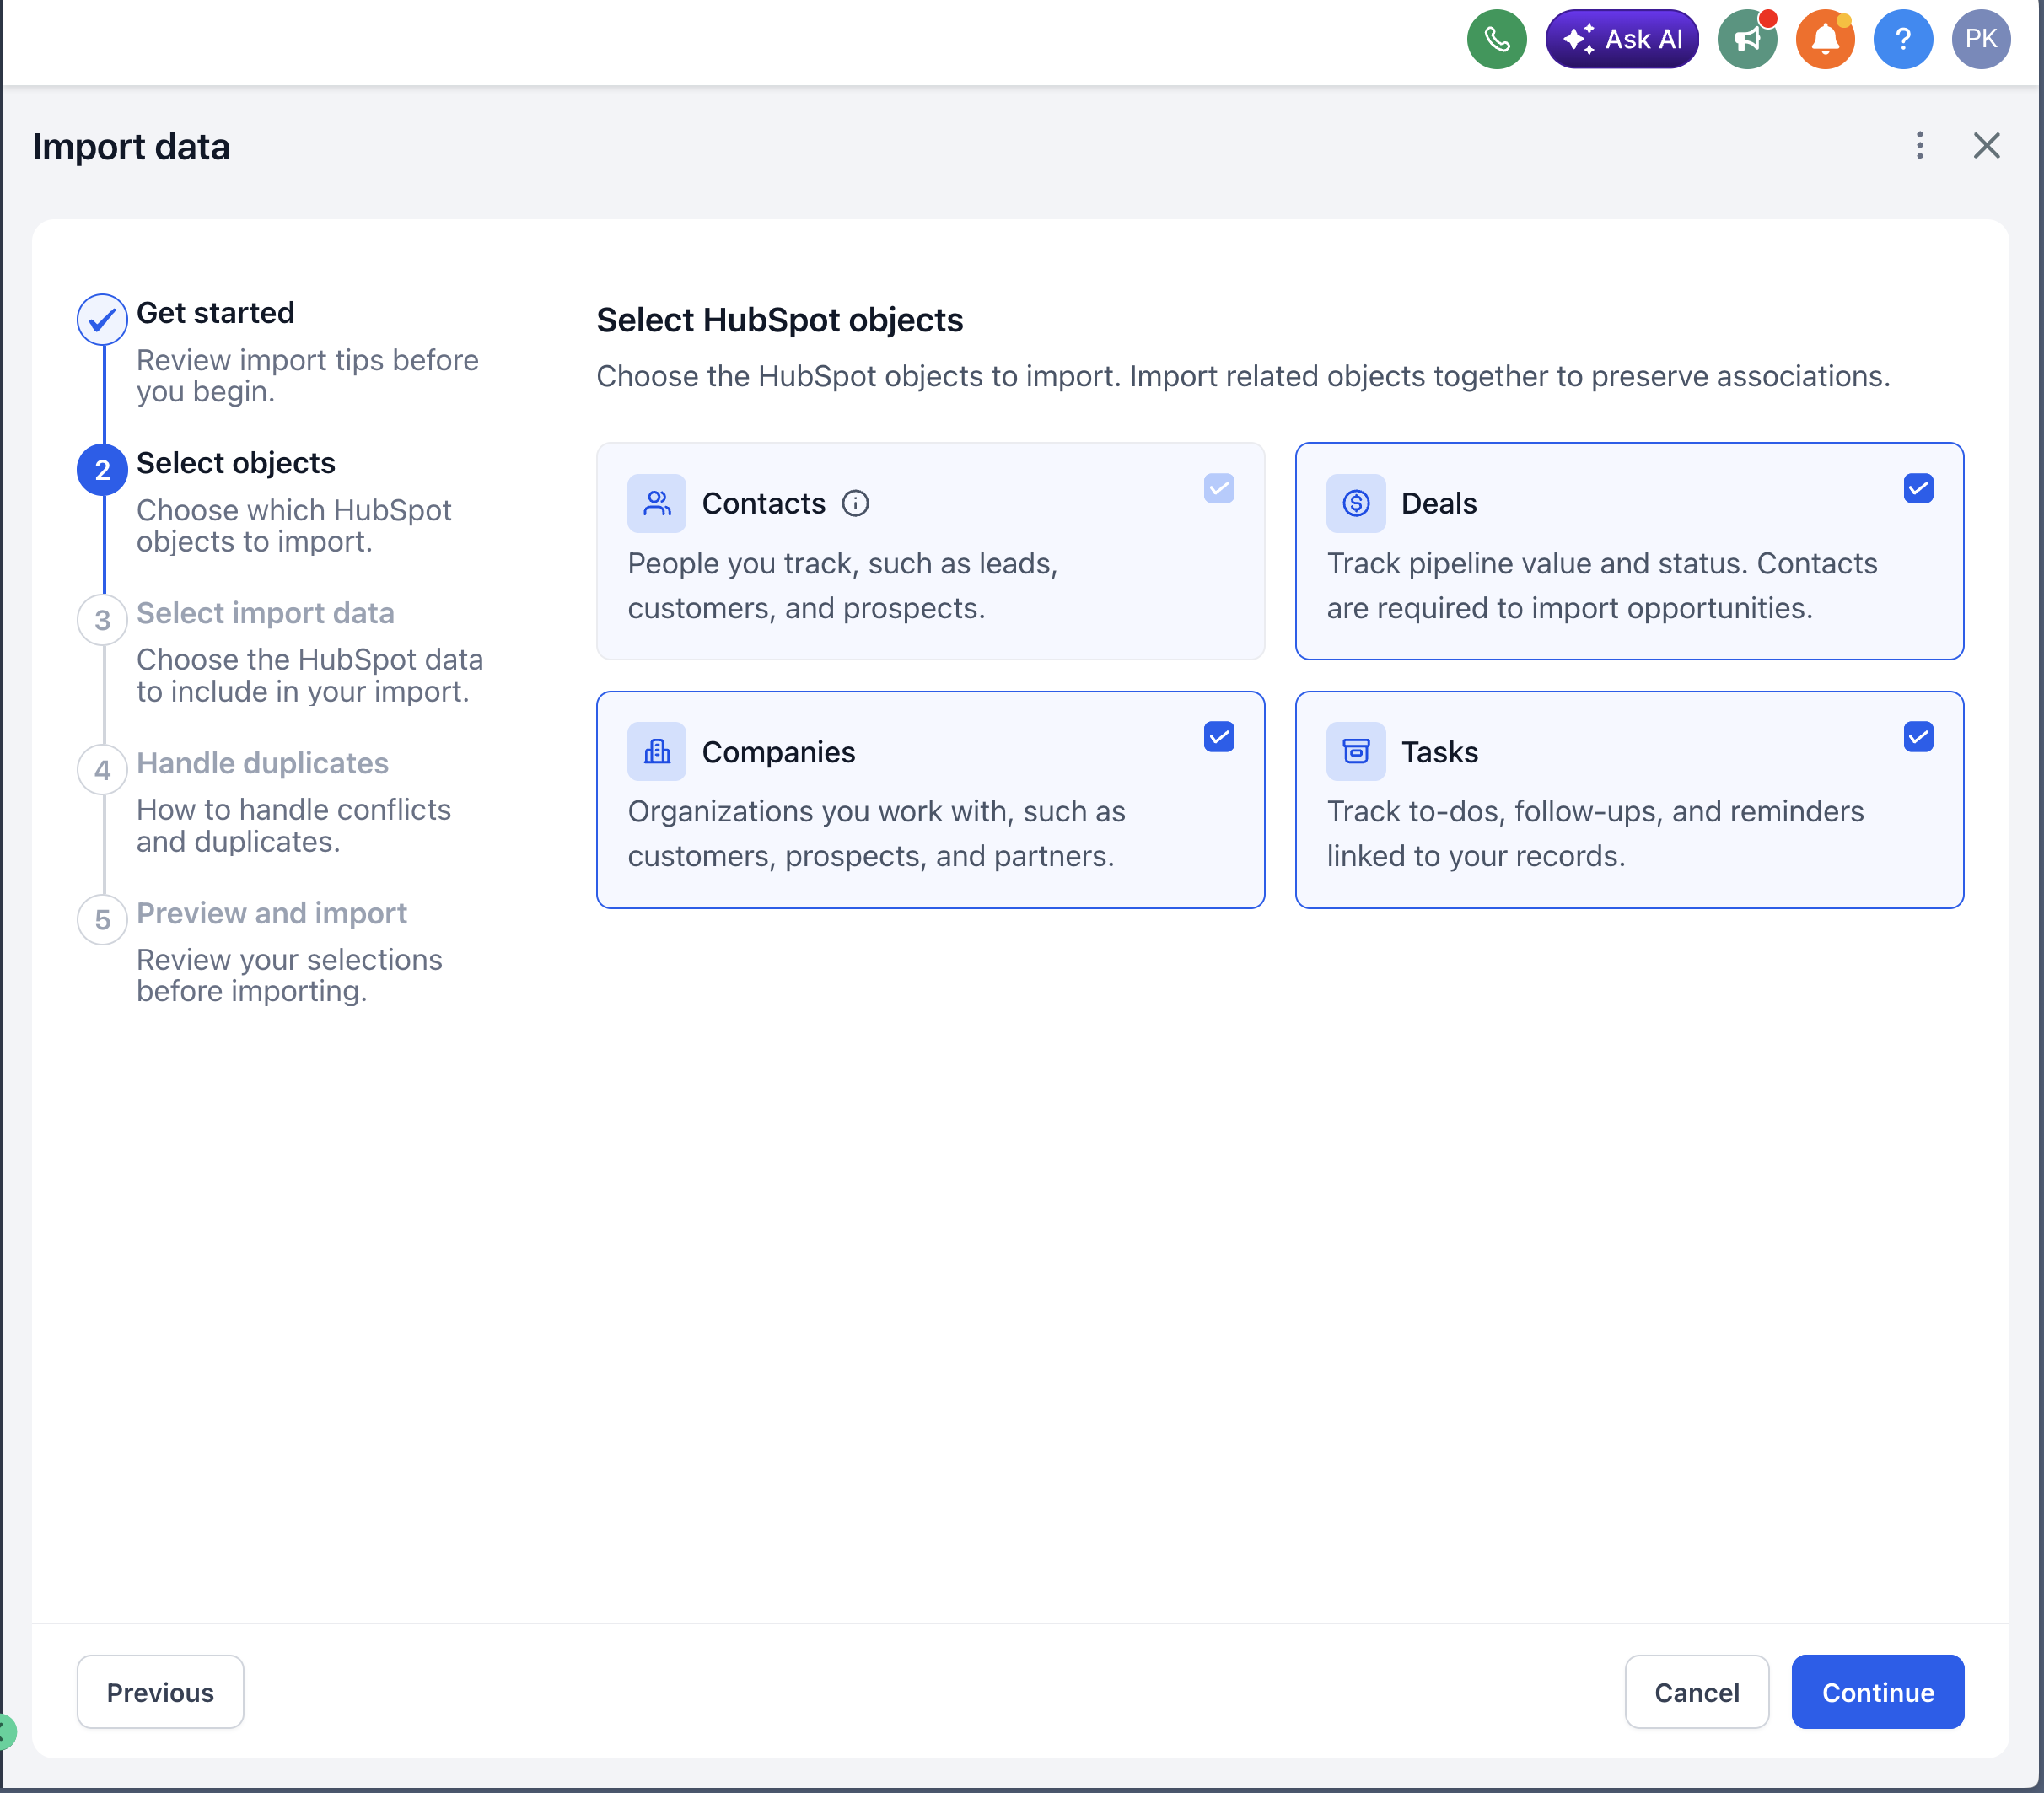
Choose which HubSpot objects to bring over:
Contacts: People you track (leads, customers, prospects).
Tasks: track to-dos, follow-ups, and reminders linked to your records.
- Deals: Track pipeline value and status. Deals are imported as Opportunities.
Importing Deals requires Contacts. Contacts will be auto-selected if you pick Deals. - Companies: Brings over your company object records as Companies.
Tick the boxes for what you want, then click Continue.
Step 6: Review What is Included
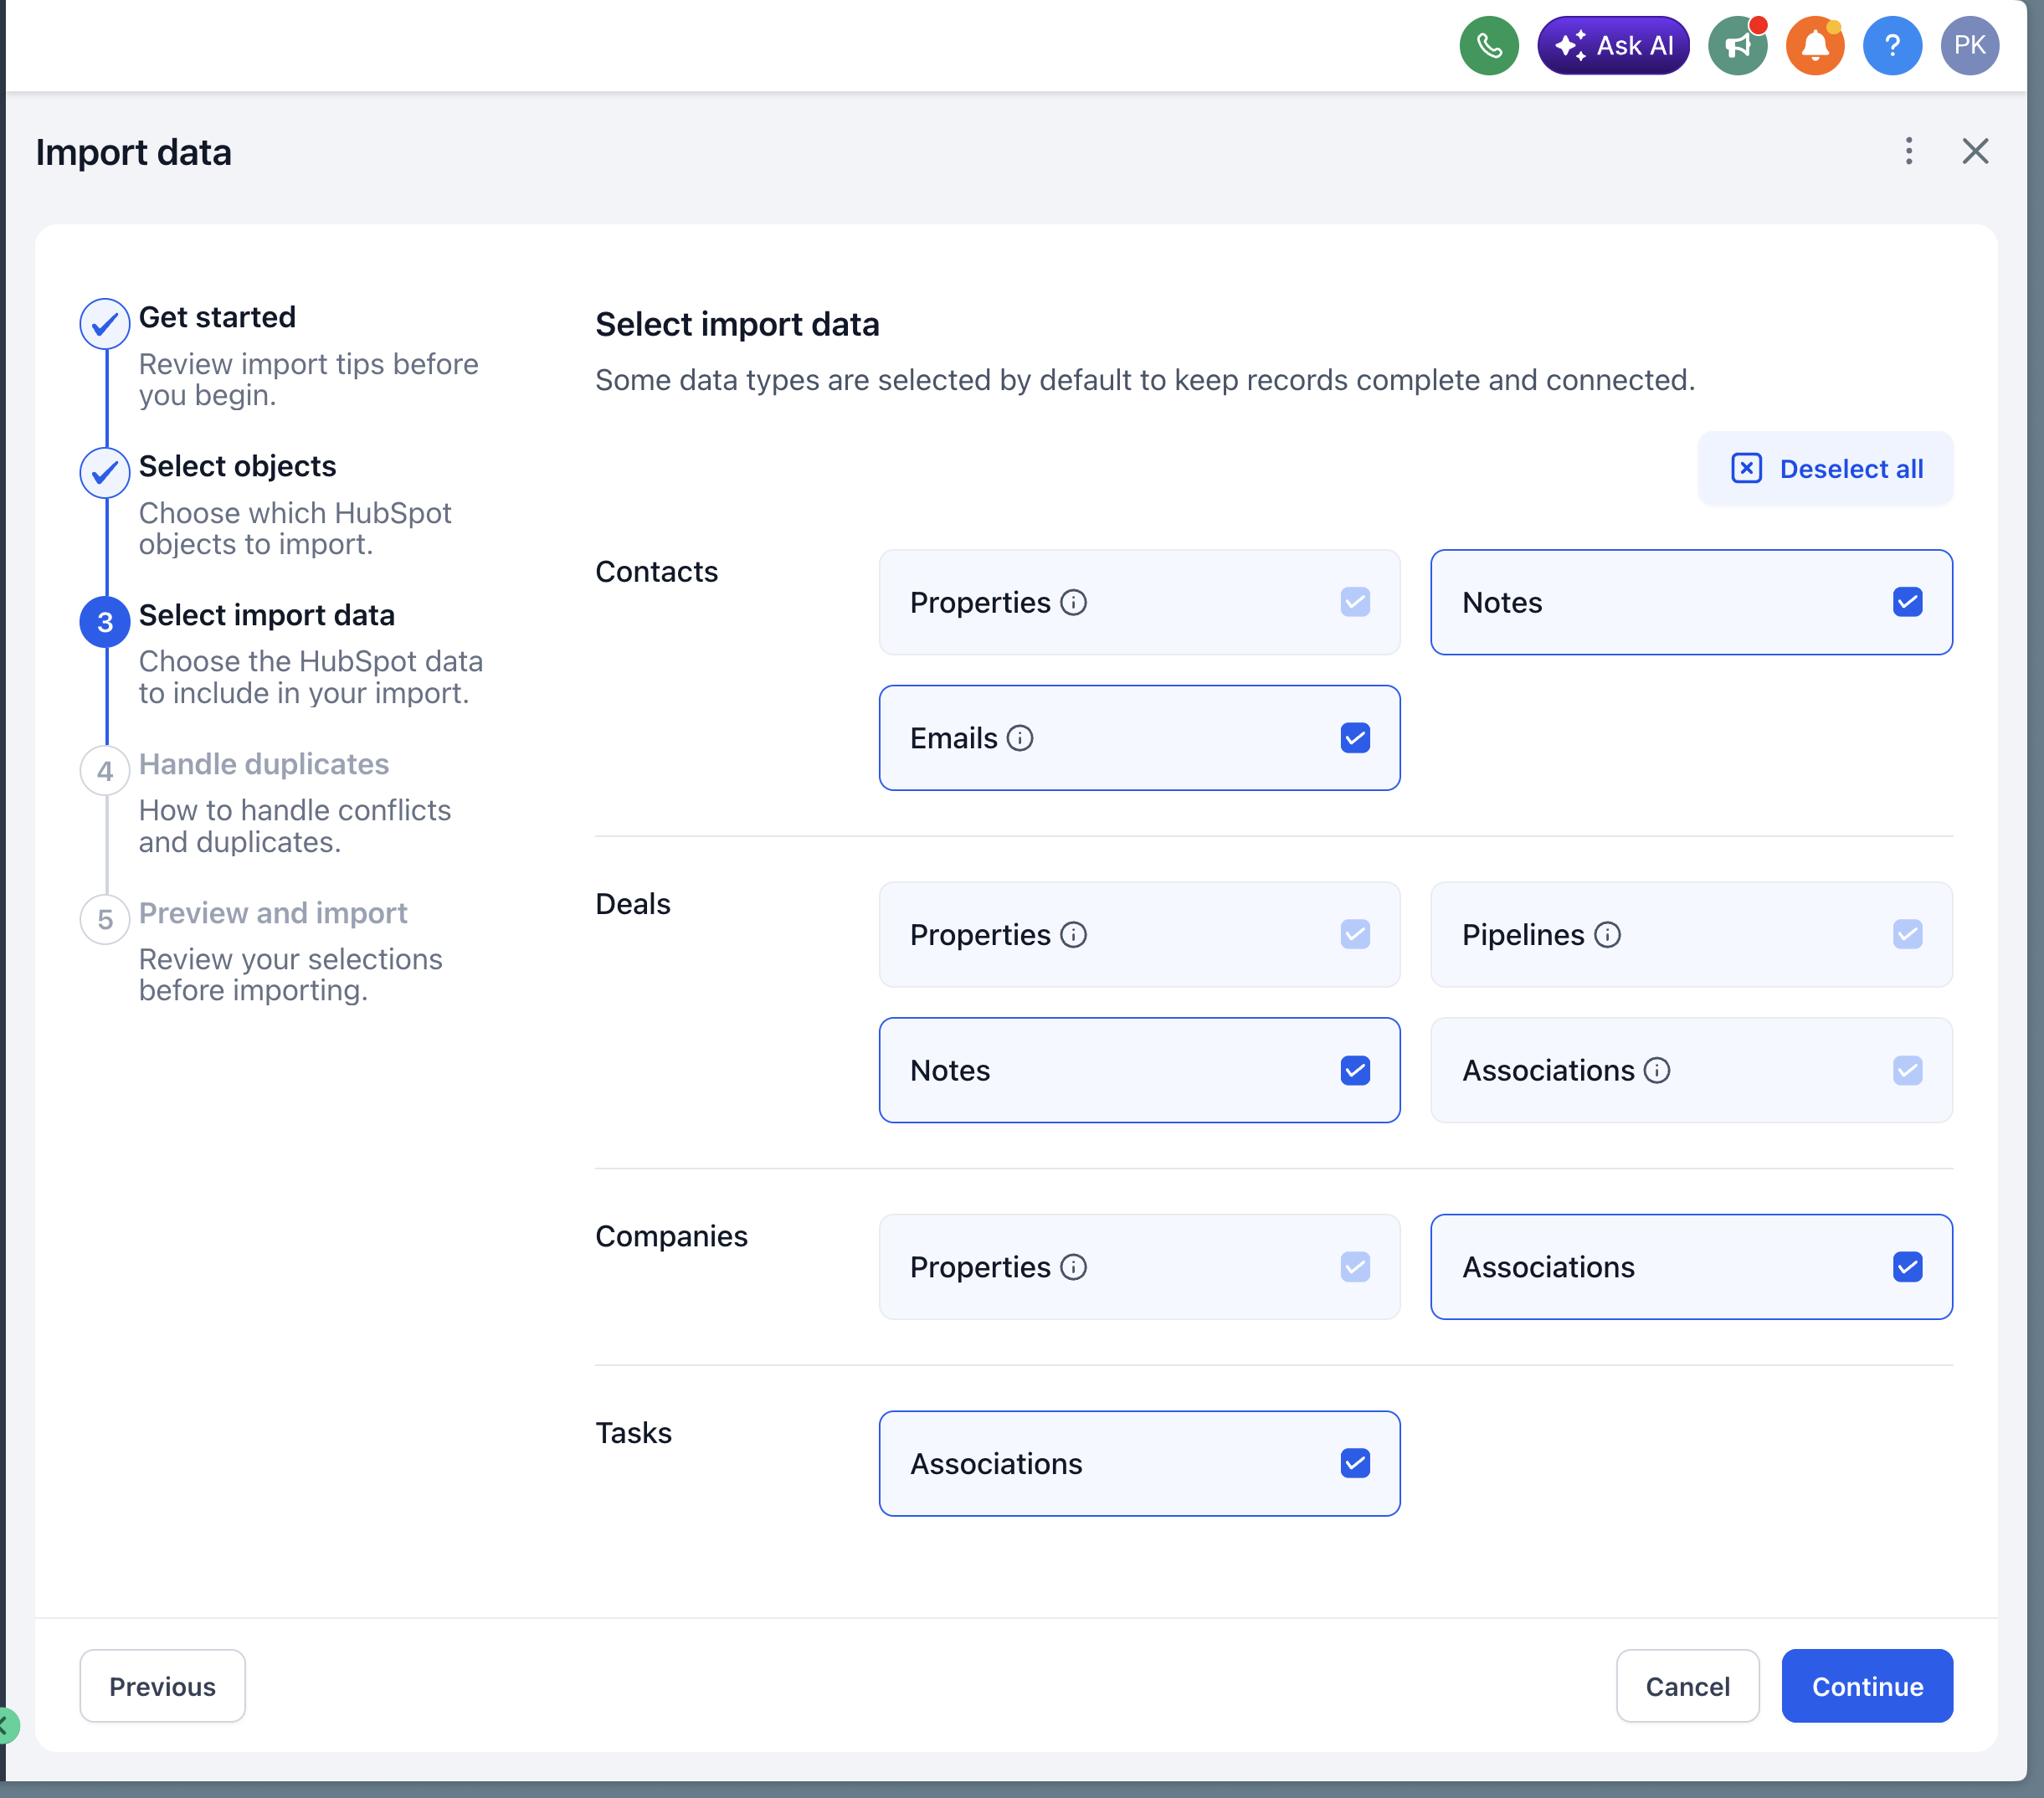
The wizard automatically includes the related data needed to keep your records complete and connected:
Contacts: all properties (standard + custom fields), notes, emails
Tasks: associations.
- Deals: all properties, pipelines, notes, associations.
- Companies: properties and associations.
Pipeline stages are imported along with pipelines. You don't need to recreate them.
Two things to watch for with custom fields:
Custom fields are mapped by key. If a custom field with the same key already exists in your account, the import will throw an error for that field. Rename or remove the existing one before importing if you want a clean mapping.
Mismatched name vs. label. If a custom field's internal name and display label are different in HubSpot, you may see issues during import. Reviewing your HubSpot custom fields and aligning name/label before importing avoids surprises.
Click Continue to move on.
Step 7: Confirm Record Counts
Before the import starts, the wizard shows what will be brought over and how many records are involved. For each row you'll see:
HubSpot data: what's in HubSpot (e.g., Contacts – records, Deals – pipelines).
Imported as: what it becomes in your account (e.g., Contacts – custom fields, Opportunities – pipelines).
Records found: how many records will be imported.
Note: The Records found count for custom fields can differ from what you see in HubSpot's UI. The wizard counts only fields it can map and import, so a small gap between the two numbers is expected.
Optionally click the Edit (pencil) icon next to contact properties or deal properties to select the specific properties to include.
Click Confirm and start import to kick it off. Confirm once more in the dialog that follows.
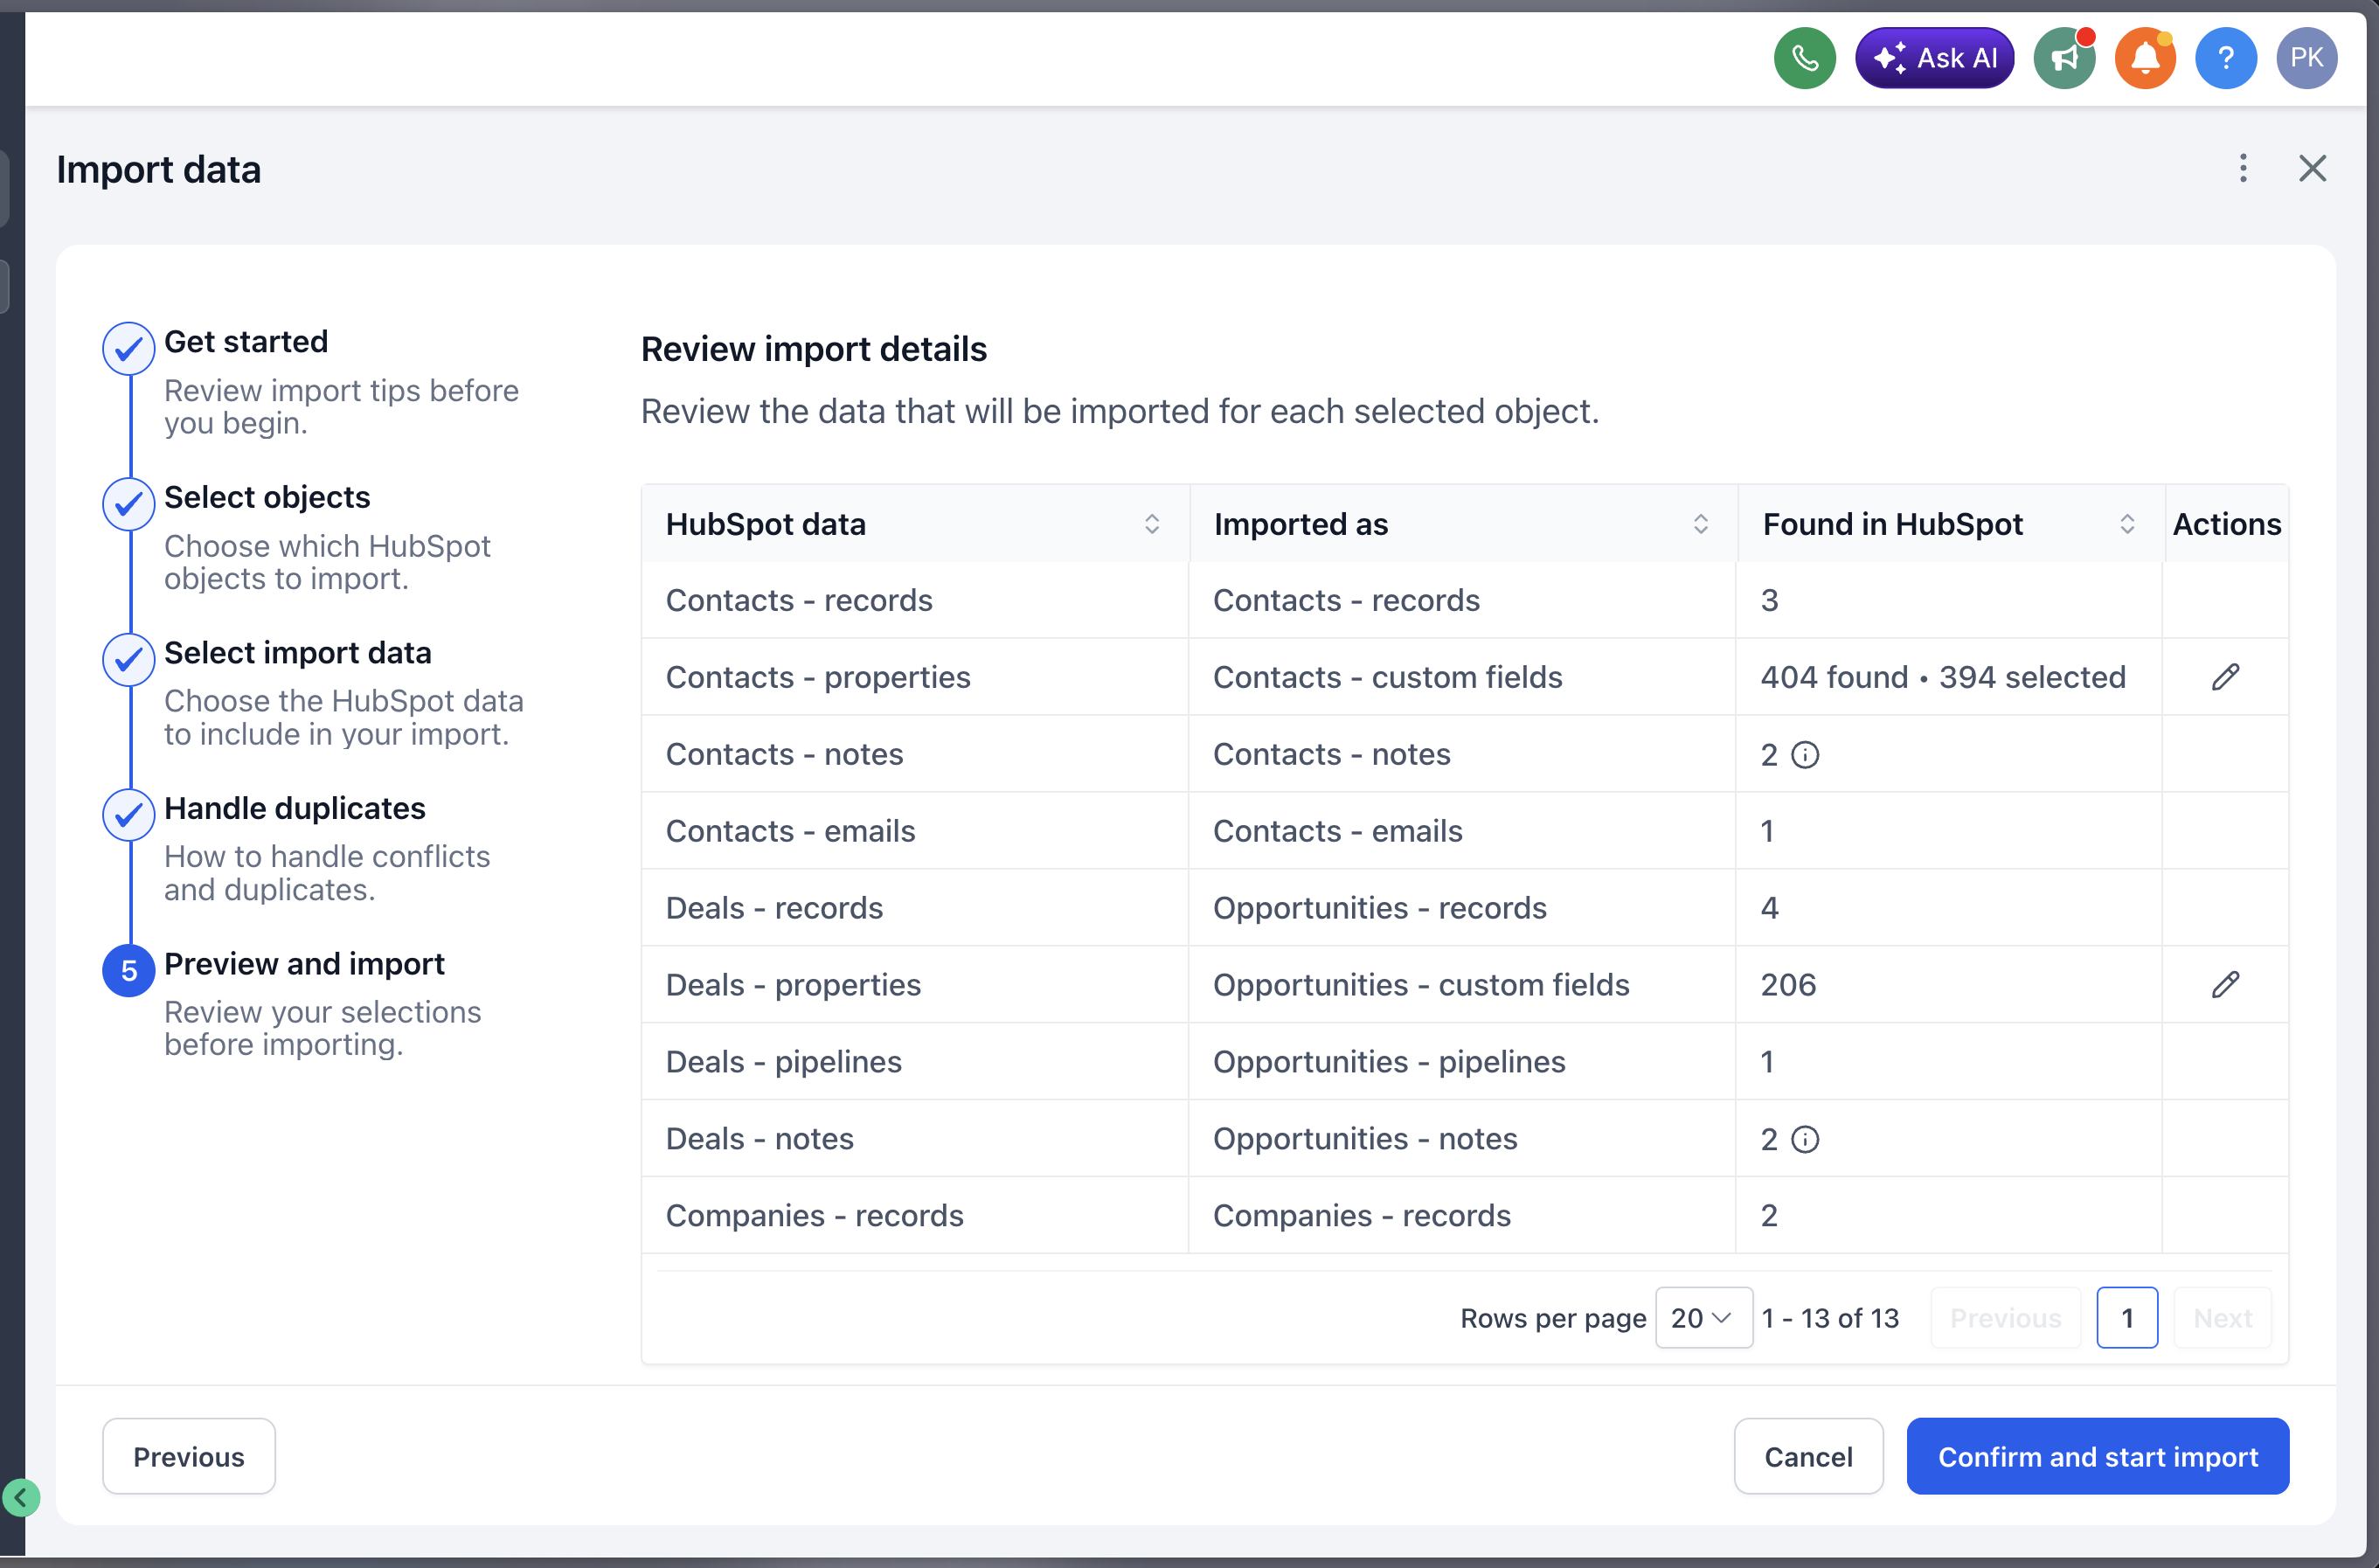
You can also choose to modify and bring in only certain custom fields from HubSpot and not all of them.
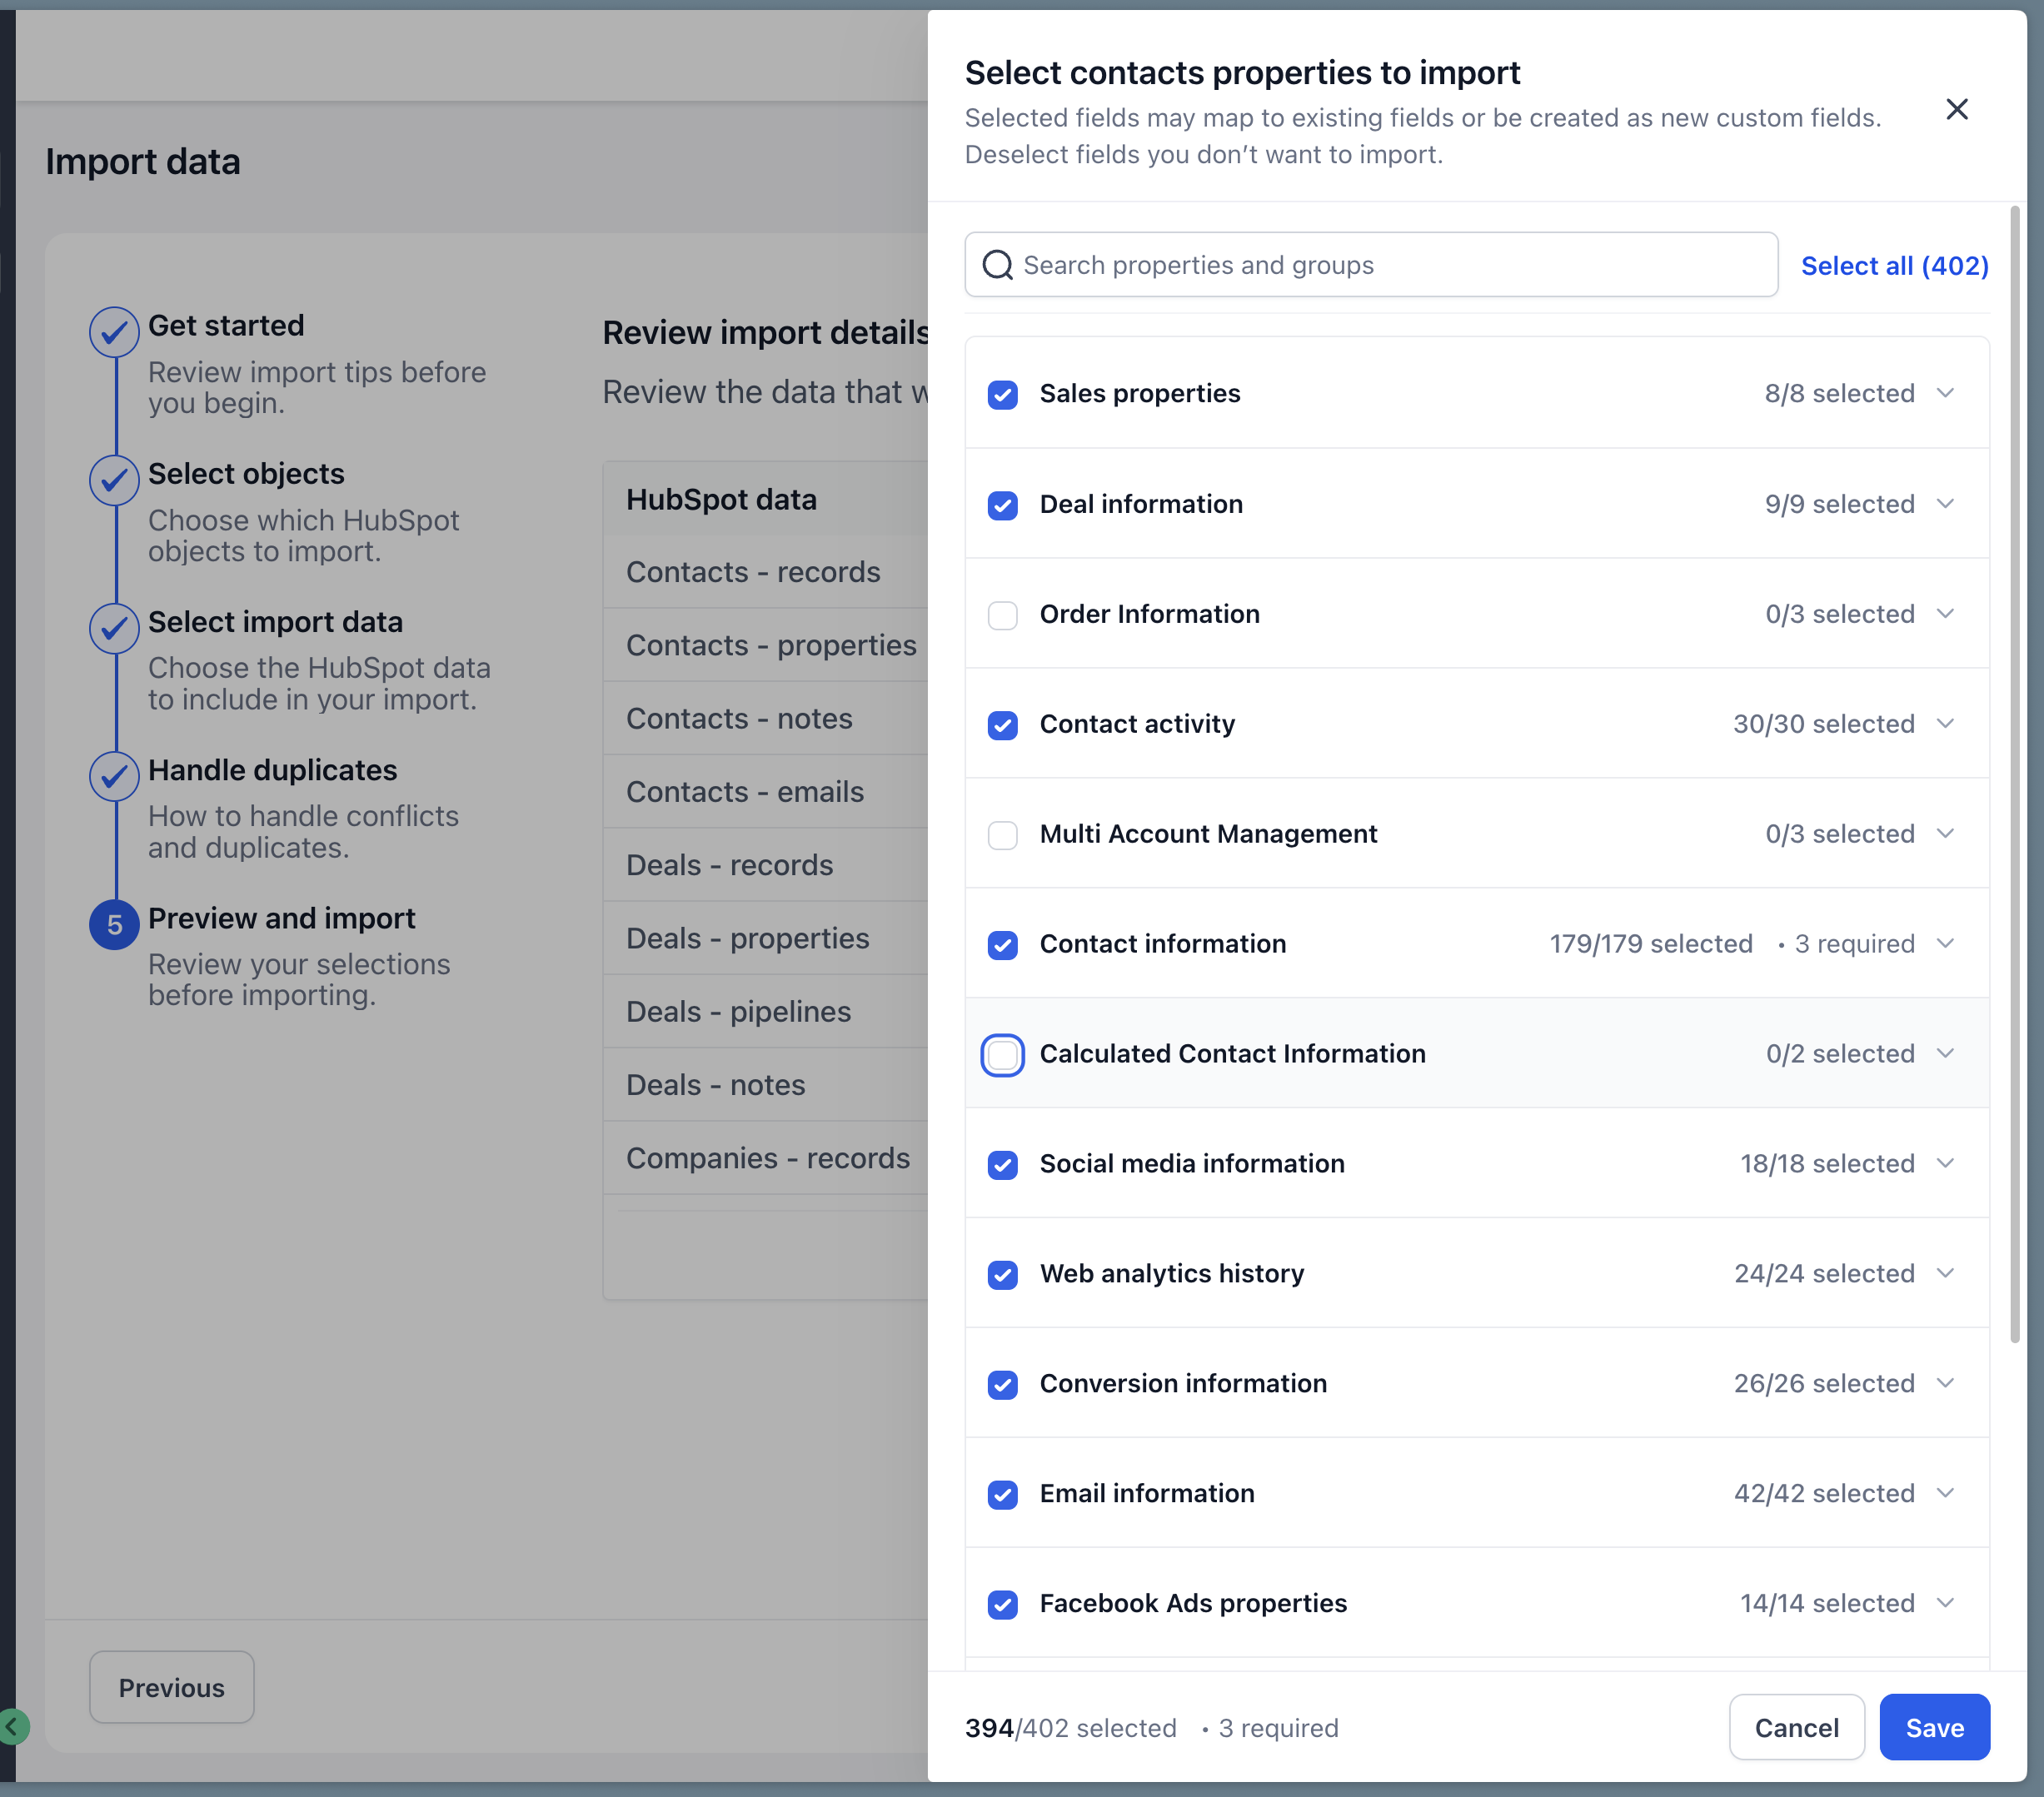
Step 8: Your Import is Running
You'll see a confirmation at the top of the page: Your HubSpot import has started and is running in the background. The Import history table below shows the in-progress run with a live Processing % status.
You can close the window or navigate away, the import keeps running. Come back to this page anytime to check progress.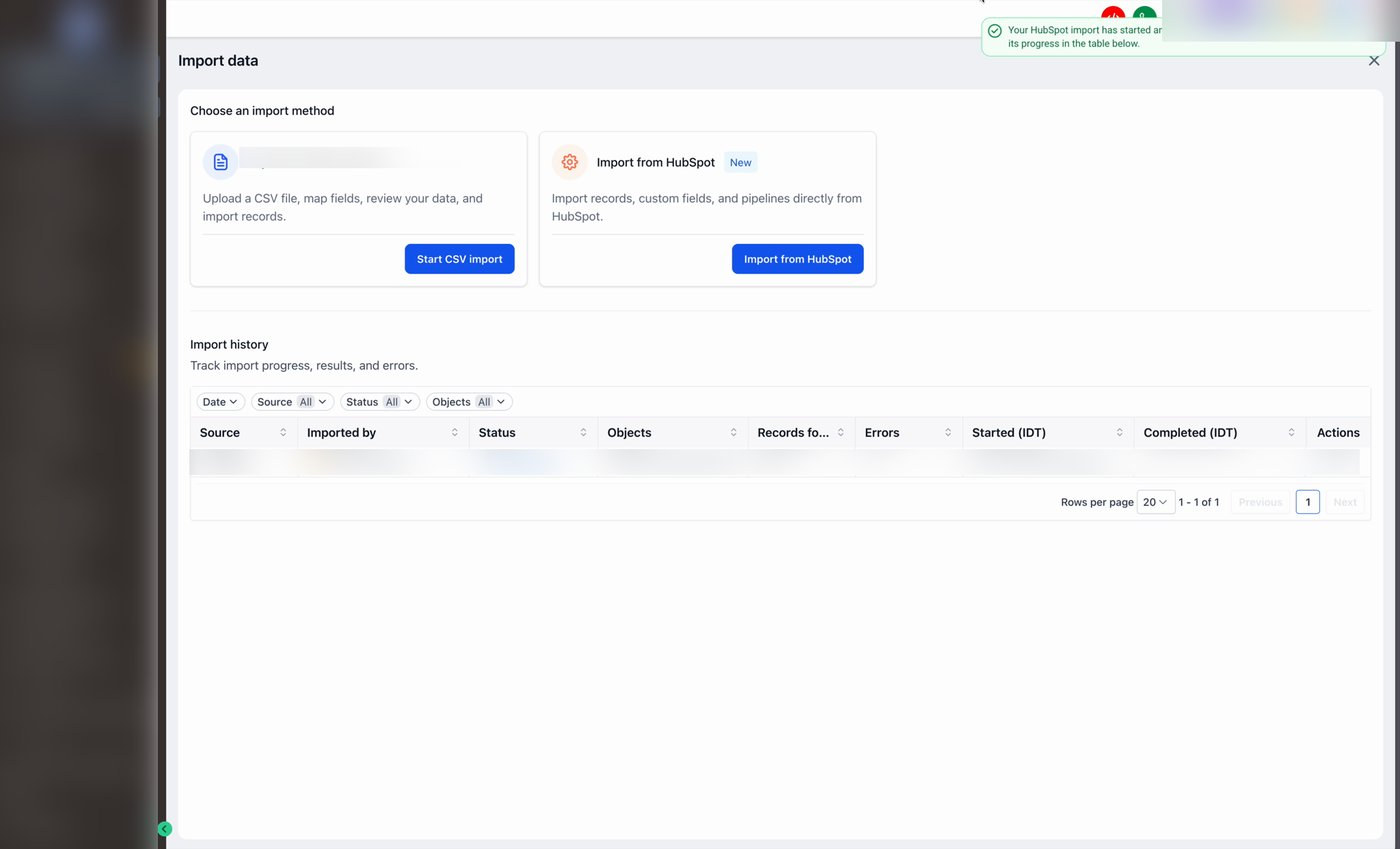
Step 9: Open Import Details (Object View)
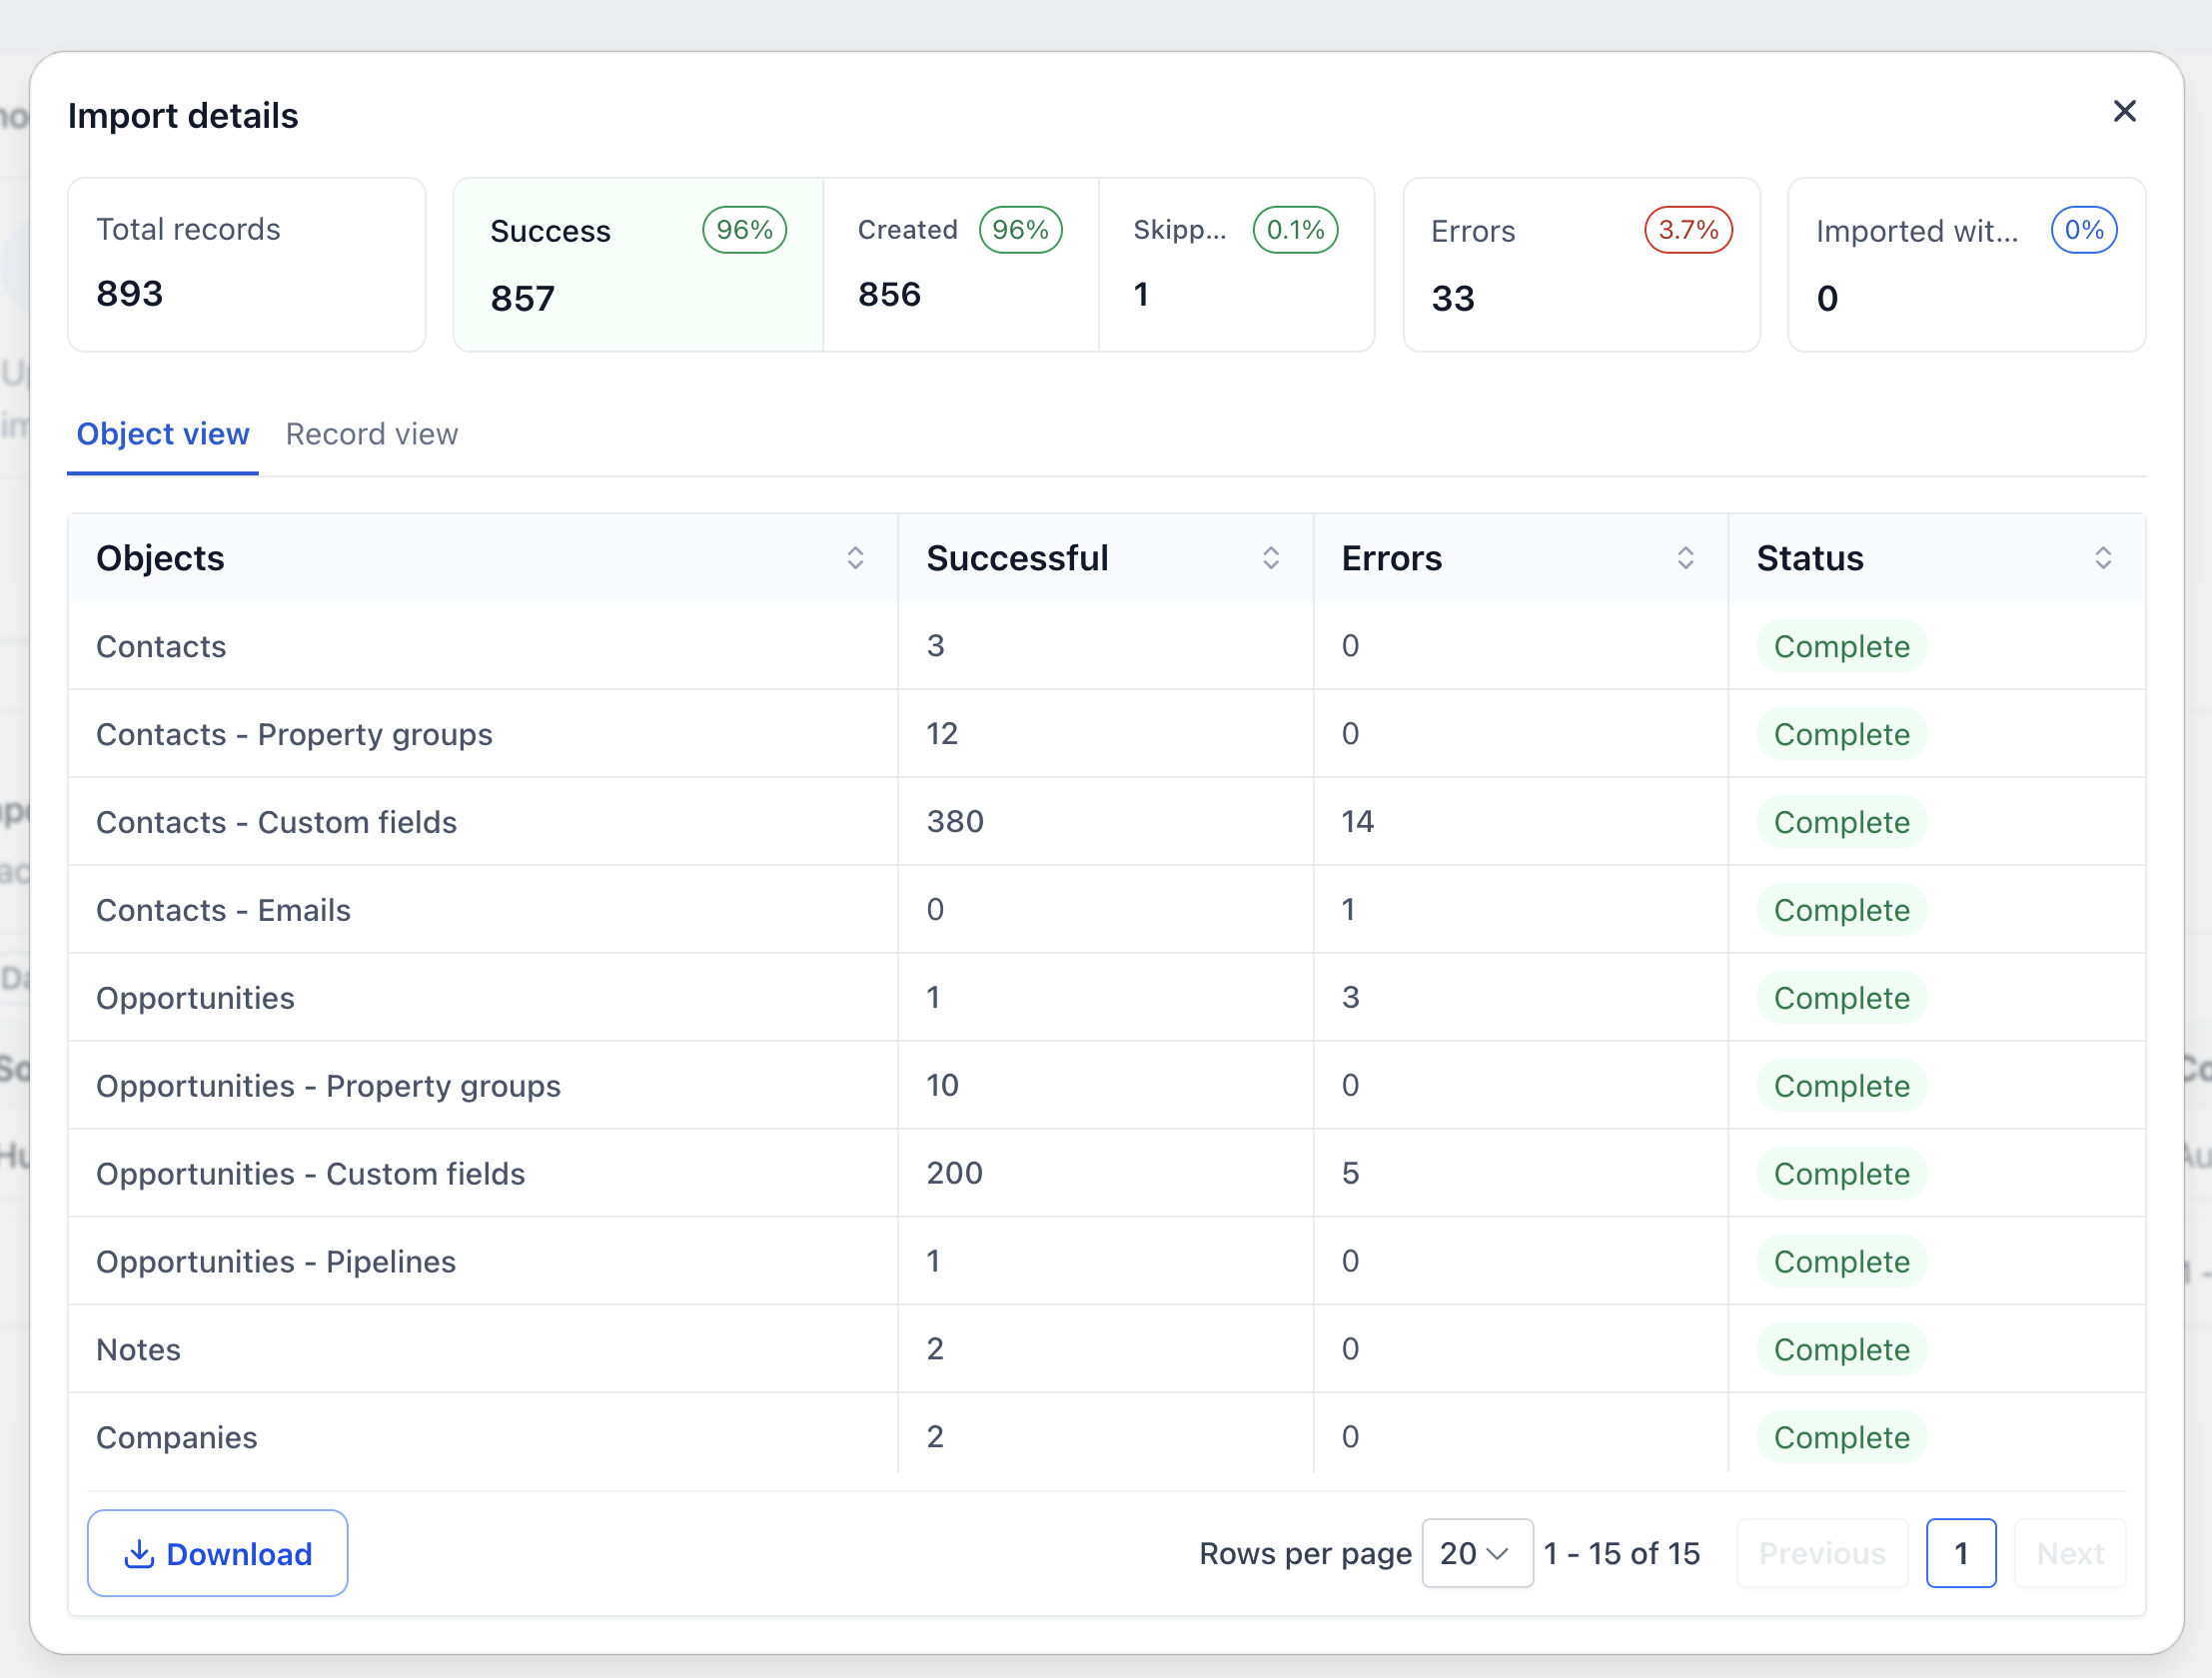
When you're ready to review results, click the stats icon in the Actions column of an import row. The Import details modal opens.
The four cards at the top give you the headline numbers:
Total records: everything the import touched.
Success: records that imported cleanly (with the success rate).
Errors: records that didn't import.
Imported with warnings: records that imported but have something worth reviewing.
Object view (the default tab) summarizes each object: how many succeeded, how many errored, and overall status.
Step 10: Drill into Individual Records
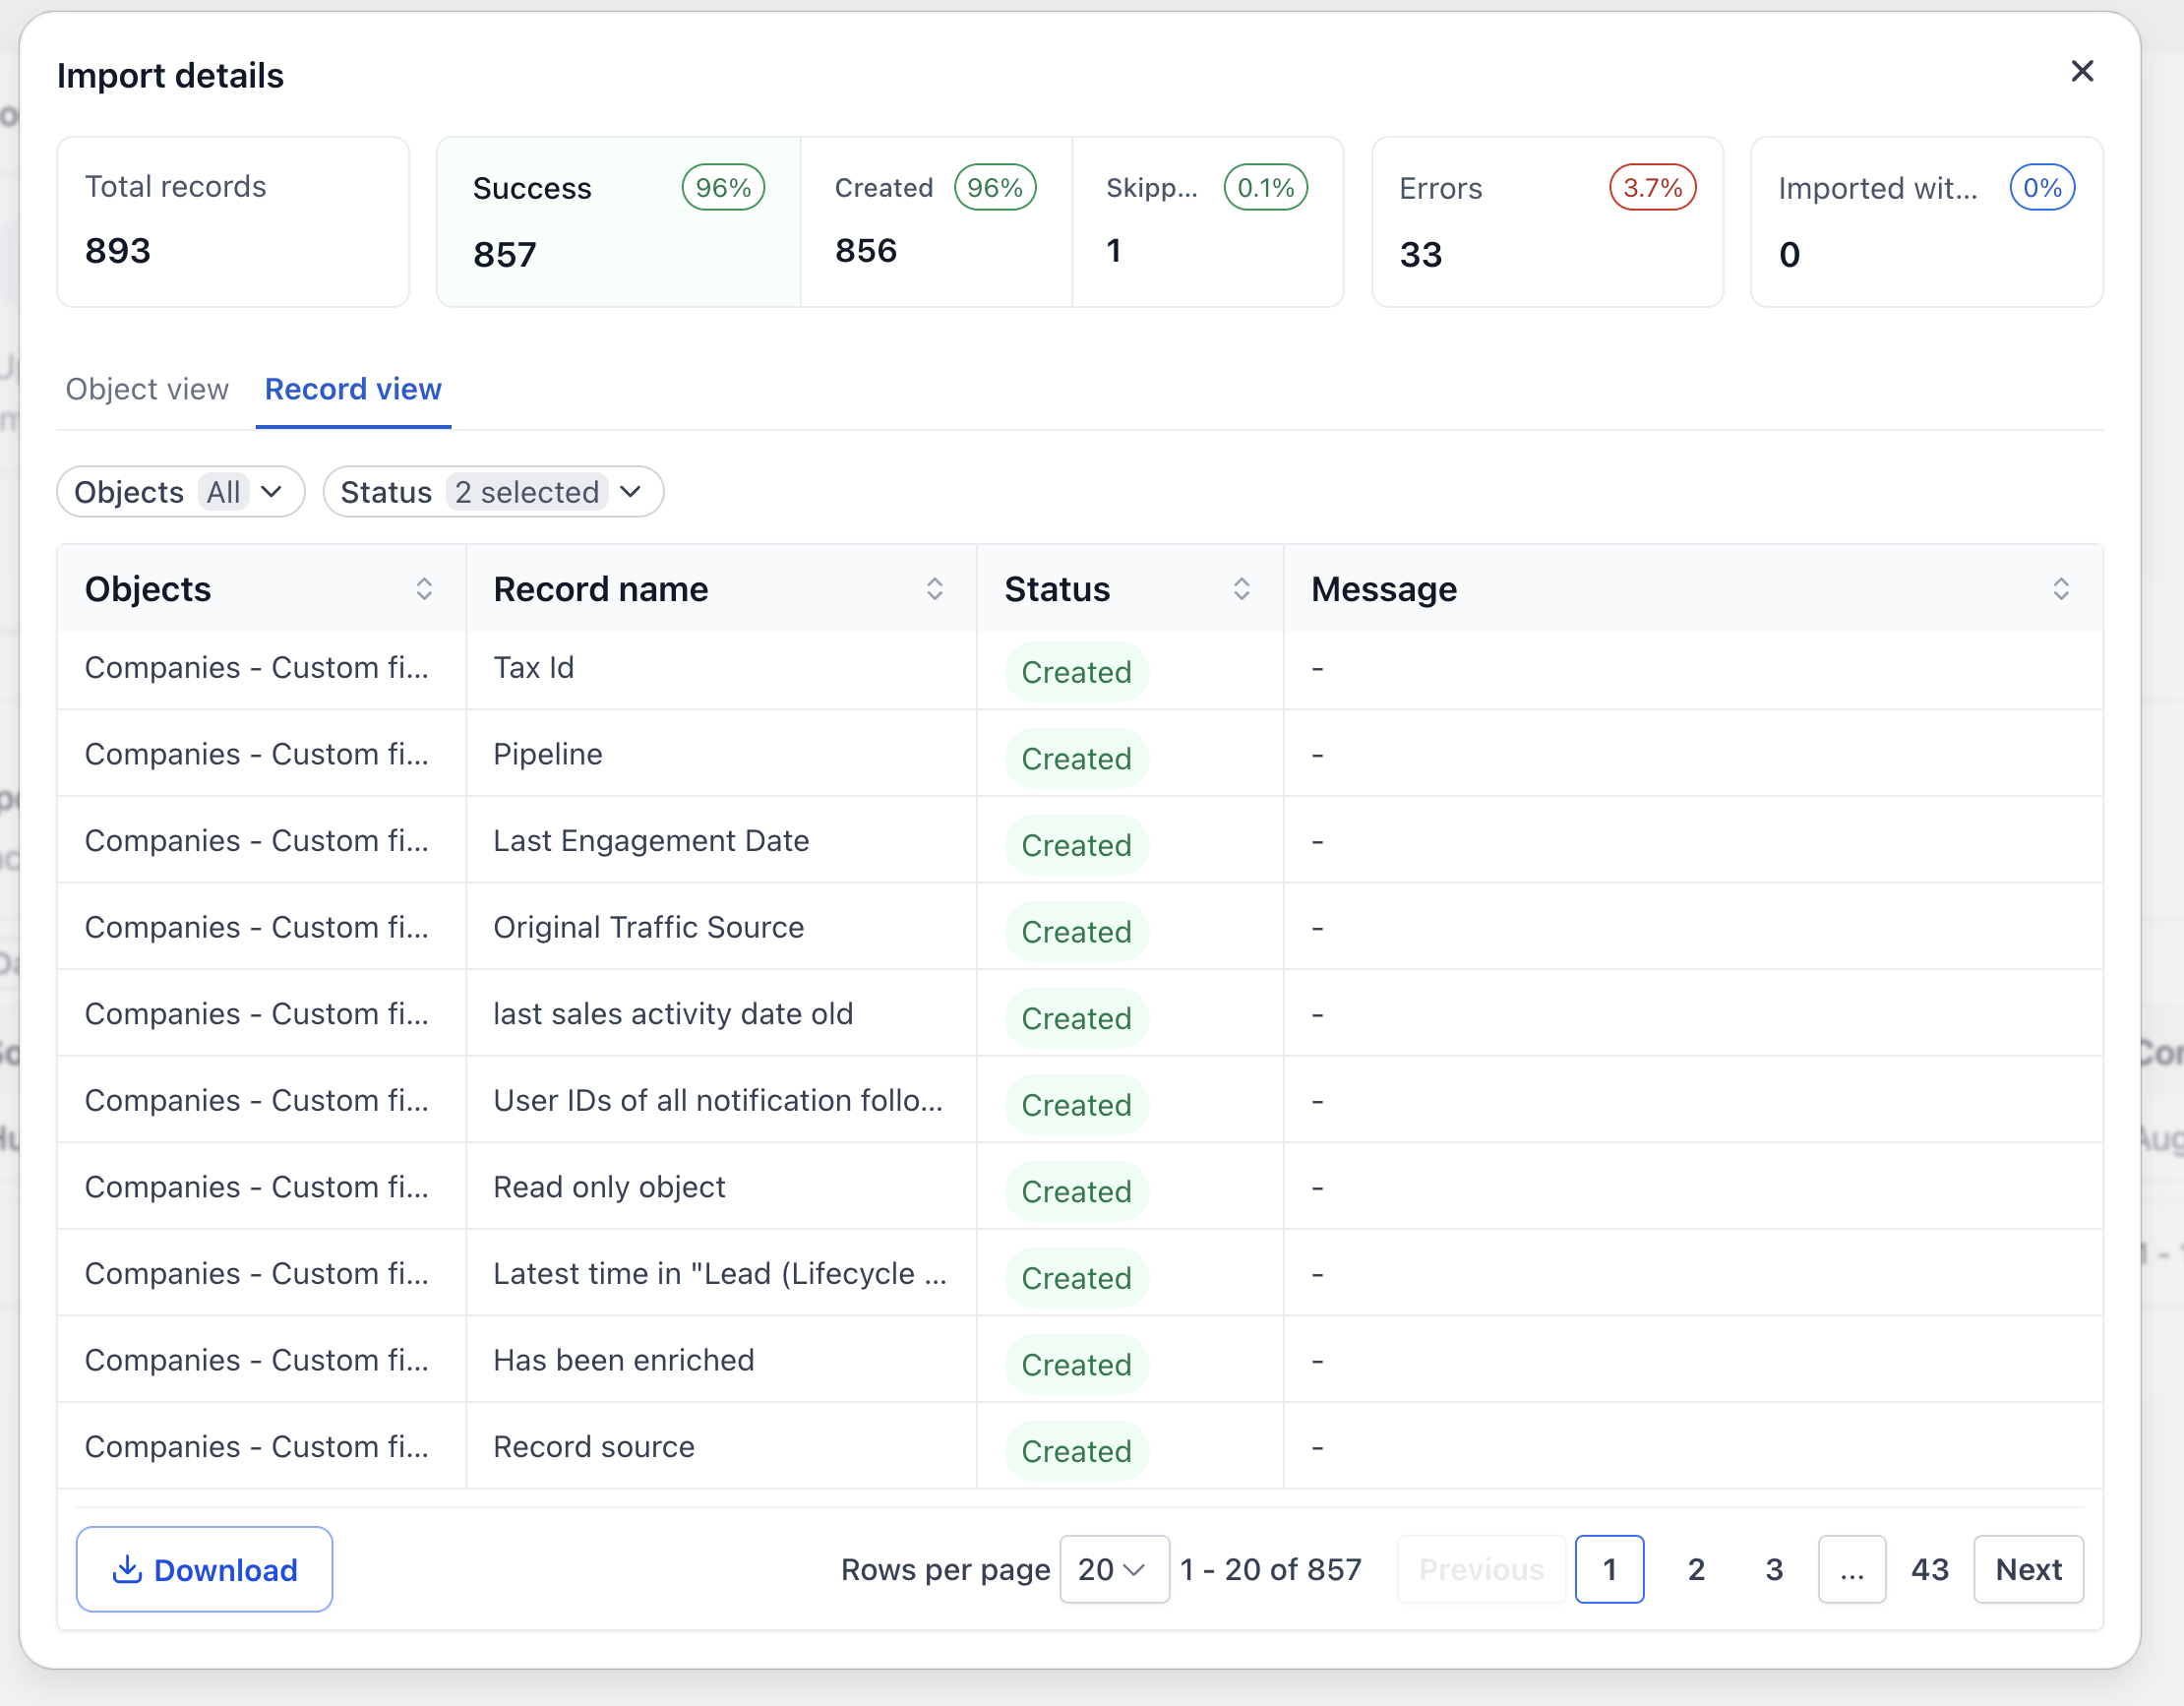
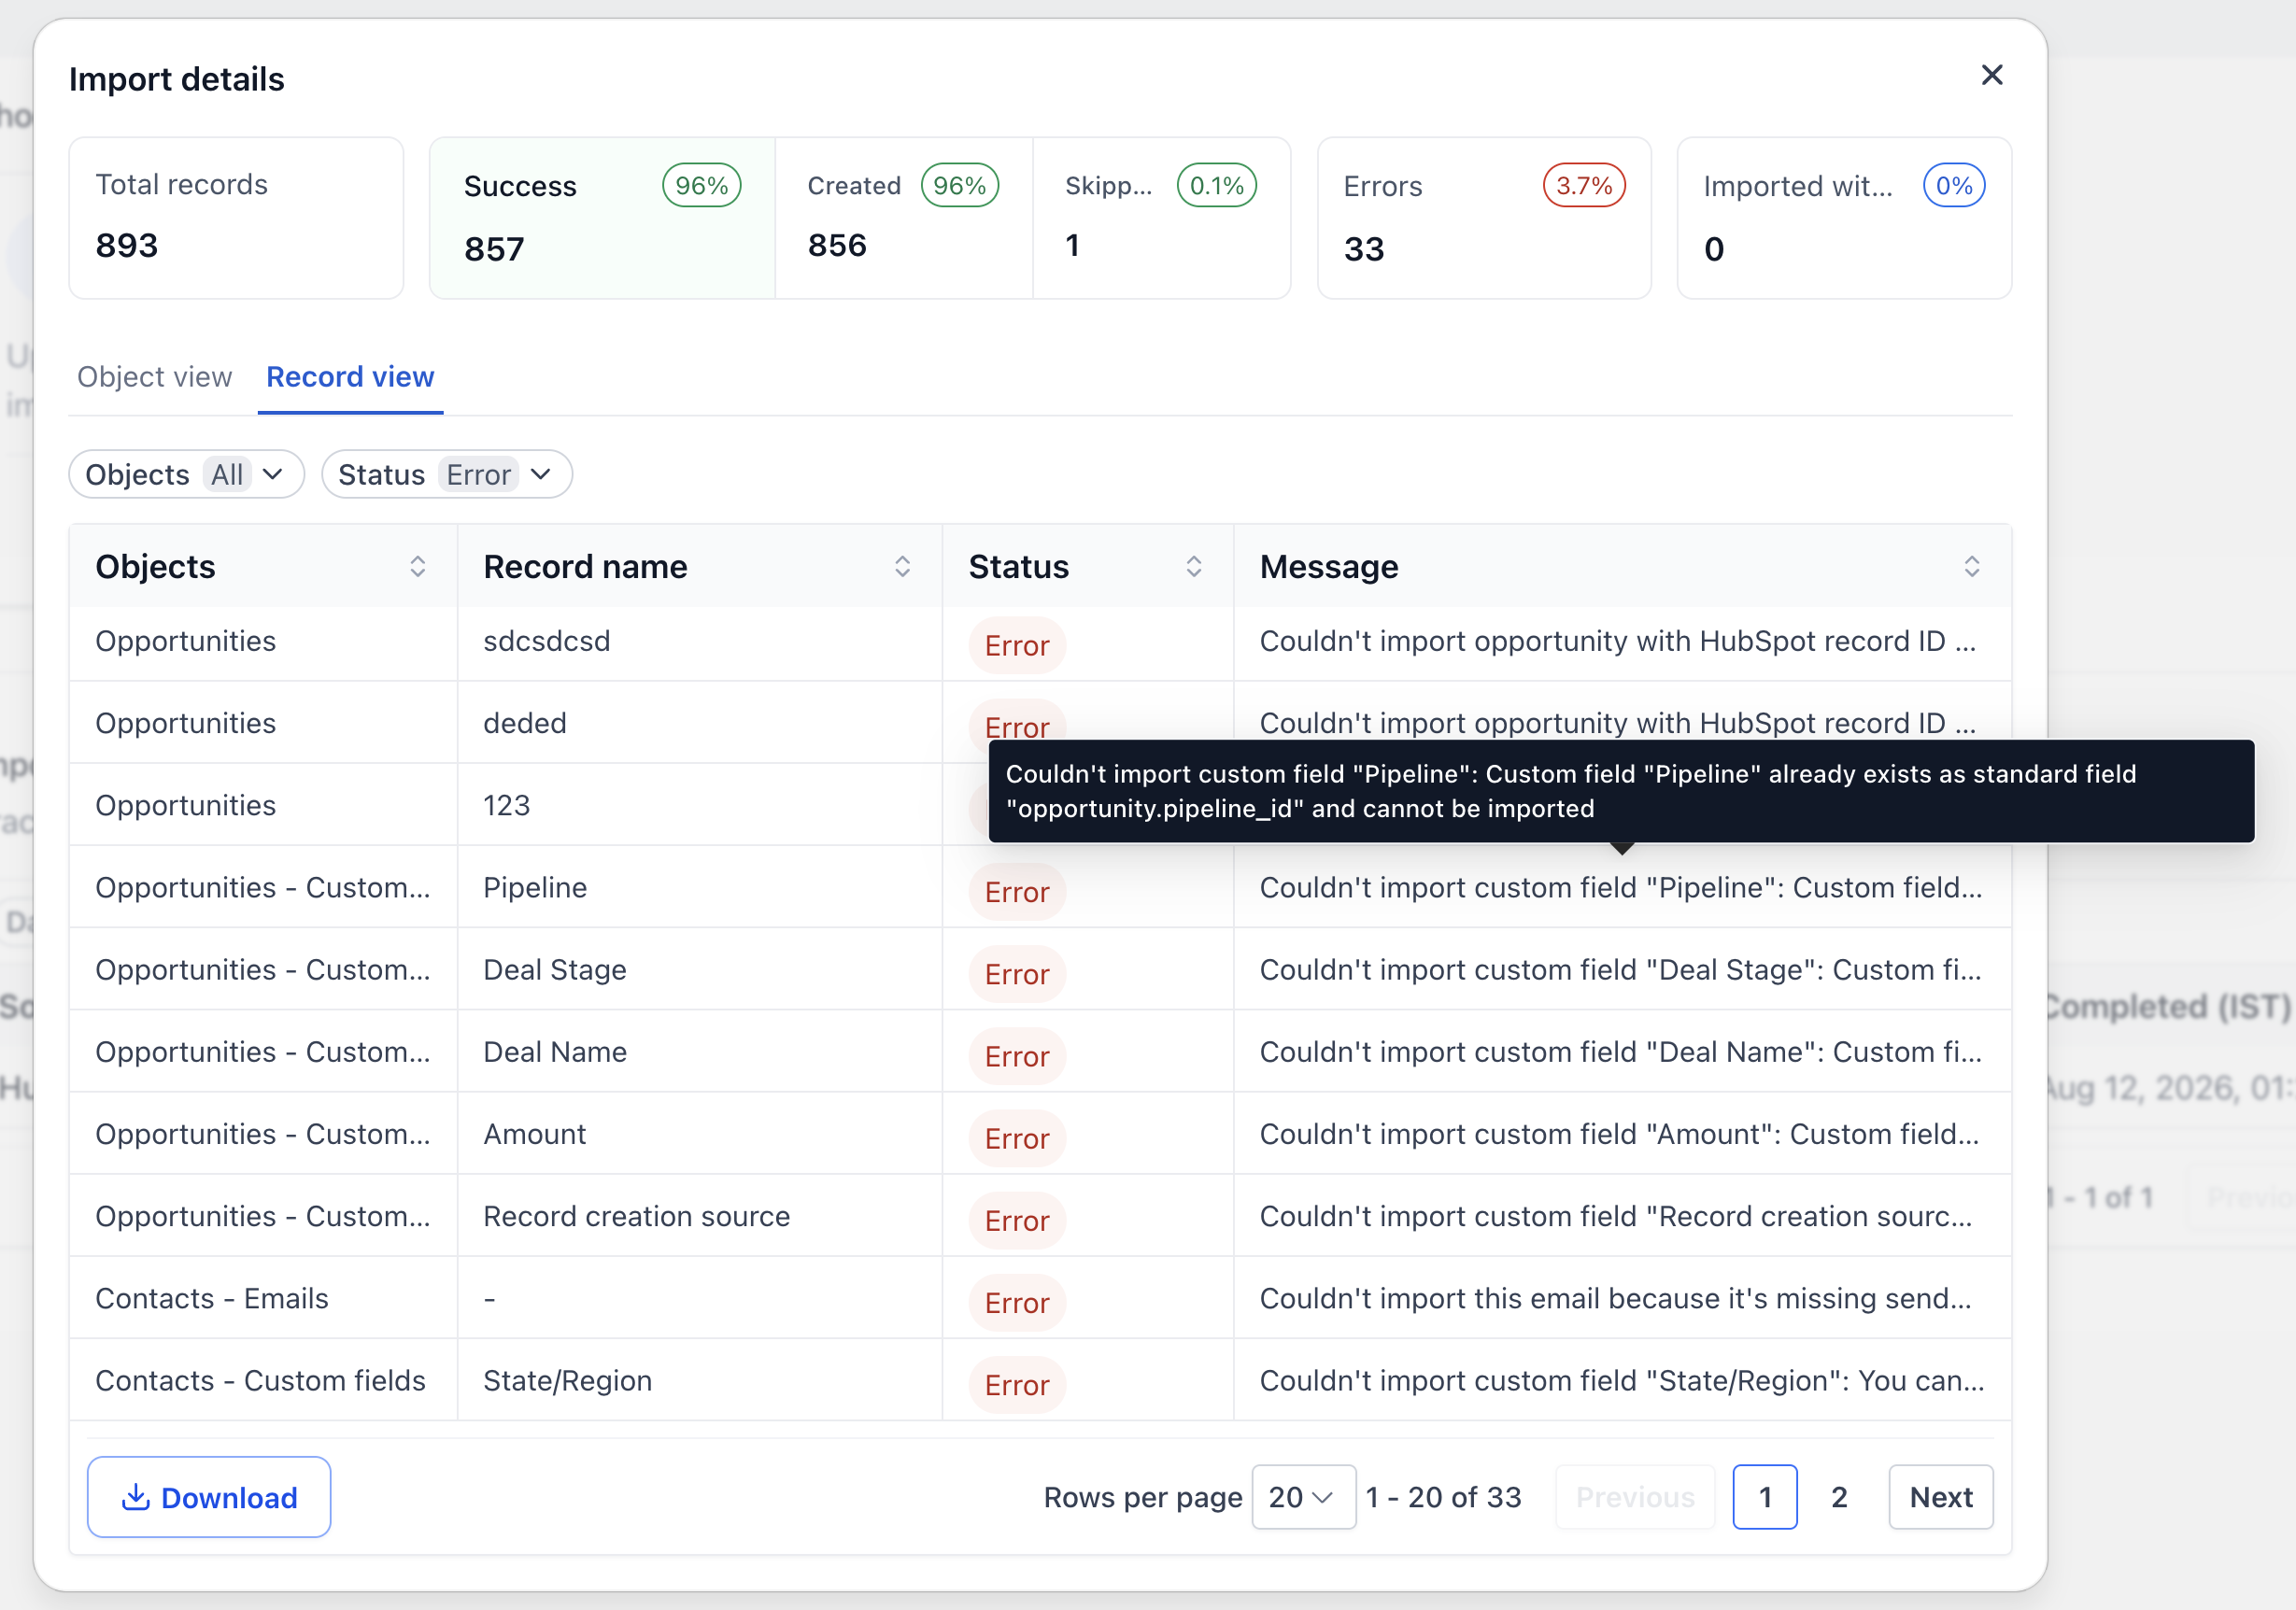
Switch to the Record view tab to see every record one row at a time.
Use the filters at the top:
Objects: narrow to Contacts, Contacts – Custom field, Opportunities, etc.
Status: filter by Success, Error, or Imported with warnings.
Step 11: Review and Fix Errors
Switch the Status filter to Error to see every record that failed. Each row tells you which object failed and why, with the HubSpot record ID in the message so you can find it back in HubSpot.
Click Download in the bottom-left to export the full error list as a CSV, useful for fixing data in HubSpot, then re-running the import.
Common error causes are covered in the Troubleshooting and FAQ sections below.
Troubleshooting
The "Records found" count is lower than what HubSpot shows.
The wizard's count includes only fields the import can actually map and bring over. Some HubSpot fields are excluded (for example, fields with unsupported types), so you may see a small gap between HubSpot's UI and the count in the import preview. The records that don't make it into the count are the ones the import would skip anyway.
I see errors saying "Couldn't import contact with HubSpot record ID…"
That message tells you exactly which HubSpot contact failed. Common reasons:
- The contact has a file attached to a field. File imports aren't supported yet — any contact (or deal) with a file attachment will throw an error. Workaround: download the file from HubSpot, remove the attachment from that field, then re-run the import. The file itself can be re-attached manually after import.
- Custom field key collision. Custom fields are mapped by their internal key. If a field with the same key already exists in the destination, the import errors on that field. Rename or delete the existing field before importing.
- Custom field name and label don't match. When a HubSpot field's name and label differ, the importer can get confused about which one to use. Aligning them in HubSpot before importing usually clears it up.
Frequently Asked Questions
Q: Can I re-import or pick up where I left off?
Yes, start a new import from the Import data page. Each run is logged separately in Import history, so you can compare runs and check the error CSV from a previous attempt before re-running.
Q: Does the import overwrite existing records?
By default, no. Imported records are added alongside whatever's already in your account. That's why we recommend importing into a clean account — and why "Allow duplicates" should be on during the import (see Before you start).
Q: Where can I see the full list of errors?
Open Import details from any import row, switch to Record view, set Status to Error, then click Download to export the full list as a CSV.