
Workflow Trigger - Appointment Status
Managing appointments efficiently is crucial for any business. The Appointment Status Workflow Trigger in Chat To Clients CRM automates actions based on appointment status updates, reducing manual work and ensuring timely follow-ups. In this guide, we’ll cover what this trigger is, its key benefits, and how to configure it step-by-step.
TABLE OF CONTENTS
- What is the Appointment Status Workflow Trigger?
- Key Benefits of the Appointment Status Workflow Trigger
- Configuring the Appointment Status Workflow Trigger
- Frequently Asked Questions
What is the Appointment Status Workflow Trigger?
The Appointment Status Workflow Trigger is an automation feature that activates workflows when an appointment is scheduled or its status changes. It helps businesses automate reminders, follow-ups, and internal updates based on various appointment statuses. With this trigger, users can streamline their appointment management and enhance customer engagement.
Key Benefits of the Appointment Status Workflow Trigger
- Automated Appointment Management: Ensures smooth scheduling and follow-ups without manual intervention.
- Improved Client Engagement: Sends timely reminders and notifications, reducing missed appointments.
- Enhanced Team Coordination: Notifies relevant team members about changes in appointment status.
- Reduced No-Show Rates: Automatically triggers re-engagement workflows for canceled or missed appointments.
- Multi-Participant Support: Enroll not just the primary contact but also appointment guests into status-based workflows, ensuring all participants receive timely updates for cancellations, confirmations, and no-shows.
Configuring the Appointment Status Workflow Trigger
Step 1: Access Workflow Builder
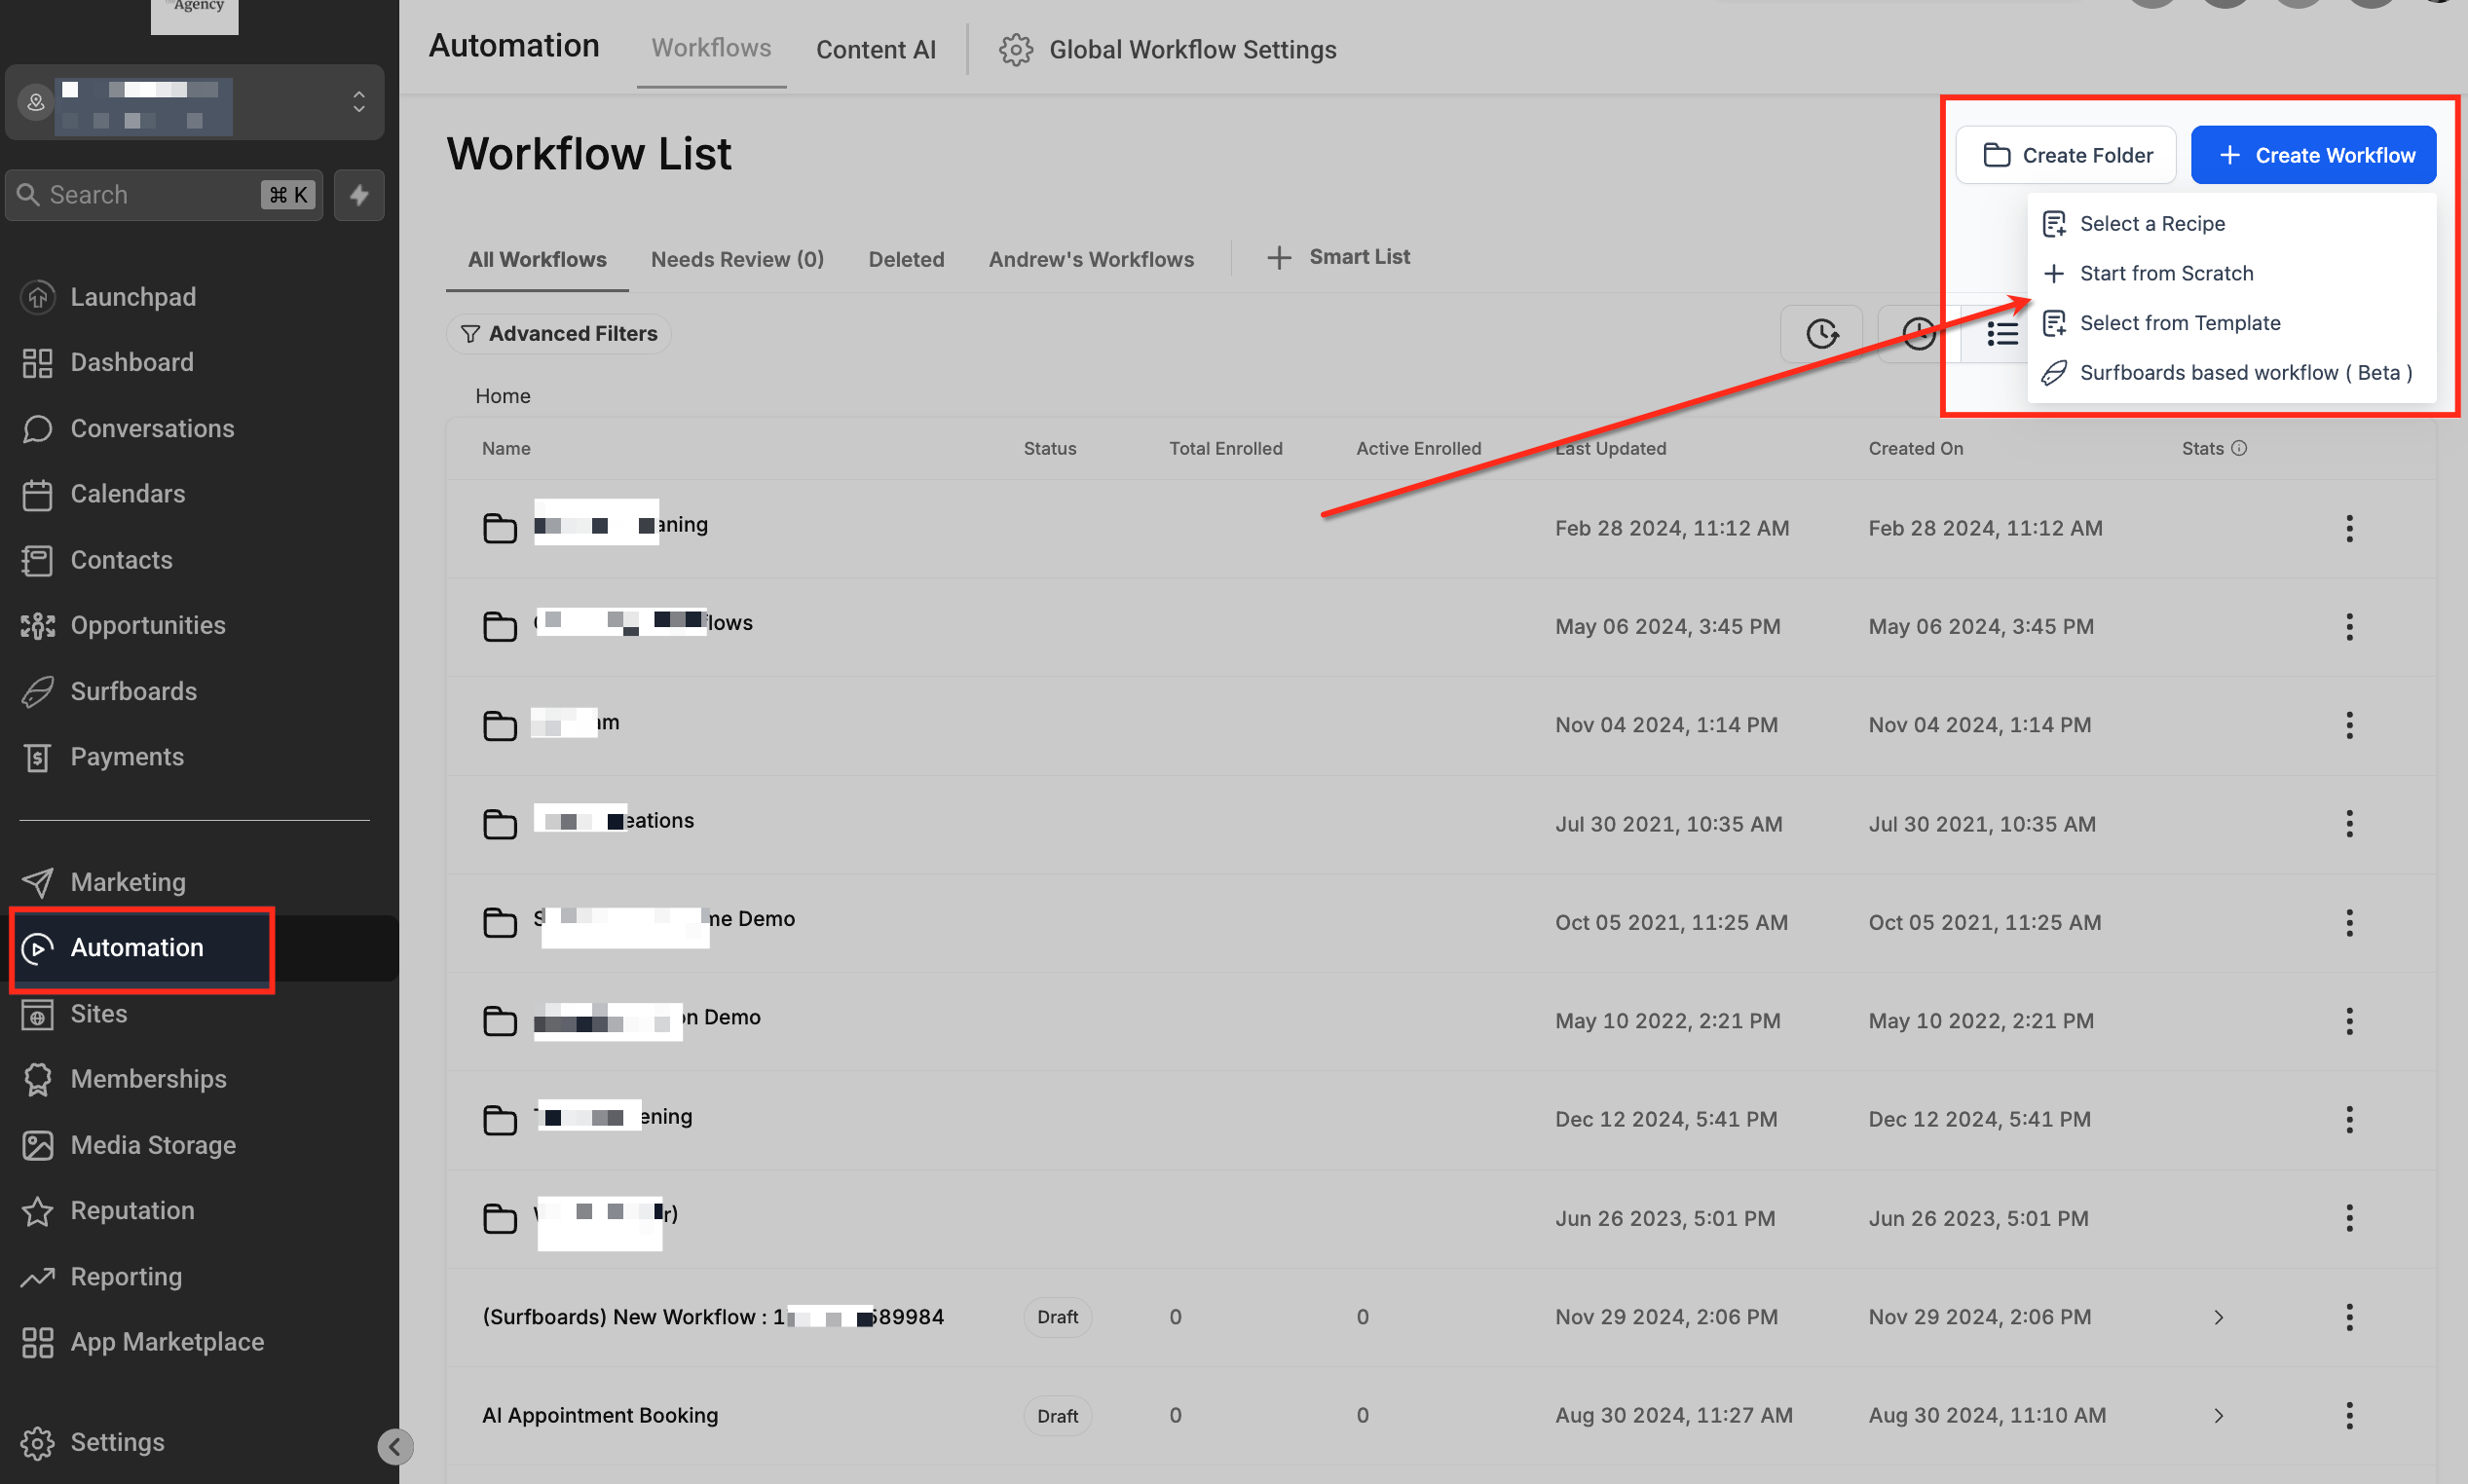
Navigate to the Automation tab in Chat To Clients CRM, select Workflows, and click + Create Workflow or edit an existing one.
Step 2: Add Appointment Status Trigger
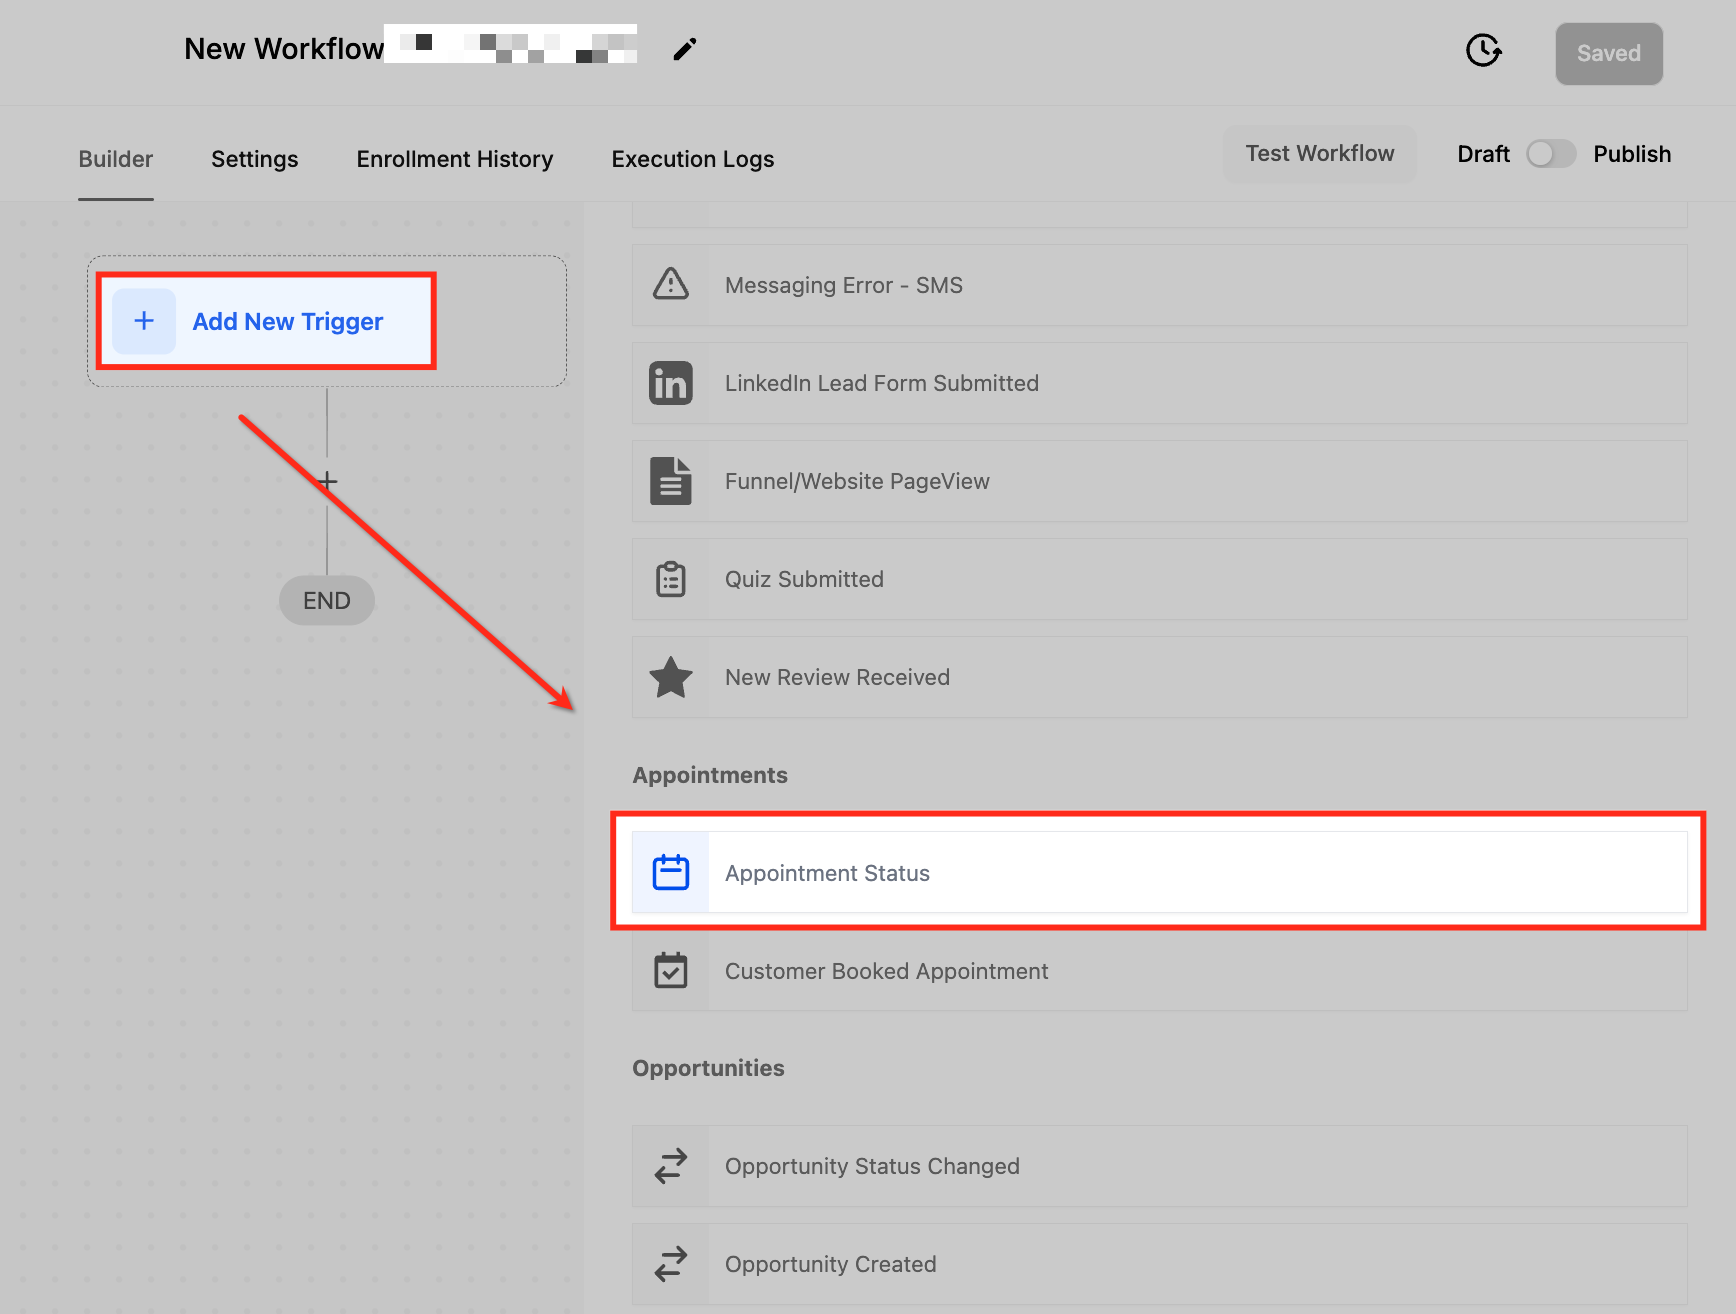
Click Add New Trigger, search for Appointment Status, and select it.
Step 3: Name the Trigger
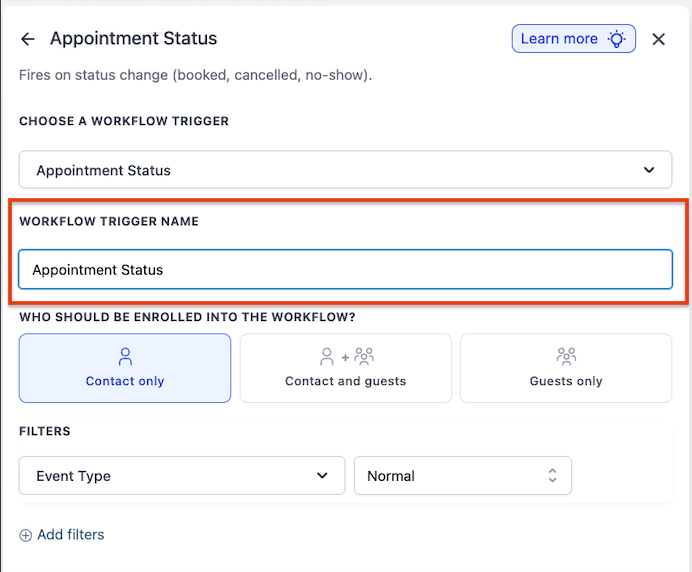
Choosing a clear and descriptive name for your trigger helps keep workflows organized and easy to manage. Instead of leaving it as the default “Appointment Status,” name it based on its purpose. For example, if the workflow is designed to send follow-up emails after an appointment, you can name it “Appointment Follow-Up Trigger.” Similarly, if it’s meant to notify staff when an appointment is canceled, you might call it “Canceled Appointment Alert.”
Step 4: Choose Workflow Enrollment
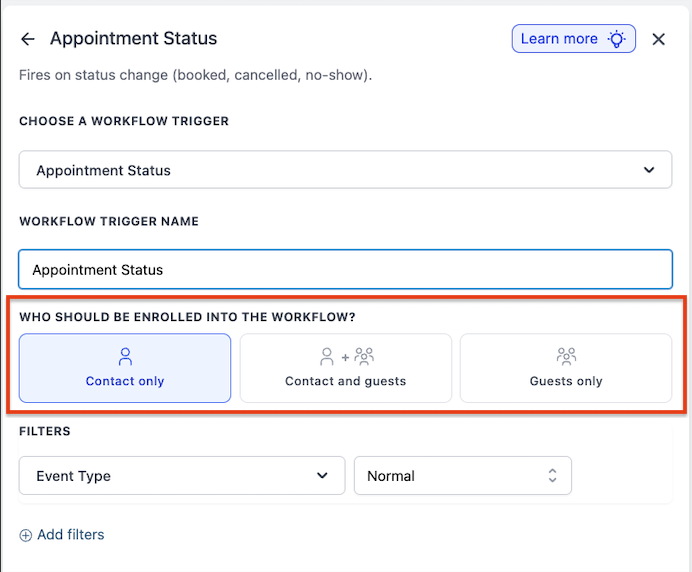
Under "Who should be enrolled into the workflow?", choose who should enter the workflow when this trigger fires:
- Contact only - Default. Only the primary appointment contact is enrolled.
- Contact and Guests - Both the primary contact and all guest contacts are enrolled. The workflow executes separately for each person.
- Guests only - Only guest contacts are enrolled; the primary contact is excluded.
Select the option that matches your automation goal. For example, if you want all attendees to receive a cancellation notice, choose "Contact and Guests."
Step 5: Set Up the Filters
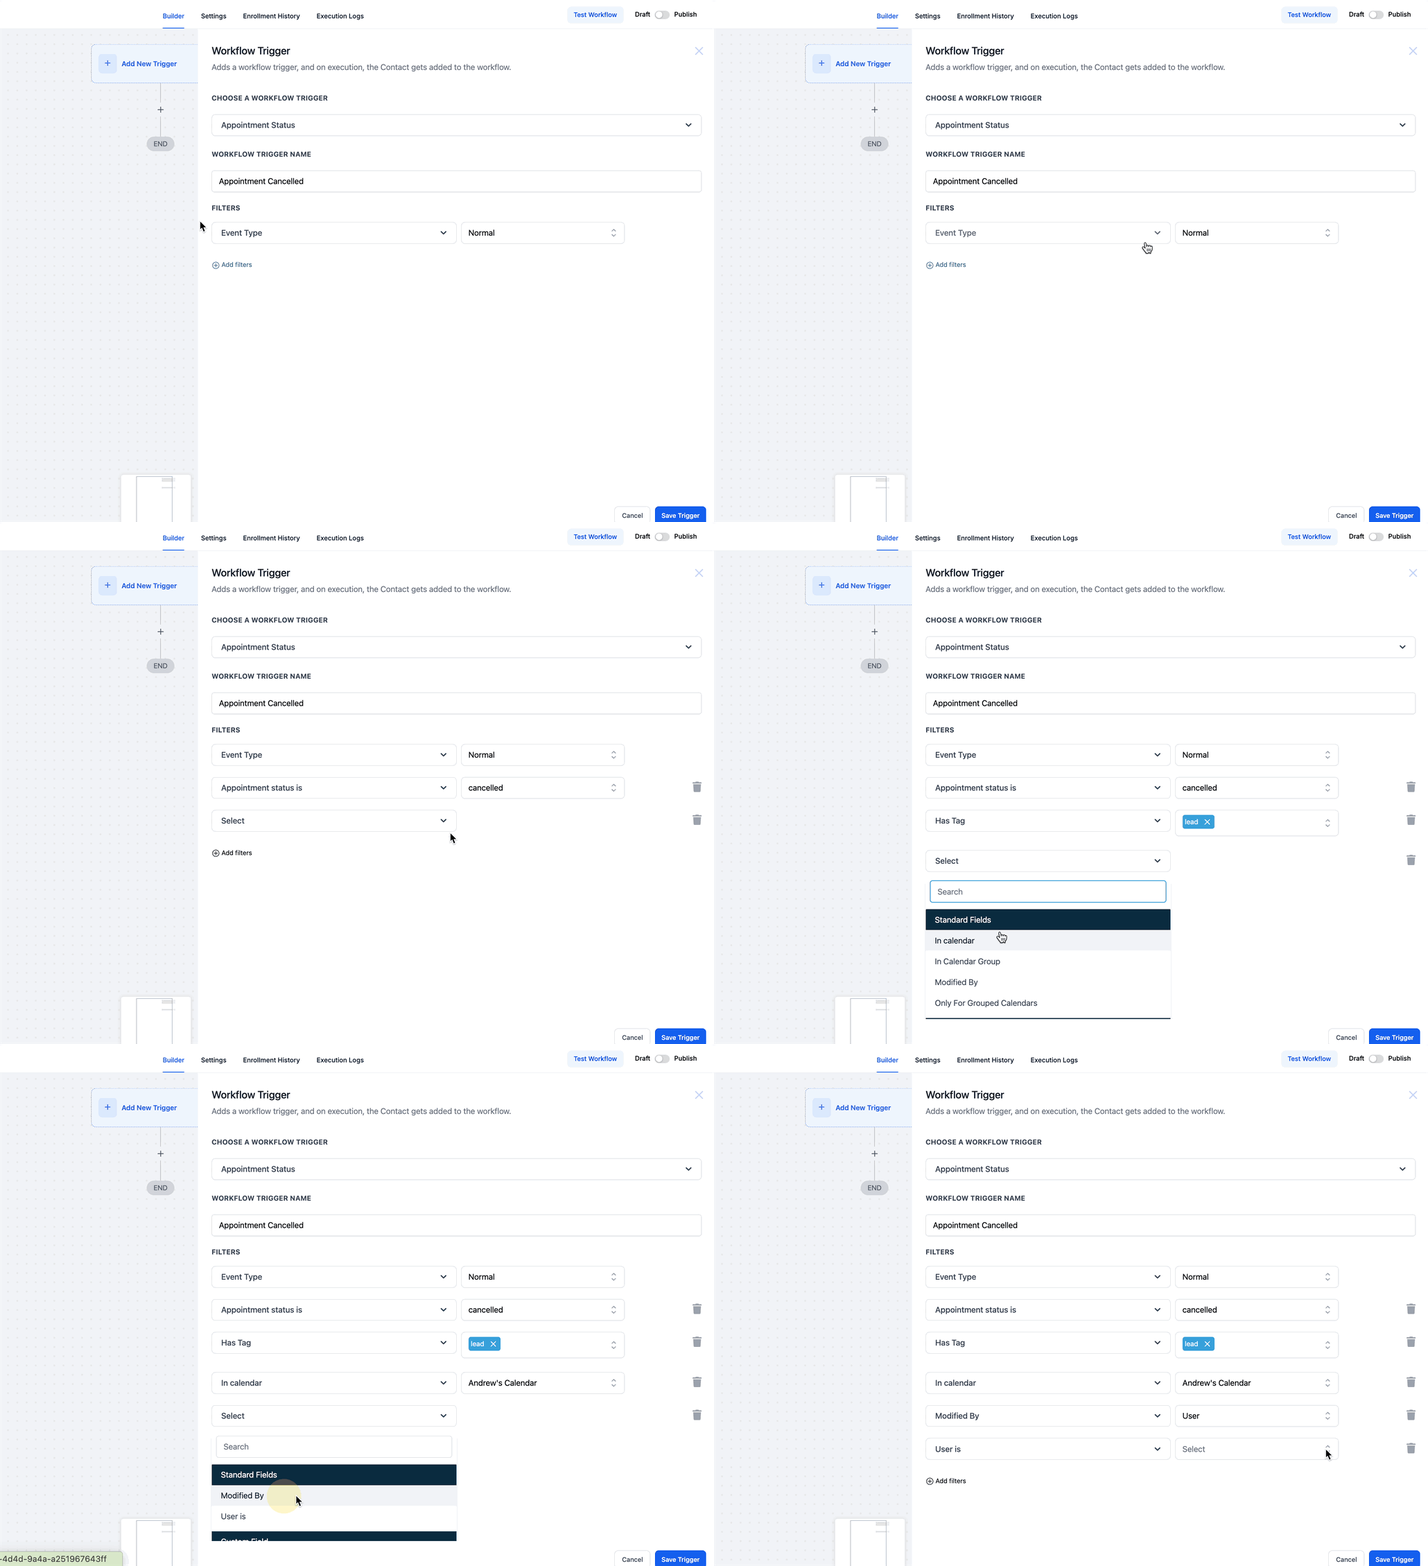
Filters allow you to refine how and when the trigger activates. Below are the available filters and their operators:
Filter By Event Type
The Event Type filter allows you to specify which type of appointment should trigger the workflow. This helps ensure that automation is only applied to the relevant appointments based on their scheduling pattern.
- Any: Includes all appointment types.
- Normal: Triggers workflows only for non-recurring appointments.
- Recurring: Activates workflows for repeating appointments.
Filter By Appointment Status
The Appointment Status filter allows you to trigger workflows based on specific status changes of an appointment. This ensures that automation is executed only when a particular status condition is met, helping businesses manage follow-ups and engagement effectively.
- New: When a new appointment is scheduled.
- Confirmed: When an appointment is confirmed.
- Cancelled: If the appointment is canceled.
- Showed: When the client attends the appointment.
- No-show: If the client does not attend.
- Invalid: If the appointment is marked as invalid.
Filter By Tag
The Filter by Tag option allows you to trigger workflows based on specific contact tags assigned in the CRM. Tags are commonly used to categorize contacts based on their attributes, behavior, or engagement level, making it easier to apply targeted automation.
When this filter is selected, a dropdown menu will display all available tags. Choosing a tag ensures that the workflow only triggers for contacts who have that specific tag assigned, allowing for more personalized and efficient automation.
In Calendar Filter
The In Calendar filter allows you to trigger workflows based on status updates for appointments scheduled in a specific calendar.
In Calendar Group Filter
This filter allows you to trigger workflows based on appointments scheduled within a specific calendar group. This is useful for businesses that manage multiple calendars under a unified group, such as different departments, teams, or service categories.
When you select this filter, a dropdown menu will appear where you can choose from the available calendar groups. Once selected, the workflow will activate only when an appointment status is updated within the chosen group, ensuring targeted automation for grouped scheduling environments.
Only for Grouped Calendar
The Only for Grouped Calendar filter allows you to specify whether the workflow should trigger exclusively for grouped calendars or apply to both individual and grouped calendars. This is useful for businesses managing multiple appointment schedules under a single calendar group.
- Yes: Workflow will trigger only for grouped calendars.
- No: Workflow will trigger for both grouped and individual calendars.
Modified By
The Modified By filter allows you to control when the workflow should trigger based on who made changes to the appointment status. This is useful for tracking updates made by different sources, ensuring the right actions are automated accordingly.
- API: Trigger fires when an appointment status is updated via API.
- Customer: Trigger activates when a client makes an appointment change.
- User: Workflow runs when a manual update is made by a user. When you select this filter, you will be able to select the individual CRM user in the next step so the trigger only gets activated when the selected user have made modifications.
- Workflow: Trigger fires when another workflow modifies the appointment status.
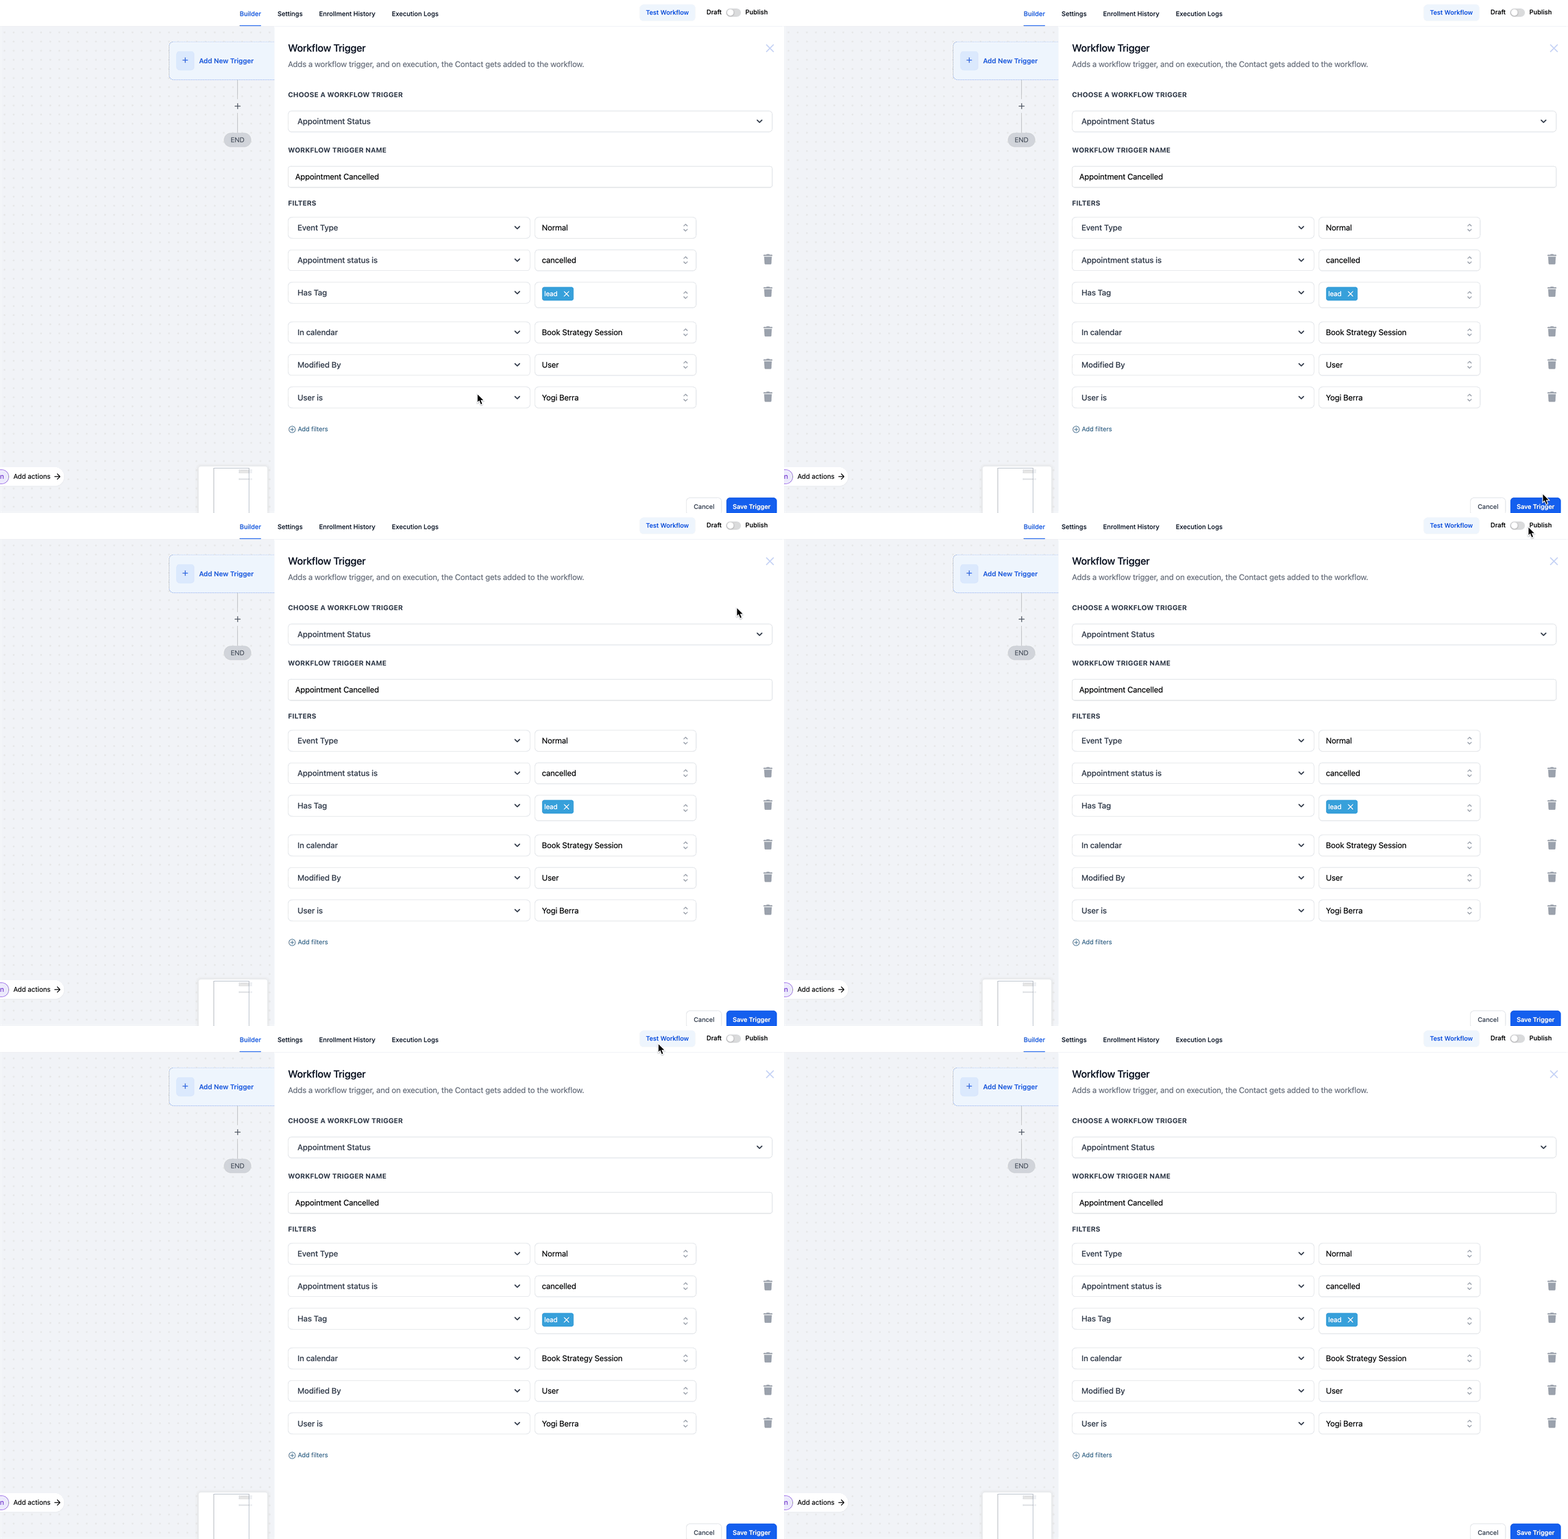
Step 5: Saving and Activating the Trigger
Once all filters are set, click Save to store the trigger configuration. Save and publish the workflow to activate automation. Test by booking an appointment and checking if the workflow executes as expected.
Frequently Asked Questions
Q: Can I trigger a workflow based on a canceled or rescheduled appointment?
Yes, by selecting the “Appointment Status Is” filter and choosing 'Cancelled', for cancelled appointments. When you reschedule an appointment, it’s treated as a new one. The contact will re-enter the workflow from the beginning.
Q: How do I use the “Modified By” filter to track changes?
This filter lets you track appointment updates based on who made the modification—whether it’s a user, API, workflow, or the customer.
Q: What’s the difference between filtering by “In Calendar” and “In Calendar Group”?
“In Calendar” filters workflows based on a specific calendar, while “In Calendar Group” applies to an entire group of calendars.
Q: Can I use multiple filters together for advanced automation?
Yes! You can combine multiple filters using AND/OR conditions to create highly specific automation rules.
Q: How do I ensure a workflow is only triggered for a specific user?
Use the User Is filter to specify a team member, ensuring the workflow activates only for their appointments.
Q: Can I trigger a workflow for appointment guests when the status changes?
Yes. Use the "Who should be enrolled into the workflow?" setting and select "Contact and Guests" or "Guests only" to include guest contacts in the automation.
Q: If I select "Contact and Guests," does the workflow run once or multiple times?
The workflow runs once for the primary contact and once for each guest. Each execution is independent, so you can use contact-specific custom values in your messages.