
How to Get Started with the Developer's Marketplace
The OAuth API for the CRM Marketplace offers developers two types of access: Location Level Access (also known as Sub-Account) and Agency Level Access (also know n as Company). These access levels provide comprehensive control over location data at either the individual location or agency-wide level. With Location Level Access, developers can perform operations specific to a sub-account, while Agency Level Access enables them to manage data across the entire agency. This distinction ensures efficient data handling and enhanced CRM Marketplace API v2.0 interoperability.
Developer Support Link: https://developers.Chat To Clients CRM.com/support
Always provide all the details and a loom video if you can while creating a support ticket for developers.
TABLE OF CONTENTS
- Glossary of Terms
- What is the OAuth Flow in the Developer's Marketplace?
- OAuth 2.0 with PKCE (Proof Key for Code Exchange)
- How to use the oAuth V2 to configure Webhooks for your apps?
- Sell on Marketplace : Auto-created Developer Accounts (Agency Admins)
- Frequently Asked Questions
Glossary of Terms
- Chat To Clients CRM: Chat To Clients CRM is a comprehensive platform that offers marketing, sales, and automation tools to help businesses grow and streamline their operations. Chat To Clients CRM Website
- Developer's Marketplace: The Developer's Marketplace is a platform within Chat To Clients CRM that allows developers to build and integrate their applications and tools using the Chat To Clients CRM API. Chat To Clients CRM Developer Documentation
- API (Application Programming Interface): An API is a set of rules and protocols that allows different software applications to communicate with each other. In the Developer's Marketplace context, the Chat To Clients CRM API enables developers to access and interact with Chat To Clients CRM's features and data.
- Access Token: An Access Token is a credential an app uses to access protected resources for a user or account. In the Developer's Marketplace, developers obtain an Access Token through the OAuth process, which allows their app to make authenticated API requests to Chat To Clients CRM. The Access Token is usually included in the Authorization header of API requests. Understanding Access Tokens
- AppID - This is the unique identifier for your marketplace application. You can find it below the app name.
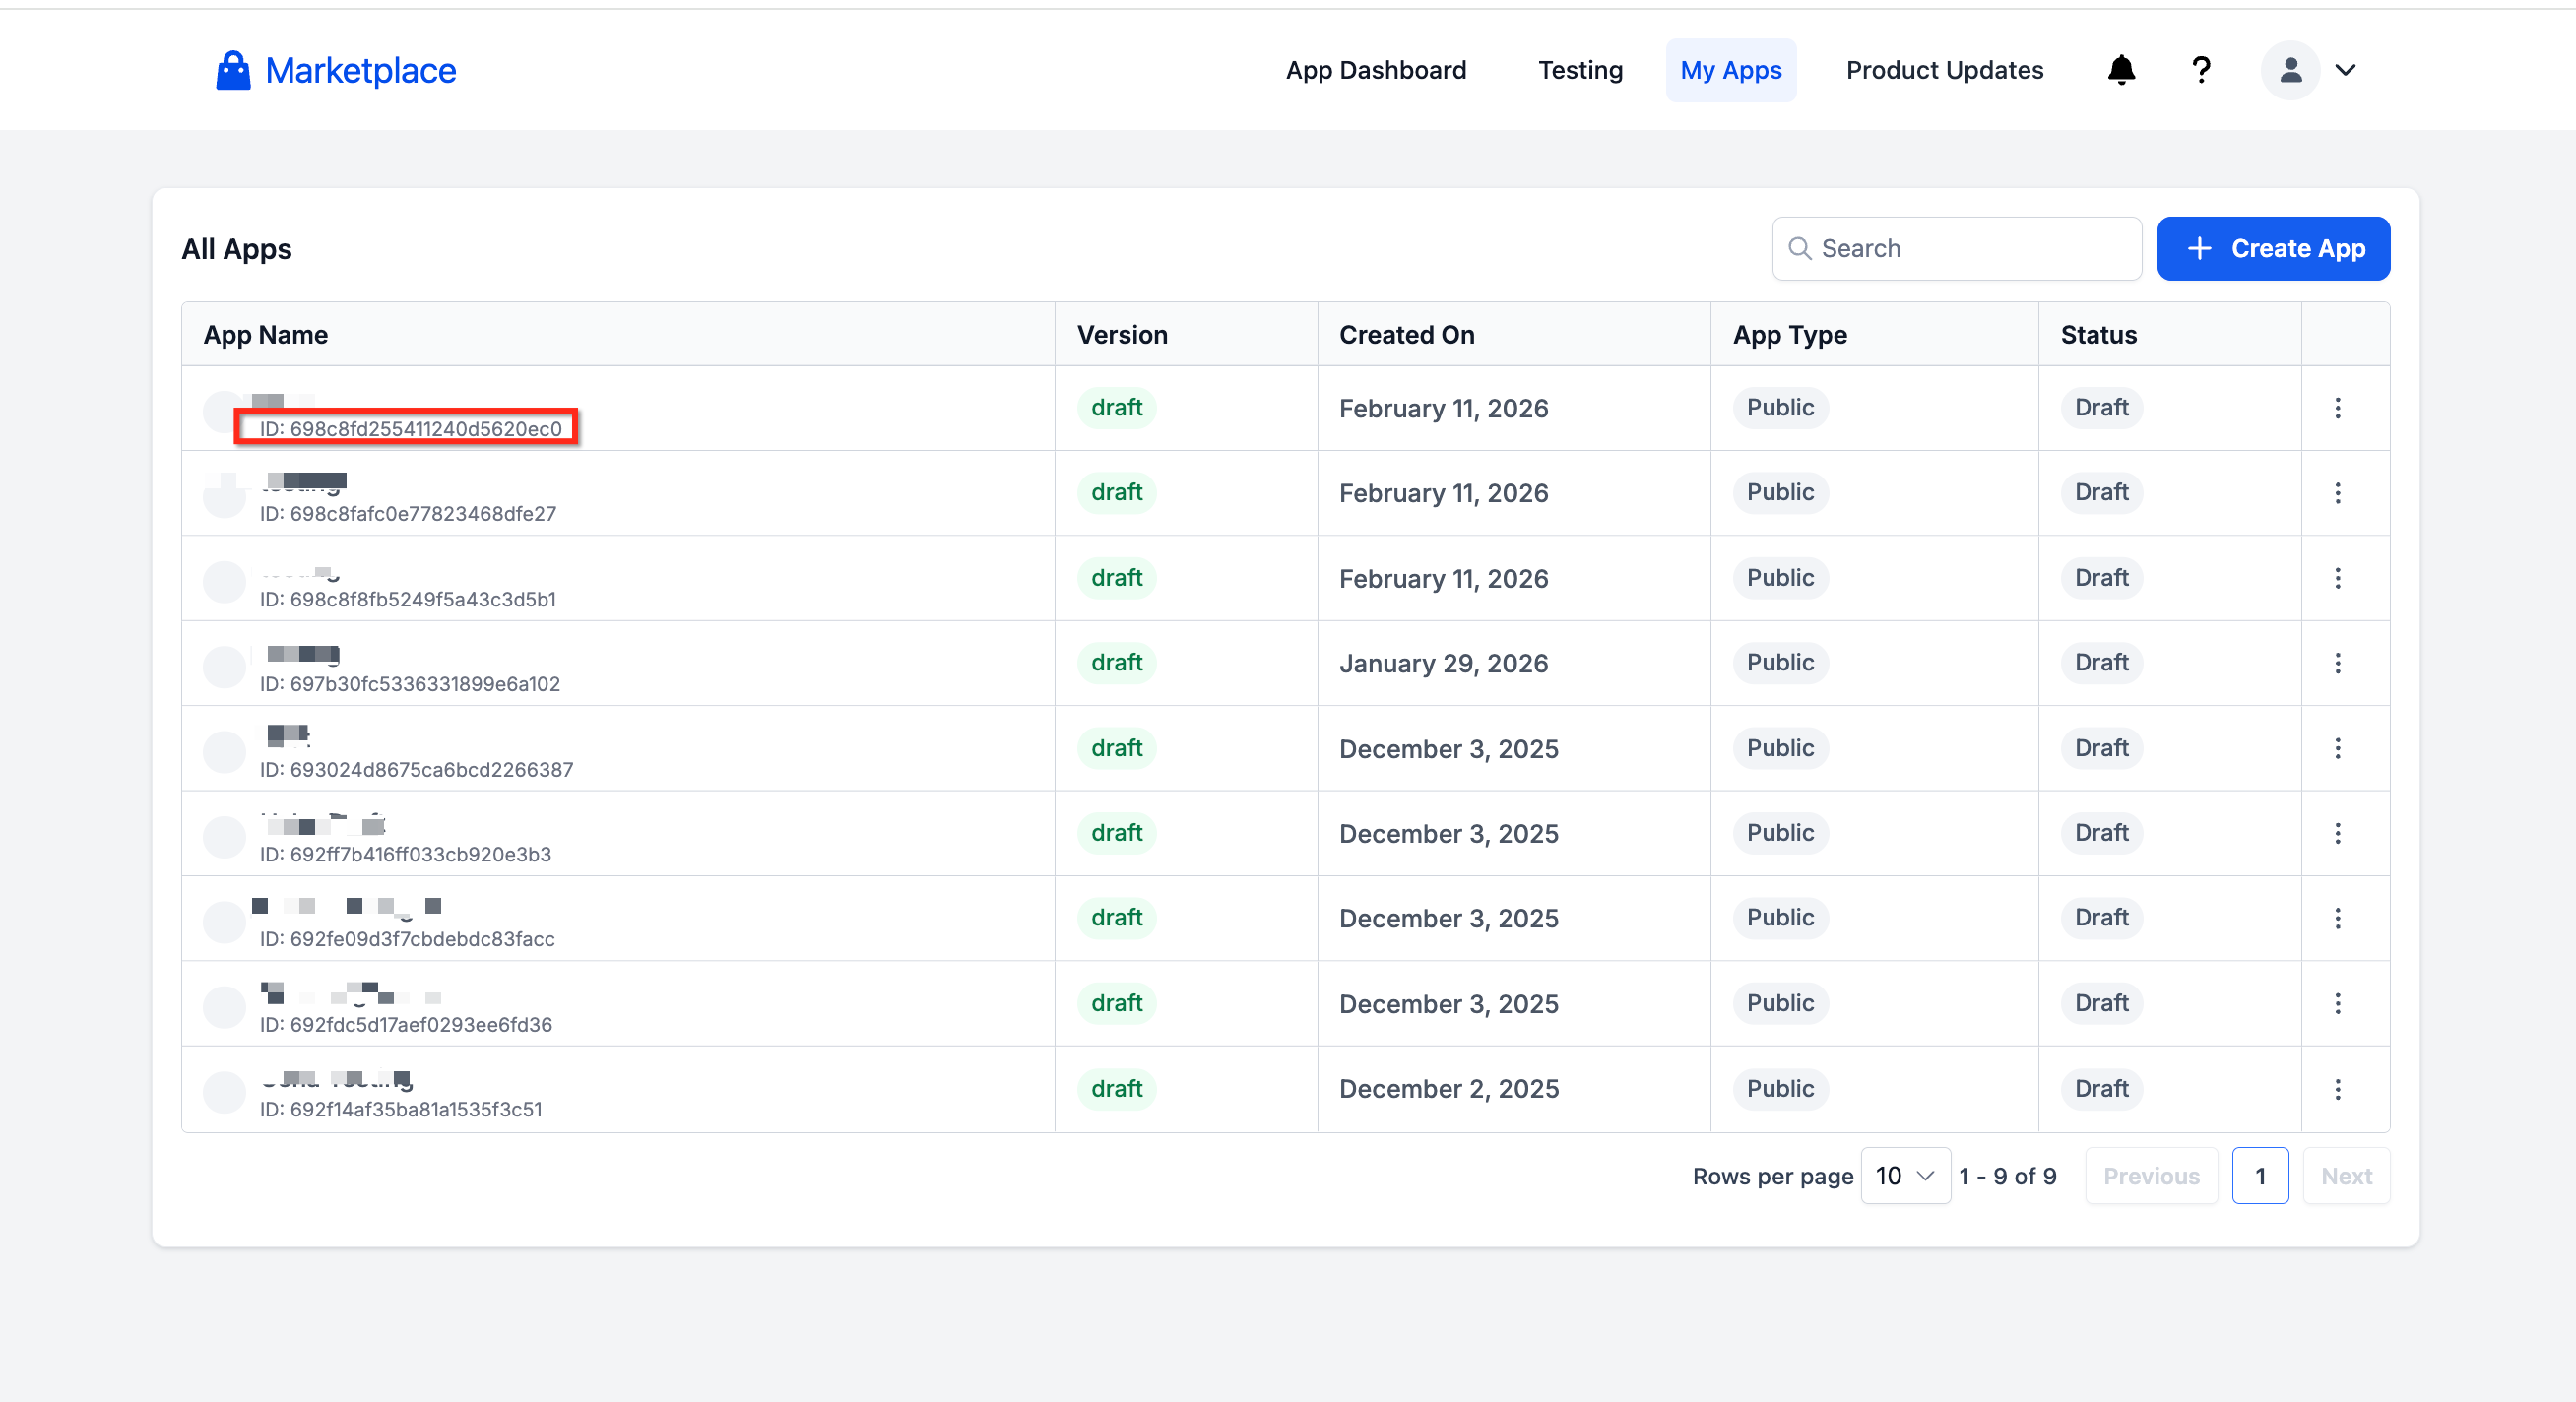
- Conversation Provider ID - This is the unique identifier for the type of provider a user installs. You can find it under the name of the conversation provider name if you have created conversation providers for your app.
- Refresh Token: A Refresh Token is a credential that can be used to obtain a new Access Token without requiring the user to reauthorize the app. It provides a longer-lasting authorization mechanism and helps maintain continuous access to Chat To Clients CRM resources. When an Access Token expires, the Refresh Token can be used to obtain a new one.
- OAuth (Open Authorization): OAuth is an industry-standard protocol that enables secure app authorization and authentication. It allows users to grant permission to apps to access their Chat To Clients CRM data without sharing their login credentials. OAuth involves an authorization process where users are redirected to Chat To Clients CRM to authenticate and grant access to the app. OAuth 2.0 Introduction
- Redirect URI: A Redirect URI is the URL that Chat To Clients CRM will send users after authorizing the app's access. During the OAuth process, users are redirected to the app with an authorization code or access token appended to the Redirect URI after granting permission. OAuth 2.0 Redirect URI
- Authorization Code: In the OAuth process, an Authorization Code is a short-lived credential obtained after a user successfully authorizes an app. The app exchanges this code for an Access Token and Refresh Token. OAuth 2.0 Authorization Code Grant
- Scopes: Scopes define the specific permissions and access rights an app requires to interact with Chat To Clients CRM. When creating an app, developers specify the necessary scopes that align with their app's functionalities. Scopes can include reading, writing, or managing permissions for different resources within Chat To Clients CRM. OAuth 2.0 Scopes and this resource is for Chat To Clients CRM's OAuth Scopes.
- Endpoint: An endpoint is a specific URL or URI representing an API resource or functionality. Chat To Clients CRM's API exposes various endpoints that developers can access to perform specific actions or retrieve specific data.
- Request: A request is a communication made by an app to the Chat To Clients CRM API. It includes the HTTP method (e.g., GET, POST), the URL or endpoint, headers, and required parameters or data.
- Response: A response is the server's reply to a request made by an app. It contains the requested data, an acknowledgment of the action performed, and an appropriate status code.
- Status Code: A status code is a three-digit number returned by the server to indicate the outcome of an HTTP request. Common status codes include 200 (OK), 400 (Bad Request), 401 (Unauthorized), and 422 (Unprocessable Entity). HTTP Status Codes
- Distribution Type: Distribution Type refers to how an app is distributed or made available to Chat To Clients CRM users. It can be either Agency or Sub Account. Agency distribution allows the app to be used by all locations within an agency account, while Sub Account distribution limits usage to specific sub-accounts or individual locations.
- Location ID: Location ID is a unique identifier assigned to a specific location within a Chat To Clients CRM account. It is used to differentiate and manage access at the location level.
- Company ID: Company ID is a unique identifier assigned to a Chat To Clients CRM company or account. It helps
differentiate and manage access at the company level. - Hashed Company ID: Hashed Company ID is a deprecated identifier that used to be associated with a Chat To Clients CRM company or account. It is no longer in use and is being phased out.
- Live Server: Live Server refers to the actual production environment where the app interacts with Chat To Clients CRM's API and real user data. It is the server where the app is deployed and accessible by users.
- SDK (Software Development Kit): An SDK is a set of tools, libraries, and documentation developers use to build applications for a specific platform or framework. Chat To Clients CRM provides an SDK that facilitates the integration of custom apps with its API.
- Authorization Header: The Authorization Header is an HTTP header that includes authentication credentials in API requests, such as an Access Token. It typically takes the form "Authorization: Bearer {access_token}". Understand the Authorization Header
- API Key: An API Key is a unique identifier or code provided to developers granting API access. It serves as a form of authentication when making API requests.
- Callback URL: A Callback URL is where an app expects to receive callbacks or responses. In the Developer's Marketplace context, the Callback URL is the endpoint that receives the authorization code or access token after the user grants permission during the OAuth process. Learn more about Callback URLs.
- JSON (JavaScript Object Notation): JSON is a lightweight data-interchange format that is easy for humans to read and write and for machines to parse and generate. It is commonly used for structuring data in API requests and responses. Introduction to JSON
- Parameters: Parameters are additional values included in an API request to provide specific instructions or filter the desired data. Parameters can be used to specify search criteria, sorting preferences, or pagination options. Understanding API Parameters
- Pagination: Pagination is dividing a large data set into smaller, more manageable parts called pages. API responses often include pagination information, such as the number of items per page and the total number of pages, allowing developers to retrieve data incrementally. Implementing Pagination in APIs
- Rate Limiting: Rate Limiting is a mechanism APIs use to restrict client or user's requests within a specific period. It helps maintain API performance and prevent abuse.
- Webhooks: Webhooks are HTTP callbacks or notifications sent from one application to another when a specific event or trigger occurs. In the Developer's Marketplace context, developers can configure webhooks to receive real-time updates or data from Chat To Clients CRM, such as new leads or contact information.
- Event: An Event refers to a specific occurrence or action within an application or system. In the context of webhooks, events are triggers that prompt sending a webhook notification.
- Request: A Request is an HTTP message sent from a client (such as an application) to a server (such as an API) to initiate an action or retrieve data. It includes information such as the requested URL, method (GET, POST, etc.), headers, and optional body. HTTP Request Methods
- Response: A Response is the HTTP message a server returns to a client in reply to its request. It contains the requested data or indicates the status and outcome of the request. HTTP Response Status Codes
- GET: GET is an HTTP method to retrieve server data. It is commonly used for fetching resources or information from APIs. GET method in HTTP
- POST: POST is an HTTP method to submit data to a server. It is typically used for creating new resources or sending data to be processed by APIs. POST method in HTTP
- PUT: PUT is an HTTP method to update or replace existing data on a server. It replaces the entire resource with the new data provided in the request. PUT method in HTTP
- DELETE: DELETE is an HTTP method that removes or deletes a resource from a server. It instructs the server to delete the specified resource. DELETE method in HTTP
- Front-End Development: Front-End Development involves building the user-facing components of a software application. It typically includes HTML, CSS, and JavaScript developers to create interactive and visually appealing interfaces.
- Back-End Development: Back-End Development focuses on the server-side components of a software application. It involves implementing the logic, data storage, and processing necessary to support the application's functionality.
What is the OAuth Flow in the Developer's Marketplace?
The GitHub Repository mentioned in the video is accessible here.
Postman tool
Chat To Clients CRM Developers Marketplace
Chat To Clients CRM Developers Community
The OAuth Flow in the Developer's Marketplace typically consists of the following steps:
App Registration: Developers register their applications on the Developer's Marketplace, providing necessary details and defining scopes. They receive a Client ID and a Client Secret, unique identifiers for their application.
Authorization Request: The application directs the user (usually via a browser) to the Marketplace's authorization server. The authorization request includes the Client ID, the requested scopes, and a redirect URL, a location in the application where users will be sent after authorization.
User Consent: The user logs into the Marketplace and reviews the application's request to access specific details (as defined by the scopes). If the user agrees, they are redirected to the provided redirect URL, with an authorization code appended as a query parameter.
Authorization Grant: The application receives the authorization code and verifies it. The application then makes a POST request to the authorization server, including the authorization code, Client ID, and Client Secret.
Access Token Issuance: If all the submitted details are correct and the authorization code is valid, the authorization server issues an access token to the application. The application can now use this access token to make requests to the API on behalf of the user, limited to the scopes defined earlier.
API Call: The application includes the access token in the header when making API calls. The server allows the requested operation if the access token is valid and has the necessary scopes.
Token Refresh: Access tokens have a limited lifetime and must be periodically refreshed using a refresh token (if provided by the authorization server). The application requests the server with the refresh token; a new access token is issued if it's valid.
Remember, OAuth is a delegation protocol, handy in scenarios where the application must act on users' behalf without requiring users' credentials. The actual flow might vary slightly based on the implementation of the Marketplace, but the basic principles remain the same.
OAuth 2.0 with PKCE (Proof Key for Code Exchange)
Chat To Clients CRM Marketplace also supports OAuth 2.0 with PKCE for external authentication. Enable PKCE when your integration uses a public client (for example, browser-based or mobile apps) or when your OAuth provider requires PKCE.
When PKCE is enabled, the authorization request includes a `code_challenge` and `code_challenge_method` (`S256`), and the token request includes the matching `code_verifier`.
For configuration details in Marketplace, see:
https://marketplace.Chat To Clients CRM.com/docs/oauth/ExternalAuthentication/index.html
Usage Cases:
- Managing Contacts: Use the contact management APIs to create, update, search, and delete contacts, enabling efficient customer relationship management.
- Conversations Management: Implement the Conversations API to retrieve, update, and delete conversations, allowing for streamlined customer communication.
- Message Automation: Leverage the messaging APIs to send and schedule automated email and SMS messages, enhancing customer engagement and lead nurturing.
- Form Submissions: Implement the forms APIs to capture and manage form submissions, enabling lead generation and data collection.
- Link Management: Use the links API to create, update, and delete links, allowing for effective tracking and management of URL links.
- Location Tagging: Utilize the location tags APIs to assign and manage tags for different locations, facilitating organized categorization and filtering.
- Custom Field Management: Implement the custom fields APIs to create, update, and delete custom fields, enabling flexible data organization and customization.
- Custom Value Management: Use the custom values APIs to create, update, and delete custom values associated with contacts, enhancing data personalization.
- Template Management: Leverage the email and SMS template APIs to create, retrieve, and update templates, facilitating consistent and efficient messaging.
- Opportunity Management: Utilize the opportunities APIs to create, update, and delete opportunities, enabling effective sales pipeline management.
- Note Creation: Implement the create note API to add notes to customer profiles, facilitating easy documentation and information sharing.
- Task Management: Use the task APIs to create, update, and delete tasks, enabling efficient task tracking and workflow management.
- Appointment Scheduling: Leverage the appointment APIs to create and update appointments, facilitating easy scheduling and calendar management.
- Order Processing: Utilize the order APIs to create, update, and manage customer orders, streamlining the order fulfillment process.
- Customer Management: Implement the customer APIs to create, update, and delete customer profiles, facilitating comprehensive customer relationship management.
- User Management: Use the user APIs to create, update, and delete user accounts, facilitating user administration and access control.
- Workflow Automation: Leverage the workflow APIs to create, update, and delete workflows, enabling automated business processes and task automation.
- Snapshot Retrieval: Utilize the snapshot APIs to retrieve and manage snapshots of data, allowing for historical data analysis and reporting.
These usage cases demonstrate how the developer marketplace's APIs can be applied in various practical scenarios to enhance productivity, automate processes, and optimize business operations.
How to use the oAuth V2 to configure Webhooks for your apps?
To configure webhooks for your application, follow these steps:
Step 1: Sign up for a developer account
Go to https://marketplace.Chat To Clients CRM.com and sign up for a developer account if you haven't already.
Step 2: Create an app
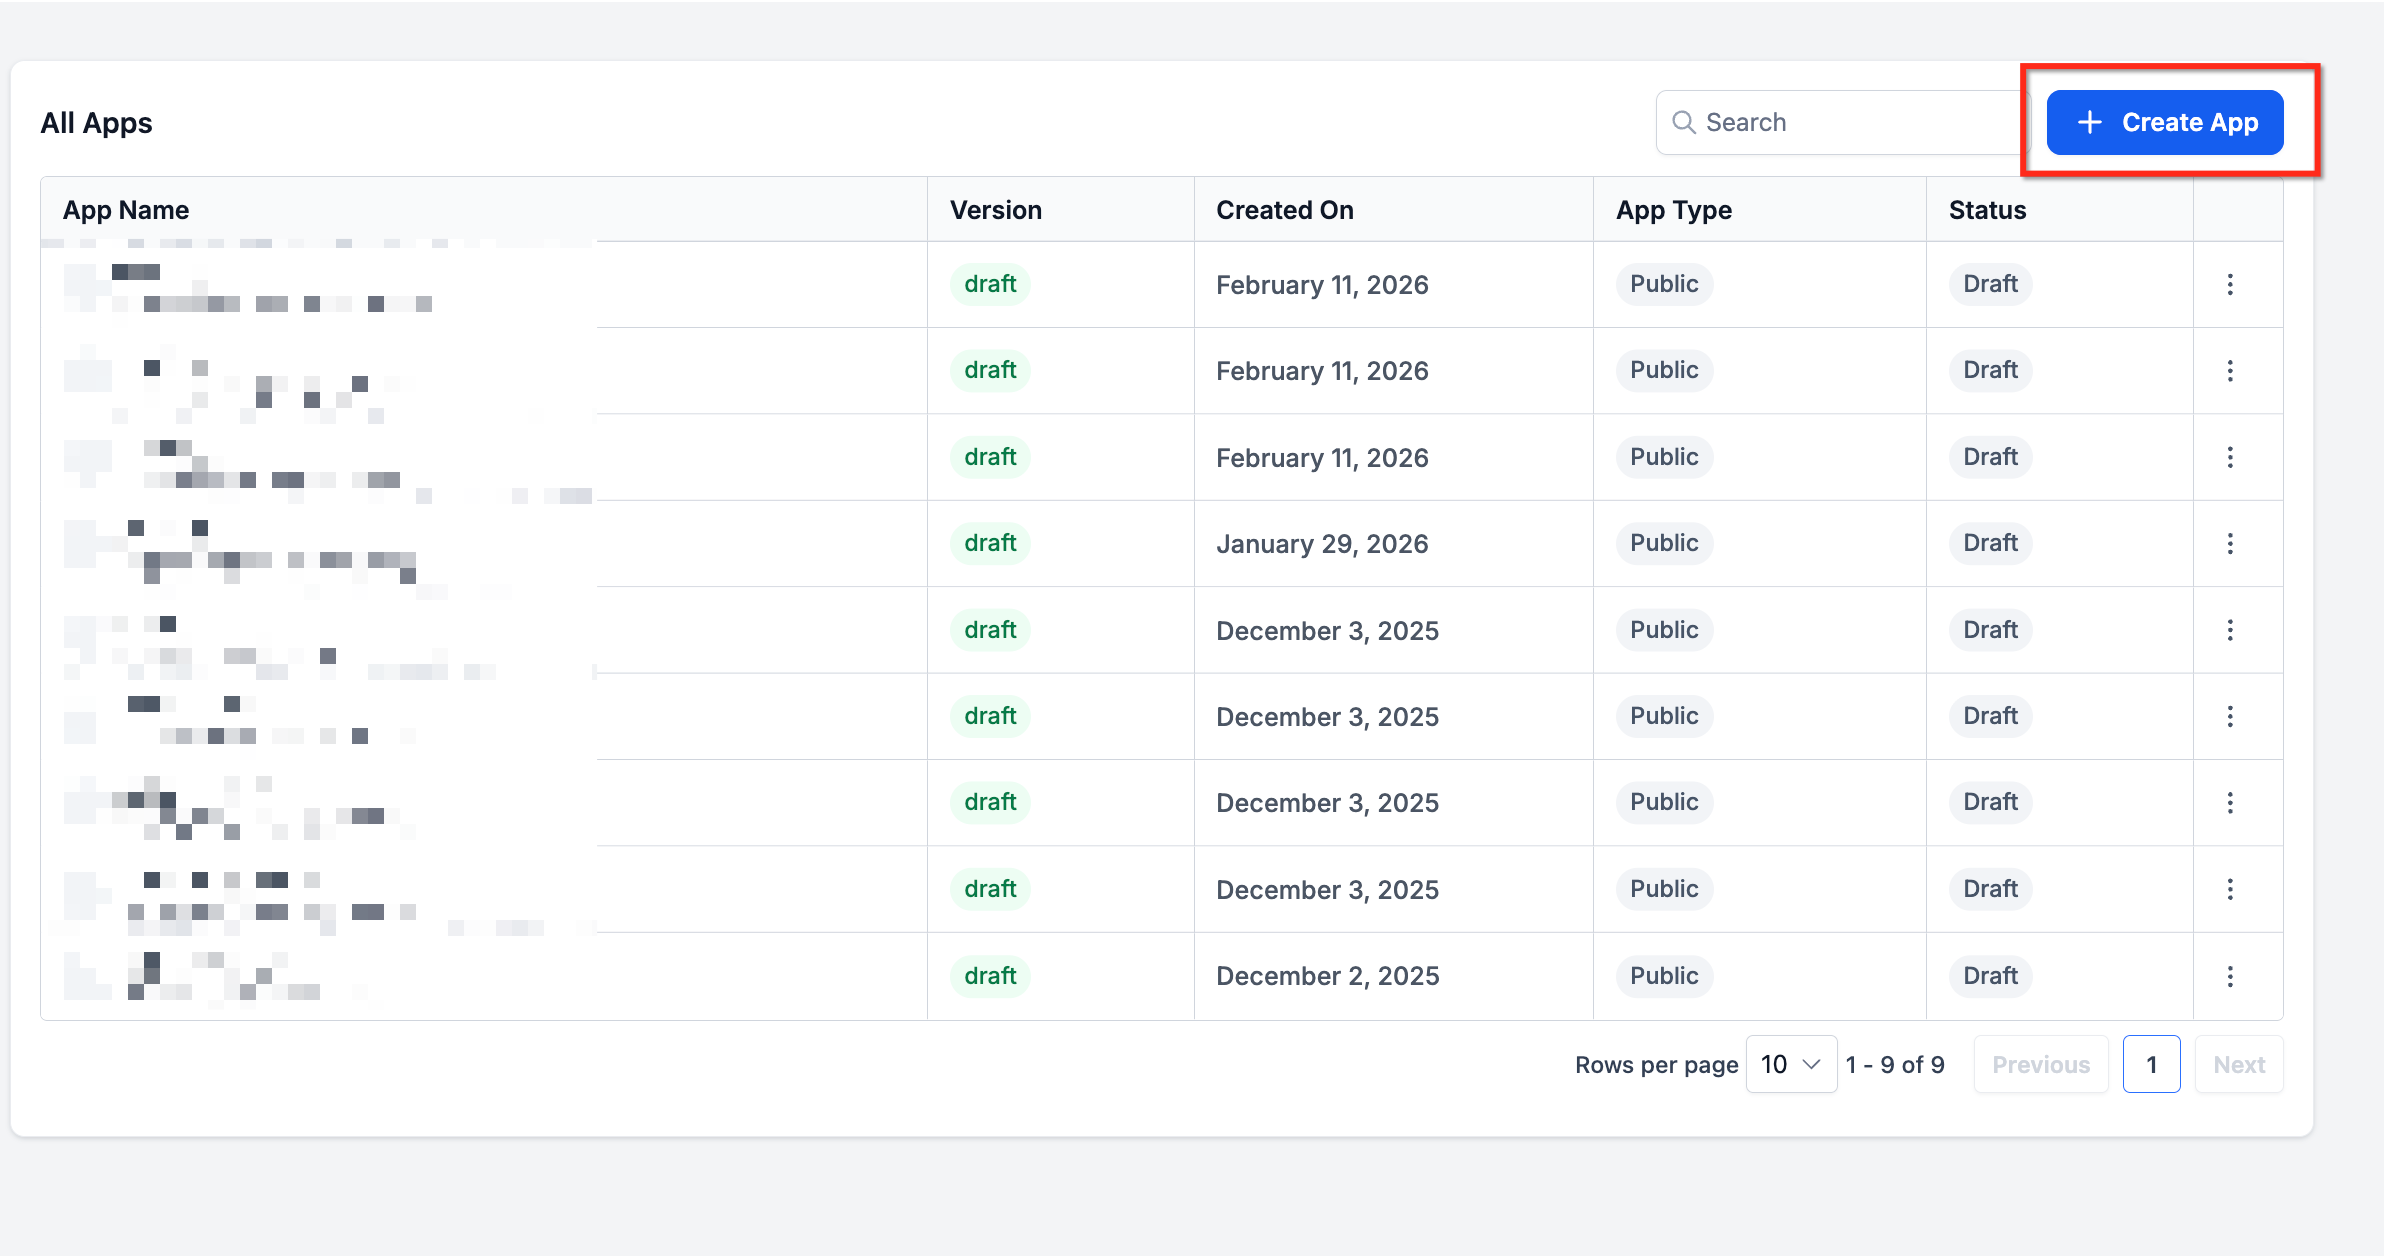
After signing in, go to "My Apps" and click "Create App" to create a new app.
Step 3: Fill in the profile information
Fill in all the required profile information for your app.
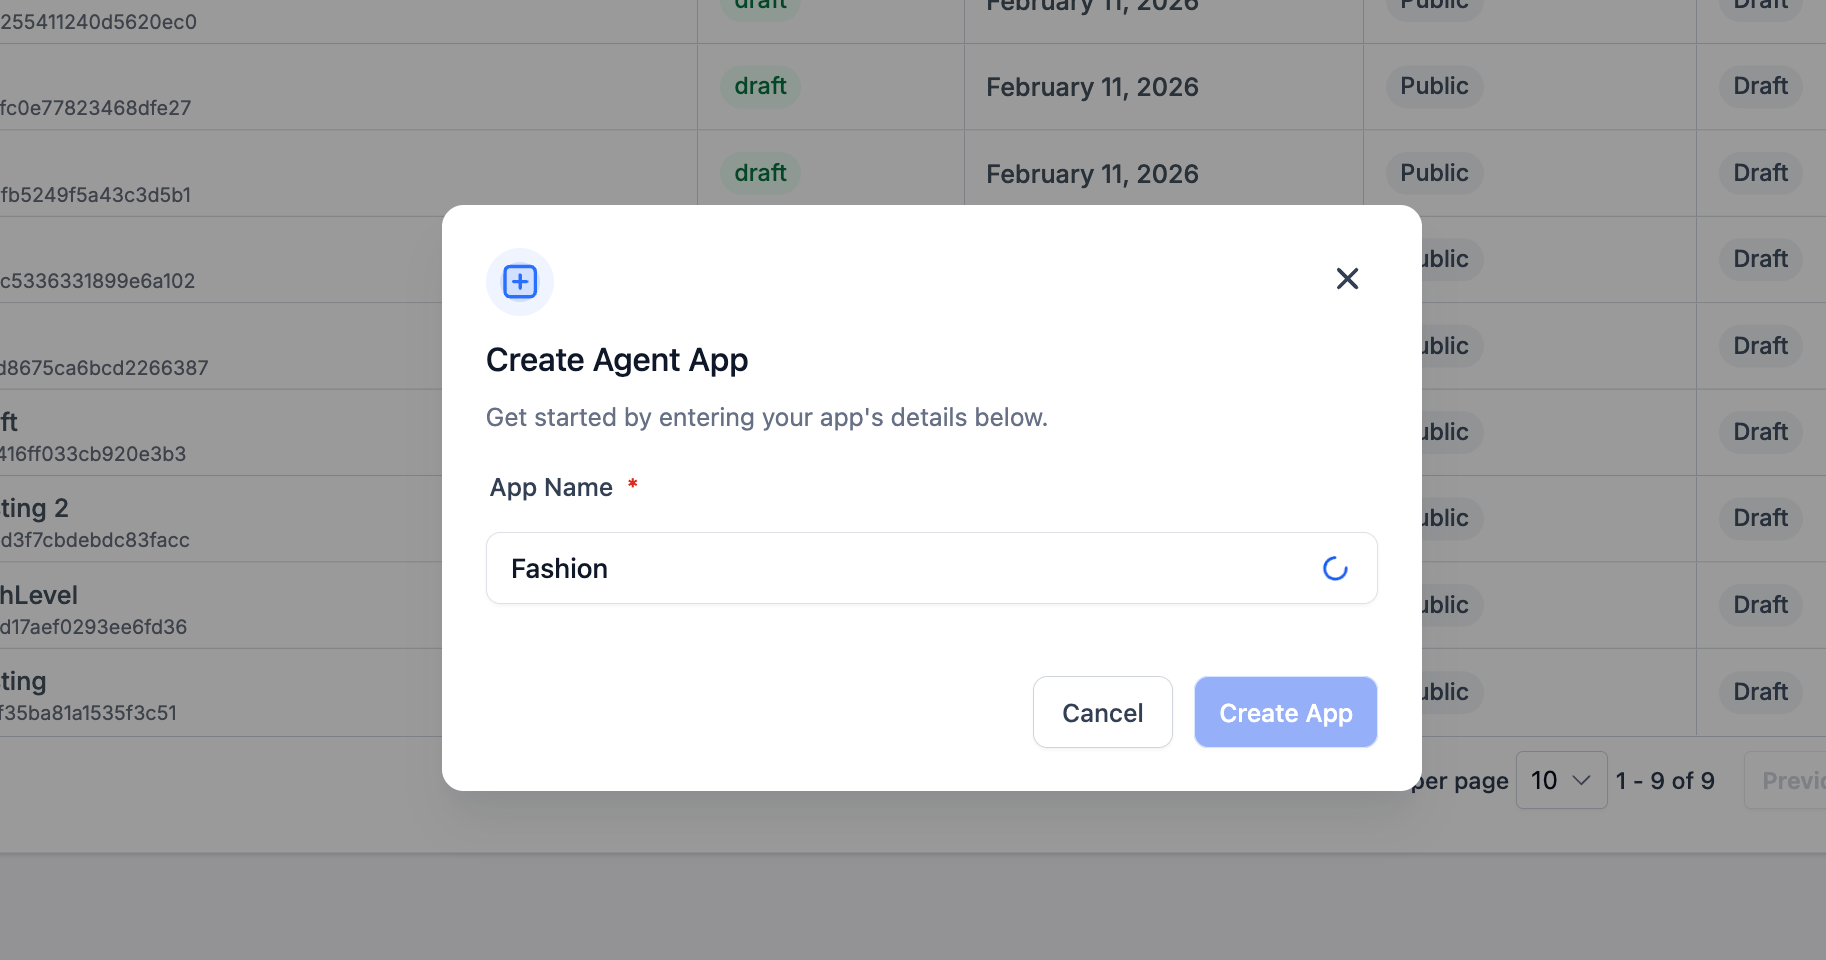
App Name:
The "App Name" refers to the name or title given to your application. It is a unique identifier representing your app within the developer marketplace and helps users quickly identify and distinguish it from other apps.
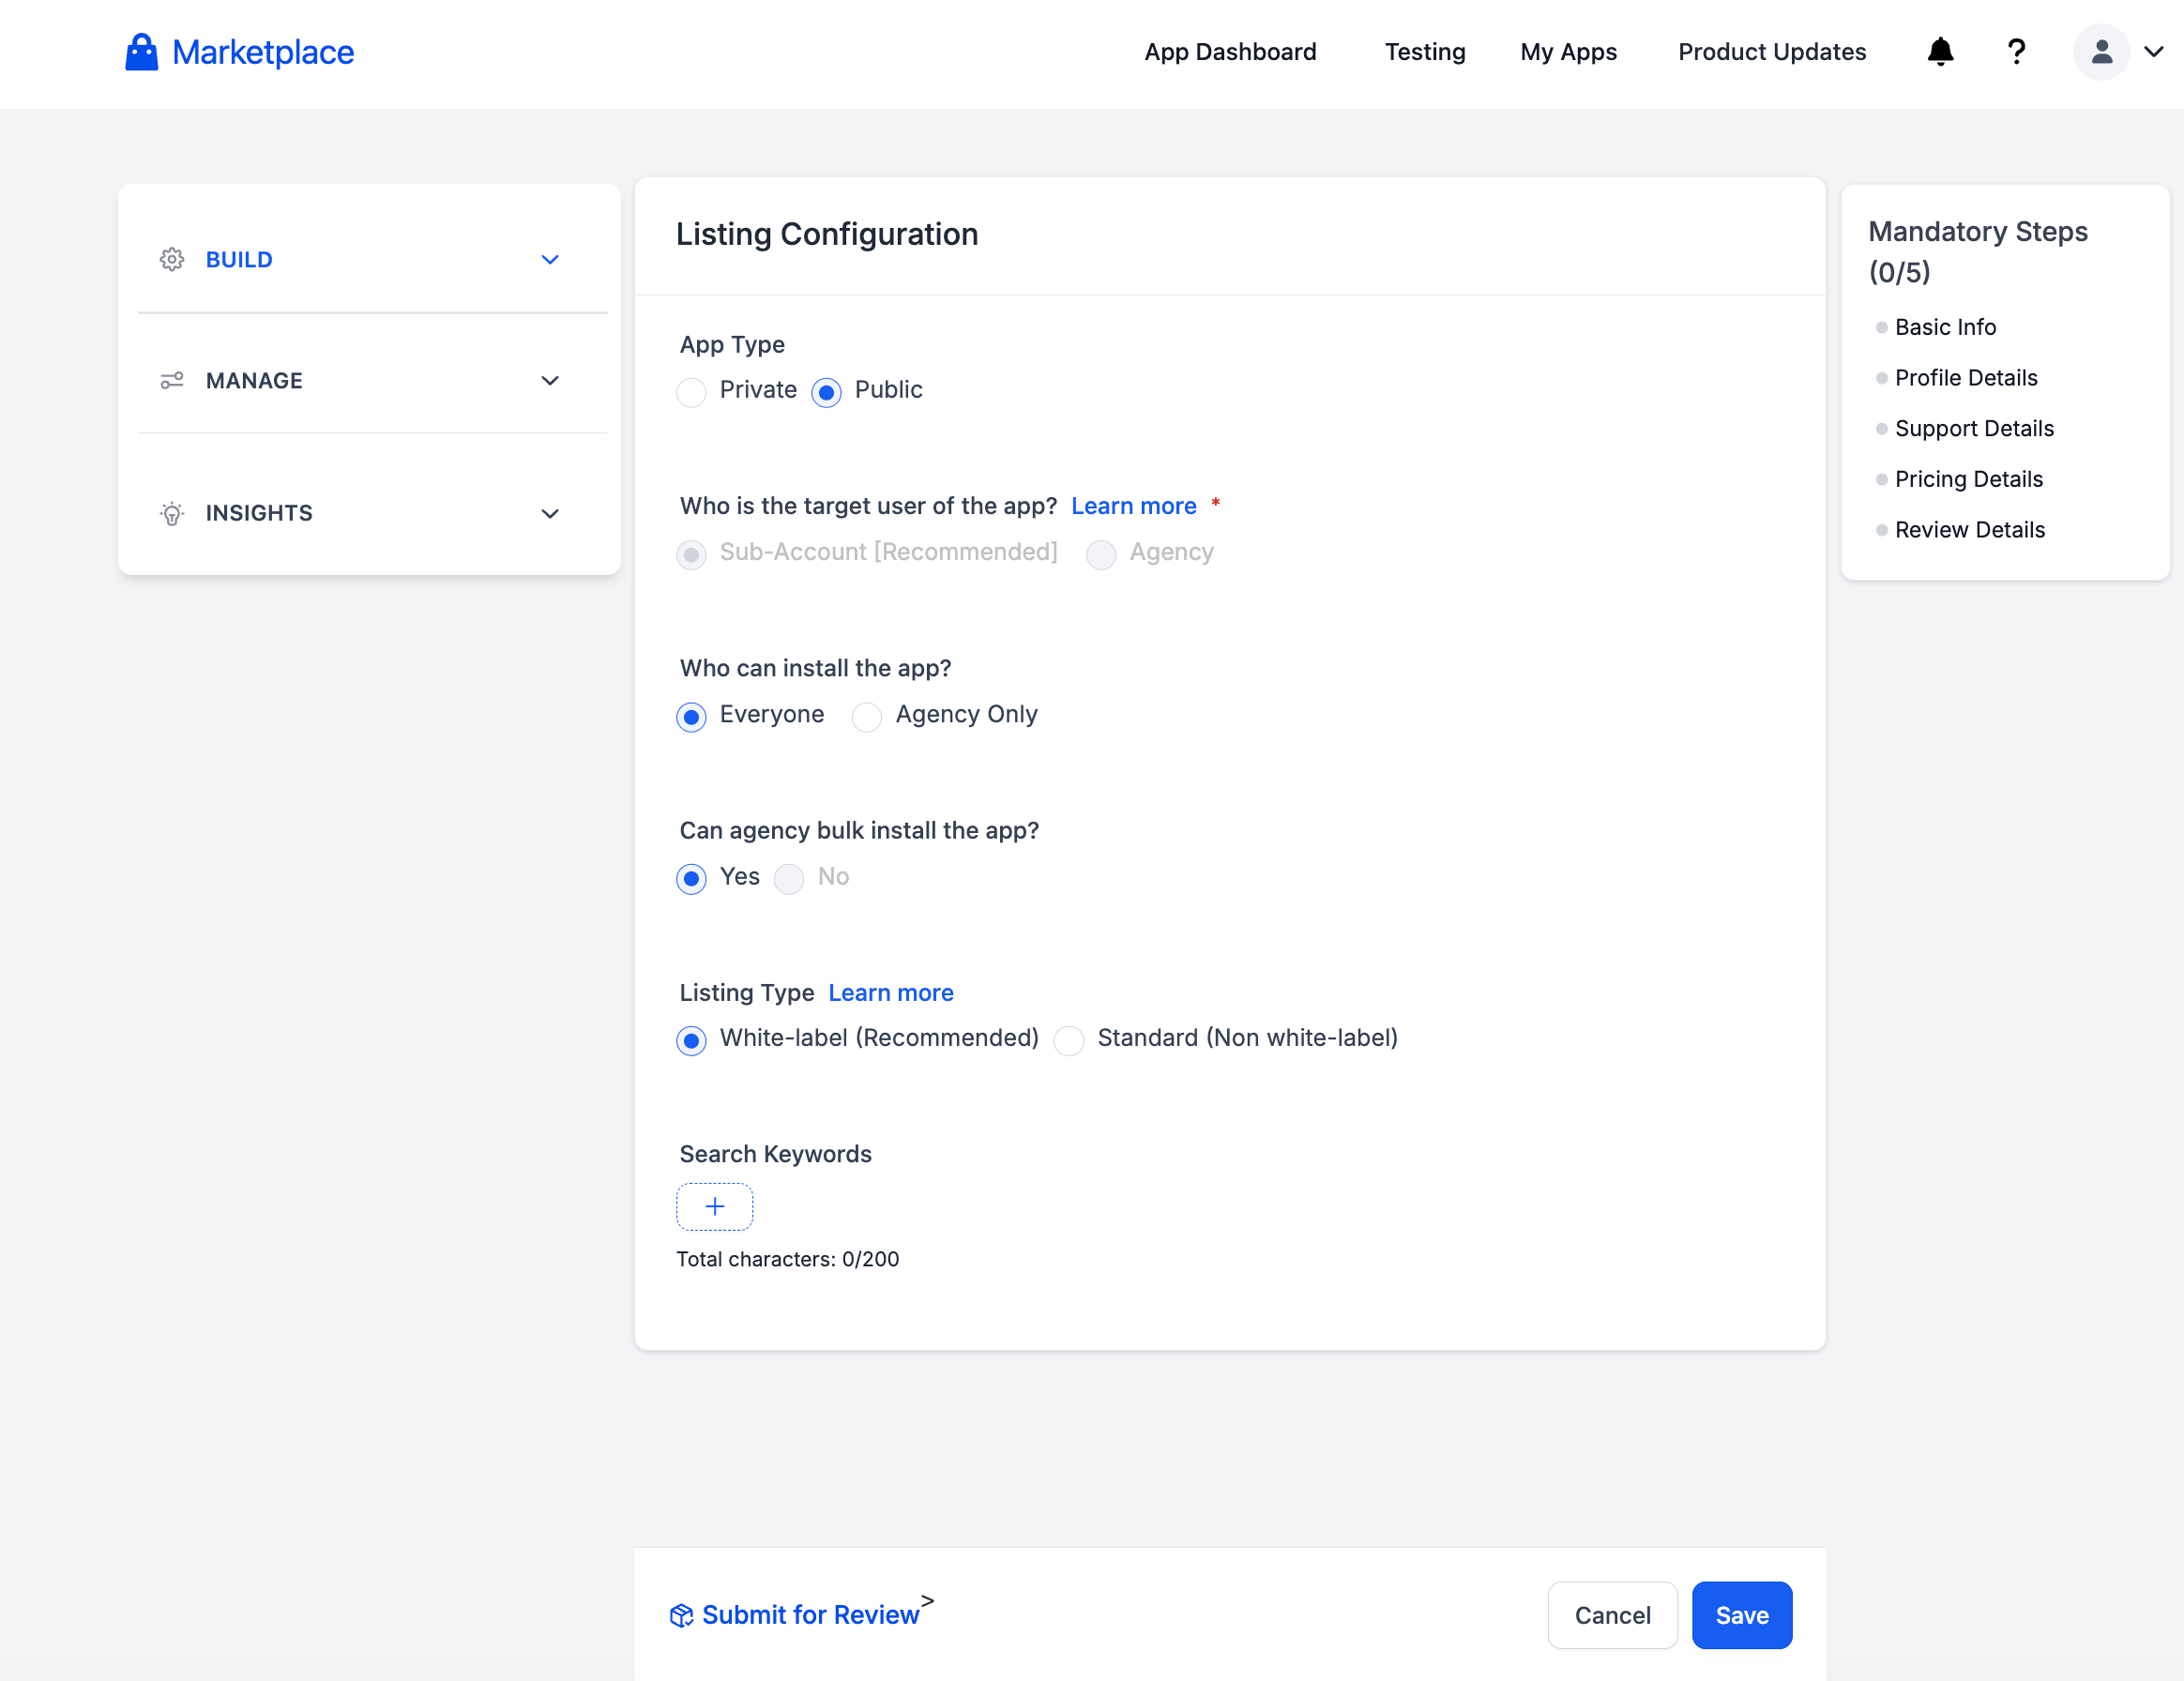
Search Keywords: Add up to 200 characters of relevant keywords to help your app match related searches in the Marketplace. Search Keywords give developers more control over app discoverability and work alongside other listing information such as the app name, tagline, and company name. Example: For an appointment-booking app, keywords could include scheduling, calendar, appointments, booking, reminders.
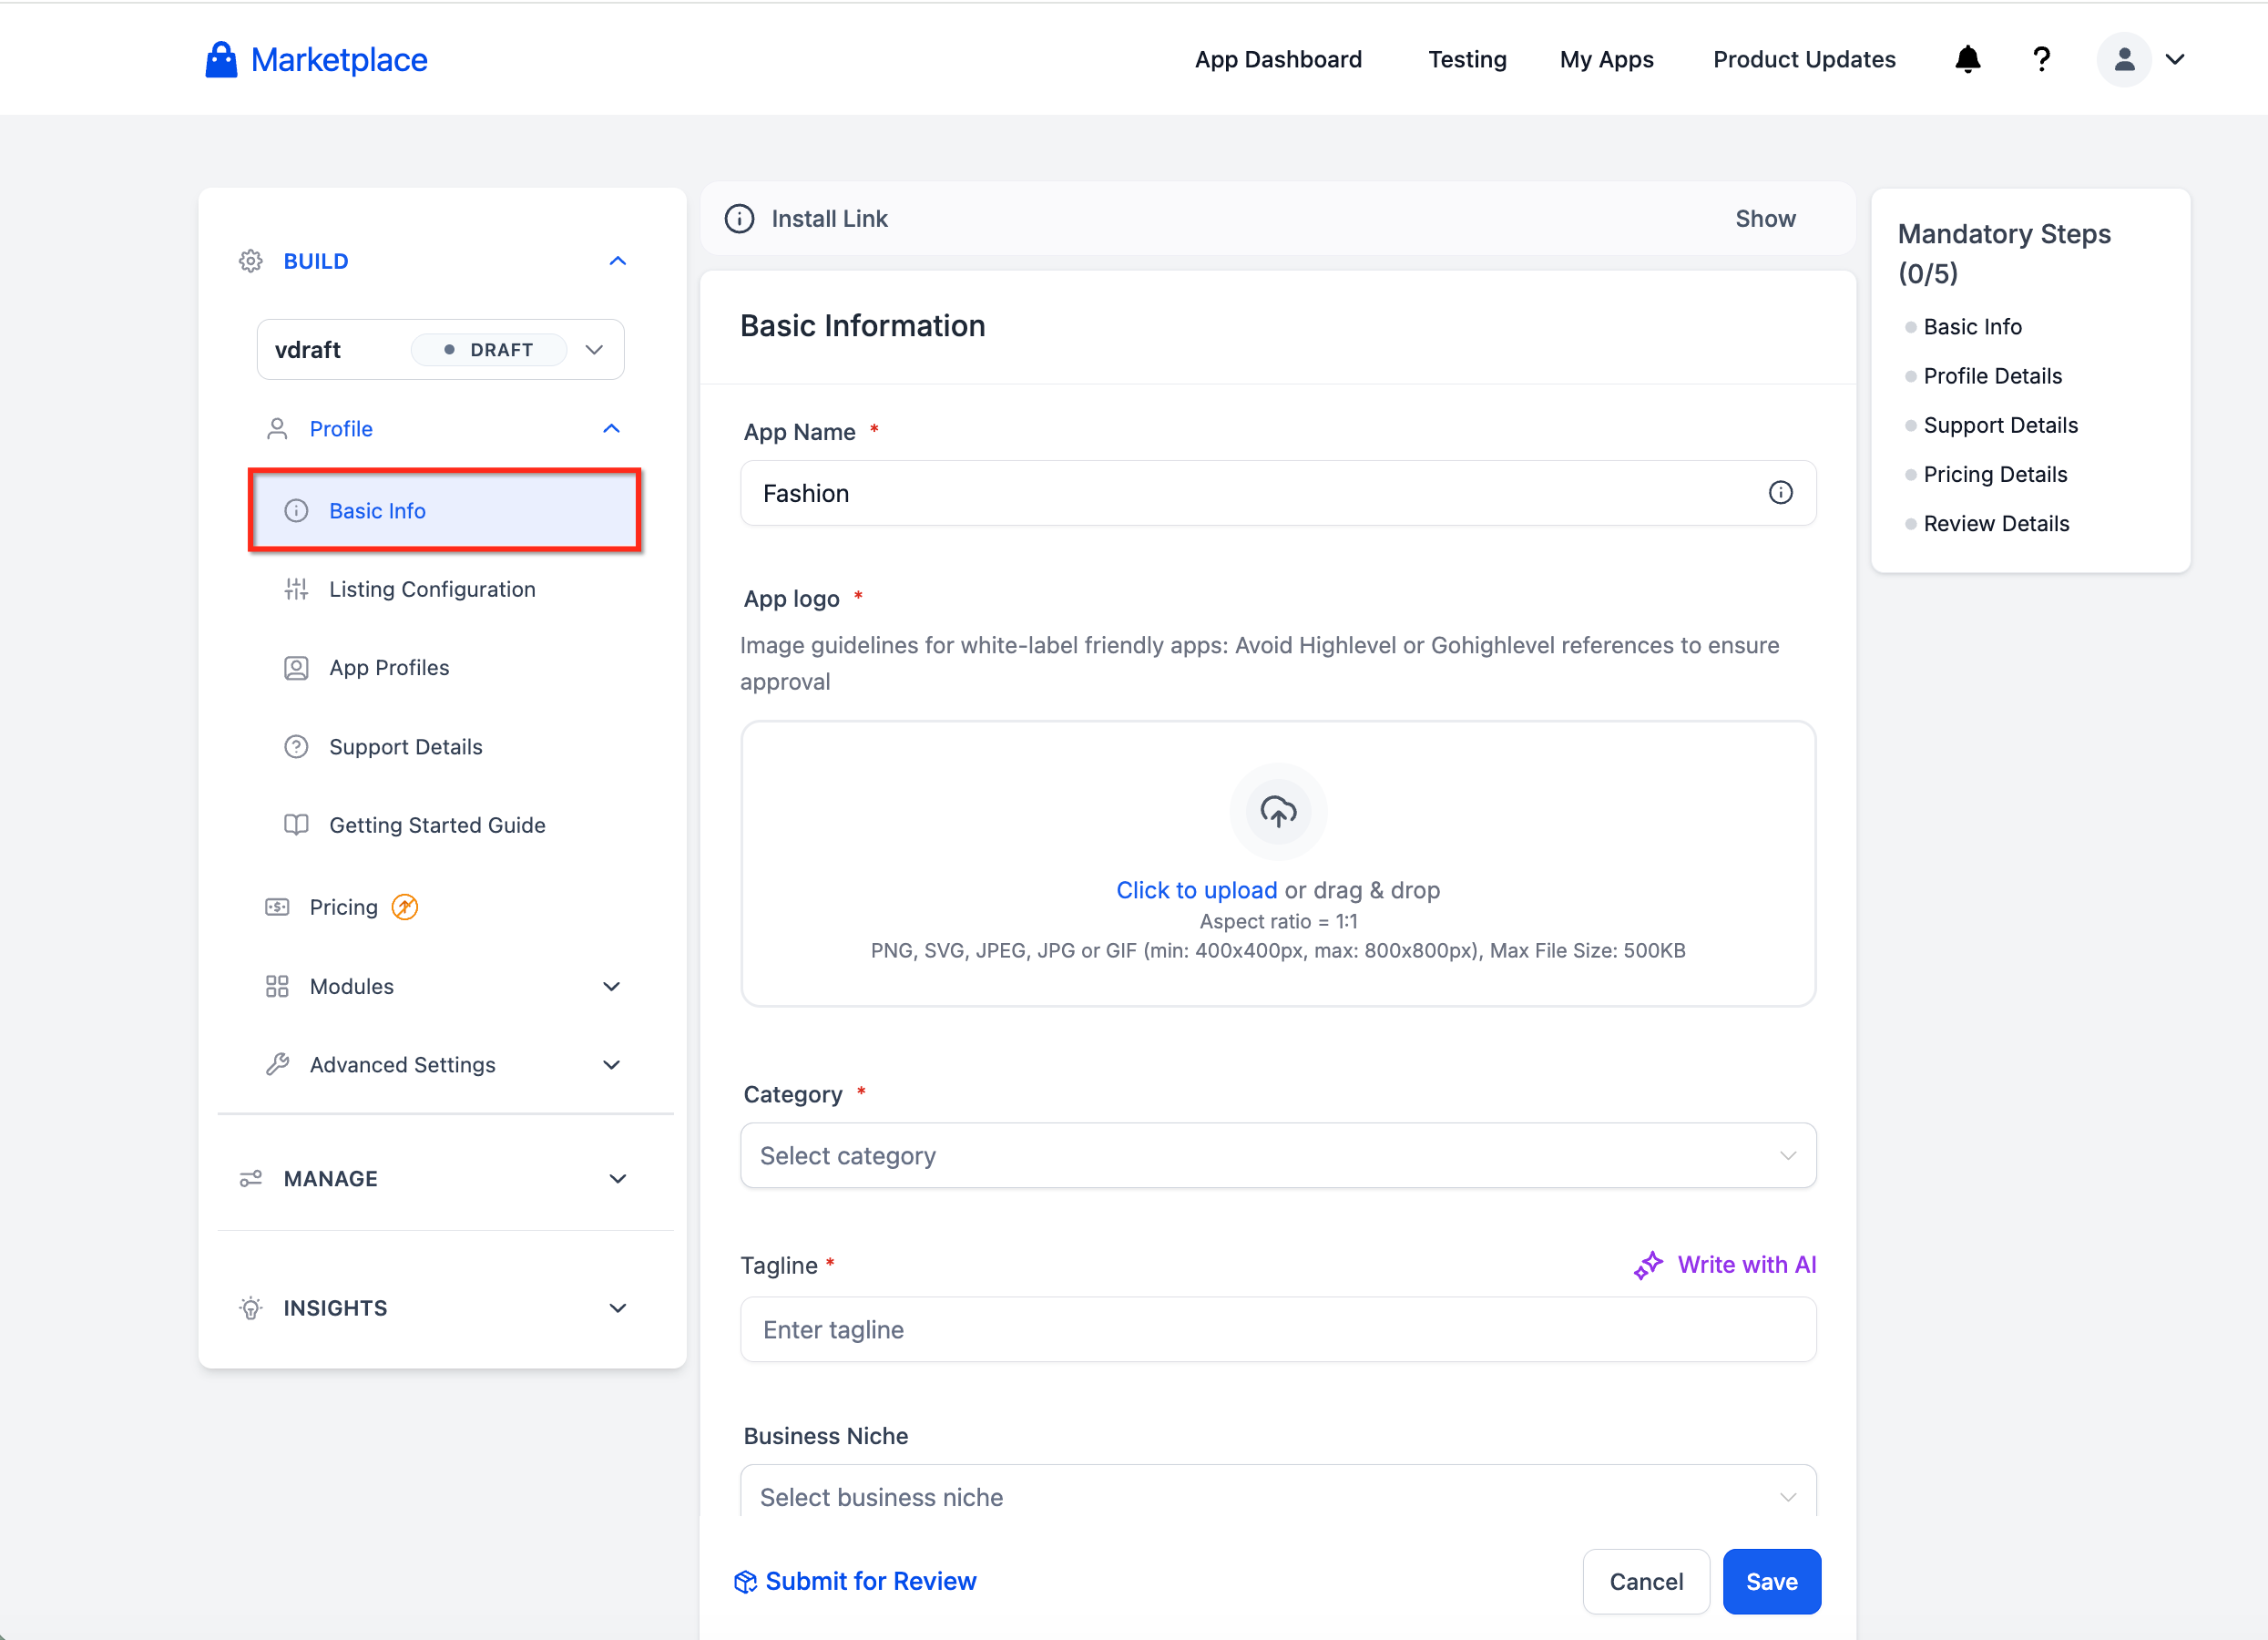
App Type: Public, Private:
The "App Type" determines the accessibility and visibility of your application.
Public App: A public app is available for anyone to use and access. It is listed in the developer marketplace and can be installed by users with the necessary permissions.
Private App: A private app is restricted to a specific group or individuals. It is not publicly listed in the Marketplace and requires an invitation or authorization to access and use.
Distribution Type: Agency, Sub Account:
The "Distribution Type" specifies how your app is distributed and made available to users.
Agency Distribution: If you choose the agency distribution type, your app will be accessible to all accounts. This means that all agency members or sub-accounts can install and use the app. All
Sub-Account Distribution: With the sub-account distribution type, your app is limited to a specific sub-account within your agency. Only users belonging to that particular sub-account can install and use the app.
Step 4: Add scopes
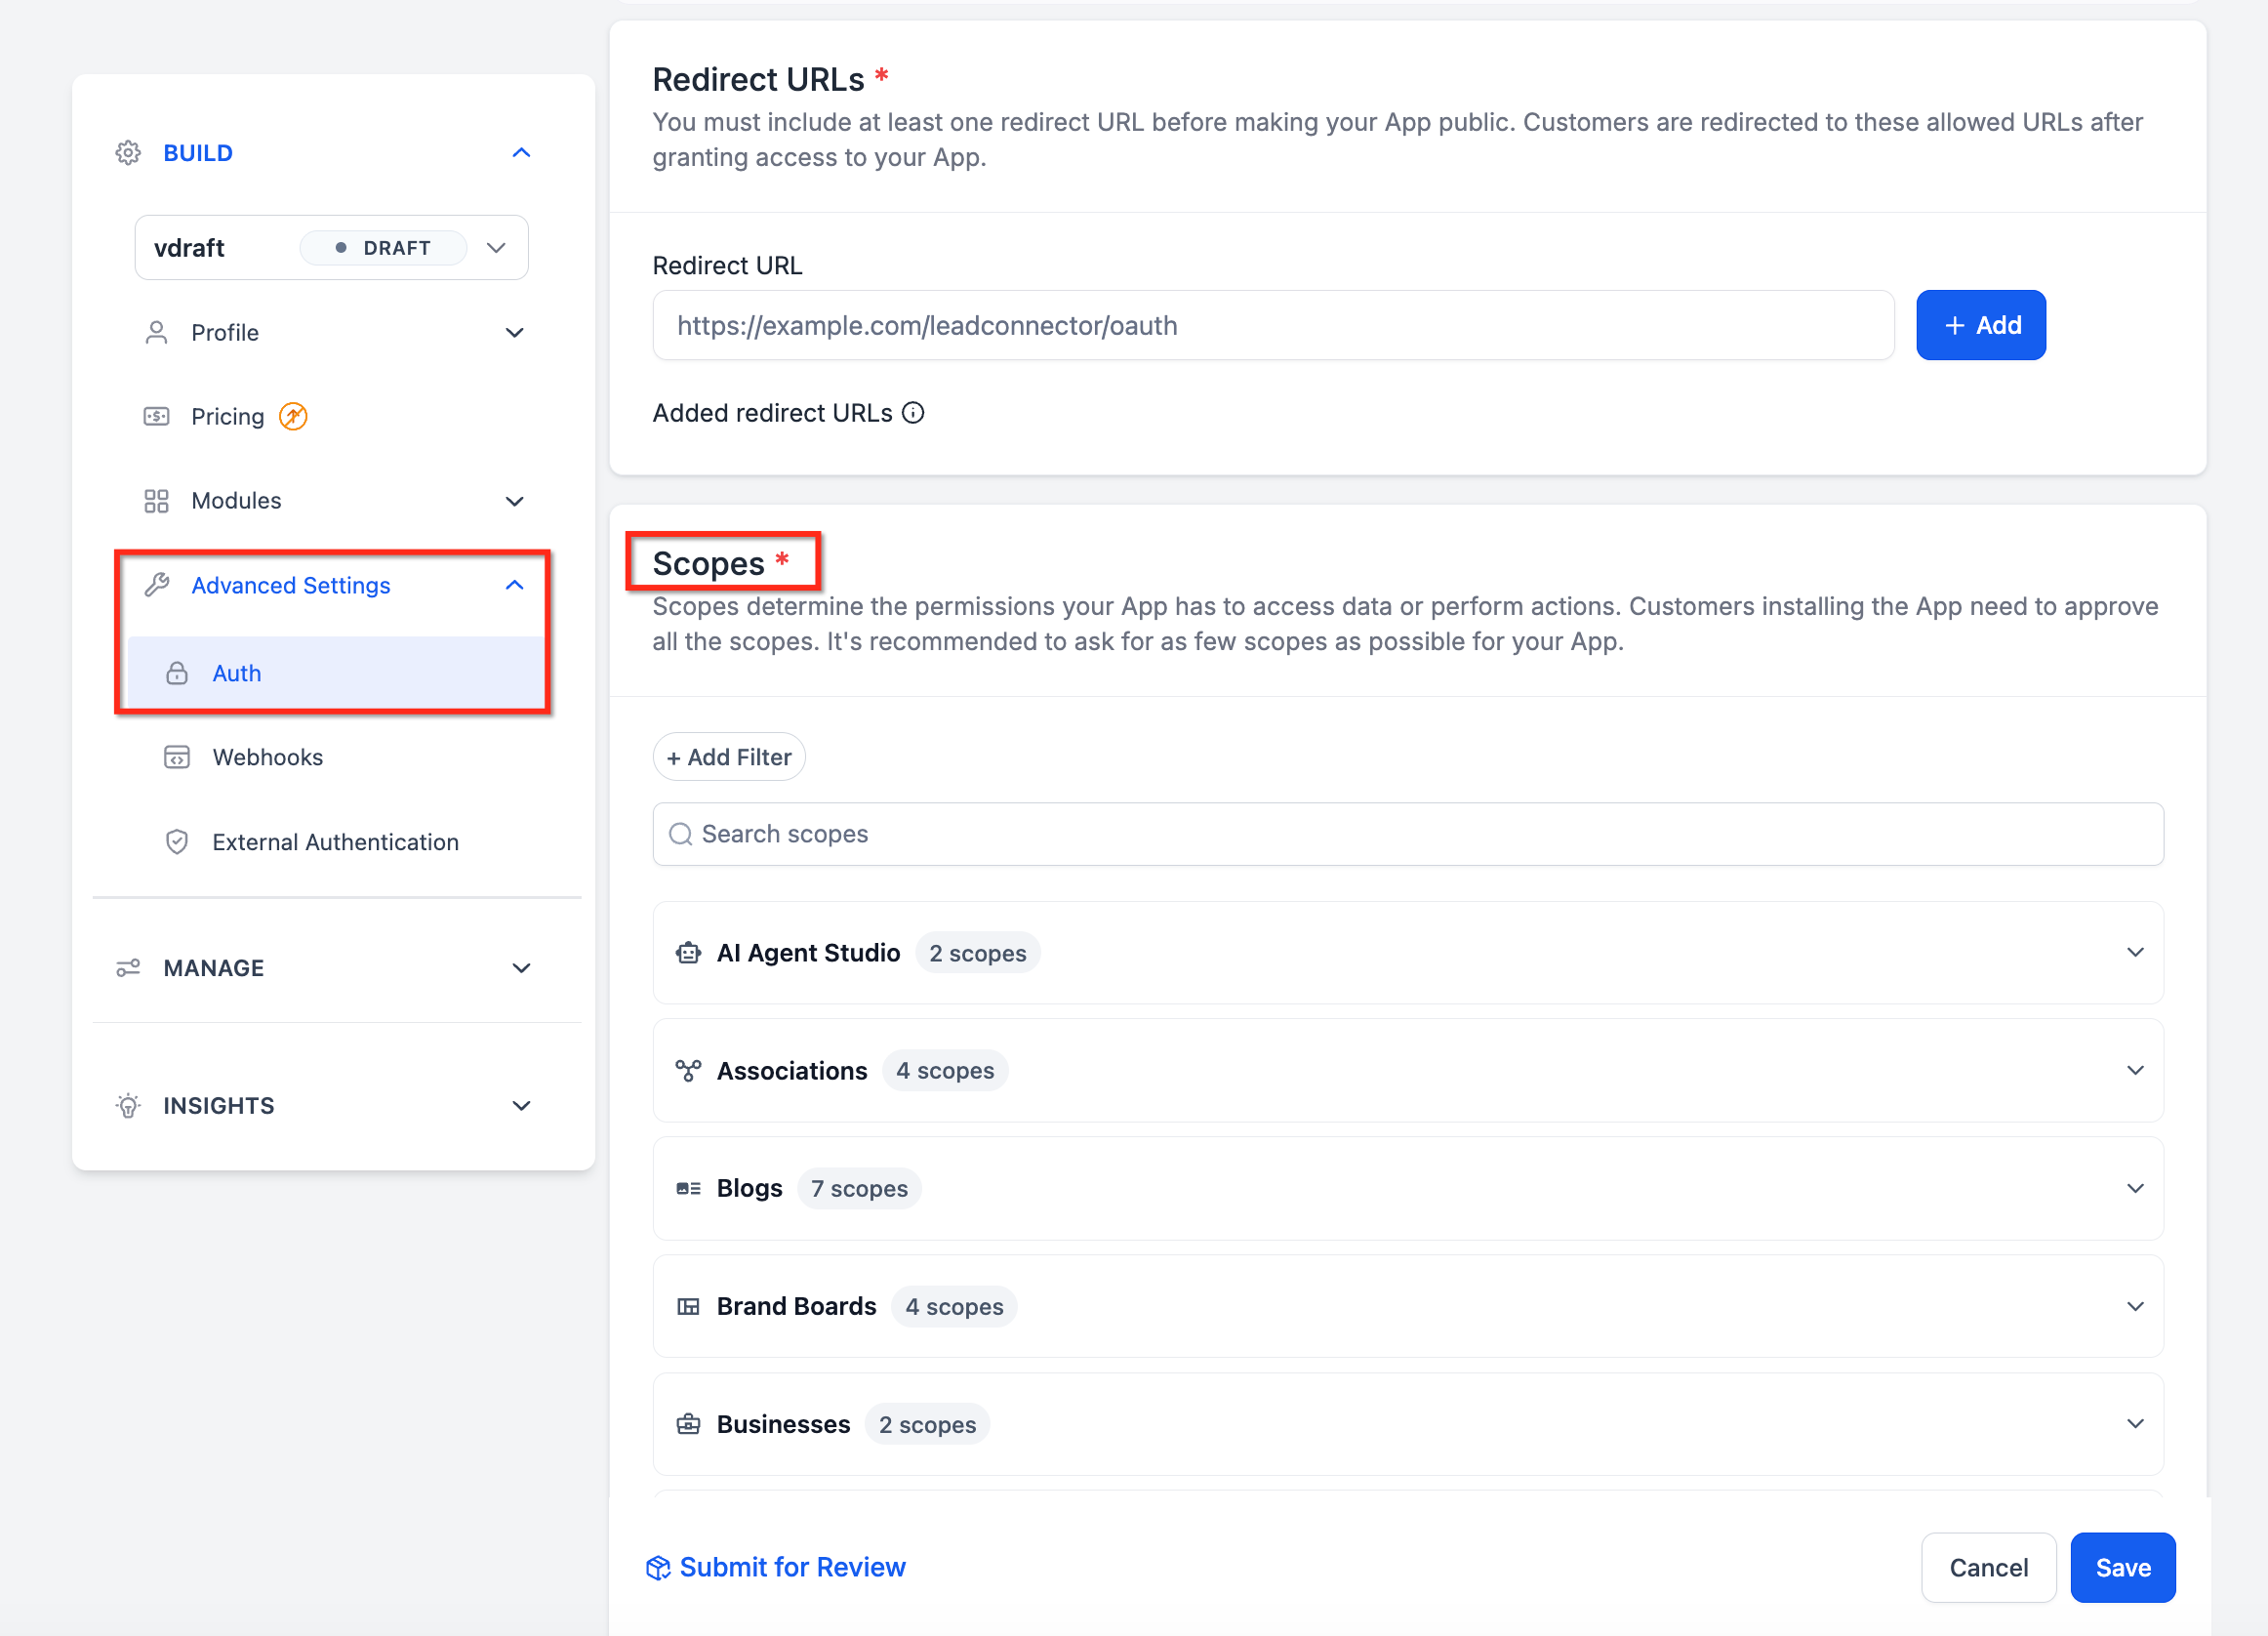
In the app settings, add the required scopes for your app.
Refer to the documentation (https://marketplace.Chat To Clients CRM.com/docs/Authorization/Scopes) to determine the necessary scopes.
Step 5: Generate client credentials
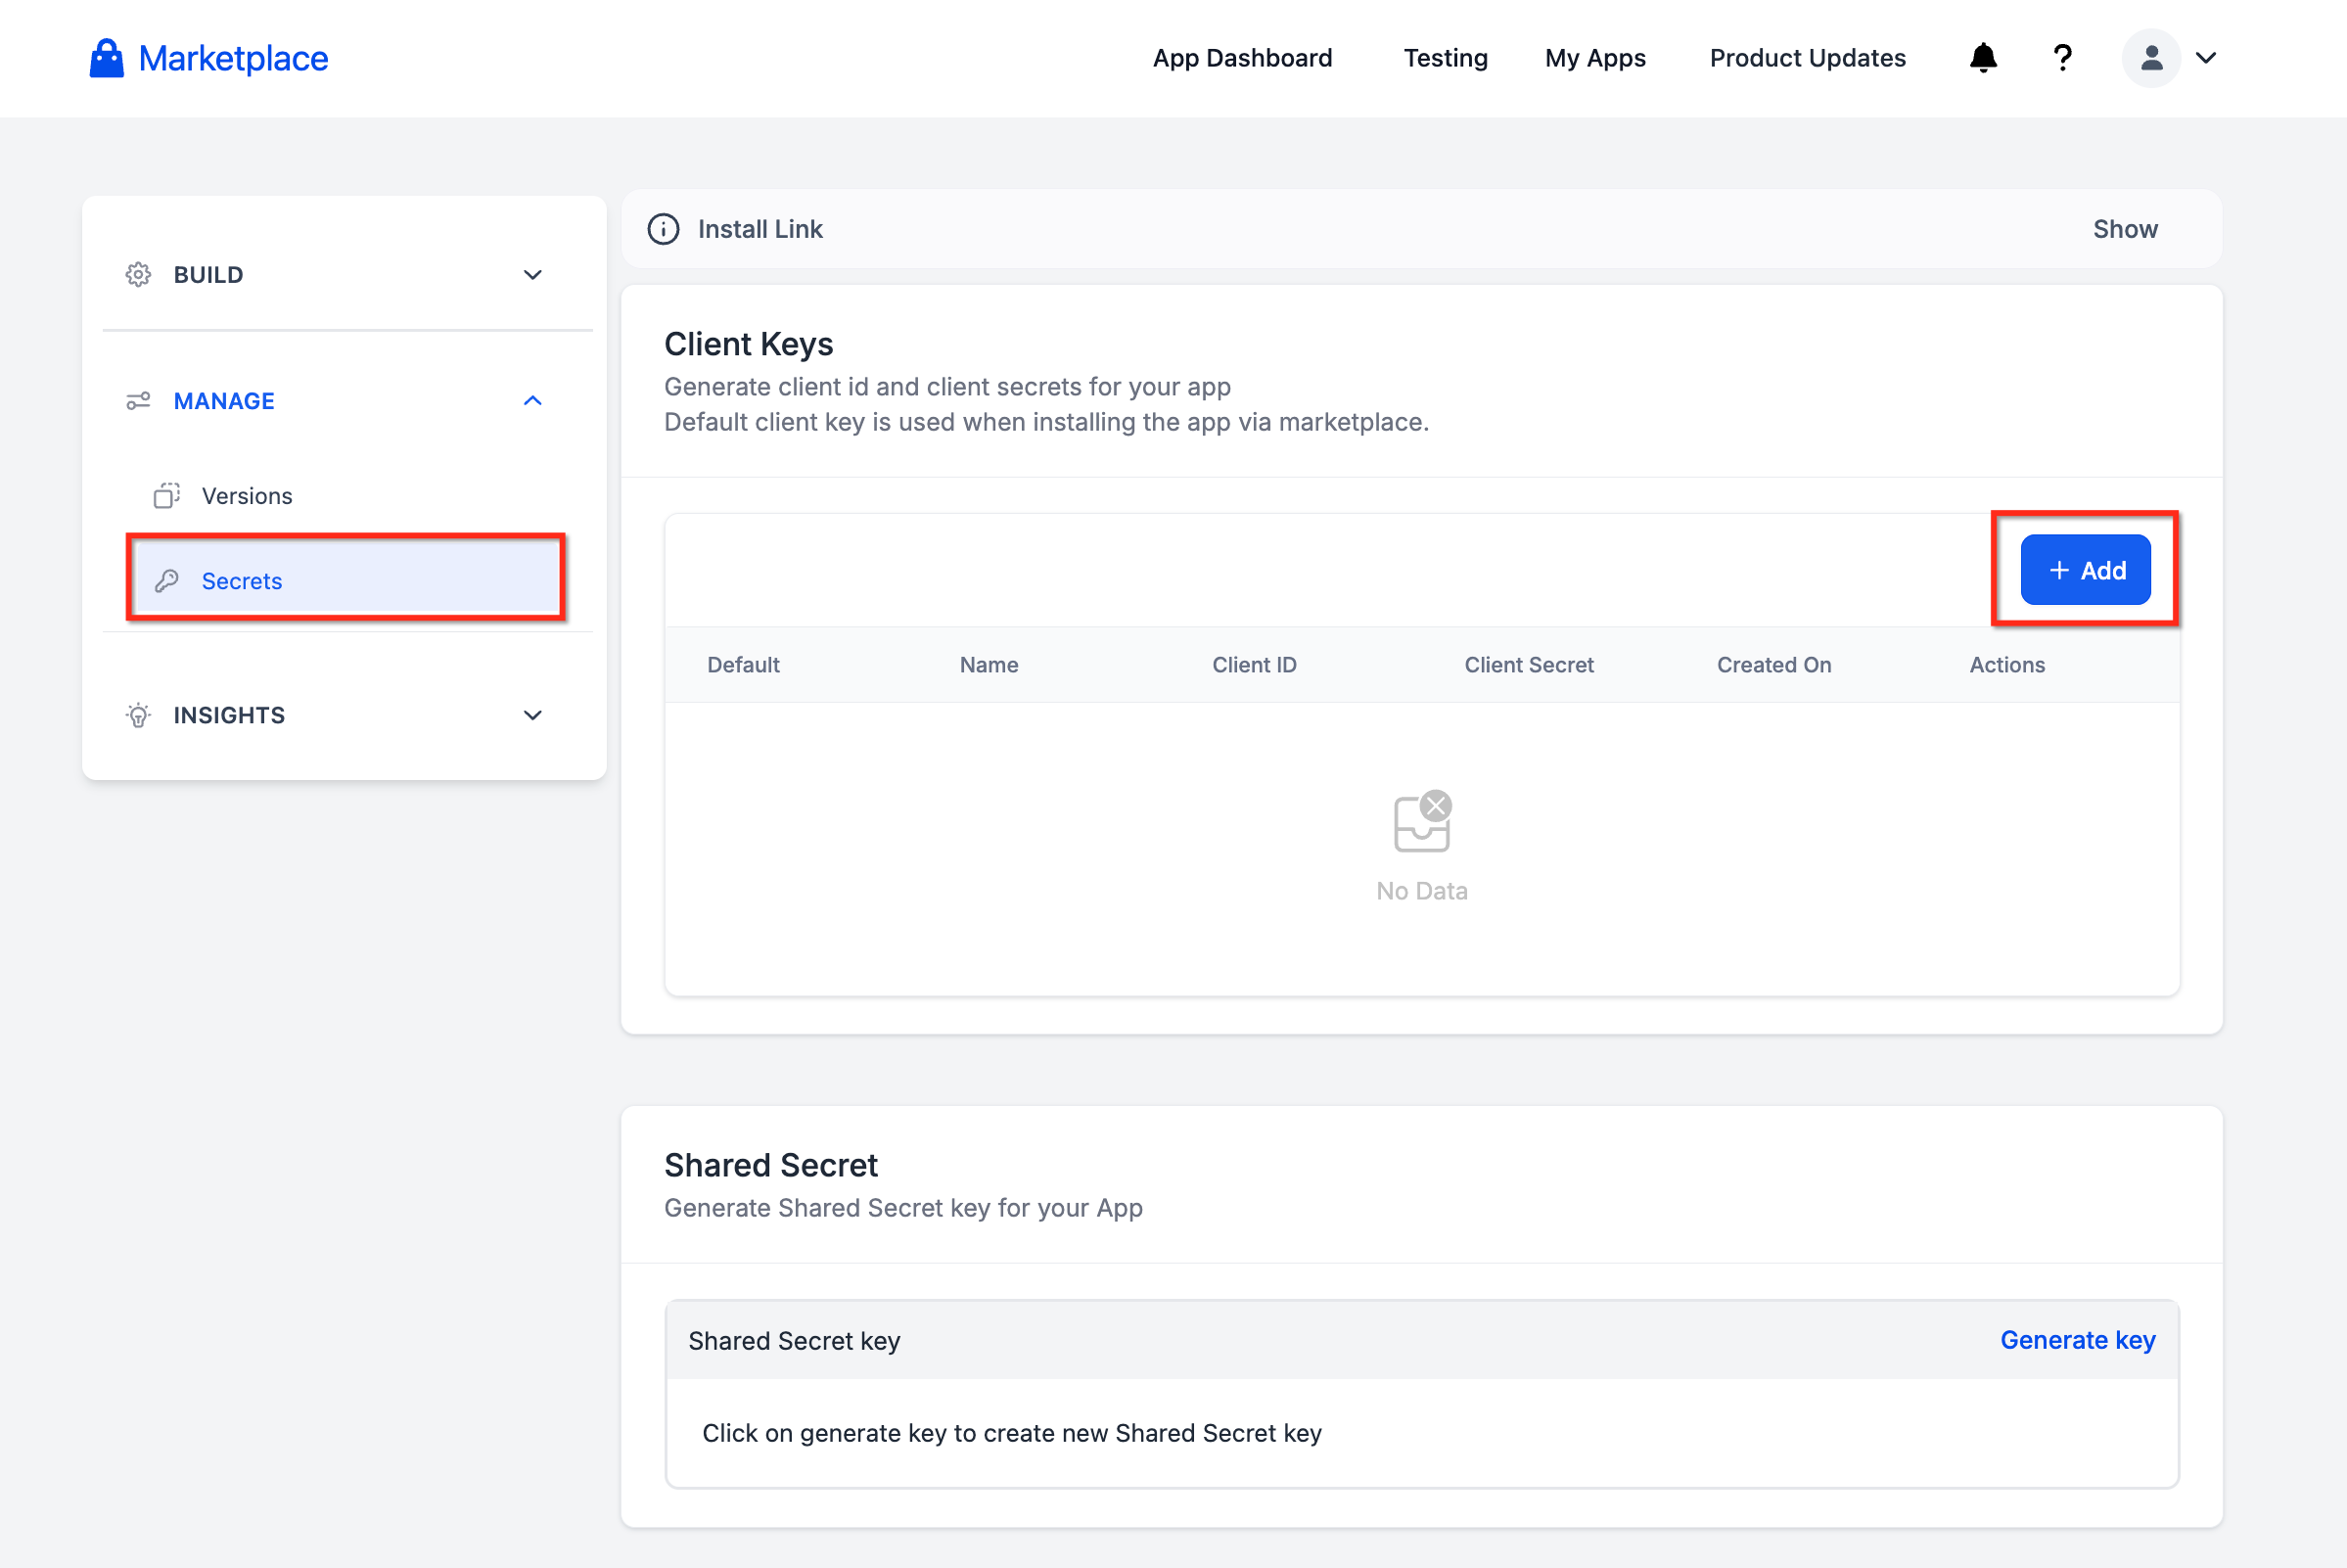
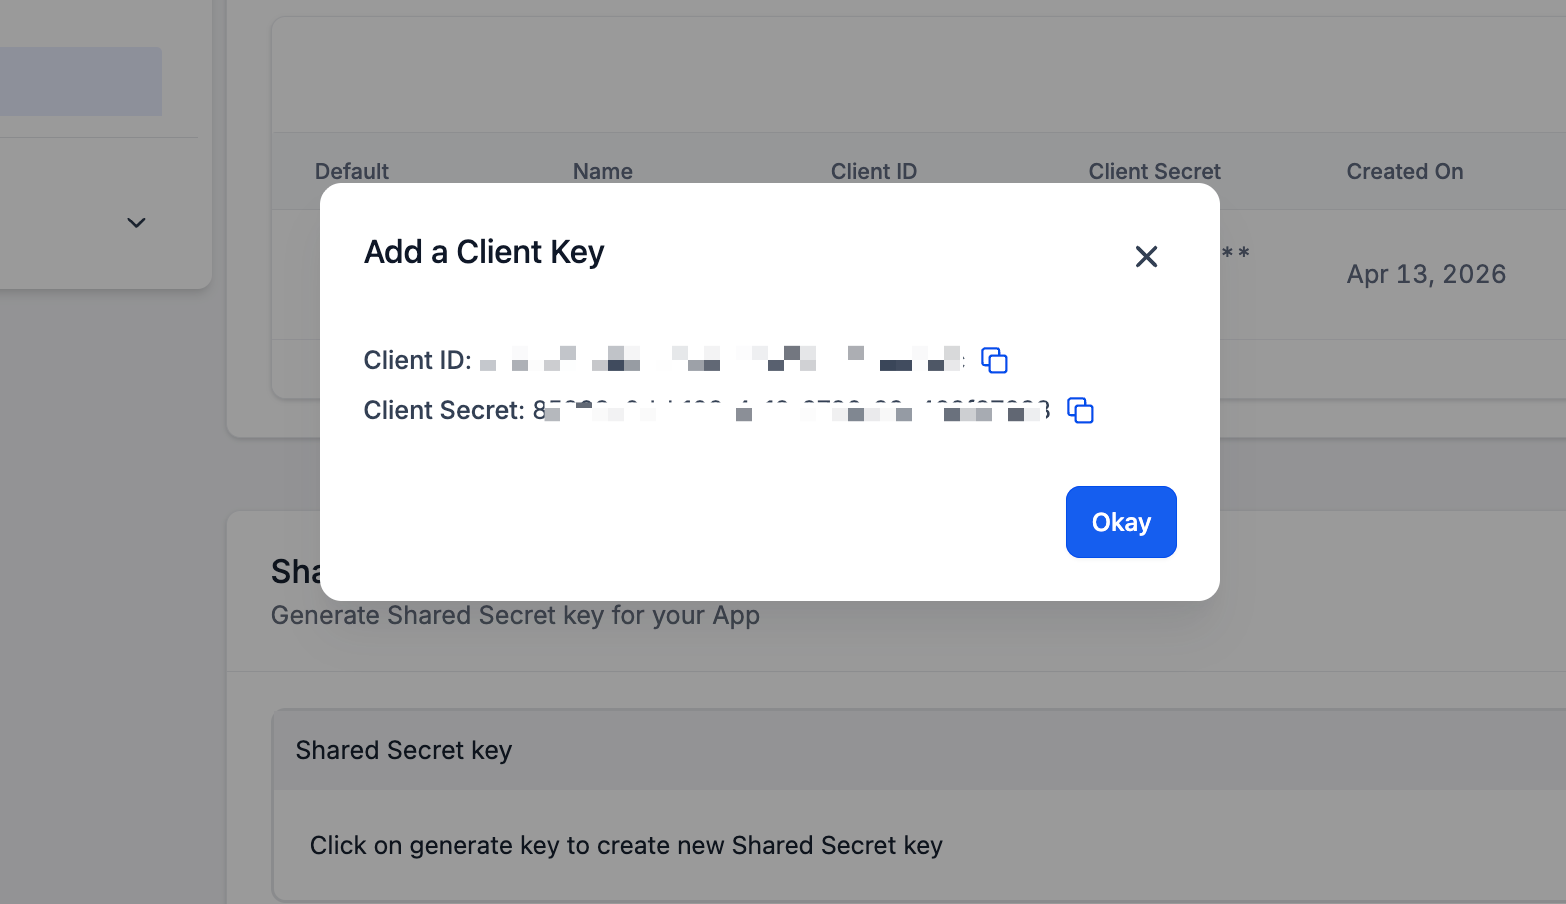
Create a client key for your app.
Save the generated Client ID and Client Secret, as needed, in the next steps.
Step 6: Set up the OAuth endpoint
Create a GET endpoint in your application that will handle the OAuth process.
Refer to the documentation (https://marketplace.Chat To Clients CRM.com/docs/ghl/oauth/get-access-token) for more details on
how to obtain the access token.
To create a GET endpoint for OAuth in your application:
- Choose a route for your endpoint (e.g., "/OAuth/callback/Chat To Clients CRM").
- Configure your application to listen for requests to this route.
- When a user authorizes your application, Chat To Clients CRM will redirect them to your endpoint with a "code" parameter.
- Retrieve the "code" parameter from the request.
- Store the code securely.
- Make a POST request to Chat To Clients CRM's "/OAuth/token" endpoint with the code, client ID, client secret, grant type, and redirect URI.
- Capture the response from the POST request.
- Extract the access token, token type, expiration time, refresh token, and other relevant information from the response.
- Store the access token securely in your application.
You can now use the access token to authenticate Chat To Clients CRM API requests.
Following these steps, your GET endpoint will handle the OAuth process by exchanging the code for an access token and securely storing it for future API interactions.
Step 7: Configure OAuth settings
Set the OAuthToken Redirect URL in your app settings to the endpoint created in the previous step.
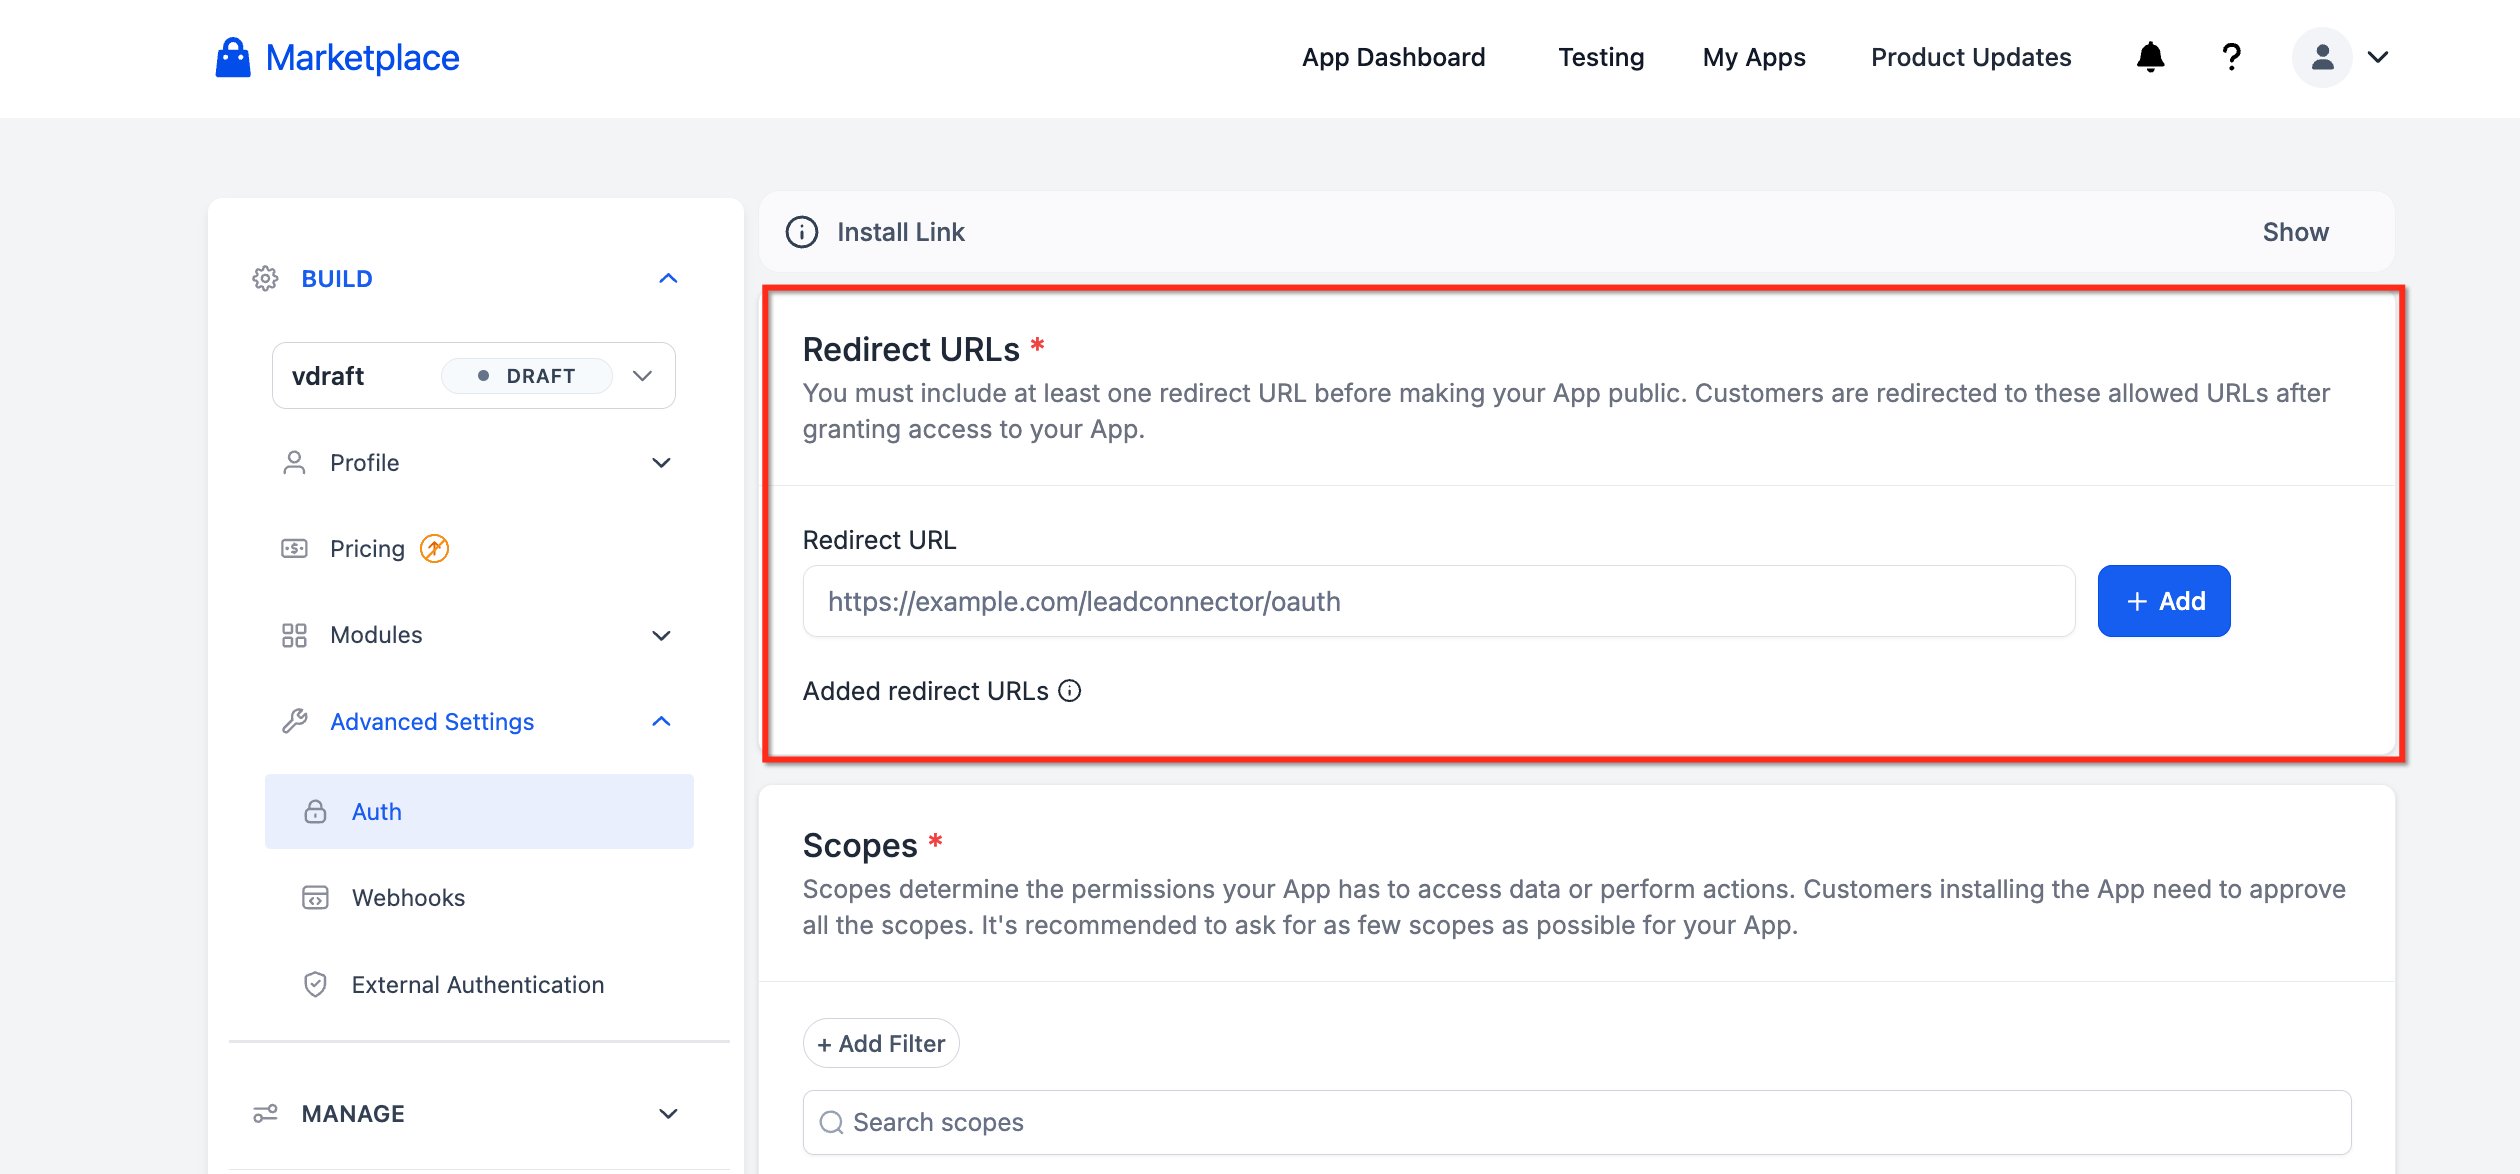
Step 8: Create a webhook endpoint
Create a POST endpoint in your application to receive and process webhook events.
This endpoint should be able to handle the JSON body of the event.
Step 9: Set up webhook URL
Enter the URL of your webhook endpoint in the app settings.
Step 10: Assign locations/accounts to your app
Sign into an agency administrator account.
Open a new browser tab and go to your app in the Marketplace.
Click "+ Add App" and search for/select the desired account/location to add the webhook.
Step 11: Retrieve the authorization code
After successfully adding the app, you will be redirected to the Marketplace App page with an updated URL.
Copy the query string parameter "code" from the URL (e.g., code=c40216d8574eb90abe0c884058fa9f5101085exx).
Step 12: Open a new browser tab
Open a new browser tab and enter the following URL: YOUR_REDIRECT_URL?code=CODE
Replace YOUR_REDIRECT_URL with your app's redirect URL and CODE with the authorization code copied in the previous step.
Step 13: Verify webhook connection
If the response from https://services.leadconnectorhq.com/oauth/token was successful and you received the access token, the webhooks should now be connected.
By following these steps, you should be able to configure webhooks for your application and connect them to the desired accounts/locations. Refer to the documentation provided for detailed information on each step.
Sell on Marketplace : Auto-created Developer Accounts (Agency Admins)
When an agency admin selects Sell on Marketplace, the system checks whether the admin already has a developer account.
If the admin does not have a developer account, Chat To Clients CRM:
1. Creates a developer profile in the background using existing account details.
2. Redirects the admin to sign in.
3. Prompts the admin to:
- Enter their password
- Accept the developer terms and conditions
- Verify a one-time password (OTP) sent by email
4. Signs the admin into the new developer account and continues the Marketplace listing flow.
You do not need to complete a manual developer signup form.
Frequently Asked Questions
Q: What is the Developer Marketplace?
A: The Developer Marketplace is a platform provided by Chat To Clients CRM where developers can create and distribute their custom applications and integrations for use with the Chat To Clients CRM CRM.
Q: How do I sign up for a developer account on the Marketplace?
A: To sign up for a developer account on Marketplace, go to the website (https://marketplace.Chat To Clients CRM.com) and click the sign-up button. Follow the prompts to create your account.
Q: What are scopes in the context of app settings?
A: Scopes define the permissions and access levels your app requires to interact with the Chat To Clients CRM CRM. You need to add the appropriate scopes to your app settings based on the functionalities your app needs.
Q: How do I generate client credentials for my app?
A: In the app settings, there is an option to generate client credentials. Click on it, and you will receive a Client ID and Client Secret that you can use for authentication and authorization purposes.
Q: Can you explain the process of OAuth with a custom application?
A: OAuth is a protocol for secure authorization between your custom application and the Chat To Clients CRM CRM. You must create a GET endpoint in your application to handle the OAuth process. This endpoint will receive a code parameter, which you will use to request an access token from the Chat To Clients CRM API.
Q: What is the purpose of the OAuthToken Redirect URL?
A: The OAuthToken Redirect URL is the endpoint in your application where the access token will be sent after the OAuth process is completed successfully. It should be defined in your app settings.
Q: How can I create a webhook endpoint for my application?
A: To create a webhook endpoint, you must set up a POST endpoint in your application to receive and process JSON payloads sent by the Chat To Clients CRM CRM. This endpoint will handle webhook events and trigger the necessary actions in your app.
Q: How do I assign locations/accounts to my marketplace app?
A: You can assign locations/accounts to your marketplace app as an agency administrator. Open the app in the Marketplace, click on "+ Add App," search for the desired account/location, and select it to establish the webhook connection.
Q: What is the purpose of the authorization code in the webhook connection process?
A: The authorization code is a unique code generated during the webhook connection process. It is a temporary authorization token exchanged for an access token, allowing your app to interact with the Chat To Clients CRM API securely.
Q: How can I verify the webhook connection?
A: After completing the webhook connection process and receiving the access token, you can verify the connection by testing your webhook endpoint. Trigger a test event in the Chat To Clients CRM CRM and check if your endpoint receives and processes the event correctly.
Q: Can I create multiple apps on the Developer Marketplace?
A: Yes, you can create multiple apps on the Developer Marketplace. Each app can have its own unique profile, settings, and webhook configurations.
Q: Is there a limit to the number of scopes I can add to my app?
A: There is no specific limit to the number of scopes you can add to your app. However, it is recommended only to include the necessary scopes that your app requires to minimize unnecessary permissions and improve security.
Q: How often should I update my app's profile information?
A: Keeping your app's profile information current is a good practice. If any significant changes to your app, such as new features or improvements, update the profile to provide accurate information to potential users.
Q: Can I access user data through the Developer Marketplace?
A: You can access user data through the Developer Marketplace by utilizing the appropriate scopes and APIs provided by the Chat To Clients CRM CRM. However, handling user data responsibly and complying with relevant data protection regulations is essential.
Q: Can I integrate third-party services with my app on the Developer Marketplace?
A: Yes, you can integrate third-party services with your app on the Developer Marketplace. As long as the integration adheres to the platform's guidelines and the necessary APIs or webhooks are available, you can enhance the functionality of your app by connecting it with external services.
Q: Why are installs blocked for my Private Marketplace app?
A: Private apps are limited to 5 unique Agency installs. If your Private app is installed in 6+ Agencies, new installs are blocked (existing installs continue). To unblock new installs, publish the app as Public (listed) or request Security Review (available after you hit 6+ Agencies).